30
│
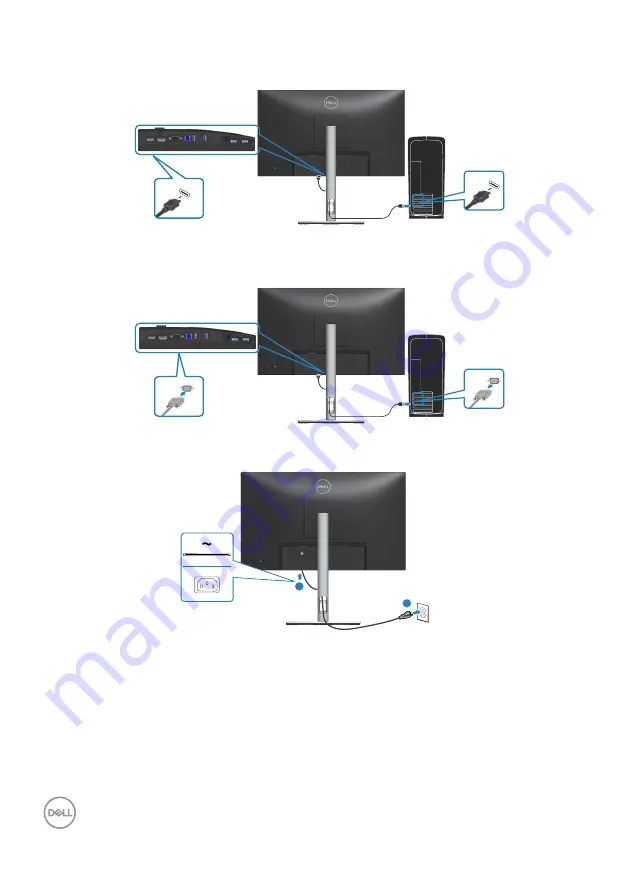
Setting up the monitor
Connecting the HDMI cable (optional)
HDMI 2.0
HDMI
Connecting the VGA cable (optional)
VGA
6. Connect the power cables from your computer and monitor into a wall outlet.
1
2
Страница 1: ...Monitor Model P2422HA Regulatory Model P2422Hb Dell P2422HA Monitor User s Guide ...
Страница 2: ...or loss of data if instructions are not followed WARNING A WARNING indicates a potential for property damage personal injury or death Copyright 2022 Dell Inc or its subsidiaries All rights reserved Dell EMC and other trademarks are trademarks of Dell Inc or its subsidiaries Other trademarks may be trademarks of their respective owners 2022 03 Rev A00 ...
Страница 3: ...iew 12 Monitor specifications 13 Resolution specifications 14 Supported video modes 15 Physical characteristics 17 Environmental characteristics 18 VGA connector 19 DisplayPort connector 20 HDMI connector 21 Universal Serial Bus USB interface 22 Plug and play capability 23 LCD monitor quality and pixel policy 24 Maintenance guidelines 24 Cleaning your monitor 24 ...
Страница 4: ...r monitor 34 Power on the monitor 34 Accessing the Menu Launcher 35 Using the navigation keys 36 Accessing the OSD menu 37 Using the joystick to lock the button s 49 Using the joystick to unlock the button s 50 OSD warning messages 51 Setting the maximum resolution 54 Using the tilt swivel and vertical extension 55 Tilt swivel 55 Vertical Extension 56 Rotating the monitor 56 Rotate clockwise 57 Ro...
Страница 5: ...59 Self test 59 Built in diagnostics 60 Common problems 62 Product specific problems 64 Universal Serial Bus USB specific problems 65 Appendix 66 FCC notices U S Only and other regulatory information 66 Contacting Dell 66 ...
Страница 6: ...e AC power available in your location Keep the monitor in room temperature Excessive cold or hot conditions can have an adverse effect on the liquid crystal of the display Connect the power cable from the monitor to a wall outlet that is near and accessible See Connecting your monitor Do not place and use the monitor on a wet surface or near water Do not subject the monitor to severe vibration or ...
Страница 7: ...hown in the table below If any component is missing contact Dell For more information see Contacting Dell NOTE Some items may be optional and may not ship with your monitor Some features or media may not be available in certain countries Monitor Stand riser Stand base Power cable varies by country ...
Страница 8: ...your monitor DisplayPort 1 2 cable HDMI 1 4 cable Brazil only USB 3 2 Gen1 5 Gbps upstream cable enables the USB ports on the monitor TechSheet Safety Environmental and Regulatory Information Quick Setup Guide ...
Страница 9: ...lor gamut of 99 sRGB Digital connectivity with DisplayPort and HDMI Equipped with 1 USB upstream port and 4 SuperSpeed USB 5 Gbps USB 3 2 Gen 1 Plug and play capability if supported by your computer On Screen Display OSD adjustments for ease of setup and screen optimization Power and joystick buttons lock Removable stand and Video Electronics Standards Association VESA 100 mm mounting holes for fl...
Страница 10: ...ifying parts and controls Front view 1 Label Description 1 Power LED indicator Solid white light indicates that the monitor is turned on and functioning normally Blinking white light indicates that the monitor is in Standby Mode ...
Страница 11: ...Regulatory label Lists the regulatory approvals 3 Stand release button Releases the stand from the monitor 4 Barcode serial number and Service Tag label Refer to this label if you need to contact Dell for technical support 5 Power On Off button To turn the monitor on or off 6 Joystick Use to control the OSD menu For more Information see Operating your monitor 7 Cable management slot Use to organiz...
Страница 12: ...splayPort Connect to your computer using a DisplayPort cable shipped with your monitor 6 VGA connector Connect your computer with VGA cable 7 SuperSpeed USB 5 Gbps USB 3 2 Gen1 upstream port Connect the USB cable shipped with your monitor from this port to your computer to enable the USB ports on your monitor 8 SuperSpeed USB 5 Gbps USB 3 2 Gen 1 Type A downstream port 4 Connect your USB devices N...
Страница 13: ...resh rate 1920 x 1080 at 60 Hz Pixel pitch 0 2745 mm x 0 2745 mm Pixel per inch PPI 93 Viewing angle Horizontal Vertical 178 typical 178 typical Luminance output 250 cd m typical Contrast ratio 1000 to 1 typical Display screen coating Anti glare treatment of the front polarizer 3H hard coating Backlight LED edgelight system Response time 5 ms Fast mode 8 ms Normal mode Color depth 16 7 million col...
Страница 14: ...p Left Right Bottom 5 38 mm 5 38 mm 16 66 mm Adjustability Height adjustable stand Tilt Swivel Pivot 150 mm 5 to 21 45 to 45 90 to 90 Cable management Yes Dell display manager compatibility Easy Arrange and other key features Security Security lock slot cable lock optional purchase Resolution specifications Model P2422HA Horizontal scan range 30 kHz to 83 kHz automatic Vertical scan range 56 Hz to...
Страница 15: ...olarity Horizontal Vertical 720 x 400 31 50 70 10 28 30 640 x 480 31 50 59 90 25 20 640 x 480 37 50 75 00 31 50 800 x 600 37 90 60 30 40 00 800 x 600 46 90 75 00 49 50 1024 x 768 48 40 60 00 65 00 1024 x 768 60 00 75 00 78 80 1152 x 864 67 50 75 00 108 00 1280 x 720 45 00 59 94 74 25 1280 x 720 56 46 74 78 95 75 1280 x 1024 64 00 60 00 108 00 1280 x 1024 80 00 75 00 135 00 1600 x 900 R 60 00 60 00...
Страница 16: ...de 1 12 W On Mode 1 48 W Max 2 11 55 W Pon 3 36 49 kWh TEC 3 1 As defined in EU 2019 2021 and EU 2019 2013 2 Max brightness and contrast setting with maximum power loading on all USB ports 3 Pon Power consumption of On mode as defined in Energy Star 8 0 version TEC Total energy consumption in kWh as defined in Energy Star 8 0 version This document is informational only and reflects laboratory perf...
Страница 17: ...pins cable not included Universal Serial Bus USB 9 pins NOTE Dell monitors are designed to work optimally with the video cables that are shipped with your monitor As Dell does not have control over the different cable suppliers in the market the type of material connector and process used to manufacture these cables Dell does not guarantee video performance on cables that are not shipped with your...
Страница 18: ...el P2422HA Compliant Standards ENERGY STAR certified monitor EPEAT registered where applicable EPEAT registration varies by country See www epeat net for registration status by country RoHS compliant TCO Certified TCO Certified Edge BFR PVC free monitor excluding external cables Meets NFPA 99 leakage current requirements Arsenic free glass and Mercury free for the panel only Temperature Operating ...
Страница 19: ...rmal dissipation 164 16 BTU hour maximum 41 04 BTU hour On Mode Pin assignments VGA connector Pin number 15 pin side of the connected signal cable 1 Video Red 2 Video Green 3 Video Blue 4 GND 5 Self test 6 GND R 7 GND G 8 GND B 9 Computer 5 V 3 3 V 10 GND sync 11 GND 12 DDC data 13 H sync 14 V sync 15 DDC clock ...
Страница 20: ...onnector Pin number 20 pin side of the connected signal cable 1 ML3 n 2 GND 3 ML3 p 4 ML2 n 5 GND 6 ML2 p 7 ML1 n 8 GND 9 ML1 p 10 ML0 n 11 GND 12 ML0 p 13 GND 14 GND 15 AUX p 16 GND 17 AUX n 18 Hot Plug Detect 19 Re PWR 20 3 3 V DP_PWR ...
Страница 21: ...A 2 2 TMDS DATA 2 SHIELD 3 TMDS DATA 2 4 TMDS DATA 1 5 TMDS DATA 1 SHIELD 6 TMDS DATA 1 7 TMDS DATA 0 8 TMDS DATA 0 SHIELD 9 TMDS DATA 0 10 TMDS CLOCK 11 TMDS CLOCK SHIELD 12 TMDS CLOCK 13 CEC 14 Reserved N C on device 15 DDC CLOCK SCL 16 DDC DATA SDA 17 DDC CEC Ground 18 5 V POWER 19 HOT PLUG DETECT ...
Страница 22: ...vailable on the monitor SuperSpeed USB 5 Gbps USB 3 2 Gen1 Transfer speed Data rate Maximum power supported each port SuperSpeed 5 Gbps 4 5 W High speed 480 Mbps 4 5 W Full speed 12 Mbps 4 5 W USB 3 2 Gen1 5 Gbps upstream connector Pin number 9 pin side of the connector 1 VCC 2 D 3 D 4 GND 5 SSTX 6 SSTX 7 GND 8 SSRX 9 SSRX ...
Страница 23: ...e monitor and then turn it On the attached peripherals may take a few seconds to resume normal functionality Plug and play capability You can connect the monitor to any Plug and Play compatible computer The monitor automatically provides the computer with its Extended Display Identification Data EDID using Display Data Channel DDC protocols so that the computer can configure itself and optimize th...
Страница 24: ... monitor screen lightly dampen a soft clean cloth with water If possible use a special screen cleaning tissue or solution suitable for the Dell Monitor screen CAUTION Do not use detergents or other chemicals such as benzene thinner ammonia abrasive cleaners or compressed air CAUTION Using chemicals for cleaning may cause changes in the appearance of the monitor such as color fading milky film on t...
Страница 25: ... with a cloth Handle your monitor with care as a darker colored monitor may get scratched and show white scuff marks more than a lighter colored monitor To help maintain the best image quality on your monitor use a dynamically changing screen saver and turn off your monitor when not in use ...
Страница 26: ...connecting a third party stand see the documentation shipped with the stand 1 Remove the stand riser and stand base from the packaging cushion NOTE The graphics are used for the purpose of illustration only The appearance of the package cushion may vary 2 Insert the stand base blocks fully into the stand slot 3 Lift the screw handle and turn the screw clockwise 4 After fully tightening the screw f...
Страница 27: ...efore attaching the stand assembly to the display ensure that the front plate flap is opened to allow space for assembly 6 Attach the stand assembly to the display a Fit the two tabs on the upper part of the stand to the groove on the back of the display b Press the stand down till it snaps into place ...
Страница 28: ...ng up the monitor 7 Hold the stand riser and lift the monitor carefully then place it on a flat surface NOTE Lift the monitor carefully to prevent it from slipping or falling 8 Remove the cover from the monitor ...
Страница 29: ...gement slot before you connect them to the monitor To connect your monitor to the computer 1 Turn off your computer and disconnect the power cable 2 Connect the DisplayPort cable shipped with your monitor from your monitor to the computer 3 Connect the HDMI or VGA cable optional purchase from your monitor to the computer 4 Connect the USB 3 2 Gen1 upstream port on the monitor and an appropriate US...
Страница 30: ...tting up the monitor Connecting the HDMI cable optional HDMI 2 0 HDMI HDMI Connecting the VGA cable optional HDMI 2 0 VGA VGA 6 Connect the power cables from your computer and monitor into a wall outlet 1 2 ...
Страница 31: ...Setting up the monitor 31 Organizing cables Use the cable management slot to route the cables connected to your monitor HDMI 2 0 7 Turn on the monitor ...
Страница 32: ...OTE The following procedure is applicable only for the stand that shipped with your monitor If you are connecting a third party stand see the documentation shipped with the stand 1 Place the monitor on a soft cloth or cushion at the edge of the desk 2 Press and hold the stand release button at the back of the display 3 Lift the stand assembly up and away from the monitor ...
Страница 33: ...dge of the desk 2 Remove the stand See Removing the stand 3 Remove the four screws that secure the display back cover 4 Install the mounting bracket from the wall mounting kit to the display 5 To mount the monitor on the wall see the documentation that shipped with the wall mounting kit NOTE For use only with UL or CSA or GS listed wall mount bracket with minimum weight load bearing capacity of 13...
Страница 34: ... On the monitor Using the joystick control Use the joystick control on the rear of the monitor to make On Screen Display OSD adjustments 1 Press the joystick to launch the Menu Launcher 2 Move the joystick up down left right to toggle between options 3 Press the joystick again to confirm the selection ...
Страница 35: ...Toggles between the menu items Increases up or decreases down the parameters of selected menu item Using the On Screen Display OSD menu Accessing the Menu Launcher When you toggle or press the joystick the Menu Launcher appears to let you access the OSD main menu and shortcut functions To select a function move the joystick The following table describes the Menu Launcher functions Joystick Descrip...
Страница 36: ... the joystick to configure the settings following the navigation keys displayed below the OSD Joystick Description Up Use the Up direction to adjust increase ranges items in the OSD menu Down Use the Down direction to adjust decrease ranges items in the OSD menu Left For all first level in the Menu list Left arrow will exit close the OSD menu Right For all other levels except first level in the Me...
Страница 37: ...olor Display Menu Personalize Others Exit 75 75 Brightness Brightness adjusts the luminance of the backlight Move the joystick up to increase the brightness and move the joystick down to decrease the brightness min 0 max 100 Contrast Adjust the Brightness first and then adjust the Contrast only if further adjustment is necessary Move the joystick up to increase the contrast and move the joystick d...
Страница 38: ...ess to adjust the screen automatically Auto Adjust allows the monitor to self adjust to the incoming video signal After using Auto Adjust you can further tune your monitor by using the Pixel Clock Coarse and Phase Fine controls under Display settings NOTE In most cases Auto Adjust produces the best image for your configuration NOTE Auto Adjust is only available when you are using the analog VGA co...
Страница 39: ... joystick to confirm the selection DP Select DP input when you are using the DisplayPort connector Press the joystick to confirm the selection HDMI Select HDMI input when you are using the HDMI connector Press the joystick to confirm the selection Auto Select Allows you to scan for available input sources The default is On Rename Inputs Allows you to specify a preset input name for the selected in...
Страница 40: ...our monitor Color Use Color to adjust the color setting mode Brightness Contrast Input Source Auto Adjust 24 Monitor Color Display Menu Personalize Others Exit Preset Modes Reset Color Input Color Format RGB Standard ...
Страница 41: ...eases the color temperature The screen appears warmer with a red yellow tint Cool Decreases the color temperature The screen appears cooler with a blue tint Custom Color Allows you to manually adjust the color settings Move the joystick to adjust the R G B color values and create your own preset color mode Brightness Contrast Input Source Auto Adjust 24 Monitor Color Display Menu Personalize Other...
Страница 42: ...ontrast Input Source Auto Adjust 24 Monitor Color Display Menu Personalize Others Exit Preset Modes Reset Color Input Color Format YPbPr RGB Hue This feature can shift the color of the video image to green or purple This is used to adjust the desired flesh tone color Use or to adjust the hue from 0 to 100 Move the joystick up to increase the green shade of the video image Move the joystick down to...
Страница 43: ...ttings to the factory default Display Use the display to adjust the images Brightness Contrast Input Source Auto Adjust 24 Monitor Color Display Menu Personalize Others Exit Normal 50 16 9 Aspect Ratio Horizontal Position Vertical Position Sharpness Pixel Clock Phase Response Time Reset Display Color Color Aspect Ratio Adjusts the image ratio to 16 9 4 3 or 5 4 Horizontal Position Use or to adjust...
Страница 44: ... Fast Reset Display Resets all display settings to the factory default values Menu Select this option to adjust the settings of the OSD such as the languages of the OSD the amount of time the menu remains on screen and so on Brightness Contrast Input Source Auto Adjust 24 Monitor Color Display Menu Personalize Others Exit Language Rotation Transparency Timer Lock Reset Menu English Select 20 20 s ...
Страница 45: ... Select this option to adjust the settings of the personalization Brightness Contrast Input Source Auto Adjust 24 Monitor Color Display Menu Personalize Others Exit Shortcut Key 1 Shortcut Key 2 Shortcut Key 3 Power Button LED USB Reset Personalization Input Source Preset Mode Brightness Contract On in On Mode Off in Standby Mode Shortcut Key 1 Shortcut Key 2 Shortcut Key 3 Allows you to choose a ...
Страница 46: ... Factory Reset Display Info Displays the monitor s current settings DDC CI DDC CI Display Data Channel Command Interface allows you to adjust the monitor settings using software on your computer You can disable this feature by selecting Off Enable this feature by selecting on for best user experience and optimum performance of your monitor Brightness Contrast Input Source Auto Adjust 24 Monitor Co...
Страница 47: ...s and access warranty information NOTE The Service Tag is also printed on a label located at the back of the cover Menu Voice The feature reads out the on screen menu options and displayed messages The default setting is On Brightness Contrast Input Source Auto Adjust 24 Monitor Color Display Menu Personalize Others Exit On Off Display Info DDC CI LCD Conditioning Service Tag Menu Voice Reset Othe...
Страница 48: ...AR tests Brightness Contrast Input Source Auto Adjust 24 Monitor Color Display Menu Personalize Others Exit Select On Off xxxxxx On ENERGY STAR Display Info DDC CI LCD Conditioning Service Tag Menu Voice Reset Others Factory Reset NOTE Your monitor has a built in feature to automatically calibrate the brightness to compensate for LED aging ...
Страница 49: ... at the bottom right corner of the display NOTE The lock menu can be accessed using this method when the Menu and Power buttons are in unlocked state Select option There are three lock options Menu Description Menu Buttons When Menu Buttons is selected all OSD functions are not accessible Power Button When Power Button is selected the display cannot be turned off using the Power button Menu Power ...
Страница 50: ...joystick or press the Power button the icon appears to indicate that the OSD functions and the Power button are in lock state Using the joystick to unlock the button s To access the unlock menu move and hold the joystick up down left right for four seconds An unlock menu appears at the bottom right corner of the display NOTE The unlock menu can be accessed when the Menu and Power buttons are in lo...
Страница 51: ...or the Horizontal and Vertical frequency ranges addressable by this monitor The recommended mode is 1920 x 1080 You will see the following message before the DDC CI function is disabled The function of adjusting display setting using PC application will be Yes No disabled Do you wish to disable DDC CI function You will see the following message before the Lock function is activated Are you sure yo...
Страница 52: ...playPort cable is not connected a floating message box as shown below appears The monitor will enter Standby Mode after 4 minutes if left at this state No VGA Cable The display will go into Standby mode in 4 minutes www dell com P2422HA or No HDMI Cable The display will go into Standby mode in 4 minutes www dell com P2422HA or No DP Cable The display will go into Standby mode in 4 minutes www dell...
Страница 53: ...djusting to this value will increase power consumption above the No When Factory Reset is selected the following message appears Are you sure you want to reset to default settings Yes No If you select Yes to reset to default settings the following message appears 2X Monitor Select Yes to enable the following function s Yes USB Charging No See Troubleshooting for more information ...
Страница 54: ...e dropdown list of the Resolution and select 1920 x 1080 4 Click Apply If you do not see 1920 x 1080 as an option you may need to update your graphics driver Depending on your computer complete one of the following procedures If you have a Dell desktop or portable computer Go to www dell com support enter your computer s Service Tag and download the latest driver for your graphics card If you are ...
Страница 55: ...shipped with your monitor If you are attaching a stand that you purchased from any other source follow the setup instructions that were included with the stand Tilt swivel With the stand attached to the monitor you can tilt and swivel the monitor for the most comfortable viewing angle NOTE The stand is detached when the monitor is shipped from the factory ...
Страница 56: ...E The stand can be extended vertically up to 150 mm 150 mm Rotating the monitor Before you rotate the monitor your monitor should be fully vertically extended Vertical extension and fully tilted up to avoid hitting the bottom edge of the monitor 1 2 ...
Страница 57: ...ell computer you require an updated graphics driver that is not included with this monitor To download the graphics driver go to www dell com support and see the Download section for Video Drivers for latest driver updates NOTE When in the Portrait View Mode you may experience performance degradation in graphic intensive applications 3D Gaming and etc ...
Страница 58: ...lay Settings 1 Right click on the desktop and click Properties 2 Select the Settings tab and click Advanced 3 If you have an ATI graphics card select the Rotation tab and set the preferred rotation 4 If you have an NVIDIA graphics card click the NVIDIA tab in the left hand column select NVRotate and then select the preferred rotation 5 If you have an Intel graphics card select the Intel graphics t...
Страница 59: ...r and the monitor 2 Disconnect all video cables from the monitor This way the computer doesn t have to be involved 3 Turn on the monitor The floating message box should appear on screen against a black background if the monitor cannot sense a video signal and is working correctly While in self test mode the power LED remains white Also depending upon the selected input one of the messages shown be...
Страница 60: ...after you use the previous procedure check your video controller and computer because your monitor is functioning properly Built in diagnostics Your monitor has a built in diagnostic tool that helps you determine if any screen abnormality you experience is an inherent problem with your monitor or with your computer and video card To run the built in diagnostics 1 Ensure that the screen is clean no...
Страница 61: ...ick to confirm A gray test pattern appears Select option 4 Carefully inspect the screen for abnormalities 5 Press the joystick to change the test patterns 6 Repeat steps 4 and 5 to inspect the display in red green blue black white and text screens 7 Press the joystick to end the diagnostic program ...
Страница 62: ...o cable connector Run the built in diagnostics Ensure that the correct input source is selected in the Input Source menu Poor focus Eliminate video extension cables Reset the monitor to Factory Settings Factory Reset Change the video resolution to the correct aspect ratio Shaky jittery video Reset the monitor to Factory Settings Factory Reset Check environmental factors Relocate the monitor and te...
Страница 63: ...deo cable connector Restart the computer in the safe mode Safety related issues Do not perform any troubleshooting steps Contact Dell immediately Intermittent problems Ensure that the video cable connecting the monitor to the computer is connected properly and is secure Reset the monitor to Factory Settings Factory Reset Perform monitor self test feature check to determine if the intermittent prob...
Страница 64: ...y Settings Factory Reset Cannot adjust the monitor with the joystick Turn Off the monitor unplug the power cord plug it back and then turn On the monitor Check whether the OSD menu is locked If yes move and hold the joystick up down left right for 4 seconds to unlock for more information see Using the joystick to unlock the button s No input signal when user controls are pressed Check the signal s...
Страница 65: ... 3 2 Gen1 interface is slow Check that your computer is SuperSpeed USB 5 Gbps USB 3 2 Gen1 compatible Some computers have USB 3 2 USB 2 0 and USB 1 1 ports Ensure that the correct USB port is used Reconnect the upstream cable to your computer Reconnect the USB peripherals downstream connector Reboot the computer Wireless USB peripherals stop working when a USB 3 2 device is plugged in Increase the...
Страница 66: ...tion see the regulatory compliance website located at www dell com regulatory_compliance Contacting Dell For customers in the United States call 800 WWW DELL 800 999 3355 NOTE If you do not have an active Internet connection you can find contact information on your purchase invoice packing slip bill or Dell product catalog Dell provides several online and telephone based support and service option...