background image

9. Identify the latest BIOS file and click 

Download

.

10. Select your preferred download method in the 

Please select your download method below 

window, click 

Download File

.

The 

File Download

 window appears.

11. Click 

Save

 to save the file on your computer.

12. Click 

Run

 to install the updated BIOS settings on your computer.

Follow the instructions on the screen.

Updating BIOS on systems with BitLocker enabled

CAUTION: 

If BitLocker is not suspended before updating the BIOS, the next time you reboot the system it will not 

recognize the BitLocker key. You will then be prompted to enter the recovery key to progress and the system will ask for 
this on each reboot. If the recovery key is not known this can result in data loss or an unnecessary operating system 
reinstall. For more information about this subject, see Knowledge Article: 

https://www.dell.com/support/article/

sln153694

Updating your system BIOS using a USB flash drive

If the system cannot load into Windows but there is still a need to update the BIOS, download the BIOS file using another system and save 
it to a bootable USB Flash Drive.

NOTE: 

You will need to use a bootable USB Flash drive. Please refer to the following article for further details: 

https://

www.dell.com/support/article/sln143196/

1. Download the BIOS update .EXE file to another system.
2. Copy the file e.g. O9010A12.EXE onto the bootable USB Flash drive.
3. Insert the USB Flash drive into the system that requires the BIOS update.
4. Restart the system and press F12 when the Dell Splash logo appears to display the One Time Boot Menu.
5. Using arrow keys, select 

USB Storage Device

 and click Return.

6. The system will boot to a Diag C:\> prompt.
7. Run the file by typing the full filename e.g. O9010A12.exe and press Return.
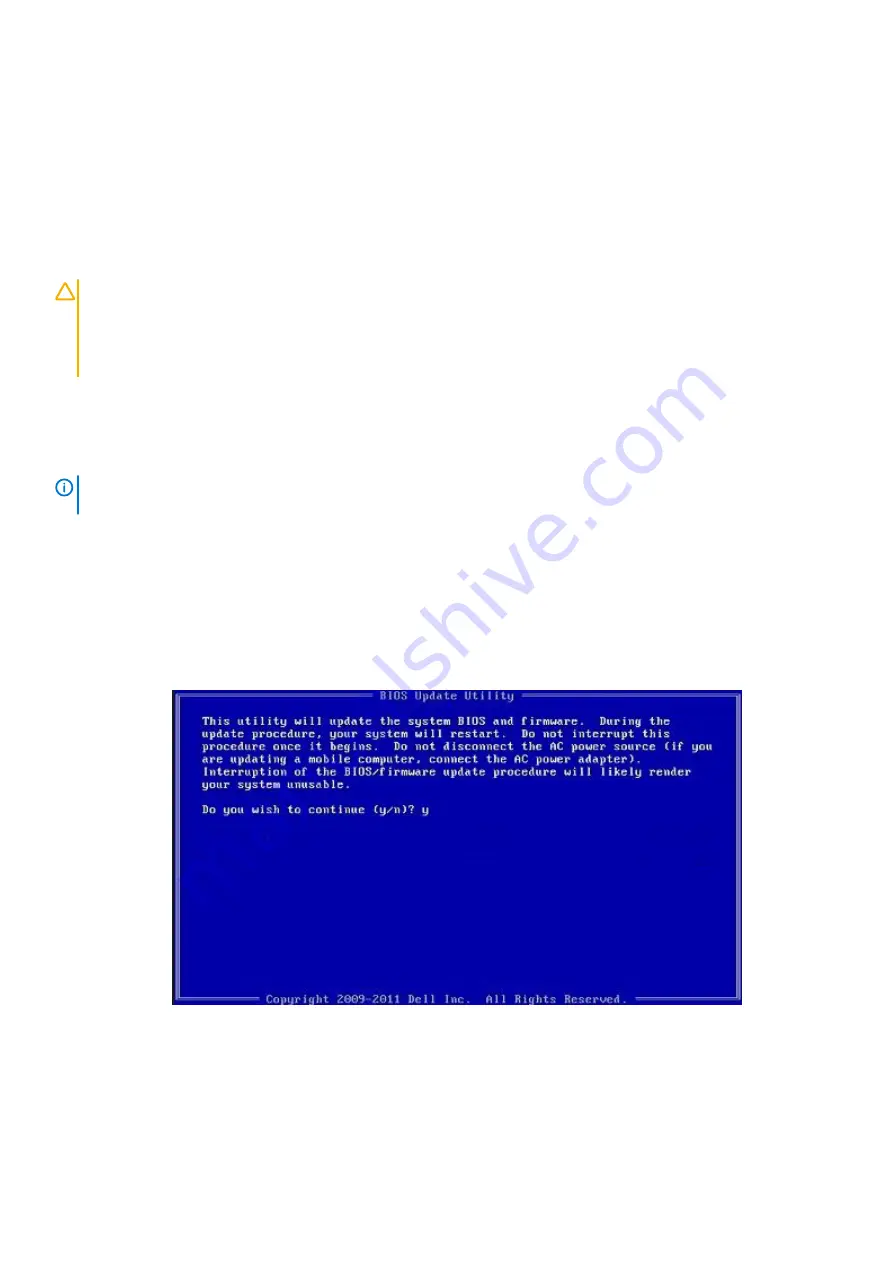
8. The BIOS Update Utility will load, follow the instructions on screen.

Figure 3. DOS BIOS Update Screen

Updating the Dell BIOS in Linux and Ubuntu environments

If you want to update the system BIOS in a Linux environment such as Ubuntu, see 

https://www.dell.com/support/article/sln171755/

.

32

System setup

Содержание OptiPlex 7071

Страница 1: ...OptiPlex 7071 Tower Setup and specifications guide Regulatory Model D28M Regulatory Type D28M001 ...

Страница 2: ...amage to hardware or loss of data and tells you how to avoid the problem WARNING A WARNING indicates a potential for property damage personal injury or death 2019 Dell Inc or its subsidiaries All rights reserved Dell EMC and other trademarks are trademarks of Dell Inc or its subsidiaries Other trademarks may be trademarks of their respective owners 2019 09 Rev A00 ...

Страница 3: ...ply unit 19 Dimensions and weight 19 Add in cards 20 Security 20 Data security 20 Environmental 21 Energy Star and Trusted Platform Module TPM 21 Computer environment 21 4 System setup 22 Boot menu 22 Navigation keys 22 System setup options 23 General options 23 System information 24 Video screen options 25 Security 25 Secure boot options 27 Intel Software Guard Extensions options 27 Performance 2...

Страница 4: ...tem BIOS using a USB flash drive 32 Updating the Dell BIOS in Linux and Ubuntu environments 32 Flashing the BIOS from the F12 One Time boot menu 33 System and setup password 37 Assigning a system setup password 38 Deleting or changing an existing system setup password 38 5 Software 39 Downloading drivers 39 6 Getting help and contacting Dell 40 4 Contents ...

Страница 5: ...Set up your computer 1 Connect the keyboard and mouse 2 Connect to your network using a cable or connect to a wireless network 1 Set up your computer 5 ...

Страница 6: ...3 Connect the display 4 Connect the power cable 6 Set up your computer ...

Страница 7: ...5 Press the power button Set up your computer 7 ...

Страница 8: ...Windows updates NOTE If connecting to a secured wireless network enter the password for the wireless network access when prompted If connected to the internet sign in with or create a Microsoft account If not connected to the internet create an offline account On the Support and Protection screen enter your contact details 7 Locate and use Dell apps from the Windows Start menu Recommended Table 1 ...

Страница 9: ...your warranty by clicking the warranty expiry date in SupportAssist Dell Update Updates your computer with critical fixes and important device drivers as they become available Dell Digital Delivery Download software applications including software that is purchased but not preinstalled on your computer Set up your computer 9 ...

Страница 10: ...gure 1 Front view 1 HDD bracket cover 2 Optical Disk Drive 3 Power button 4 SD 4 0 card reader optional 5 Hard drive activity light 6 Headset Universal audio jack port 7 USB 2 0 port with PowerShare 8 USB 2 0 port 9 USB 3 1 Gen 2 Type C port with PowerShare 2 10 Chassis overview ...

Страница 11: ... mode 4 Serial port 5 PS 2 port for keyboard 6 PS 2 port for mouse 7 USB 3 1 Gen 1 ports 4 8 USB 2 0 ports with Smart Power On 2 9 PCI Express slot 10 PCI slot 11 PCI Express slots 2 12 Power port 13 Power supply diagnostics light 14 SMA connectors 2 optional 15 Kensignton lock 16 Network port 17 Padlock loop 18 Release latch Chassis overview 11 ...

Страница 12: ...white 10 Internal USB connector 11 SATA power cable 12 ATX power connector 13 Speaker cable connector 14 Coin cell battery 15 M 2 2230 2280 SSD PCIe connector 16 CMOS_CLR Password Service_Mode jumper 17 APS PETS connector 18 PCIe x16 wired x4 Slot4 19 LPC debug card connector 20 PCI 32 Slot3 21 PCIe x16 Slot2 22 PCIe x1 Slot1 23 Chassis fan connector 24 Intrusion switch connector 25 Type C connect...

Страница 13: ...al Guard uses virtualization based security to isolate secrets credentials so that only privileged system software can access them Unauthorized access to these secrets can lead to credential theft attacks Credential Guard prevents these attacks by protecting NTLM password hashes and Kerberos Ticket Granting Tickets NOTE Processor numbers are not a measure of performance Processor availability subj...

Страница 14: ...re versions of Windows 10 Dell continues to test the commercial platform with coming Windows 10 releases during device production and for five years post production including both fall and spring releases from Microsoft For additional information about N 2 and 5 year Windows operating system supportability see the Dell Windows as a Service WaaS at dell com support Memory NOTE Memory modules should...

Страница 15: ...ory configuration you must disconnect the 2nd hard drive from the controller to support Intel Optane memory in the Windows operating system Table 5 Storage specifications Storage type Interface type Capacity 2 5 inch 7200 rpm SATA hard drive SATA up to 6 Gbps Up to 1 TB 2 5 inch 7200 rpm FIPS Self Encrypting Opal 2 0 hard drive SATA up to 6 Gbps Up to 500 GB 2 5 inch 5400 rpm hard drive SATA up to...

Страница 16: ...ersal audio jack front 1 Line out audio jack rear Video 2 DisplayPort v1 2 1 Optional 3rd video port HDMI 2 0 DP VGA or USB Type C Alt mode Media card reader 1 SD 4 0 card optional Docking port Not supported Power adapter port AC in Serial 1 port PS 2 2 ports Security 1 Kensington slot 1 Padlock loop Antenna 2 SMA connectors optional Table 8 Internal ports and connectors Description Values Interna...

Страница 17: ...ications Description Values Type 1 SD 4 0 card Cards supported Secure Digital SD Secure Digital High Capacity SDHC Secure Digital Extended Capacity SDXC MultiMedia Card MMC MMC Audio Table 10 Audio specifications Description Values Controller Realtek ALC3246 Stereo conversion Supported Internal interface High Definition Audio interface External interface Universal audio jack Speakers 1 Internal sp...

Страница 18: ...tel Core i3 i5 i7 i9 Communications Ethernet Table 13 Ethernet specifications Description Values Model number Intel i219LM Transfer rate 10 100 1000 Mbps Wireless module Table 14 Wireless module specifications Description Values Model number Qualcomm QCA9377 Intel AX200 Transfer rate Up to 433 Mbps Up to 2400 Mbps Frequency bands supported 2 4 GHz 5 GHz 2 4 GHz 5 GHz Wireless standards WiFi 802 11...

Страница 19: ...8 A 12 VB 18 A 12 VC 18 A Standby mode 12 VA1 1 50 A 12 VA2 1 50 A 12 VB 2 50 A Rated output voltage 12 VA 12 VB 12 VA1 12 VA2 12 VB 12 VC Temperature range Operating 5 C to 45 C 41 F to 113 F 5 C to 45 C 41 F to 113 F Storage 40 C to 70 C 40 F to 158 F 40 C to 70 C 40 F to 158 F Dimensions and weight Table 16 Dimensions and weight Description Values Height Front 367 mm 14 45 in Rear 367 mm 14 45 ...

Страница 20: ...ck Supported Lockable port cover Optional Windows Hello support Optional through security input device Chassis Intrusion Switch Standard Dell Smartcard Keyboard Optional Data security Table 19 Data security Data security options Values Dell Data Protection Endpoint Security Suite and Endpoint Security Suite Enterprise Supported Dell Data Protection SW Encryption Supported Dell Data Protection Exte...

Страница 21: ...m Module TPM Table 21 Energy Star and TPM Features Specifications Energy Star Compliant TPM Hardware Trusted Platform Module Discrete TPM Enable Computer environment Airborne contaminant level G1 as defined by ISA S71 04 1985 Table 22 Computer environment Description Operating Storage Temperature range 10 C to 35 C 50 F to 95 F 40 C to 65 C 40 F to 149 F Relative humidity maximum 20 to 80 non cond...

Страница 22: ...the bootable devices in the system This menu is useful when you are attempting to boot to a particular device or to bring up the diagnostics for the system Using the boot menu do not change the boot order that is stored in the BIOS The options are Legacy External Device Boot Onboard NIC UEFI Boot UEFI TOSHIBA MQ01ACF050 Other Options BIOS Setup Device Configuration BIOS Flash Update Diagnostics In...

Страница 23: ...ssor L2 Cache Processor L3 Cache HT Capable and 64 Bit Technology Device Information Displays SATA 0 SATA 4 M 2 PCIe SSD 0 LOM MAC Address Video Controller Audio Controller Wi Fi Device and Bluetooth Device Boot Sequence Allows you to specify the order in which the computer attempts to find an operating system from the devices specified in this list Boot Sequence By default the UEFI TOSHIBA MQ01AC...

Страница 24: ... is configured to support RAID mode This option is enabled by default Drives Allows you to enable or disable various drives on board SATA 0 SATA 1 SATA 2 SATA 3 SATA 4 M 2 PCIe SSD 0 M 2 PCIe SSD 1 Smart Reporting This field controls whether hard drive errors for integrated drives are reported during system startup The Enable Smart Reporting option is disabled by default USB Configuration Allows y...

Страница 25: ...bled by default Enable Secure Digital SD Card enabled by default Secure Digital SD Card Secure Digital SD Card Read Only Mode Video screen options Table 25 Video Option Description Primary Display Allows you to select the primary display when multiple controllers are available in the system Auto default Intel HD Graphics NOTE If you do not select Auto the on board graphics device will be present a...

Страница 26: ...ether the Trusted Platform Module TPM is visible to the operating system TPM On enabled by default Clear PPI Bypass for Enable Commands PPI Bypass for Disable Commands PPI Bypass for Clear Commands Attestation Enable enabled by default Key Storage Enable enabled by default SHA 256 enabled by default The options are Disabled Enabled enabled by default Absolute This field enables you to enable disab...

Страница 27: ...y to a user selected file Replace from File Replaces the current key with a key from a user selected file Append from File Adds a key to the current database from a user selected file Delete Deletes the selected key Reset All Keys Resets to default setting Delete All Keys Deletes all the keys NOTE If you disable the Custom Mode all the changes made will be erased and the keys will restore to defau...

Страница 28: ...l TurboBoost mode of the processor Enable Intel TurboBoost This option is set by default Hyper Thread Control Allows you to enable or disable the HyperThreading in the processor Disabled Enabled Default Power management Table 30 Power Management Option Description AC Recovery Determines how the system responds when AC power restored after a power loss You can set the AC Recovery to Power Off enabl...

Страница 29: ... to block entering to sleep S3 state in operating system environment This option is disabled by default Post behavior Table 31 POST Behavior Option Description Numlock LED Allows you to enable or disable the Numlock feature when your computer starts This option is enabled by default Keyboard Errors Allows you to enable or disable the keyboard error reporting when the computer starts The option Ena...

Страница 30: ... Monitor VMM from using the additional hardware capabilities that are provided by the Intel Virtualization technology for direct I O The option Enable VT for Direct I O is enabled by default Trusted Execution This option specifies whether a Measured Virtual Machine Monitor MVMM can use the additional hardware capabilities that are provided by Intel Trusted Execution Technology The option Trusted E...

Страница 31: ...guration Table 37 Advanced configuration Option Description ASPM Allows you to set the ASPM level Auto default There is handshaking between the device and PCI Express hub to determine the best ASPM mode supported by the device Disabled ASPM power management is turned off at all time L1 Only ASPM power management is set to use L1 Updating the BIOS in Windows It is recommended to update your BIOS Sy...

Страница 32: ... drive If the system cannot load into Windows but there is still a need to update the BIOS download the BIOS file using another system and save it to a bootable USB Flash Drive NOTE You will need to use a bootable USB Flash drive Please refer to the following article for further details https www dell com support article sln143196 1 Download the BIOS update EXE file to another system 2 Copy the fi...

Страница 33: ...me Boot Menu To update your BIOS from the F12 One Time boot menu you will need USB key formatted to the FAT32 file system key does not have to be bootable BIOS executable file that you downloaded from the Dell Support website and copied to the root of the USB key AC power adapter connected to the system Functional system battery to flash the BIOS Perform the following steps to execute the BIOS upd...

Страница 34: ...4 Select the BIOS executable file and then press OK Switch to correct catalogue of your external USB device by File system if you do not find the BIOS executable file 34 System setup ...

Страница 35: ...5 Click Begin Flash Update and then a warning message is displayed System setup 35 ...

Страница 36: ...6 Click Yes The systems restarts automatically and starts BIOS Flash 36 System setup ...

Страница 37: ...p password Password that you must enter to access and make changes to the BIOS settings of your computer You can create a system password and a setup password to secure your computer CAUTION The password features provide a basic level of security for the data on your computer CAUTION Anyone can access the data stored on your computer if it is not locked and left unattended NOTE System and setup pa...

Страница 38: ...leting or changing an existing system setup password Ensure that the Password Status is Unlocked in the System Setup before attempting to delete or change the existing System and or Setup password You cannot delete or change an existing System or Setup password if the Password Status is Locked To enter the System Setup press F2 immediately after a power on or reboot 1 In the System BIOS or System ...

Страница 39: ... NOTE If you do not have the Service Tag use the auto detect feature or manually browse for your desktop model 4 Click Drivers and Downloads 5 Select the operating system installed on your desktop 6 Scroll down the page and select the driver to install 7 Click Download File to download the driver for your desktop 8 After the download is complete navigate to the folder where you saved the driver fi...

Страница 40: ...2 Type the subject or keyword in the Search box 3 Click Search to retrieve the related articles Learn and know the following information about your product Product specifications Operating system Setting up and using your product Data backup Troubleshooting and diagnostics Factory and system restore BIOS information Select Detect Product Locate your product through the drop down menu under View Pr...

Отзывы: