background image

Dell

 Latitude™ XT2 XFR Service Manual 


Page 85 of 94 


Version A00-01


6.5


GPS Device 

Follow the directions in the hot swappable modules section above to install the GPS device. Ensure the 
GPS device is properly seated and the lock is in the locked position. 

6.5.1


GPS Hardware Configuration 

It is important that you configure your computer’s hardware settings properly to allow the GPS device 
to operate. The following instructions show the proper process to configuring a communications port 
for the GPS to operate in. 
 

1.


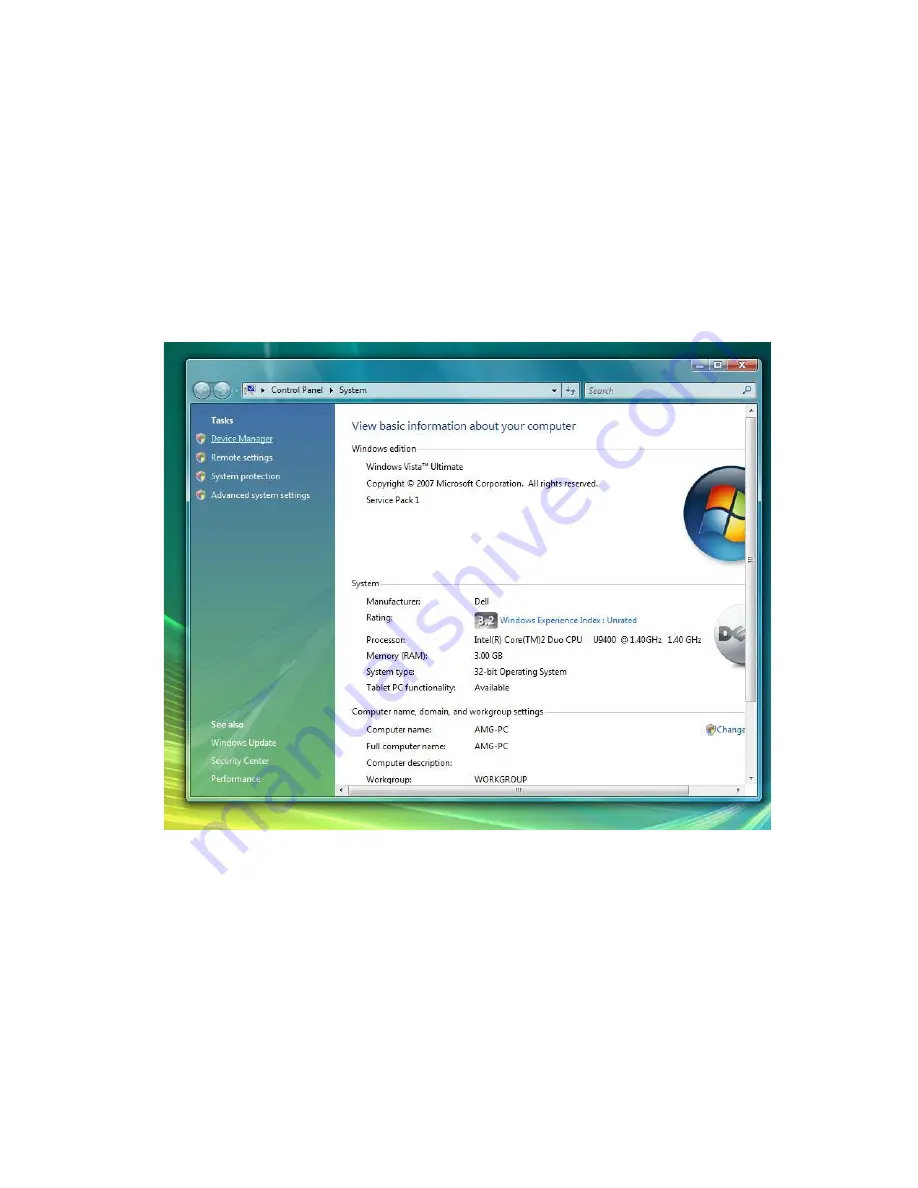
Click on the Start button and right-click on Computer; then click on Properties.  

2.


Click on Device Manager.  


Содержание LATITUDE XT2 XFR

Страница 1: ...Dell Latitude XT2 XFR Service Manual ...

Страница 2: ...marks used in this text Dell the DELL logo Latitude TravelLite Wi Fi Catcher and ExpressCharge are trademarks of Dell Inc Intel Pentium Celeron and Core are registered trademarks of Intel Corporation Bluetooth is a registered trademark owned by Bluetooth SIG Inc and is used by Dell under license TouchStrip is a trademark of Zvetco Biometrics LLC Blu ray Disc is a trademark of the Blu ray Disc Asso...

Страница 3: ...COMMENDED TOOLS 24 2 3 TURNING OFF YOUR XT2 XFR 24 2 4 AFTER WORKING INSIDE YOUR XT2 XFR 24 3 SCREW CHART 25 4 ADDING AND REPLACING PARTS 27 4 1 MAIN BATTERY 27 4 1 1 Removing the Main Battery 28 4 1 2 Removing the Battery from the Battery Door 28 4 1 3 Installing the Battery into the Battery Door 29 4 2 HINGE COVER 30 4 2 1 Removing the Hinge Cover 30 4 3 KEYBOARD 31 4 3 1 Removing the Keyboard 3...

Страница 4: ... Fan Assembly 59 4 18 DISPLAY ASSEMBLY 61 4 18 1 Removing the Display Assembly 62 4 18 2 Installing the Display Assembly 63 4 19 RF PASSTHRU 66 4 19 1 Removing the RF Passthru Board 66 4 19 2 Installing the RF Passthru Board 66 4 20 ROCKER SWITCH 67 4 20 1 Remove the Rocker Switch 67 4 20 2 Install the Rocker Switch 67 4 21 DOORS 68 4 21 1 Removing the USB 1394 Door 68 4 21 2 Removing the VGA RJ45...

Страница 5: ...4 2 Double Clicking the Dell Support Icon 84 6 5 GPS DEVICE 85 6 5 1 GPS Hardware Configuration 85 6 5 2 Software Configuration 87 6 5 3 Diagnostics 87 6 6 CAMERA 88 6 6 1 Camera Configuration Verification 88 6 6 2 Diagnostics 89 6 7 DEVICE STATUS LEDS 90 6 8 KEYBOARD STATUS LEDS 91 6 9 LED ERROR CODES 91 7 SYSTEM BIOS 93 7 1 BIOS SCREEN NAVIGATION KEYSTROKES 93 7 2 F12 MENU 93 7 3 ENTERING SYSTEM...

Страница 6: ... Modes 1 1 1 Notebook Mode Your XT2 XFR can be used either in notebook mode or tablet mode To use your XT2 XFR in notebook mode open the display until it reaches a comfortable viewing angle as in the image to the above and use the keyboard and display as you would those of any other notebook computer ...

Страница 7: ...alm rest grasp the top of the display with the other hand and turn the rotating hinge clockwise 180 degrees until you feel the display engage securely Lay the display assembly on the base with the display facing upwards Press the latch down to secure the display When you convert your XT2 XFR between notebook and tablet modes the screen orientation of your XT2 XFR will automatically change accordin...

Страница 8: ...se the screen rotate button to change the display orientation from portrait to landscape mode Each time you press and release the screen rotate button the screen image rotates clockwise 90 degrees Dell Control Point tablet settings button Press this button to view and configure options for the XT2 XFR and the pen through Dell Control Point System Manager You can configure this button to perform a ...

Страница 9: ...r as an input device YES YES Windows Journal Native note taking application which takes input directly from pen or touch YES YES Snipping Tool Tool used to capture portions of visual data documents pictures etc via pen or touch Available as a separate download from Microsoft YES YES Flicks Gesture activated shortcuts for common tasks YES NO Check Boxes Visual identifier in folders for selecting fi...

Страница 10: ...Click on the View tab 3 Under Advanced settings select the Use check boxes to select items check box and then click OK Using the Pen as a Pen The Windows Vista handwriting recognition software makes it easy to enter text into your applications with the pen Some applications such as Windows Journal allow you to write with the pen directly into the application window XT2 XFR Input Panel When an appl...

Страница 11: ... for using the Input Panel Input Panel Icons Icon Name Function Writing Pad With the writing pad you can write continuously as if you were writing on a lined piece of paper Character Pad The character pad converts your handwriting to typed text one letter number or symbol at a time On screen Keyboard The on screen keyboard is similar to a standard keyboard The writing pad and character pad have a ...

Страница 12: ...itch from pen input to touch input When you use Touch Mode a translucent image of a computer mouse called the touch pointer floats beneath your finger The touch pointer has left and right mouse buttons that you can tap with your finger You use the area beneath the buttons to drag the touch pointer 1 3 3 Windows XP 1 3 3 1 Pen Usage Using the Pen as a Mouse You can use the pen the same way you use ...

Страница 13: ...riting on a lined piece of paper Character Pad The character pad converts your handwriting to typed text one letter number or symbol at a time On screen Keyboard The on screen keyboard is similar to a standard keyboard The writing pad and character pad have a number pad a symbol pad and web quick keys to help you quickly and accurately enter these types of text These quick keys are hidden when you...

Страница 14: ...ta On the Digitizer Options tab under the Input Mode section there is no listing for Dual Mode on the XP version Windows XP does allow use of both pen and touch but the seamless switching capability that Vista offers is not available 1 4 3 N trig Applet The N trig Tablet Settings applet is used to adjust several settings for the digitizer Once the N trig drivers are loaded an icon appears in the s...

Страница 15: ... Tablet Settings window There are four tabs on the N trig Tablet Settings window Digitizer Options Interaction Options Multi Touch Gestures About 1 4 3 1 Digitizer Options Tab The Digitizer Options tab is used for the following Input mode selection Touch tuning Launching diagnostics Restoring default settings ...

Страница 16: ... contact A basic principle in Auto Mode is that stylus detection in the digitizer proximity would turn the digitizer into Pen Only mode as an overriding priority A double tap finger gesture on the screen similar in style to a mouse double click will switch the digitizer from Pen Only mode to Touch Only mode The system will remain in Touch Only mode as long as the stylus is out of range Once the st...

Страница 17: ... There are disconnected lines Pen or touch may be malfunctioning in a specific physical display area 15 Sensor Antenna shorts Digitizer grid shortcut There are shorted lines Pen or touch may be malfunctioning in a specific physical display area 18 Channel imbalance Digitizer channel degraded There is an unbalanced channel Pen or touch may be malfunctioning in a specific physical display area 19 Ca...

Страница 18: ...aphical indicator to appear Pen Touch Pen is detected after finger usage Touch Pen Touch is detected after pen usage 1 4 3 2 2 Sound Feedback This section enables you to select which wav file sound will be played when the finger touches the screen The sound can be tested using the play button One can enable disable this functionality using the specified radio button 1 4 3 3 Multi Touch Gestures Ta...

Страница 19: ... system command that you can configure It can be used to perform actions such as turning the display off and disabling touch gestures default or run an executable program such as one that opens Internet Explorer Sensitivity Setup To adjust the sensitivity for the two finger gestures double click the N trig icon in the system tray and tap the Multi Touch Gestures tab Set the sliders for each gestur...

Страница 20: ...ropriate signal is transferred to the digitizer s on board processor Tips come in one color type black The black tips present a harder writing feel The system ships with a total of two black tips These tips are easily replaced by using the pen tip removal tool which looks similar to an oversized pair of tweezers This tool also ships with the XT2 XFR NOTE In the event of a suspected digitizer failu...

Страница 21: ... 5 2 Troubleshooting The pen is the first component to be investigated in the event of a suspected problem with the digitizer Verify the tip is in good shape free of chips excessive wear etc by closely examining it If there is any doubt you should change out the tip with a new one or one that is known to be in good condition You should also verify that the touch capabilities are not affected Switc...

Страница 22: ...ertical Scroll Windows Explorer Yes Yes Yes No Yes Yes Photo Gallery Yes Yes Yes No No No Windows Live Photo Gallery Yes Yes Yes No No No Virtual Earth No No No No No No Microsoft Office 2007 Outlook Yes Yes No Yes Yes No Word Yes Yes Yes Yes Yes No Excel Yes Yes Yes Yes Yes No Power Point Yes Yes Yes Yes Yes Yes One Note Yes Yes Yes Yes Yes No Picture Manager Yes Yes Yes Yes Yes Yes Microsoft Off...

Страница 23: ... a processor by its edges not by its pins CAUTION When you disconnect a cable pull on its connector or on its pull tab not on the cable itself Some cables have connectors with locking tabs if you are disconnecting this type of cable press in on the locking tabs before you disconnect the cable As you pull connectors apart keep them evenly aligned to avoid bending any connector pins Also before you ...

Страница 24: ...the following tools Small flat blade screwdriver 0 Phillips screwdriver 1 Phillips screwdriver Small plastic scribe Flash BIOS update program CD 2 3 Turning Off Your XT2 XFR CAUTION To avoid losing data save and close all open files and exit all open programs before you turn off your XT2 XFR 1 Shut down the operating system In Windows Vista Click Start then click the arrow in the lower right corne...

Страница 25: ... then plug it into the computer 3 Replace the main battery 4 Connect your XT2 XFR and all attached devices to their electrical outlets 5 Turn on your XT2 XFR 3 Screw Chart Chassis Location Screw Part Qty 1 USB 1394 DOOR hinge assy screw M3 x 3 21106 03 2 Latch screw M1 2 40621 1 door to chassis mouting screw 21106 00 4 2 IO AUDIO DOOR hinge assy screw M3 x 3 21106 03 3 Latch screw M1 2 40621 1 doo...

Страница 26: ...06 00 2 6 Upper Palm Rest Screw CSK screw M2x 5 40628 1 LCD inner Bezel 1 FPR board M2 x 3 21106 00 1 LCD Outer 1 Rocker Switch Assy custom Thread Forming 3 2 Antenna bracket M2 x 3 21106 00 4 LCD ASSY 1 LCD mouting screws PCB custom csk 40319 3 2 Hinge Moutning screws M2 5 x 5 21106 01 4 3 ID Plate M2 5 x 5 21106 01 4 4 LCD inner and Outer Assy screws M2 5 x 8 21106 02 8 front top side M2 5 x 7 4...

Страница 27: ...ry module assy M2 x 3 21106 00 4 KEYPAD HINGE COVER 1 Captive screw M2 custom 40190 4 Dimms Door 1 Captive screw M2 custom 40190 4 Latch Palm Rest 1 shoulder screw Captive custom 40301 2 4 Adding and Replacing Parts 4 1 Main Battery WARNING Before working inside your XT2 XFR read the safety information that shipped with your XT2 XFR For additional safety best practices information see the Regulato...

Страница 28: ...R outward to each side 3 Slide the battery out of the battery bay Lift slightly using the latches to release the back edge 4 Remove the battery from the XT2 XFR 4 1 2 Removing the Battery from the Battery Door 1 Follow the procedures in Before Working Inside Your XT2 XFR 2 Remove the battery from the XT2 XFR before continuing 3 Loosen the four captive screws on the front edge of the battery door T...

Страница 29: ...ion A00 01 4 Rotate the door up to remove the battery 5 Remove the battery 4 1 3 Installing the Battery into the Battery Door 1 Place the bracket onto the battery 2 Slide the battery onto the battery door and align the tabs on the battery with the door tabs ...

Страница 30: ...T2 XFR For additional safety best practices information see the Regulatory Compliance Homepage at www dell com regulatory_compliance 4 2 1 Removing the Hinge Cover 1 Follow the procedures in Before Working Inside Your XT2 XFR 2 Remove the battery from the XT2 XFR 3 Loosen the four captive screws securing the hinge cover in place 4 Use your fingers to release the rest of the hinge cover by pulling ...

Страница 31: ... best practices information see the Regulatory Compliance Homepage at www dell com regulatory_compliance 4 3 1 Removing the Keyboard 1 Follow the procedures in Before Working Inside Your XT2 XFR 2 Before performing this step follow the instructions in removing the battery section 3 Perform the instructions on removing the hinge cover section 4 Remove the two screws securing the keyboard to the XT2...

Страница 32: ...ge 32 of 94 Version A00 01 5 Gently slide the keyboard towards the display 6 Remove the two screws M2 x 3 mm securing the connector door to the palm rest 7 Lift and remove the connector door 8 Release the zif connector for the touchpad cable ...

Страница 33: ...Dell Latitude XT2 XFR Service Manual Page 33 of 94 Version A00 01 7 Disconnect the touch pad cable 8 Release the zif connector for the keyboard cable ...

Страница 34: ...ver WARNING Before working inside your XT2 XFR read the safety information that shipped with your XT2 XFR For additional safety best practices information see the Regulatory Compliance Homepage at www dell com regulatory_compliance 4 4 1 Removing the Memory and Mini Card Cover 1 Follow the procedures in Before Working Inside Your XT2 XFR 2 Remove the battery from the XT2 XFR 3 Loosen the two capti...

Страница 35: ...Dell Latitude XT2 XFR Service Manual Page 35 of 94 Version A00 01 4 Lift the cover up from the left side using the grip tab 5 Lift the cover while sliding to the left and remove from the XT2 XFR ...

Страница 36: ... information see the Regulatory Compliance Homepage at www dell com regulatory_compliance 4 5 1 Removing a Memory Module 1 Follow the procedures in Before Working Inside Your XT2 XFR 2 Remove the battery before continuing 3 Remove the memory and mini card cover before continuing 4 Use your fingers to gently pry the retaining clips away from the memory module 5 Remove the memory module from the XT2...

Страница 37: ...2 XFR For additional safety best practices information see the Regulatory Compliance Homepage at www dell com regulatory_compliance 4 6 1 Removing the Hard Drive 1 Follow the procedures in Before Working Inside Your XT2 XFR 2 Remove the battery from the XT2 XFR 3 Slide the hard drive towards front edge to disconnect from the system board and unlock the housing from the chassis ...

Страница 38: ... remove the hard drive from the XT2 XFR 4 7 Mini Card WARNING Before working inside your XT2 XFR read the safety information that shipped with your XT2 XFR For additional safety best practices information see the Regulatory Compliance Homepage at www dell com regulatory_compliance Handle ...

Страница 39: ...milar labeling NOTE There are five cables located under the memory door Two enter the bay from the left side three enter from the back center location The table below explains where each cable would connect to for WLAN and WWAN devices Most new WLAN and WWAN mini cards available today have icons on their label that tells you which cable to connect to which antenna port 1 BLACK left side Connects t...

Страница 40: ...Dell Latitude XT2 XFR Service Manual Page 40 of 94 Version A00 01 5 Use your finger to gently pry the retaining clips back and release the mini card 6 Remove the mini card from the XT2 XFR at an angle ...

Страница 41: ...ety best practices information see the Regulatory Compliance Homepage at www dell com regulatory_compliance 4 8 1 Removing the Internal Card With Bluetooth Wireless Technology 1 Follow the procedures in Before Working Inside Your XT2 XFR 2 Remove the battery before continuing 3 Disconnect the Bluetooth cable from the Bluetooth adapter 4 Loosen the screw on the Bluetooth assembly 5 Carefully lift t...

Страница 42: ...Dell Latitude XT2 XFR Service Manual Page 42 of 94 Version A00 01 6 Remove the Bluetooth assembly from the XT2 XFR ...

Страница 43: ...enna cables from the WWAN WLAN adapters in the XT2 XFR 6 Remove the seventeen 17 screws 7 2 5 x 5 mm and 10 2 5 x 8 mm securing the palm rest from the bottom of the XT2 XFR 7 Release the two 2 locking tabs by pressing each toward the corner edge slightly and pushing down to disengage the tabs from the chassis 8 Flip the unit over and remove the hinge cover from the XT2 XFR 9 Remove the keyboard fr...

Страница 44: ... the chassis 13 Gently lift the palm rest moving the door opening over to the right slightly and disconnect the touchpad cable 14 Lift the palmrest from the left side slightly and tilt the palm rest up towards the right to disconnect the LCD to USB hub board and USB hub board to system board connector ...

Страница 45: ...able clamp to base screws CAUTION Make sure the cable clamp is set properly over the cable gasket and the cable gasket is secure before proceeding Failure to perform this step properly could cause an inlet for moisture into the system 2 Set the palm rest onto the right side and tilt the palm rest up connect the USB Hub board to system board cable ribbon cable Then connect the LCD to USB Hub board ...

Страница 46: ... palm rest over the chassis so the view through the door is over the touchpad connector Insert the touch pad cable into the connector and close the lock tab 4 Lift the palm rest slightly and set it into position over the edge gaskets and press on the palm rest front edge to lock the palm rest into place 5 Install the screw on the right side of the keyboard valley ...

Страница 47: ... cover 8 Install the front two screws securing the display to the chassis Rotate the display to notebook mode before continuing 9 Install the keyboard see Keyboard chapter for reference 10 Install the hinge cover see Hinge Cover chapter for reference 11 Turn the system over so the bottom side is facing up 12 Install the seventeen 17 screws 7 2 5 x 5 mm and 10 2 5 x 8 mm securing the palm rest from...

Страница 48: ...ll the battery See battery chapter for reference 4 10 Coin Cell Battery WARNING Before working inside your XT2 XFR read the safety information that shipped with your XT2 XFR For additional safety best practices information see the Regulatory Compliance Homepage at www dell com regulatory_compliance 4 10 1 Removing the Coin Cell Battery 1 Follow the procedures in Before Working Inside Your XT2 XFR ...

Страница 49: ...irectly in front of the USB connector location DO NOT place battery on chassis pad 3 Follow the procedures for Installing the palm rest 4 11 USB Interface Board 4 11 1 Removing the USB Interface Board WARNING Before working inside your XT2 XFR read the safety information that shipped with your XT2 XFR For additional safety best practices information see the Regulatory Compliance Homepage at www de...

Страница 50: ...e and the system board cable from the ZIF connectors on the USB Interface board 5 Remove the 4 screws holding the USB interface board to the palm rest 4 12 Stylus Bay WARNING Before working inside your XT2 XFR read the safety information that shipped with your XT2 XFR For additional safety best practices information see the Regulatory Compliance Homepage at www dell com regulatory_compliance 4 12 ...

Страница 51: ... the Stylus Bay 1 Start by threading the cable and connector through the opening in the chassis 2 Set the grommet surrounding the cable in the opening to produce a seal 3 Insert the stylus bay into the chassis being careful with the gaskets around the bay 4 Insert and tighten the self tapping screw 4 13 Speaker WARNING Before working inside your XT2 XFR read the safety information that shipped wit...

Страница 52: ...0 01 4 13 1 Removing the Speaker 1 Follow the procedures in Before Working Inside Your XT2 XFR 2 Follow the procedures in removing the palm rest before continuing 3 Disconnect the speaker cable from the system board 4 Remove the speaker assembly from the XT2 XFR ...

Страница 53: ...rocedures in Before Working Inside Your XT2 XFR 2 Follow the procedures in Removing the palm rest before continuing 3 Loosen and remove the two screws holding the WiFi sniffer assembly chassis 4 Carefully remove the WiFi sniffer assembly from the bottom chassis by rotating slightly 4 14 2 Wifi Sniffer Assembly Installation 1 Install the sniffer switch assembly into the chassis On installation the ...

Страница 54: ...button 1 Place the rubber sniffer button over the hole and gently press while rolling your finger over the button This is a self sealing button 2 Verify the button is sealed by sliding your finger over it 4 15 2 Installing the Wifi on off switch 1 Follow the procedures in WiFi Sniffer Assembly Removal before continuing 2 Place a scribe or flathead screwdriver at a position that allows the switch t...

Страница 55: ... help to hold the tool and bracket in place with the flathead screwdriver and set the switch in place then use your index finger to hold the upper part of the bracket while pressing the switch into place with your thumb 4 Perform the steps for Installing the WiFi Sniffer Assembly 5 To complete perform the steps for Installing the Palm Rest Set flat scribe here ...

Страница 56: ...dures in Before Working Inside Your XT2 XFR 2 Follow the procedures in removing the palm rest before continuing 3 From the inside of the XT2 XFR disconnect the display cable from the system board 4 Remove the coin cell battery from the XT2 XFR 5 Disconnect the speaker cable from the system board 6 Disconnect the Stylus bay connector from the system board 7 Disconnect the video connector from the s...

Страница 57: ...ell battery connection 4 WiFi sniffer connection 5 System board screw 2 5 x 5 mm 6 System board screw at bracket 2 5 x 8 mm 10 Carefully lift the gasket surround from the fan housing area and lift the gasket from over the video antenna cable socket 11 Lift the system board up and remove from the XT2 XFR 1 2 3 4 5 6 ...

Страница 58: ...rest side of the system board and one 1 on the processor side of the system board near the docking connector 2 Place the system board into the chassis and seat the fan cable grommet into the grommet channel 3 Install the screws 1 2 5 x 5 mm 1 2 5 x 8 mm with bracket securing the system board to the chassis 1 Speaker connection 2 Stylus connection 3 Coin cell battery connection 4 WiFi sniffer conne...

Страница 59: ...bay before proceeding Failure to perform this step properly could cause an inlet for moisture into the system 10 Complete the assembly by following instructions for Installing the Palm Rest 4 17 Heat Sink and Fan Assembly WARNING Before working inside your XT2 XFR read the safety information that shipped with your XT2 XFR For additional safety best practices information see the Regulatory Complian...

Страница 60: ...e 60 of 94 Version A00 01 5 Loosen the four captive screws on the heat sink 16 Remove the top section of the heat sink assembly from the system board then turn over the system board again 17 Remove the bottom section of the heat sink assembly ...

Страница 61: ... of the heat sink assembly If this insulator is missing a replacement system board should be ordered 4 18 Display Assembly WARNING Before working inside your XT2 XFR read the safety information that shipped with your XT2 XFR For additional safety best practices information see the Regulatory Compliance Homepage at www dell com regulatory_compliance ...

Страница 62: ...e system board 4 Carefully lift the gasket surround from the fan housing area and lift the gasket from over the video antenna cable socket WARNING Do NOT cut or remove the gasket material as this will cause the unit to not seal against water intrusion 5 Follow the procedures in Removing the system board before continuing 6 Remove the rear two Dock Door Screws along with the side screw and lightly ...

Страница 63: ...9 Lift the cables for the display assembly out of the chassis area and remove the display assembly 4 18 2 Installing the Display Assembly 1 Set the display assembly behind the system and pull all cables to align with the center of the chassis 2 The black grey red and black cables with the barrel connector on the ends connect onto the back side of the RF Passthru board The RF Passthru board is labe...

Страница 64: ...he three cables under the tab for the docking door bracket then install and tighten the five M2 x 3 mm screws for the docking door bracket 4 Place the RF Passthru board into place and tighten the two screws M2 x 3 mm securing it to the chassis 5 Route the black and grey cable from the front end of the RF Passthru so they sit under the retention tab and lay within the memory door opening 1 2 3 4 5 ...

Страница 65: ...ning 7 Place the grommet surrounding the cables into the grommet chamber Be sure the grommet is seated properly and hold in place 8 Insert the cable bracket and install the two screws securing the bracket cables and grommet in place Release the grommet once this has been completed 9 Perform the steps for Installing the system board before continuing ...

Страница 66: ... 1 Follow the procedures in Before Working Inside Your XT2 XFR 2 Follow the procedures in removing the palm rest before continuing 3 Follow the procedures in Removing the system board before continuing 4 Remove the two 2 5 x 5 mm screws holding the RF Passthru board onto the bottom chassis 5 Remove the WWAN and WLAN RF Cables from the retaining tab 6 Lift the RF Passthru board straight up to remov...

Страница 67: ... 3 Connect the grey and black mini card cables into the barrel connectors on the opposite side and run them under the retainer tab 4 20 Rocker Switch 4 20 1 Remove the Rocker Switch 1 Remove the screw M2 x 3 mm from the center of the rocker switch 2 Pull the rocker switch with your finger until it disengages from the rocker pin 4 20 2 Install the Rocker Switch 1 Insert the rocker switch onto the r...

Страница 68: ...21 1 Removing the USB 1394 Door 1 Follow the procedures in Before Working Inside Your XT2 XFR 2 Remove the four 2 5 x 5 mm screws from the door hinge connected to the bottom chassis 3 Rotate the pull tab to release the lock and open the door to remove 4 21 2 Removing the VGA RJ45 USB Door 1 Follow the procedures in Before Working Inside Your XT2 XFR 2 Remove the four 2 5 x 5 mm screws from the doo...

Страница 69: ...e door hinge connected to the bottom chassis 3 Rotate the pull tab to release the lock and open the door to remove 4 21 4 Removing the Audio Card Socket Door 1 Follow the procedures in Before Working Inside Your XT2 XFR 2 Remove the two 2 5 x 5 mm screws from the door hinge connected to the bottom chassis 3 Rotate the pull tab to release the lock and open the door to remove 4 22 USB Module Bay Cov...

Страница 70: ...al safety best practices information see the Regulatory Compliance Homepage at www dell com regulatory_compliance 4 22 1 Removing the USB Module Cover 1 Follow the procedures in Before Working Inside Your XT2 XFR 2 Remove the battery from the XT2 XFR 3 Unlock the cover from the LCD bezel 4 Remove the cover from the Hot Swappable Module bay 4 23 GPS Module OPTIONAL Unlock Position ...

Страница 71: ...R For additional safety best practices information see the Regulatory Compliance Homepage at www dell com regulatory_compliance 4 23 1 Removing the GPS Module 1 Follow the procedures in Before Working Inside Your XT2 XFR 2 Remove the battery from the XT2 XFR 3 Unlock the GPS from the LCD bezel 4 Remove the GPS module from the Hot Swappable Module bay Unlock Position ...

Страница 72: ...your XT2 XFR For additional safety best practices information see the Regulatory Compliance Homepage at www dell com regulatory_compliance 4 24 1 Removing the Camera Module 1 Follow the procedures in Before Working Inside Your XT2 XFR 2 Remove the battery from the XT2 XFR 3 Unlock the camera from the LCD bezel 4 Remove the GPS module from the Hot Swappable Module Bay Unlock Position ...

Страница 73: ...its Camera Optional IP54 rated integrated 2 0MP camera Ports 1394 USB 2 0 x2 USB 2 0 eSATA VGA RJ 45 Audio External Antenna Connection RF pass thru Expansion Express 54 34 and 54mm support SD Card slot Docking Vehicle Docking Desktop Media Bay Tri Mode RF Pass through ODD External E Family modular media bay 8X DVD ROM 24X CDRW DVD 8X DVD RW 2nd Hard Drive Battery 4 cell 28W Hr Li Ion primary stand...

Страница 74: ... a docking device docked undock it See the documentation that came with your docking device for instructions NOTE If your computer does not display a screen image contact Dell Support 1 Ensure that the computer is connected to an electrical outlet that is known to be working properly 2 Press and hold the Fn key or the mute button then turn on your computer NOTE Alternatively you can select Diagnos...

Страница 75: ...re information on using the system setup program see the Dell Technology Guide on your computer or at support dell com 1 Insert the Drivers and Utilities media into the optional external optical drive 2 Restart your computer 3 When the DELL logo appears press F12 immediately NOTE Keyboard failure may result when a key is held down for extended periods of time To avoid possible keyboard failure pre...

Страница 76: ...is recommended that you select Test System to run a complete test on your computer Selecting Test Memory initiates the extended memory test which can take up to thirty minutes or more to complete When the test completes record the test results and then press any key to return to the previous menu After Test System is selected the following menu appears Option Function Express Test Performs a quick...

Страница 77: ...onents installed on your computer or all devices attached to your computer Parameters Allows you to customize the test if applicable by changing the test settings 6 1 1 Error Messages CAUTION Before you begin any of the procedures in this section follow the safety instructions that shipped with your computer If the error message is not listed see the documentation for the operating system or the p...

Страница 78: ... peripheral device does not work ensure that the device is properly connected If an error message appears on the screen write down the exact message This message may help support personnel diagnose and fix the problem s If an error message occurs in a program see the program s documentation NOTE The procedures in this document were written for the Windows default view so they may not apply if you ...

Страница 79: ...uted by clicking any boxes that are checked CHECK THE SPEAKERS AND SUBWOOFER See Sound and Speaker Problems Problems writing to an optical drive CLOSE OTHER PROGRAMS The optical drive must receive a steady stream of data during the writing process If the stream is interrupted an error occurs Try closing all programs before you write to the optical TURN OFF STANDBY MODE IN WINDOWS BEFORE WRITING TO...

Страница 80: ...isted Windows recognizes the device IF YOU HAVE PROBLEMS WITH A DELL IEEE 1394 DEVICE Contact Dell Support IF YOU HAVE PROBLEMS WITH AN IEEE 1394 DEVICE NOT PROVIDED BY DELL Contact the IEEE 1394 device manufacturer 6 2 4 Lockups and Software Problems CAUTION Before you begin any of the procedures in this section follow the safety instructions that shipped with your computer The Computer Does Not ...

Страница 81: ...e Screen Appears TURN THE COMPUTER OFF If you are unable to get a response by pressing a key onyour keyboard or moving your mouse press and hold the power button for at least 8 to 10 seconds until the computer turns off and then restart your computer Other Software Problems CHECK THE SOFTWARE DOCUMENTATION OR CONTACT THE SOFTWARE MANUFACTURER FOR TROUBLESHOOTING INFORMATION Ensure that the program...

Страница 82: ...s not receiving power Reseat the power cable in the power connector on the back of the computer and the electrical outlet Bypass power strips power extension cables and other power protection devices to verify that the computer turns on properly Ensure that any power strips being used are plugged into an electrical outlet and are turned on Ensure that the electrical outlet is working by testing it...

Страница 83: ...pport dell com CHECK THE DIAGNOSTIC LIGHTS See Diagnostic Lights CHECK THE DISPLAY SETTINGS See the Dell Technology Guide on your computer or at support dell com ADJUST THE WINDOWS DISPLAY SETTINGS Windows XP 1 Click Start Control Panel Appearance and Themes 2 Click the area you want to change or click the Display icon 3 Try different settings for Color quality and Screen resolution Windows Vista ...

Страница 84: ...m the Start menu go to support dell com and download the software The Dell Support Utility is customized for your computing environment The icon in the taskbar functions differently when you click double click or right click the icon 6 4 1 Clicking the Dell Support Icon Click or right click the icon to perform the following tasks Check your computing environment View the Dell Support Utility setti...

Страница 85: ...ated and the lock is in the locked position 6 5 1 GPS Hardware Configuration It is important that you configure your computer s hardware settings properly to allow the GPS device to operate The following instructions show the proper process to configuring a communications port for the GPS to operate in 1 Click on the Start button and right click on Computer then click on Properties 2 Click on Devi...

Страница 86: ...Dell Latitude XT2 XFR Service Manual Page 86 of 94 Version A00 01 3 Double click on Ports Right click on the USB Serial Port COM device and select Properties ...

Страница 87: ...be required to allow the software to function with the GPS module Please follow the instructions provided by your software manufacturer 6 5 3 Diagnostics Performing Dell Diagnostics on USB devices will locate the GPS as a connected device and run a ping test on the GPS installed A pass indicates the GPS is installed and using the USB bus properly If the USB device test fails the GPS only replace t...

Страница 88: ...l the Camera device Ensure the camera is properly seated and the lock is in the locked position 6 6 1 Camera Configuration Verification If the camera is not working or is working intermittently use the following steps to verify the camera configuration 1 Click on the Start button and right click on Computer then click on Properties 2 Click on Device Manager ...

Страница 89: ...ite Device and look at the General tab in the Properties for the USB Composite Device If a Down Arrow appears over the USB icon for the device then the device is installed but needs to be enabled 4 Verify that the messaging application does not have the camera disabled or turned off 6 6 2 Diagnostics Performing Dell Diagnostics on USB devices will locate the camera as a connected device and run a ...

Страница 90: ...lows Alternately blinking amber light and blue light An unauthenticated or unsupported non Dell AC adapter is attached to your XT2 XFR Alternately blinking amber light with steady blue light Temporary battery failure with AC adapter present Constantly blinking amber light Fatal battery failure with AC adapter present Light off Battery in full charge mode with AC adapter present Blue light on Batte...

Страница 91: ...2 If memory is already present reseat the module s one at time in each slot 3 Try known good memory from another computer or replace the memory 4 Replace the system board FLASH ON ON System board error 1 Reseat the processor 2 Replace the system board 3 Replace the processor FLASH ON FLASH LCD Panel Error 1 Reseat the LCD cable 2 Replace the LCD panel 3 Replace the video card system board OFF FLAS...

Страница 92: ...oard OFF FLASH FLASH Modem Error 1 Reseat the modem 2 Replace the modem 3 Replace the system board FLASH FLASH FLASH System board error 1 Replace the system board FLASH FLASH OFF Option ROM Error 1 Reseat the device 2 Replace the device 3 Replace the system board OFF ON OFF Storage device error 1 Reseat the hard drive and optical drive 2 Test the computer with just the hard drive and just the opti...

Страница 93: ...ems listed in this section may or may not appear 7 2 F12 Menu Press F12 when the Dell logo appears to initiate a one time boot menu with a list of the valid boot devices for the system Diagnostics and Enter Setup options are also included in this menu The devices listed on the boot menu depend on the bootable devices in the system This menu is useful when you are attempting to boot to a particular...

Страница 94: ...can change settings that appear as white type on the screen Options or values that you cannot change because they are determined by your XT2 XFR appear less bright The upper right corner of the screen displays help information for the currently highlighted option The lower right corner displays information about the computer System setup key functions are listed across the bottom of the screen The...

Отзывы: