background image

Installing the optional finger print reader board

1.

Insert the finger print reader board into the slot on the computer.

2.

Connect the finger print reader cable to the finger print reader board.

3.

Place the metal bracket on the finger print reader board and tighten the screw to secure the finger 

print reader board.

4.

Install the:
a.

hard drive assembly

 or 

M.2 SSD

 or 

PCIe SSD

b.

dock frame

c.

WLAN card

d.

WWAN card

e.

battery

f.

base cover

5.

Follow the procedure in 

After working inside your system

.

Removing the LED board

1.

Follow the procedure in 

Before working inside your computer

.

2.

Remove the:
a.

base cover

b.

battery

c.

hard drive assembly

 or 

M.2 SSD

 or 

PCIe SSD

d.

dock frame

3.

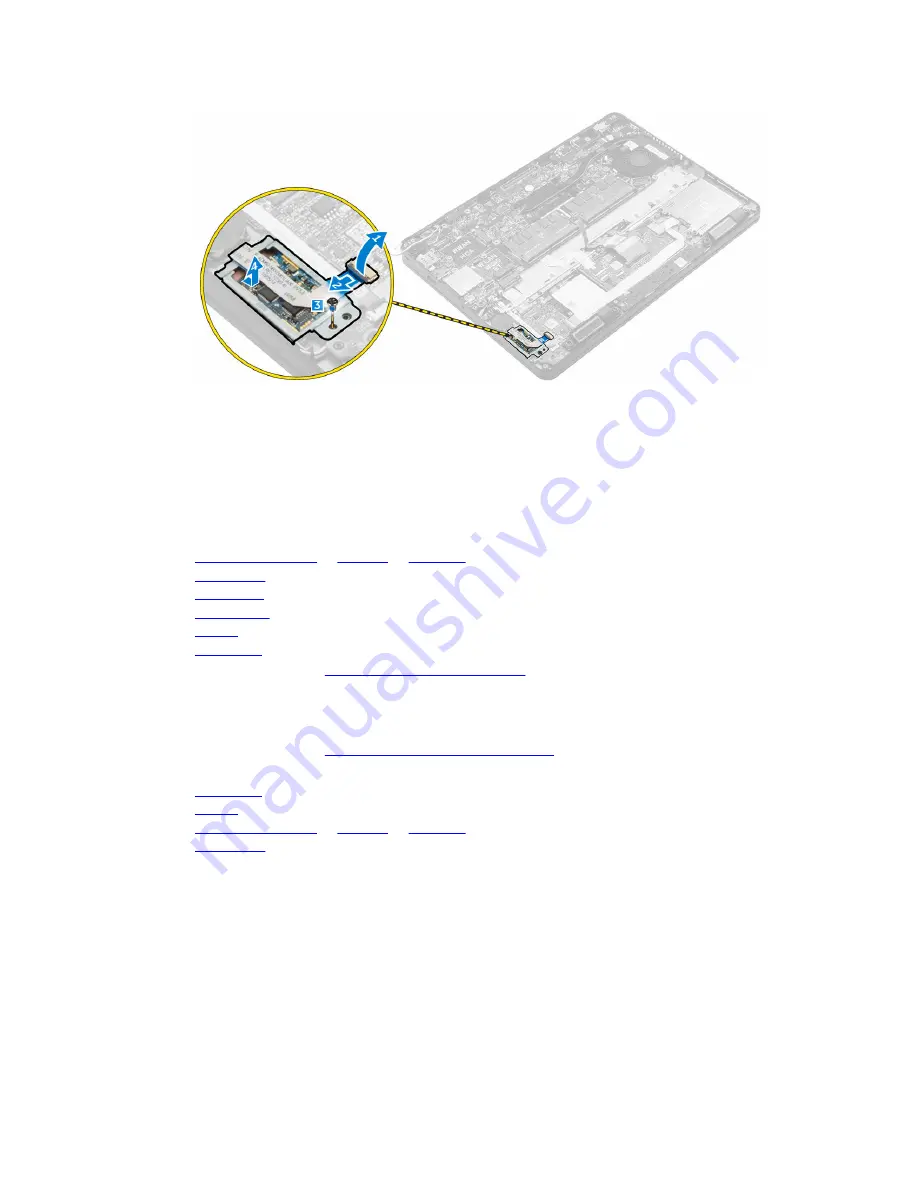
To remove the LED board:
a. Disconnect the LED board cable from the connector on the LED board [1, 2].
b. Remove the screw that secures the LED board to the computer [3].
c. Lift the LED board from the computer [4].

24

Содержание latitude e5270

Страница 1: ...Dell Latitude E5270 Owner s Manual Regulatory Model P23T Regulatory Type P23T001 ...

Страница 2: ...problem WARNING A WARNING indicates a potential for property damage personal injury or death Copyright 2015 Dell Inc All rights reserved This product is protected by U S and international copyright and intellectual property laws Dell and the Dell logo are trademarks of Dell Inc in the United States and or other jurisdictions All other marks and names mentioned herein may be trademarks of their res...

Страница 3: ...rd drive into the hard drive bracket 13 Installing the hard drive assembly 13 Removing the optional M 2 Solid State Drive SSD 13 Installing the optional M 2 SSD 14 Removing the optional PCIe SSD 14 Installing the optional PCIe SSD 15 Removing the memory module 15 Installing the memory module 15 Removing the WLAN card 15 Installing the WLAN card 16 Removing the WWAN card 16 Installing the WWAN card...

Страница 4: ...screen options 31 System Configuration screen options 32 Video screen options 34 Security screen options 34 Secure Boot screen options 36 Intel Software Guard Extensions screen options 37 Performance screen options 37 Power Management screen options 38 POST Behavior screen options 40 Virtualization support screen options 41 Wireless screen options 41 Maintenance screen options 42 System Log screen...

Страница 5: ...isplay specifications 48 Keyboard specifications 49 Touchpad specifications 49 Battery specifications 50 AC Adapter specifications 50 Physical specifications 51 Environmental specifications 51 5 Diagnostics 52 Enhanced Pre Boot System Assessment ePSA diagnostics 52 Device status lights 53 Battery status lights 54 6 Contacting Dell 55 5 ...

Страница 6: ...epairs as authorized in your product documentation or as directed by the online or telephone service and support team Damage due to servicing that is not authorized by Dell is not covered by your warranty Read and follow the safety instructions that came with the product CAUTION To avoid electrostatic discharge ground yourself by using a wrist grounding strap or by periodically touching an unpaint...

Страница 7: ... as the metal at the back of the computer While you work periodically touch an unpainted metal surface to dissipate static electricity which could harm internal components Turning off your computer CAUTION To avoid losing data save and close all open files and exit all open programs before you turn off your computer 1 Turning off your computer In Windows 10 using a touch enabled device or mouse 1 ...

Страница 8: ... batteries designed for other Dell computers 1 Connect any external devices such as a port replicator or media base and replace any cards such as an ExpressCard 2 Connect any telephone or network cables to your computer CAUTION To connect a network cable first plug the cable into the network device and then plug it into the computer 3 Replace the battery 4 Replace the base cover 5 Connect your com...

Страница 9: ...Small flat blade screwdriver Phillips 0 screwdriver Phillips 1 screwdriver Small plastic scribe Installing the Subscriber Identification Module SIM card 1 Follow the procedure in Before working inside your computer 2 Insert a paperclip or a SIM card removal tool into the pinhole to remove the SIM card tray 1 3 Place the SIM card on the SIM card tray 2 4 Push the SIM card tray into the slot until i...

Страница 10: ...fore working inside your computer 2 To remove the base cover a Loosen the screws that secure the base cover to the computer 1 b Lift the base cover from the edge and remove it from the computer 2 3 NOTE You may need a plastic scribe to lift the base cover from the edges Installing the base cover 1 Align the base cover with the screw holders on the computer 2 Press the edges of the cover until it c...

Страница 11: ...he connector on the battery 2 Route the battery cable through the routing channel on the battery NOTE This step is applicable only for a 4 cell battery 3 Insert the battery into the slot on the computer 4 Tighten the screws to secure the battery to the computer NOTE The number of screws will vary depending on the type of battery installed 5 Connect the battery cable to the connector on the system ...

Страница 12: ...d drive from the hard drive bracket 1 Follow the procedure in Before working inside your computer 2 Remove the a base cover b battery c hard drive assembly 3 Pull the hard drive cable to remove it from the connector 4 Remove the screws that secure the hard drive bracket to the hard drive 1 and lift the hard drive from the hard drive bracket 2 12 ...

Страница 13: ...er working inside your system Installing the hard drive assembly 1 Insert the hard drive assembly into the slot on the computer 2 Tighten the screws to secure the hard drive assembly to the computer 3 Connect the hard drive cable to the connector on the hard drive and on the system board 4 Install the a battery b base cover 5 Follow the procedures in After working inside your system Removing the o...

Страница 14: ... computer 3 Install the a battery b base cover 4 Follow the procedure in After working inside your computer Removing the optional PCIe SSD 1 Follow the procedure in Before working inside your computer 2 Remove the a base cover b battery 3 To remove the PCIe SSD a Remove the screws that secure the SSD bracket to the SSD 1 b Remove the SSD bracket 2 c Remove the SSD from the computer 3 d Remove the ...

Страница 15: ... in After working inside your computer Removing the memory module 1 Follow the procedure in Before working inside your computer 2 Remove the a base cover b battery 3 Pull the clips securing the memory module until the memory module pops up 1 4 Remove the memory module from the system board 2 Installing the memory module 1 Insert the memory module into the memory module socket until the clips secur...

Страница 16: ...ugh the routing channel 3 Connect the WLAN cables to the connectors on the WLAN Card 4 Place the metal bracket and tighten the screw to secure it to the computer 5 Install the a battery b base cover 6 Follow the procedure in After working inside your system Removing the WWAN card 1 Follow the procedure in Before working inside your computer 2 Remove the a base cover b battery 3 To remove the WWAN ...

Страница 17: ...r 6 Follow the procedure in After working inside your computer Removing the power connector port 1 Follow the procedure in Before working inside your computer 2 Remove the a base cover b battery c dock frame 3 To remove the power connector port a Remove the screw to release the metal bracket on the power connector port 1 b Lift the metal bracket from the computer 2 c Remove the power connector por...

Страница 18: ...er connector port cable through the routing channels 5 Connect the power connector port cable to the connector on the system board 6 Install the a dock frame b battery c base cover 7 Follow the procedure in After working inside your computer Removing the keyboard 1 Follow the procedure in Before working inside your computer 2 Remove the a base cover b battery 3 Disconnect the keyboard cables from ...

Страница 19: ...omputer 5 Installing the keyboard 1 Align the keyboard with the screw holders on the computer 2 Tighten the screws to secure the keyboard to the computer 3 Align the keyboard trim with the tabs on the computer and press it until it clicks into place 4 Connect the keyboard cables to the connectors on the system board 5 Install the a battery b base cover 6 Follow the procedure in After working insid...

Страница 20: ...move the screws that secure the display assembly to the computer 3 4 To disconnect display cable and remove the display assembly a Remove the screw that secures the display cable bracket to the computer 1 b Remove the display cable bracket to access the display cable 2 c Disconnect the display cable from the system board 3 d Release the antenna cables and display cable from the routing channel 4 e...

Страница 21: ...lace the display hinge bracket and tighten the screw to secure it to the computer 7 Install the a WLAN b WWAN c battery d base cover 8 Follow the procedure in After working inside your computer Removing the dock frame 1 Follow the procedure in Before working inside your computer 2 Remove the a base cover b battery c hard drive assembly or M 2 SSD or PCIe SSD d WLAN card e WWAN card 3 To remove the...

Страница 22: ...tep 5 is required only if the PCIe SSD card is removed 6 Tighten the screws to secure the dock frame to the computer 7 Install the a WWAN card b WLAN card c hard drive assembly or M 2 SSD or PCIe SSD d battery e base cover 8 Follow the procedure in After working inside your system Removing the optional SmartCard reader board 1 Follow the procedure in Before working inside your computer 2 Remove th...

Страница 23: ... hard drive assembly or M 2 SSD or PCIe SSD c battery d base cover 5 Follow the procedure in After working inside your computer Removing the optional finger print reader board 1 Follow the procedure in Before working inside your computer 2 Remove the a base cover b battery c hard drive assembly or M 2 SSD or PCIe SSD d dock frame e WLAN card f WWAN card 3 To remove the finger print reader board a ...

Страница 24: ...ve assembly or M 2 SSD or PCIe SSD b dock frame c WLAN card d WWAN card e battery f base cover 5 Follow the procedure in After working inside your system Removing the LED board 1 Follow the procedure in Before working inside your computer 2 Remove the a base cover b battery c hard drive assembly or M 2 SSD or PCIe SSD d dock frame 3 To remove the LED board a Disconnect the LED board cable from the...

Страница 25: ...battery d base cover 5 Follow the procedure in After working inside your computer Removing the heat sink assembly 1 Follow the procedure in Before working inside your computer 2 Remove the a base cover b battery c hard drive assembly or M 2 SSD or PCIe SSD d WLAN e WWAN f dock frame 3 To remove the heat sink a Disconnect the fan cable 1 b Remove the screws that secure the heat sink assembly to the...

Страница 26: ...WWAN c WLAN d hard drive assembly or M 2 SSD or PCIe SSD e battery f base cover 5 Follow the procedure in After working inside your computer Removing the coin cell battery 1 Follow the procedure in Before working inside your computer 2 Remove the a base cover b battery 3 To remove the coin cell battery a Disconnect the coin cell battery cable from the connector on the system board 1 b Lift the coi...

Страница 27: ...cedure in After working inside your computer Removing the speakers 1 Follow the procedure in Before working inside your computer 2 Remove the a base cover b battery c hard drive assembly or M 2 SSD or PCIe SSD d WWAN e WLAN f dock frame 3 To remove the speaker a Disconnect the speaker cable 1 b Lift the latch and disconnect the cable 2 3 c Remove the screw 4 d Lift the LED board 5 e Remove the spe...

Страница 28: ...embly or M 2 SSD or PCIe SSD e battery f base cover 7 Follow the procedure in After working inside your computer Removing the system board 1 Follow the procedure in Before working inside your computer 2 Remove the a base cover b battery c memory d hard drive assembly or M 2 SSD or PCIe SSD e keyboard f dock frame g WLAN h WWAN i heat sink assembly j power connector port 3 To remove the system boar...

Страница 29: ...uter 3 Connect the speaker cable to its connector on the system and route the cable through its routing channels 4 Connect the speaker power connector and coin cell battery cables to the connectors on the system board 5 Install the a power connector port b WLAN c heat sink assembly d WWAN e dock frame f hard drive assembly or M 2 SSD or PCIe SSD g keyboard h memory module i battery j base cover 6 ...

Страница 30: ...he boot menu options are Removable Drive if available STXXXX Drive NOTE XXX denotes the SATA drive number Optical Drive Diagnostics NOTE Choosing Diagnostics will display the ePSA diagnostics screen The boot sequence screen also displays the option to access the System Setup screen Navigation keys The following table displays the system setup navigation keys NOTE For most of the System Setup optio...

Страница 31: ...Turn on or restart your computer 2 After the white Dell logo appears press F2 immediately The System Setup page is displayed NOTE If you wait too long and the operating system logo appears wait until you see the desktop Then shut down or restart your computer and try again NOTE After the Dell logo appears you can also press F12 and then select BIOS setup General screen options This section lists t...

Страница 32: ...ows you the legacy option ROMs to load By default the Enable Legacy Option ROMs is disabled Date Time Allows you to change the date and time System Configuration screen options Option Description Integrated NIC Allows you to configure the integrated network controller The options are Disabled Enabled Enabled w PXE This option is enabled by default Parallel Port Allows you to configure the parallel...

Страница 33: ... If USB port is enabled device attached to this port is enabled and available for OS If USB port is disabled the OS cannot see any device attached to this port The options are Enable USB Boot Support by default enable Enable External USB Port by default enable USB PowerShare This field configures the USB PowerShare feature behavior This option allows you to charge external devices using the stored...

Страница 34: ...Protection enabled by default Enable Media Card Disable Media Card NOTE All devices are enabled by default Video screen options Option Description LCD Brightness Allows you to set the display brightness depending up on the power source On Battery and On AC NOTE The video setting will be visible only when a video card is installed into the system Security screen options Option Description Admin Pas...

Страница 35: ...ion to bypass the System and the Internal HDD password when they are set The options are Disabled Reboot bypass Default setting Disabled Password Change Allows you to enable the disable permission to the System and Hard Drive passwords when the admin password is set Default setting Allow Non Admin Password Changes is selected Non Admin Setup Changes Allows you to determine whether changes to the s...

Страница 36: ...Administrator password is set Default Setting Enable Admin Setup Lockout is not selected Secure Boot screen options Option Description Secure Boot Enable This option enables or disables the Secure Boot feature Disabled Enabled Default setting Enabled Expert Key Management Allows you to manipulate the security key databases only if the system is in Custom Mode The Enable Custom Mode option is disab...

Страница 37: ...ze The options are 32 MB 64 MB 128 MB Performance screen options Option Description Multi Core Support This field specifies whether the process has one or all cores enabled The performance of some applications improves with the additional cores This option is enabled by default Allows you to enable or disable multi core support for the processor The installed processor supports two cores If you en...

Страница 38: ...ake on AC is not selected Auto On Time Allows you to set the time at which the computer must turn on automatically The options are Disabled Every Day Weekdays Select Days Default setting Disabled USB Wake Support Allows you to enable USB devices to wake the system from Standby NOTE This feature is only functional when the AC power adapter is connected If the AC power adapter is removed during Stan...

Страница 39: ...tery This option allows you to use the docking station when AC power is absent but only when the battery is above a certain charge percentage The percentage may change per battery and per platform Dock Support on Battery Default setting Disabled Advanced Battery Charge Configuration This option enables you to maximize the battery health By enabling this option your system uses the standard chargin...

Страница 40: ...g this option has no effect Setup works in Fn Key Only mode Mouse Touchpad Allows you to define how the system handles mouse and touch pad input The options are Serial Mouse PS2 Mouse Touchpad PS 2 Mouse This option is enabled by default Numlock Enable Allows you to enable the Numlock option when the computer boots Enable Network This option is enabled by default Fn Key Emulation Allows you to set...

Страница 41: ...le Intel Virtualization Technology default VT for Direct I O Enables or disables the Virtual Machine Monitor VMM from utilizing the additional hardware capabilities provided by Intel Virtualization technology for direct I O Enable VT for Direct I O enabled by default Trusted Execution This option specifies whether a Measured Virtual Machine Monitor MVMM can utilize the additional hardware capabili...

Страница 42: ...ault BIOS Downgrade This controls flashing of the system firmware to previous revisions Data Wipe This field allows users to erase the data securely from all internal storage devices The following is list of devices affected Internal HDD Internal SDD Internal mSATA Internal eMMC BIOS Recovery This field allows you to recover from certain corrupted BIOS conditions from a recover file on the user pr...

Страница 43: ... update To do this for your product click Analyze System for Updates and follow the instructions on the screen 10 Select your preferred download method in the Please select your download method below window click Download File The File Download window appears 11 Click Save to save the file on your computer 12 Click Run to install the updated BIOS settings on your computer Follow the instructions o...

Страница 44: ... 5 Select Setup Password type your system password and press Enter or Tab A message prompts you to re type the setup password 6 Type the setup password that you entered earlier and click OK 7 Press Esc and a message prompts you to save the changes 8 Press Y to save the changes The computer reboots Deleting or changing an existing system and or setup password Ensure that the Password Status is Unlo...

Страница 45: ...s PC and devices PC Info Windows 7 click Start right click My Computer and then select Properties System specifications Feature Specification Chipset Intel 6th Generation processors DRAM bus width 64 bit Flash EPROM SPI 128 Mbits PCIe bus 100 MHz External Bus Frequency PCIe Gen3 8 GT s Processor specifications Feature Specification Types Intel Core i5 series or i7 series L3 cache i5 series non Vpr...

Страница 46: ...through HDMI up to 7 1 compressed and uncompressed audio Internal interface High definition audio codec External interface Stereo headset mic combo Speakers Two Internal speaker amplifier 2 W RMS per channel Volume controls Hot keys Video specifications Feature Specification Type Integrated on system board hardware accelerated UMA controller i3 i5 i7 Intel HD Graphics 520 dual core i3 i5 i7 Intel ...

Страница 47: ...ation Network adapter 10 100 1000 Mb s Ethernet RJ 45 Wireless Internal wireless local area network WLAN wireless wide area network WWAN wireless gigabit WiGig NOTE WWAN and WiGig is optional Bluetooth 4 1 Port and connector specifications Feature Specification Audio Stereo headset mic combo Video One 19 pin HDMI connector 15 pin VGA connector Network adapter One RJ 45 connector USB Three USB3 0 O...

Страница 48: ...n touch FHD anti glare Touch FHD Corning Gorilla NBT HD anti glare Height 360 mm 14 17 inches Width 224 3 mm 8 83 inches Diagonal 396 24 mm 15 6 inches Active area X Y Maximum resolution Non touch FHD anti glare 1366 x 768 Touch FHD 1920 x 1080 HD 1366 1388 x 768 Maximum brightness Non touch FHD anti glare 200 nits Touch FHD 270 nits HD Refresh rate Non Touch FHD anti glare 60 Hz Touch FHD 60 Hz 4...

Страница 49: ...lare 10 30 Vertical touch FHD 80 80 Vertical HD Pixel pitch non touch FHD anti glare 0 202 x 0 202 Pixel pitch touch FHD 0 144 x 0 144 Pixel pitch HD Keyboard specifications Feature Specification Number of keys United States 82 keys United Kingdom 83 keys Japan 86 keys Touchpad specifications Feature Specification Active Area X axis 99 50 mm Y axis 53 00 mm 49 ...

Страница 50: ...e Operating Charge 0 C to 50 C Discharge 0 C to 70 C Operating 0 C to 35 C 32 F to 95 F Non operating 40 C to 65 C 40 F to 149 F Coin cell battery 3 V CR2032 lithium coin cell AC Adapter specifications Feature Specification Type 65 W Input voltage 100 V AC to 240 V AC Input current maximum 1 5 A Input frequency 50 Hz to 60 Hz Output current 3 34 A Rated output voltage 19 5 1 0 V DC Temperature ran...

Страница 51: ...nches Weight 3 31 lb 1 5 kg Environmental specifications Temperature Specifications Operating 0 C to 35 C 32 F to 95 F Storage 40 C to 65 C 40 F to 149 F Relative humidity maximum Specifications Operating 10 to 90 non condensing Storage 5 to 95 non condensing Altitude maximum Specifications Operating 0 m to 3048 m 0 ft to 10 000 ft Non operating 0 m to 10 668 m 0 ft to 35 000 ft Airborne contamina...

Страница 52: ...ion about the failed device s View status messages that inform you if tests are completed successfully View error messages that inform you of problems encountered during testing CAUTION Use the system diagnostics to test only your computer Using this program with other computers may cause invalid results or error messages NOTE Some tests for specific devices require user interaction Always ensure ...

Страница 53: ...t Turns on when you turn on the computer and blinks when the computer is in a power management mode Hard drive status light Turns on when the computer reads or writes data Battery charge indicator Turns on steadily or blinks to indicate battery charge status NOTE Refer to the following table for Battery charge LED indicator codes WiFi indicator Turns on when wireless networking is enabled The devi...

Страница 54: ...re the next cycle starts again at the interval of 1 5 seconds This is in White color For Example No Memory detected 2 3 Battery LED blinks two times of amber color followed by a pause and then blinks three times of white color The Battery LED will pause for 3 seconds before the next cycle repeat itself again Battery status lights If the computer is connected to an electrical outlet the battery lig...

Страница 55: ...upport and service options Availability varies by country and product and some services may not be available in your area To contact Dell for sales technical support or customer service issues 1 Go to Dell com support 2 Select your support category 3 Verify your country or region in the Choose a Country Region drop down list at the bottom of the page 4 Select the appropriate service or support lin...

Отзывы: