background image

Steps

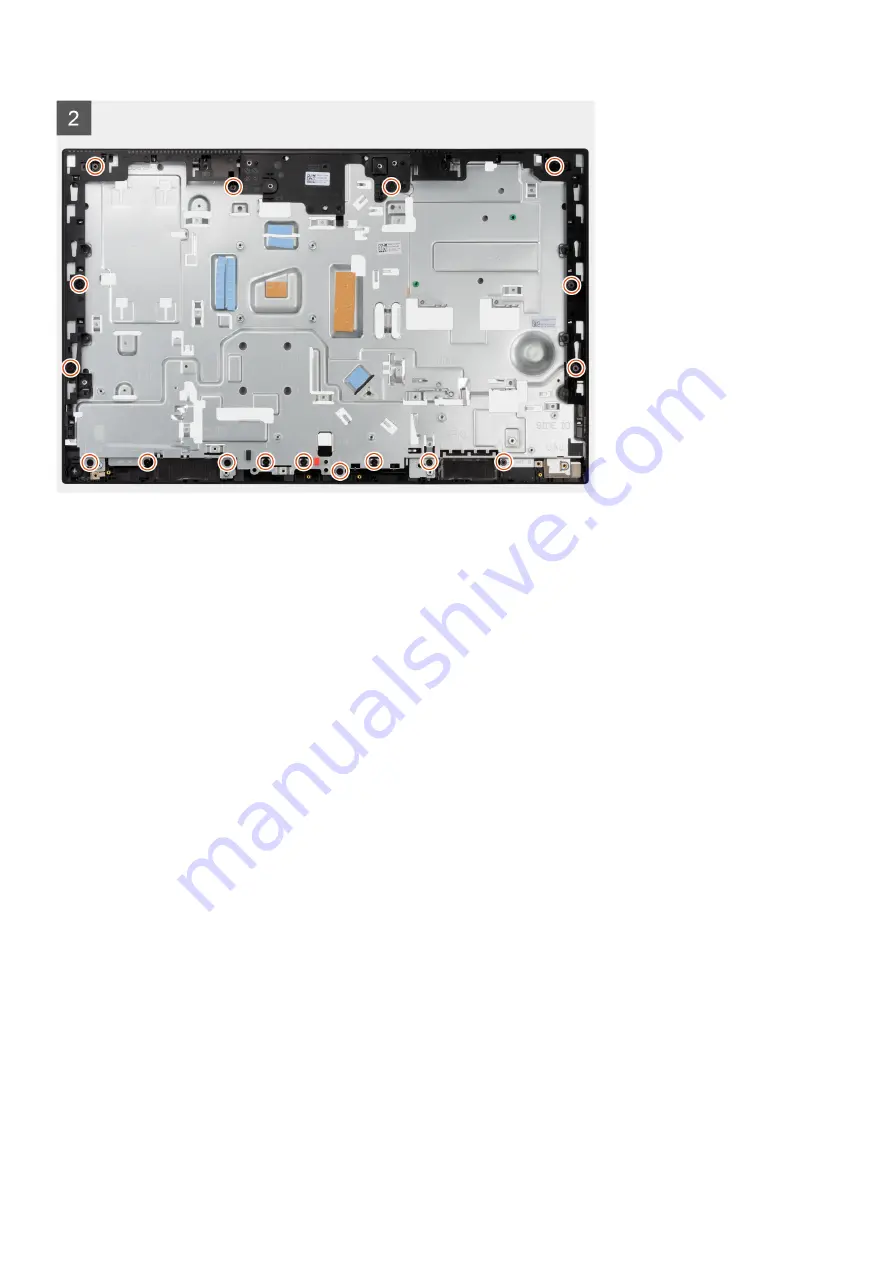
1. Slide and align the middle frame to the slots on the display-assembly base, then snap the middle frame into place on the

display-assembly base.

2. Replace the 17 screws (M3x5) to secure the middle frame to the display-assembly base.

Next steps

1. Install the 

display panel

.

2. Install the 

antenna modules

.

3. Install the 

side-I/O board

.

4. Install the 

PSU fan

.

5. Install the 

PSU

.

6. Install the 

microphones

.

7. Install the 

power-button board

.

8. Install the 

system board

.

9. Install the 

camera assembly

.

10. Install the 

speakers

.

11. Install the 

rear-I/O bracket

.

12. Install the 

bottom cover

.

13. Install the 

wireless card

.

14. Install the 

hard drive

.

15. Install the 

system-board shield

.

16. Install the 

back cover

.

17. Install the 

cable cover

 (optional).

18. Install the 

stand

.

19. Follow the procedure in 

After working inside your computer

.

86

Removing and installing components

Содержание Latitude 5490

Страница 1: ...OptiPlex 5490 All In One Service Manual Regulatory Model W26C Regulatory Type W26C003 W26C004 August 2021 Rev A01 ...

Страница 2: ...ential damage to hardware or loss of data and tells you how to avoid the problem WARNING A WARNING indicates a potential for property damage personal injury or death 2021 Dell Inc or its subsidiaries All rights reserved Dell EMC and other trademarks are trademarks of Dell Inc or its subsidiaries Other trademarks may be trademarks of their respective owners ...

Страница 3: ...ng the cable cover 17 Installing the cable cover 19 Back cover 20 Removing the back cover 20 Installing the back cover 22 Hard drive 24 Removing the hard drive 24 Installing the hard drive 25 Memory modules 26 Removing the memory modules 26 Installing the memory modules 27 System board shield 28 Removing the system board shield 28 Installing the system board shield 28 Solid state drive 29 Removing...

Страница 4: ...ving the processor 54 Installing the processor 55 Rear I O bracket 57 Removing the rear I O bracket 57 Installing the rear I O bracket 58 System board 59 Removing the system board 59 Installing the system board 61 Speakers 64 Removing the speakers 64 Installing the speakers 65 Power button board 66 Removing the power button board 66 Installing the power button board 67 Microphones 68 Removing the ...

Страница 5: ...in Windows 98 Updating the BIOS from the F12 One Time boot menu 98 System and setup password 99 Assigning a system setup password 99 Deleting or changing an existing system setup password 100 Clearing CMOS settings 100 Clearing BIOS System Setup and System passwords 100 Chapter 5 Troubleshooting 101 Display built in self test 101 SupportAssist diagnostics 101 Running the SupportAssist Pre Boot Sys...

Страница 6: ...oduct or at www dell com regulatory_compliance CAUTION Before touching anything inside your computer ground yourself by touching an unpainted metal surface such as the metal at the back of the computer While you work periodically touch an unpainted metal surface to dissipate static electricity which could harm internal components CAUTION When you disconnect a cable pull it by its connector or its ...

Страница 7: ... Standby power Dell products with standby power must be unplugged before you open the case Systems that incorporate standby power are essentially powered while turned off The internal power enables the system to be remotely turned on wake on LAN and suspended into a sleep mode and has other advanced power management features Unplugging pressing and holding the power button for 20 seconds should di...

Страница 8: ...re can be either directly connected between your wrist and bare metal on the hardware if the ESD mat is not required or connected to the anti static mat to protect hardware that is temporarily placed on the mat The physical connection of the wrist strap and bonding wire between your skin the ESD mat and the hardware is known as bonding Use only Field Service kits with a wrist strap mat and bonding...

Страница 9: ...o the following guidelines when lifting heavy weight equipment CAUTION Do not lift greater than 50 pounds Always obtain additional resources or use a mechanical lifting device 1 Get a firm balanced footing Keep your feet apart for a stable base and point your toes out 2 Tighten stomach muscles Abdominal muscles support your spine when you lift offsetting the force of the load 3 Lift with your legs...

Страница 10: ...rocessor Rear I O bracket System board Speakers Power button board Microphones Side I O board Audio board Antenna modules Display panel Middle frame Recommended tools The procedures in this document may require the following tools Phillips screwdriver 0 Phillips screwdriver 1 Phillips screwdriver 2 Plastic scribe Screw list NOTE When removing screws from a component it is recommended to note the s...

Страница 11: ...able cover optional M3x9 1 System board shield M3x5 5 Bottom cover M3x5 4 M 2 2230 solid state drive M2x2 5 1 M 2 2280 solid state drive M2x2 5 1 System fan M3x5 3 Wireless card shield M2x2 5 2 Wireless card M2x2 5 1 Camera assembly M3x5 2 Camera door M3x5 2 Heat sink UMA Captive screws 5 Heat sink Discrete Captive screws 9 Power supply unit PSU M3x5 2 PSU fan M3x5 2 Rear I O bracket M3x5 4 System...

Страница 12: ...ent Screw type Quantity Screw image Power button board M3x5 1 Microphones M2x2 5 4 Side I O board shield M3x5 2 Side I O board M2 5x3 5 2 Antenna modules M2x2 5 2 Display panel M3x5 12 Middle frame M3x5 17 Audio board M3x5 1 12 Removing and installing components ...

Страница 13: ...2230 2280 solid state drive 8 Rear I O bracket 9 Side I O board 10 Speakers 11 Audio board 12 Display panel 13 Display assembly base 14 Middle frame 15 Camera assembly door 16 Power supply unit PSU 17 System board 18 System board shield 19 Camera assembly 20 Wireless card 21 PSU fan Removing and installing components 13 ...

Страница 14: ...s recommends removing the stand to avoid accidental damage to the system display during servicing About this task The following image provides a visual representation of the fixed stand removal procedure Steps 1 Press and slide the release button up 2 Hold the button in the release position and lift the stand upward 3 Slide the stand downward to lift the stand off the back cover 14 Removing and in...

Страница 15: ...slots on the monitor until you hear a click Next steps 1 Follow the procedure in After working inside your computer Removing the height adjustable stand Prerequisites NOTE Follow the same procedure to remove the Height Adjustable Stand with Optical Disk Drive 1 Follow the procedure in Before working inside your computer CAUTION When servicing the system place it on an elevated clean and flat surfa...

Страница 16: ...ard to lift the stand off the back cover Installing the height adjustable stand Prerequisites If you are replacing a component remove the existing component before performing the installation procedure NOTE Follow the same procedure to install the Height Adjustable Stand with Optical Disk Drive About this task The following image provides a visual representation of the height adjustable stand inst...

Страница 17: ...le cover Prerequisites 1 Follow the procedure in Before working inside your computer CAUTION When servicing the system place it on an elevated clean and flat surface It is recommended to remove the stand to avoid accidental damage to the system display during servicing 2 Remove the stand About this task The following image provides a visual representation of the cable cover removal procedure Remov...

Страница 18: ...route the power cable from the slots on the cable cover 2 Remove the screw M3x5 that secures the cable cover to the bottom cover 3 Lift the cable cover from the bottom cover 18 Removing and installing components ...

Страница 19: ...are replacing a component remove the existing component before performing the installation procedure About this task The following image provides a visual representation of the cable cover installation procedure Removing and installing components 19 ...

Страница 20: ...r computer Back cover Removing the back cover Prerequisites 1 Follow the procedure in Before working inside your computer CAUTION When servicing the system place it on an elevated clean and flat surface It is recommended to remove the stand to avoid accidental damage to the system display during servicing 2 Remove the stand 3 Remove the cable cover optional About this task The following image prov...

Страница 21: ...ack cover to release it from the latch on the system board shield 2 Slide the back cover up to release the tabs on the cover from the slots on the middle frame 3 Lift the back cover and remove it from the system Removing and installing components 21 ...

Страница 22: ...are replacing a component remove the existing component before performing the installation procedure About this task The following image provides a visual representation of the back cover installation procedure 22 Removing and installing components ...

Страница 23: ...m board shield and align the tabs on the back cover with the slots on the middle frame 2 Slide the back cover to lock the release tab under the latch on the system board shield Next steps 1 Install the cable cover optional Removing and installing components 23 ...

Страница 24: ...uisites 1 Follow the procedure in Before working inside your computer 2 Remove the stand 3 Remove the cable cover optional 4 Remove the back cover About this task The following image indicates the location of the hard drive and provides a visual representation of the removal procedure 24 Removing and installing components ...

Страница 25: ...om its slots on the hard drive 4 Remove the hard drive from the hard drive bracket Installing the hard drive Prerequisites If you are replacing a component remove the existing component before performing the installation procedure About this task The following image indicates the location of the hard drive and provides a visual representation of the installation procedure Removing and installing c...

Страница 26: ...rking inside your computer Memory modules Removing the memory modules Prerequisites 1 Follow the procedure in Before working inside your computer 2 Remove the stand 3 Remove the cable cover optional 4 Remove the back cover About this task The following image indicates the location of the memory modules and provides a visual representation of the removal procedure Steps 1 Pry and remove the DIMM do...

Страница 27: ...emory module with the tab on the memory module slot 2 Slide the memory module firmly into the slot at an angle and press the memory module down until it clicks into place NOTE If you do not hear the click remove the memory module and reinstall it NOTE Repeat step 1 and 2 if there are two memory modules 3 Align the tabs on the DIMM door with the slots on the system board shield and snap into place ...

Страница 28: ...e location of the system board shield and provides a visual representation of the removal procedure Steps 1 Remove the five screws M3x5 that secure the system board shield to the display assembly base 2 Lift the system board shield off the display assembly base Installing the system board shield Prerequisites If you are replacing a component remove the existing component before performing the inst...

Страница 29: ...ve screws M3x5 to secure the system board shield to the display assembly base Next steps 1 Install the back cover 2 Install the cable cover optional 3 Install the stand 4 Follow the procedure in After working inside your computer Solid state drive Removing the M 2 2230 solid state drive Prerequisites 1 Follow the procedure in Before working inside your computer 2 Remove the stand 3 Remove the cabl...

Страница 30: ...state drive from the M 2 card slot on the system board Installing the M 2 2230 solid state drive Prerequisites CAUTION Solid state drives are fragile Exercise care when handling the solid state drive If you are replacing a component remove the existing component before performing the installation procedure About this task The following image indicates the location of the M 2 2230 solid state drive...

Страница 31: ...cable cover optional 4 Install the stand 5 Follow the procedure in After working inside your computer Removing the M 2 2280 solid state drive Prerequisites 1 Follow the procedure in Before working inside your computer 2 Remove the stand 3 Remove the cable cover optional 4 Remove the back cover 5 Remove the system board shield About this task The following image indicates the location of the M 2 22...

Страница 32: ...ve Prerequisites CAUTION Solid state drives are fragile Exercise care when handling the solid state drive If you are replacing a component remove the existing component before performing the installation procedure About this task The following image indicates the location of the M 2 2280 solid state drive and provides a visual representation of the installation procedure 32 Removing and installing...

Страница 33: ...nstall the cable cover optional 4 Install the stand 5 Follow the procedure in After working inside your computer System fan Removing the system fan Prerequisites 1 Follow the procedure in Before working inside your computer 2 Remove the stand 3 Remove the cable cover optional 4 Remove the back cover 5 Remove the system board shield About this task The following image indicates the location of the ...

Страница 34: ...g with its cable off the display assembly base Installing the system fan Prerequisites If you are replacing a component remove the existing component before performing the installation procedure About this task The following image indicates the location of the system fan and provides a visual representation of the installation procedure 34 Removing and installing components ...

Страница 35: ...computer Coin cell battery Removing the coin cell battery Prerequisites 1 Follow the procedure in Before working inside your computer 2 Remove the stand 3 Remove the cable cover optional 4 Remove the back cover 5 Remove the system board shield NOTE Removing the coin cell battery resets the CMOS and BIOS settings to default and results in data lose It is recommended that you note the CMOS and BIOS ...

Страница 36: ...in cell battery holder Installing the coin cell battery Prerequisites If you are replacing a component remove the existing component before performing the installation procedure About this task The following image indicates the location of the coin cell battery and provides a visual representation of the installation procedure 36 Removing and installing components ...

Страница 37: ...ll the stand 5 Follow the procedure in After working inside your computer Wireless card Removing the wireless card Prerequisites 1 Follow the procedure in Before working inside your computer 2 Remove the stand 3 Remove the cable cover optional 4 Remove the back cover 5 Remove the system board shield About this task The following image indicates the location of the wireless card and provides a visu...

Страница 38: ...off the wireless card 6 Disconnect the antenna cables from the wireless card 7 Slide and remove the wireless card from the wireless card slot Installing the wireless card Prerequisites If you are replacing a component remove the existing component before performing the installation procedure CAUTION To avoid damage to the wireless card route the antenna cables accurately About this task The follow...

Страница 39: ...reless card slot 4 Slide the wireless card at an angle into the wireless card slot 5 Replace the screw M2x2 5 to secure the wireless card and wireless card bracket to the display assembly base 6 Align and place the wireless card shield on the system board and wireless card 7 Replace the two screws M2x2 5 to secure the wireless card shield to the system board 8 Route the antenna cables through the ...

Страница 40: ...cedure in Before working inside your computer 2 Remove the stand 3 Remove the cable cover optional 4 Remove the back cover 5 Remove the system board shield About this task The following image indicates the location of the camera assembly and provides a visual representation of the removal procedure 40 Removing and installing components ...

Страница 41: ...ame 5 Unroute the camera cable from the routing guides on the display assembly base Installing the camera assembly Prerequisites If you are replacing a component remove the existing component before performing the installation procedure About this task The following image indicates the location of the camera assembly and provides a visual representation of the installation procedure Steps 1 Route ...

Страница 42: ...o the display assembly base Next steps 1 Install the system board shield 2 Install the back cover 3 Install the cable cover optional 4 Install the stand 5 Follow the procedure in After working inside your computer Bottom cover Removing the bottom cover Prerequisites 1 Follow the procedure in Before working inside your computer 2 Remove the stand 3 Remove the cable cover optional 4 Remove the back ...

Страница 43: ...sembly base Installing the bottom cover Prerequisites If you are replacing a component remove the existing component before performing the installation procedure About this task The following image indicates the location of the bottom cover and provides a visual representation of the installation procedure Removing and installing components 43 ...

Страница 44: ... stand 5 Follow the procedure in After working inside your computer Power supply unit Removing the power supply unit PSU Prerequisites 1 Follow the procedure in Before working inside your computer 2 Remove the stand 3 Remove the cable cover optional 4 Remove the back cover 5 Remove the system board shield 6 Remove the bottom cover About this task The following image indicates the location of the P...

Страница 45: ...Removing and installing components 45 ...

Страница 46: ...rom the connector on the system board 5 Remove the screw M3x5 that secures the PSU to the display assembly base 6 Lift the PSU out of the system Installing the power supply unit PSU Prerequisites If you are replacing a component remove the existing component before performing the installation procedure About this task The following image indicates the location of the PSU and provides a visual repr...

Страница 47: ...Removing and installing components 47 ...

Страница 48: ...e the power supply socket to the rear I O bracket Next steps 1 Install the bottom cover 2 Install the system board shield 3 Install the back cover 4 Install the cable cover optional 5 Install the stand 6 Follow the procedure in After working inside your computer Power supply fan Removing the PSU fan Prerequisites 1 Follow the procedure in Before working inside your computer 2 Remove the stand 3 Re...

Страница 49: ...splay assembly base 4 Lift the PSU fan from the display assembly base Installing the PSU fan Prerequisites If you are replacing a component remove the existing component before performing the installation procedure About this task The following image indicates the location of the PSU fan and provides a visual representation of the installation procedure Removing and installing components 49 ...

Страница 50: ... PSU fan Next steps 1 Install the bottom cover 2 Install the system board shield 3 Install the back cover 4 Install the cable cover optional 5 Install the stand 6 Follow the procedure in After working inside your computer Heat sink Removing the heat sink UMA Prerequisites 1 Follow the procedure in Before working inside your computer 2 Remove the stand 3 Remove the cable cover optional 4 Remove the...

Страница 51: ...heat sink off the system board and display assembly base Installing the heat sink UMA Prerequisites If you are replacing a component remove the existing component before performing the installation procedure NOTE If either the system board or the heat sink is replaced use the thermal pad paste provided in the kit to ensure that thermal conductivity is achieved About this task The following image i...

Страница 52: ...eps 1 Install the system fan 2 Install the system board shield 3 Install the back cover 4 Install the cable cover optional 5 Install the stand 6 Follow the procedure in After working inside your computer Removing the heat sink discrete Prerequisites 1 Follow the procedure in Before working inside your computer 2 Remove the stand 3 Remove the cable cover optional 4 Remove the back cover 5 Remove th...

Страница 53: ...nk off the system board and display assembly base Installing the heat sink discrete Prerequisites If you are replacing a component remove the existing component before performing the installation procedure NOTE If either the system board or the heat sink is replaced use the thermal pad paste provided in the kit to ensure that thermal conductivity is achieved About this task The following image ind...

Страница 54: ...se Next steps 1 Install the system fan 2 Install the system board shield 3 Install the back cover 4 Install the cable cover optional 5 Install the stand 6 Follow the procedure in After working inside your computer Processor Removing the processor Prerequisites 1 Follow the procedure in Before working inside your computer 2 Remove the stand 3 Remove the cable cover optional 4 Remove the back cover ...

Страница 55: ...essor cover CAUTION When removing the processor do not touch any of the pins inside the socket or allow any objects to fall on the pins in the socket 3 Gently lift the processor from the processor socket Installing the processor Prerequisites If you are replacing a component remove the existing component before performing the installation procedure About this task The following image indicates the...

Страница 56: ...eated properly 2 Align the notches on the processor with the tabs on the processor socket and place the processor in the processor socket CAUTION Ensure that the processor cover notch is positioned underneath the alignment post 3 When the processor is fully seated in the socket pivot the release lever down and place it under the tab on the processor cover Next steps 1 Install the heat sink 2 Insta...

Страница 57: ... of the rear I O bracket and provides a visual representation of the removal procedure Steps 1 Remove the screw M3x5 that secures the power supply socket to the rear I O bracket 2 Remove the power supply cable from the routing guide on the rear I O bracket 3 Slide and remove the power supply socket away from the rear I O bracket 4 Remove the three screws M3x5 that secure the rear I O bracket to th...

Страница 58: ...screws M3x5 to secure the rear I O bracket to the display assembly base 3 Route the power supply cables through the routing guide on the rear I O bracket 4 Align the screw hole on the power supply socket with the screw hole on the rear I O bracket and place it in the slot on the rear I O bracket 5 Replace the screw M3x5 to secure the power supply socket to the rear I O bracket Next steps 1 Install...

Страница 59: ...the appropriate changes again after you replace the system board 2 Remove the stand 3 Remove the cable cover optional 4 Remove the back cover 5 Remove the hard drive 6 Remove the system board shield 7 Remove the memory modules 8 Remove the wireless card 9 Remove the M 2 2230 solid state drive 10 Remove the M 2 2280 solid state drive 11 Remove the heat sink 12 Remove the processor 13 Remove the coi...

Страница 60: ...able connector 10 Side I O power cable connector 11 Audio board cable connector 12 Microphone module cable connector 13 Speaker cable connector 14 Power button cable connector 15 Display cable connector 16 M 2 WLAN connector 17 PSU fan cable connector 18 Touchscreen cable connector 19 Processor The following image indicates the location of the system board and provides a visual representation of t...

Страница 61: ...system board 9 Disconnect the SIO power cable from the connector on the system board 10 Disconnect the audio board cable from the connector on the system board 11 Disconnect the system fan cable from the connector on the system board 12 Disconnect the touchscreen cable from the connector on the system board 13 Disconnect the camera cable from the connector on the system board 14 Remove the nine sc...

Страница 62: ...le connector 10 SIO power cable connector 11 Audio board cable connector 12 Microphone module cable connector 13 Speaker cable connector 14 Power button cable connector 15 Display cable connector 16 M 2 WLAN connector 17 PSU fan cable connector 18 Touchscreen cable connector 19 Processor The following image indicates the location of the system board and provides a visual representation of the inst...

Страница 63: ...gn the screw holes on the system board with the screw holes on the display assembly base 2 Replace the nine screws M3x5 to secure the system board to the display assembly base Removing and installing components 63 ...

Страница 64: ...n a closed position Next steps 1 Install the rear I O bracket 2 Install the bottom cover 3 Install the coin cell battery 4 Install the processor 5 Install the heat sink 6 Install the M 2 2280 solid state drive 7 Install the M 2 2230 solid state drive 8 Install the wireless card 9 Install the memory modules 10 Install the system board shield 11 Install the hard drive 12 Install the back cover 13 In...

Страница 65: ...assembly base 3 Remove the speaker cable from the routing guides on the display assembly base 4 Lift the speakers along with the cable off the display assembly base Installing the speakers Prerequisites If you are replacing a component remove the existing component before performing the installation procedure About this task The following image indicates the location of the speakers and provides a...

Страница 66: ... system board Next steps 1 Install the rear I O bracket 2 Install the bottom cover 3 Install the system board shield 4 Install the back cover 5 Install the cable cover optional 6 Install the stand 7 Follow the procedure in After working inside your computer Power button board Removing the power button board Prerequisites 1 Follow the procedure in Before working inside your computer 2 Remove the st...

Страница 67: ...le from the connector on the system board 2 Remove the screw M3x5 that secures the power button board to the middle frame 3 Lift the power button board away from the middle frame Installing the power button board Prerequisites If you are replacing a component remove the existing component before performing the installation procedure About this task The following image indicates the location of the...

Страница 68: ...peakers 2 Install the rear I O bracket 3 Install the bottom cover 4 Install the system board shield 5 Install the back cover 6 Install the cable cover optional 7 Install the stand 8 Follow the procedure in After working inside your computer Microphones Removing the microphones Prerequisites 1 Follow the procedure in Before working inside your computer 2 Remove the stand 3 Remove the cable cover op...

Страница 69: ...ides on the display assembly base 2 Remove the two screws M2x2 5 that secure the microphone modules to the middle frame 3 Lift the microphone modules off the slots on the middle frame Installing the microphones Prerequisites If you are replacing a component remove the existing component before performing the installation procedure About this task The following image indicates the location of the m...

Страница 70: ...stem board Next steps 1 Install the speakers 2 Install the rear I O bracket 3 Install the bottom cover 4 Install the system board shield 5 Install the back cover 6 Install the cable cover optional 7 Install the stand 8 Follow the procedure in After working inside your computer Side I O board Removing the side I O board Prerequisites 1 Follow the procedure in Before working inside your computer 2 R...

Страница 71: ...ield to the display assembly base 2 Lift and remove the side I O board shield off the side I O board 3 Disconnect the SIO signal cable SIO power cable and audio board cable from the system board 4 Remove the SIO signal cable SIO power cable and audio board cable from the routing guides on the display assembly base 5 Remove the two screws M2 5x3 5 that secure the side I O board to the display assem...

Страница 72: ... display assembly base 2 Replace the two screws M2 5x3 5 to secure the side I O board to the display assembly base 3 Route the SIO signal cable SIO power cable and audio board cable through the routing guides on the display assembly base 4 Connect the SIO signal cable SIO power cable and audio board cable to the connectors on the system board 5 Align the screw holes on the side I O board shield wi...

Страница 73: ...e cable cover optional 4 Remove the back cover 5 Remove the system board shield 6 Remove the wireless card 7 Remove the bottom cover 8 Remove the rear I O bracket 9 Remove the speakers 10 Remove the side I O board About this task The following image indicates the location of the audio board and provides a visual representation of the installation procedure Steps 1 Disconnect the audio board cable ...

Страница 74: ...udio board to the display assembly base 3 Connect the audio board cable to the system board Next steps 1 Install the side I O board 2 Install the speakers 3 Install the rear I O bracket 4 Install the bottom cover 5 Install the wireless card 6 Install the system board shield 7 Install the back cover 8 Install the cable cover optional 9 Install the stand 10 Follow the procedure in After working insi...

Страница 75: ...card 7 Remove the bottom cover 8 Remove the rear I O bracket 9 Remove the speakers About this task The following image indicates the location of the antenna modules and provides a visual representation removal procedure of the antenna modules Removing and installing components 75 ...

Страница 76: ...cables to the middle frame 4 Lift the antenna modules off the middle frame Installing the antenna modules Prerequisites If you are replacing a component remove the existing component before performing the installation procedure About this task The following image indicates the location of the antenna modules and provides a visual representation of the antenna modules installation procedure 76 Remo...

Страница 77: ...2 Adhere the copper foil that secures the antenna cables to the middle frame 3 Replace the two screws M2x2 5 to secure the antenna modules to the middle frame 4 Route the antenna cables through the routing guides on the display assembly base Removing and installing components 77 ...

Страница 78: ...ow the procedure in Before working inside your computer 2 Remove the stand 3 Remove the cable cover optional 4 Remove the back cover 5 Remove the system board shield 6 Remove the hard drive 7 Remove the bottom cover 8 Remove the rear I O bracket 9 Remove the speakers 10 Remove the camera assembly 11 Remove the system board 12 Remove the PSU 13 Remove the PSU fan About this task The following image...

Страница 79: ...ecure the display panel to the middle frame and display assembly base 2 Unroute the display back light cable from the routing guides on the display assembly base 3 Place the system in an upright position Removing and installing components 79 ...

Страница 80: ...isplay panel up from the middle frame and display assembly base Installing the display panel Prerequisites If you are replacing a component remove the existing component before performing the installation procedure About this task The following image indicates the location of the display panel and provides a visual representation of the display panel installation procedure 80 Removing and installi...

Страница 81: ...eplace the nine screws M3x5 to secure the display panel to the middle frame and display assembly base 5 Remove the three jig screws from the display panel and replace with three screws M3x5 to secure the display panel to the middle frame and display assembly base NOTE The jig screw is shipped with the replacement display panel It is used to align the display panel to the display assembly base Tabl...

Страница 82: ...g screws Non touch display Three 6 Route the display back light cable in the routing guides on the display assembly base Next steps 1 Install the PSU fan 2 Install the PSU 3 Install the system board 4 Install the camera assembly 82 Removing and installing components ...

Страница 83: ...e cover optional 4 Remove the back cover 5 Remove the system board shield 6 Remove the hard drive 7 Remove the wireless card 8 Remove the bottom cover 9 Remove the rear I O bracket 10 Remove the speakers 11 Remove the camera assembly 12 Remove the system board 13 Remove the power button board 14 Remove the microphones 15 Remove the PSU 16 Remove the PSU fan 17 Remove the side I O board 18 Remove t...

Страница 84: ... 1 Remove the 17 screws M3x5 that secure the middle frame to the display assembly base 2 Remove the middle frame and lift the middle frame off the display assembly base 84 Removing and installing components ...

Страница 85: ...nt remove the existing component before performing the installation procedure About this task The following image indicates the location of the middle frame and provides a visual representation of the middle frame installation procedure Removing and installing components 85 ...

Страница 86: ... I O board 4 Install the PSU fan 5 Install the PSU 6 Install the microphones 7 Install the power button board 8 Install the system board 9 Install the camera assembly 10 Install the speakers 11 Install the rear I O bracket 12 Install the bottom cover 13 Install the wireless card 14 Install the hard drive 15 Install the system board shield 16 Install the back cover 17 Install the cable cover option...

Страница 87: ...rivers and downloads When troubleshooting downloading or installing drivers it is recommended that you read the Dell Knowledge Based article Drivers and Downloads FAQ 000123347 3 Drivers and downloads 87 ...

Страница 88: ... setup options Updating the BIOS System and setup password Clearing CMOS settings Clearing BIOS System Setup and System passwords BIOS overview The BIOS manages data flow between the computer s operating system and attached devices such as hard disk video adapter keyboard mouse and printer Entering BIOS setup program About this task Turn on or restart your computer and press F2 immediately Boot Se...

Страница 89: ...ice Tag of the computer Asset Tag Displays the Asset Tag of the computer Manufacture Date Displays the manufacture date of the computer Ownership Date Displays the ownership date of the computer Express Service Code Displays the express service code of the computer Ownership Tag Displays the Ownership Tag of the computer Signed Firmware Update Displays whether the Signed Firmware Update is enabled...

Страница 90: ... Bluetooth Device Displays the Bluetooth device information of the computer LOM MAC Address Displays the LAN On Motherboard LOM MAC address of the computer Slot 1 Displays the M 2 network information of the computer SATA 0 Displays the SATA hard drive information of the computer Slot 2_M 2 Displays the M 2 PCIe SSD information of the computer Slot 3_M 2 Displays the M 2 PCIe SSD information of the...

Страница 91: ...orage SATA Operation Enable or disable the operating mode of the integrated SATA hard drive controller By default the RAID On option is enabled Storage Interface Port Enablement Enable or disable the onboard drives By default SATA HDD M 2 PCIe SSD 0 and M 2 PCIe SSD 1 options are enabled SMART Reporting Enable SMART Reporting Enable or disable Self Monitoring Analysis and Reporting Technology SMAR...

Страница 92: ...e the internal WLAN device By default the option enabled Bluetooth Enable or disable the internal Bluetooth device By default the option enabled Enable UEFI Network Stack Enable or disable UEFI Network Stack and controls the on board LAN Controller By default the option is enabled HTTPs Boot Feature HTTPs Boot Enable or disable the HTTPs Boot feature By default the HTTPs Boot option is enabled HTT...

Страница 93: ...vailable to the operating system By default the Attestation Enable option is enabled Key Storage Enable Enables to control whether the Trusted Platform Module TPM Storage Hierarchy is available to the operating system By default the Key Storage Enable option is enabled SHA 256 BIOS and the TPM will use the SHA 256 hash algorithm to extend measurements into the TPM PCRs during BIOS boot By default ...

Страница 94: ...n is disabled Special Character Reinforces password must have at least one special character By default the option is disabled Minimum Characters Set the minimum characters allowed for password Password Bypass When enabled this always prompts for computer and internal hard drive passwords when powered on from the off state By default the Disabled option is enabled Password Changes Enable Non Admin...

Страница 95: ...o OS Recovery Threshold Controls the automatic boot flow for SupportAssist System Resolution Console and for Dell OS Recovery Tool By default the threshold value is set to 2 Table 14 System setup options System Management menu System Management Service Tag Display the Service Tag of the computer Asset Tag Create a computer Asset Tag Wake on LAN WLAN Enable or disable the computer to power on by sp...

Страница 96: ...peed of the boot process By default the Thorough option is enabled Extend BIOS POST Time Set the BIOS POST time By default the 0 seconds option is enabled Table 17 System setup options Virtualization menu Virtualization Intel Virtualization Technology Enable Intel Virtualization Technology VT Specify whether a Virtual Machine Monitor VMM can utilize the additional hardware capabilities provided by...

Страница 97: ... System Logs menu System Logs BIOS Event Log Clear BIOS Event Log Display BIOS events By default the Keep option is enabled Updating the BIOS Updating the BIOS in Windows About this task CAUTION If BitLocker is not suspended before updating the BIOS the next time you reboot the system it will not recognize the BitLocker key You will then be prompted to enter the recovery key to progress and the sy...

Страница 98: ... file to the bootable USB drive 4 Connect the bootable USB drive to the computer that needs the BIOS update 5 Restart the computer and press F12 6 Select the USB drive from the One Time Boot Menu 7 Type the BIOS setup program filename and press Enter The BIOS Update Utility appears 8 Follow the on screen instructions to complete the BIOS update Updating the BIOS from the F12 One Time boot menu Upd...

Страница 99: ...t 6 Click Update BIOS The computer restarts to flash the BIOS 7 The computer will restart after the BIOS update is completed System and setup password Table 20 System and setup password Password type Description System password Password that you must enter to log in to your system Setup password Password that you must enter to access and make changes to the BIOS settings of your computer You can c...

Страница 100: ...rity screen verify that Password Status is Unlocked 3 Select System Password update or delete the existing system password and press Enter or Tab 4 Select Setup Password update or delete the existing setup password and press Enter or Tab NOTE If you change the System and or Setup password reenter the new password when prompted If you delete the System and or Setup password confirm the deletion whe...

Страница 101: ...ally The SupportAssist diagnostics provides a set of options for particular devices or device groups It allows you to Run tests automatically or in an interactive mode Repeat tests Display or save test results Run thorough tests to introduce additional test options and provide extra information about the failed device s View status messages that indicate if the tests are completed successfully Vie...

Страница 102: ...dicating the Recovery image is not found The following table shows different light patterns and what they indicate Table 21 Diagnostic LED behavior Blinking pattern Problem description Suggested resolution Amber White 1 1 MBIST TPM Detection Failure Replace the system board 1 2 MBIST SPI flash Unrecoverable SPI flash failure Replace the system board 1 5 i Fuse Failure EC unable to program i Fuse R...

Страница 103: ...le to boot to the operating system even after repeated attempts it automatically starts Dell SupportAssist OS Recovery Dell SupportAssist OS Recovery is a standalone tool that is preinstalled in all Dell computers installed with Windows operating system It consists of tools to diagnose and troubleshoot issues that may occur before your computer boots to the operating system It enables you to diagn...

Страница 104: ...uter even after it has been powered off and the battery has been removed The following procedure provides the instructions on how to conduct flea power release Steps 1 Turn off your computer 2 Disconnect the power adapter from your computer 3 Press and hold the power button for 15 seconds to drain the flea power 4 Connect the power adapter to your computer 5 Turn on your computer 104 Troubleshooti...

Страница 105: ...cations technical help blogs drivers software updates and so on www dell com support Dell knowledge base articles for a variety of computer concerns 1 Go to https www dell com support home app knowledgebase 2 Type the subject or keyword in the Search box 3 Click Search to retrieve the related articles Contacting Dell To contact Dell for sales technical support or customer service issues see www de...

Отзывы: