background image


7.

Lift the hard drive up to remove it from the computer. 


8.

Remove the hard-drive bracket screws from both sides of the hard drive. 

Содержание Latitude 2120

Страница 1: ...ames other than its own June 2010 Rev A00 Working on Your Computer Removing and Replacing Parts System Setup Diagnostics NOTE A NOTE indicates important information that helps you make better use of your computer CAUTION A CAUTION indicates potential damage to hardware or loss of data if instructions are not followed WARNING A WARNING indicates a potential for property damage personal injury or de...

Страница 2: ...ock position 3 Slide and remove the battery from the computer WARNING Before working inside your computer read the safety information that shipped with your computer For additional safety best practices information see the Regulatory Compliance Homepage at www dell com regulatory_compliance NOTE You may need to install Adobe Flash Player from Adobe com in order to view the illustrations below ...

Страница 3: ...Replacing the Battery To replace the battery perform the above steps in reverse order Back to Contents Page ...

Страница 4: ...and then push a flathead screwdriver through the screw socket from where you removed the keyboard screw WARNING Before working inside your computer read the safety information that shipped with your computer For additional safety best practices information see the Regulatory Compliance Homepage at www dell com regulatory_compliance NOTE You may need to install Adobe Flash Player from Adobe com in ...

Страница 5: ...5 Starting in the top left corner of the keyboard lift the keyboard up and then flip the keyboard 6 Disconnect the keyboard data cable and remove the keyboard from the computer ...

Страница 6: ...Replacing the Keyboard To replace the keyboard perform the above steps in reverse order Back to Contents Page ...

Страница 7: ...el screws under the keyboard 5 Remove the access panel screws on the bottom of the computer WARNING Before working inside your computer read the safety information that shipped with your computer For additional safety best practices information see the Regulatory Compliance Homepage at www dell com regulatory_compliance NOTE You may need to install Adobe Flash Player from Adobe com in order to vie...

Страница 8: ...6 Starting near the hinges lift the access panel and remove it from the computer Replacing the Access Panel To replace the access panel perform the above steps in reverse order Back to Contents Page ...

Страница 9: ...5 Pry the retention clips away from the memory module 6 Remove the memory module from the computer WARNING Before working inside your computer read the safety information that shipped with your computer For additional safety best practices information see the Regulatory Compliance Homepage at www dell com regulatory_compliance NOTE You may need to install Adobe Flash Player from Adobe com in order...

Страница 10: ...placing the Memory Modules To replace the memory modules insert the memory module in the memory slot at an angle then press down the memory module to snap the memory module in place Back to Contents Page ...

Страница 11: ...panel 5 Disconnect the coin cell battery cable from the system board 6 Remove the coin cell battery WARNING Before working inside your computer read the safety information that shipped with your computer For additional safety best practices information see the Regulatory Compliance Homepage at www dell com regulatory_compliance NOTE You may need to install Adobe Flash Player from Adobe com in orde...

Страница 12: ...Replacing the Coin Cell Battery To replace the coin cell battery perform the above steps in reverse order Back to Contents Page ...

Страница 13: ...he WLAN antenna cables from the card 6 Remove the screw that secures the WLAN card to the system board WARNING Before working inside your computer read the safety information that shipped with your computer For additional safety best practices information see the Regulatory Compliance Homepage at www dell com regulatory_compliance NOTE You may need to install Adobe Flash Player from Adobe com in o...

Страница 14: ...7 Remove the WLAN card from the computer Replacing the WLAN Card To replace the WLAN card perform the above steps in reverse order Back to Contents Page ...

Страница 15: ...he WWAN antenna cables from the card 6 Remove the screw that secures the WWAN card to the system board WARNING Before working inside your computer read the safety information that shipped with your computer For additional safety best practices information see the Regulatory Compliance Homepage at www dell com regulatory_compliance NOTE You may need to install Adobe Flash Player from Adobe com in o...

Страница 16: ...7 Remove the WWAN card from the computer Replacing the WWAN Card To replace the WWAN card perform the above steps in reverse order Back to Contents Page ...

Страница 17: ...hat secure the hard drive to the system board 6 Slide the hard drive towards the side of the computer to disengage the hard drive from the system board WARNING Before working inside your computer read the safety information that shipped with your computer For additional safety best practices information see the Regulatory Compliance Homepage at www dell com regulatory_compliance NOTE You may need ...

Страница 18: ...7 Lift the hard drive up to remove it from the computer 8 Remove the hard drive bracket screws from both sides of the hard drive ...

Страница 19: ...Remove the hard drive bracket from the hard drive Replacing the Hard Drive Hard Drive Brackets To replace the hard drive hard drive brackets perform the above steps in reverse order Back to Contents Page ...

Страница 20: ...le from the system board and remove it from its routing path 6 Disconnect the fan power cable from the system board WARNING Before working inside your computer read the safety information that shipped with your computer For additional safety best practices information see the Regulatory Compliance Homepage at www dell com regulatory_compliance NOTE You may need to install Adobe Flash Player from A...

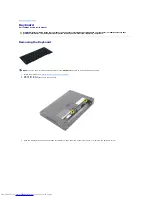
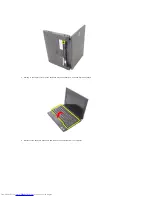
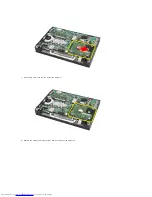
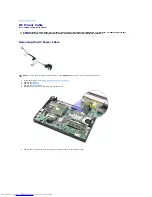
Страница 21: ...7 Loosen the captive screws on the heat sink 8 Lift the heat sink up to remove it from the computer ...

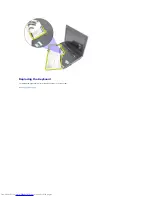
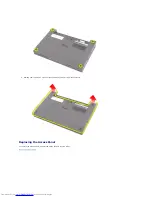
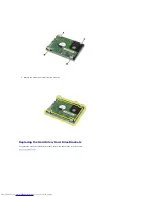
Страница 22: ...Replacing the Heatsink To replace the heatsink perform the above steps in reverse order Back to Contents Page ...

Страница 23: ...C power cable from the system board 6 Remove the screw that secures the DC power cable connector to the system board WARNING Before working inside your computer read the safety information that shipped with your computer For additional safety best practices information see the Regulatory Compliance Homepage at www dell com regulatory_compliance NOTE You may need to install Adobe Flash Player from ...

Страница 24: ...7 Lift up to remove the DC power cable from the computer Replacing the DC Power Cable To replace the DC power cable perform the above steps in reverse order Back to Contents Page ...

Страница 25: ...em board and remove it from its routing path 6 Disconnect the antenna cables from the WLAN card and then remove the cables from their routing path WARNING Before working inside your computer read the safety information that shipped with your computer For additional safety best practices information see the Regulatory Compliance Homepage at www dell com regulatory_compliance NOTE You may need to in...

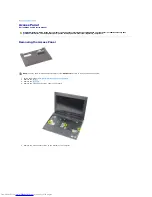
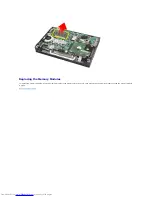
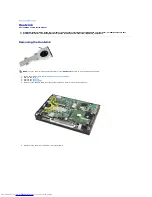
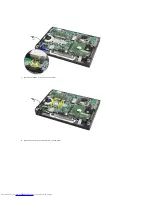
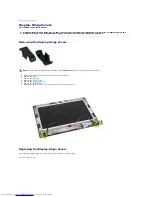
Страница 26: ...7 Disconnect the display data cable from the system board 8 Remove the screws that secure the display assembly ...

Страница 27: ...9 Remove the display assembly by sliding it toward the base of the computer Replacing the Display Assembly To replace the display assembly perform the above steps in reverse order Back to Contents Page ...

Страница 28: ... scribe pry and remove the rubber screw covers from the display bezel 7 Remove the screws that secure the display bezel to the display assembly WARNING Before working inside your computer read the safety information that shipped with your computer For additional safety best practices information see the Regulatory Compliance Homepage at www dell com regulatory_compliance NOTE You may need to insta...

Страница 29: ...f the display bezel disengage the display bezel from the display assembly and then remove the display bezel Replacing the Display Bezel To replace the display bezel perform the above steps in reverse order Back to Contents Page ...

Страница 30: ...cover away from the hinge and remove the hinge cover Replacing the Display Hinge Covers To replace the display hinge covers perform the above steps in reverse order Back to Contents Page WARNING Before working inside your computer read the safety information that shipped with your computer For additional safety best practices information see the Regulatory Compliance Homepage at www dell com regul...

Страница 31: ... display bezel 7 Disconnect the cable from the camera module 8 Peel the tapes that secure the camera to the display assembly WARNING Before working inside your computer read the safety information that shipped with your computer For additional safety best practices information see the Regulatory Compliance Homepage at www dell com regulatory_compliance NOTE You may need to install Adobe Flash Play...

Страница 32: ...9 Remove the screws that secure the camera to the display assembly 10 Lift the camera module up to remove it from the display assembly ...

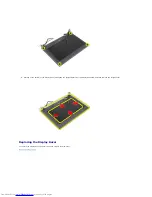
Страница 33: ...Replacing the Camera To replace the camera perform the above steps in reverse order Back to Contents Page ...

Страница 34: ...connect the display touch screen cable from the display assembly 8 Remove the screws that secure the display panel to the display assembly and then flip over the display panel WARNING Before working inside your computer read the safety information that shipped with your computer For additional safety best practices information see the Regulatory Compliance Homepage at www dell com regulatory_compl...

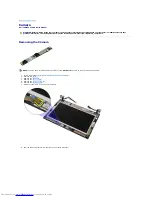
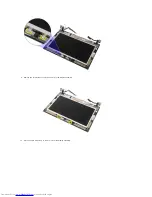
Страница 35: ...9 Remove the display data cable from the display panel 10 Remove the display panel from the display assembly ...

Страница 36: ...t secure the display bracket and then remove the display bracket from the display assembly Replacing the Display Panel Bracket To replace the display panel bracket perform the above steps in reverse order Back to Contents Page ...

Страница 37: ...bezel 7 Remove the display panel 8 Disconnect the camera cable from the display assembly 9 Remove the grounding captive screw from the display hinge WARNING Before working inside your computer read the safety information that shipped with your computer For additional safety best practices information see the Regulatory Compliance Homepage at www dell com regulatory_compliance NOTE You may need to ...

Страница 38: ...10 Remove the display cable from the display assembly Replacing the Display Cable To replace the display cable perform the above steps in reverse order Back to Contents Page ...

Страница 39: ...8 Loosen the display cable captive screw and remove the screws that secures the display hinge to the display assembly 9 Lift the display hinges and remove it from the display assembly WARNING Before working inside your computer read the safety information that shipped with your computer For additional safety best practices information see the Regulatory Compliance Homepage at www dell com regulato...

Страница 40: ...Replacing the Display Hinges To replace the display hinges perform the above steps in reverse order Back to Contents Page ...

Страница 41: ...nk 10 Open the touchpad cable clip and disconnect the touchpad cable from the system board Open the button board cable clip and disconnect the button board data cable from the system board 11 Remove the screws that secure the system board in place WARNING Before working inside your computer read the safety information that shipped with your computer For additional safety best practices information...

Страница 42: ...12 Starting from the side where the USB ports are located lift up the system board and remove the system board 13 Disconnect the Bluetooth module cable from the system board ...

Страница 43: ...14 Remove the screw that secures the Bluetooth module to the system board 15 Remove the Bluetooth module from the system board ...

Страница 44: ...Replacing the System Board Bluetooth Module To replace the system board Bluetooth module perform the above steps in reverse order Back to Contents Page ...

Страница 45: ... release it 3 Pull and remove the SD Card from the computer WARNING Before working inside your computer read the safety information that shipped with your computer For additional safety best practices information see the Regulatory Compliance Homepage at www dell com regulatory_compliance NOTE You may need to install Adobe Flash Player from Adobe com in order to view the illustrations below ...

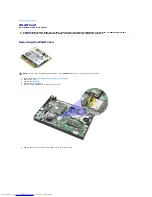
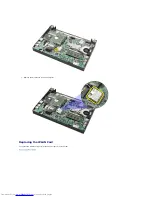
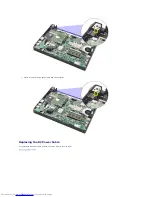
Страница 46: ...Replacing the SD Card To replace the SD Card perform the above steps in reverse order Back to Contents Page ...

Страница 47: ...d to release it 4 Pull and remove the SIM Card from the computer WARNING Before working inside your computer read the safety information that shipped with your computer For additional safety best practices information see the Regulatory Compliance Homepage at www dell com regulatory_compliance NOTE You may need to install Adobe Flash Player from Adobe com in order to view the illustrations below ...

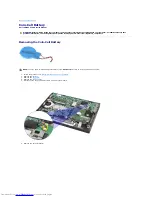
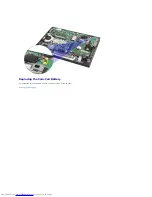
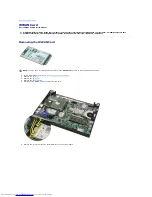
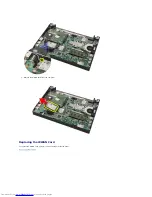
Страница 48: ...Replacing the SIM Card To replace the SIM Card perform the above steps in reverse order Back to Contents Page ...

Страница 49: ...the screw that secures the hard drive accelerator card to the system board 6 Remove the hard drive accelerator card from the computer WARNING Before working inside your computer read the safety information that shipped with your computer For additional safety best practices information see the Regulatory Compliance Homepage at www dell com regulatory_compliance NOTE You may need to install Adobe F...

Страница 50: ...e the hard drive accelerator card metal bracket from the card Replacing the Hard Drive Accelerator Card To replace the hard drive accelerator card perform the above steps in reverse order Back to Contents Page ...

Страница 51: ... the boot sequence permanently in the system setup To access the Boot menu 1 Turn on or restart your computer 2 When the blue DELL logo is displayed press F12 immediately Navigation Keystrokes Use the following keystrokes to navigate the System Setup screens System Setup Menu Options The following tables describe the menu options for the System Setup program CAUTION Unless you are an expert comput...

Страница 52: ...configure the operating mode of the internal SATA hard drive controller The options are Disabled ATA and AHCI Miscellaneous Devices Allows you to enable or disable the following devices l External USB Port l Microphone l Media Card l Camera Network Activity LED Allows you to configure the network LED behavior The options are l Enable ACPI OS Control Allows the activity LED to be controlled by an A...

Страница 53: ... on by a special LAN signal or from Hibernate state when triggered by a special wireless LAN signal Wake up from the Standby state is unaffected by this setting and must be enabled in the operating system l Disabled Do not allow the system to power on when it receives a wake up signal from the LAN or wireless LAN l LAN Only Allow the system to be powered on by special LAN signals The factory defau...

Страница 54: ...is field to set the Service Tag If a Service Tag has not been set for this computer the computer will automatically bring up this screen when you enter the System Setup You will be prompted to enter the Service Tag Asset Tag Allows you to create a system Asset Tag The field can only be updated if the Asset Tag is not already set System Logs Option Description BIOS Events Allows you to view and cle...

Страница 55: ...he charge gauge press and hold the status button on the battery charge gauge for at least three seconds If no lights appear the battery is in good condition and more than 80 percent of its original charge capacity remains Each light represents incremental degradation If five lights appear less than 60 percent of the charge capacity remains and you should consider replacing the battery Keyboard Sta...

Страница 56: ...ules 3 Replace the memory 4 Replace the system board ON FLASH ON Memory is detected but has errors 1 Reseat the memory 2 If two modules are installed remove one and test Try the other module in the same slot and test Test the other slot with both modules 3 Replace the memory 4 Replace the system board FLASH FLASH FLASH System board error 1 Replace the system board OFF ON OFF Storage device error 1...

Страница 57: ...ital Card SIM Card Access Panel Coin Cell Battery WWAN Card Heatsink DC Power Cable Display Hinge Covers Display Display Brackets Display Hinge System Board Bluetooth Module Battery Keyboard Memory WLAN Card Hard Drive Accelerator Card Hard Drive Hard Drive Bracket Display Assembly Display Bezel Camera Display Cable ...

Страница 58: ...DRAM Speed 667 MHz Connectors one SODIMM slot Module capacities 1 GB 2 GB Minimum memory 1 GB Maximum memory 2 GB Video Type Intel UMA graphics integrated on the processor Controller Intel Graphics Media Accelerator Output 15 pin VGA connector Audio Type two channel integrated audio Controller Realtek ALC269 Speakers two Internal speaker amplifier 2 W per channel Volume controls media control butt...

Страница 59: ...United States 83 keys United Kingdom 84 keys Brazil 85 keys Japan 87 keys Layout QWERTY AZERTY Kanji Touchpad Active area X axis 60 40 mm 2 37 inches Y axis 34 00 mm 1 34 inches Battery Type 3 cell smart lithium ion 28 WHr 6 cell smart lithium ion 56 WHr Charge time with computer off approximately 80 charge on the battery is restored in 1 hour on a fully discharged battery Operating time battery o...

Страница 60: ... 00 mm 10 43 inches Depth 187 00 mm 7 36 inches Weight 3 cell battery without touchscreen 1 30 kg 2 86 lb 6 cell battery without touchscreen 1 50 kg 3 30 lb Environmental Temperature range Operating 0 C to 35 C 32 F to 95 F Non operating 40 C to 65 C 40 F to 149 F Relative humidity maximum Operating 10 to 90 noncondensing Non operating 20 to 95 noncondensing Altitude maximum Operating 15 20 m to 3...

Страница 61: ...om regulatory_compliance CAUTION Many repairs may only be done by a certified service technician You should only perform troubleshooting and simple repairs as authorized in your product documentation or as directed by the online or telephone service and support team Damage due to servicing that is not authorized by Dell is not covered by your warranty Read and follow the safety instructions that c...

Страница 62: ...side Your Computer After you complete any replacement procedure ensure you connect any external devices cards and cables before turning on your computer 1 Connect any external devices such as a port replicator battery slice or media base and replace any cards such as an ExpressCard 2 Connect any telephone or network cables to your computer 3 Replace the hard drive 4 Replace the battery 5 Connect y...

Отзывы: