background image

13

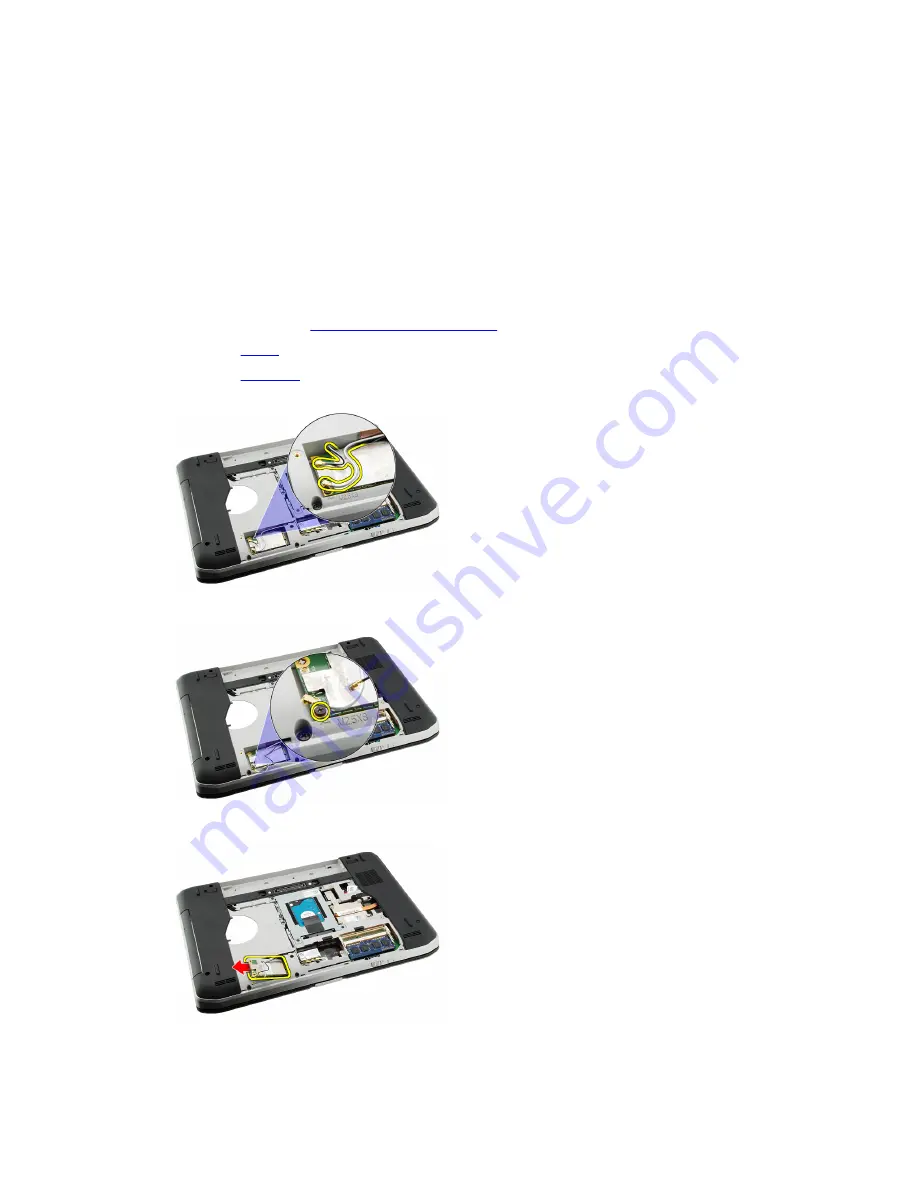
Wireless Wide Area Network (WWAN) Card

Removing the Wireless Wide Area Network (WWAN) Card

1.

Follow the procedures in 

Before Working On Your Computer

.

2.

Remove the 

battery

.

3.

Remove the 

back panel

.

4.

Disconnect the antenna cables from the WWAN card.

5.

Remove the screw that secures the WWAN card to the system board.

6.

Remove the WWAN card.

35

Содержание Inspiron 5520

Страница 1: ...Dell Latitude 5520 E5520 E5520m Owner s Manual Regulatory Model P16G Regulatory Type P16G001 ...

Страница 2: ...rtant information that helps you make better use of your computer CAUTION A CAUTION indicates potential damage to hardware or loss of data if instructions are not followed WARNING A WARNING indicates a potential for property damage personal injury or death ...

Страница 3: ... Secure Digital SD Card 15 Removing The Secure Digital SD Card 15 Installing The Secure Digital SD Card 15 5 Subscriber Identity Module SIM Card 17 Removing the Subscriber Identity Module SIM Card 17 Installing the Subscriber Identity Module SIM Card 17 6 ExpressCard 19 Removing the ExpressCard 19 Installing the ExpressCard 19 7 Back Panel 21 Removing the Back Panel 21 Installing the Back Panel 21...

Страница 4: ...e Area Network WWAN Card 35 Installing The Wireless Wide Area Network WWAN Card 36 14 Memory 37 Removing the Memory Module 37 Installing the Memory Module 37 15 CPU Door 39 Removing the CPU Door 39 Installing the CPU Door 39 16 Heat Sink 41 Removing the Heat Sink 41 Installing the Heat Sink 41 17 Processor 43 Removing the Processor 43 Installing the Processor 43 18 Palm Rest 45 Removing the Palm R...

Страница 5: ...Installing the Audio Board 64 25 System Board 65 Removing the System Board 65 Installing the System Board 67 26 Coin Cell Battery 69 Removing the Coin Cell Battery 69 Installing the Coin Cell Battery 69 27 Input Output Panel 71 Removing the Input Output I O Panel 71 Installing the Input Output I O Panel 72 28 Power Connector 73 Removing the Power Connector 73 Installing the Power Connector 74 29 M...

Страница 6: ...y Hinges 89 Removing the Display Hinges 89 Installing the Display Hinges 91 35 Camera 93 Removing the Camera 93 Installing the Camera 94 36 Specifications 95 Technical Specifications 95 37 System Setup 101 Overview 101 Entering System Setup 101 System Setup Options 101 38 Diagnostics 109 Diagnostics 109 Device Status LightsBattery Status LightsBattery Charge and HealthKeyboard Status Lights 109 39...

Страница 7: ...ching an unpainted metal surface such as a connector on the back of the computer CAUTION Handle components and cards with care Do not touch the components or contacts on a card Hold a card by its edges or by its metal mounting bracket Hold a component such as a processor by its edges not by its pins CAUTION When you disconnect a cable pull on its connector or on its pull tab not on the cable itsel...

Страница 8: ...d ExpressCards or Smart Cards from the appropriate slots Recommended Tools The procedures in this document may require the following tools Small flat blade screwdriver 0 Phillips screwdriver 1 Phillips screwdriver Small plastic scribe Flash BIOS update program CD Turning Off Your Computer CAUTION To avoid losing data save and close all open files and exit all open programs before you turn off your...

Страница 9: ...ot use batteries designed for other Dell computers 1 Connect any external devices such as a port replicator battery slice or media base and replace any cards such as an ExpressCard 2 Connect any telephone or network cables to your computer CAUTION To connect a network cable first plug the cable into the network device and then plug it into the computer 3 Replace the battery 4 Connect your computer...

Страница 10: ...10 ...

Страница 11: ...unlock the battery 3 Remove the battery from the computer Related Links Installing the Battery Installing the Battery 1 Slide the battery back into the computer The release latches automatically click into the lock position 2 Follow the procedures in After Working Inside Your Computer Related Links Removing the Battery 11 ...

Страница 12: ...12 ...

Страница 13: ...Follow the procedures in Before Working On Your Computer 2 Press in on the PC latch to release the latch 3 Press in on the PC latch to release the PC card 4 Slide the PC card out of the computer Related Links Installing the PC Card 13 ...

Страница 14: ...Installing the PC Card 1 Push the PC latch to lock it 2 Push the PC card to its slot until it clicks 3 Follow the procedures in After Working Inside Your Computer Related Links Removing the PC Card 14 ...

Страница 15: ...sh in on the SD card 3 Slide the SD card out of the computer Related Links Installing The Secure Digital SD Card Installing The Secure Digital SD Card 1 Slide the SD card into its slot until it clicks into place 2 Follow the procedures in After Working Inside Your Computer Related Links Removing The Secure Digital SD Card 15 ...

Страница 16: ...16 ...

Страница 17: ...ase the SIM card located on the battery wall 4 Slide the SIM card from the computer Related Links Installing the Subscriber Identity Module SIM Card Installing the Subscriber Identity Module SIM Card 1 Insert the SIM card into the slot 2 Replace the battery 3 Follow the procedures in After Working Inside Your Computer Related Links Removing the Subscriber Identity Module SIM Card 17 ...

Страница 18: ...18 ...

Страница 19: ...h in on the ExpressCard 3 Slide the ExpressCard out of the computer Related Links Installing the ExpressCard Installing the ExpressCard 1 Insert the ExpressCard into the slot until it clicks into place 2 Follow the procedures in After Working Inside Your Computer Related Links Removing the ExpressCard 19 ...

Страница 20: ...20 ...

Страница 21: ...el 4 Slide and remove the back panel toward the front of the computer Related Links Installing the Back Panel Installing the Back Panel 1 Slide the back panel towards the back of the computer 2 Tighten the screws to secure the back panel 3 Replace the battery 4 Follow the procedures in After Working Inside Your Computer Related Links Removing the Back Panel 21 ...

Страница 22: ...22 ...

Страница 23: ...Trim 1 Follow the procedures in Before Working On Your Computer 2 Remove the battery 3 Pry up the keyboard trim from the bottom edge 4 Pry up the keyboard trim from the top edge 5 Remove the keyboard trim from the computer Related Links 23 ...

Страница 24: ...lign the keyboard trim with the tabs on top of the palm rest 2 Press the keyboard trim down along the edges until it clicks into place 3 Replace the battery 4 Follow the procedures in After Working Inside Your Computer Related Links Removing the Keyboard Trim 24 ...

Страница 25: ...move the battery 3 Remove the keyboard trim 4 Flip the computer and remove the screw that secures the keyboard to the back of the computer 5 Flip the computer and remove the screws that secure the keyboard to the front of the computer 6 Pry the keyboard from its edges and turn the keyboard over 25 ...

Страница 26: ...t secures the keyboard data cable to the back of the keyboard 8 Disconnect the keyboard data cable 9 Flip the keyboard 10 Disconnect the keyboard data cable and remove it from the computer Related Links Installing the Keyboard 26 ...

Страница 27: ...e the keyboard data cable to the back of the keyboard 4 Replace the keyboard on the palm rest to align the screw holes 5 Tighten the keyboard screws 6 Flip the computer and tighten the screw on the back of the computer 7 Replace the keyboard trim 8 Replace the battery 9 Follow the procedures in After Working Inside Your Computer Related Links Removing the Keyboard 27 ...

Страница 28: ...28 ...

Страница 29: ...ng On Your Computer 2 Remove the battery 3 Remove the back panel 4 Remove the screw that secures the optical drive to the computer 5 Push the screw tab away from the computer to release the optical drive from the drive bay 6 Remove the optical drive from the computer Related Links 29 ...

Страница 30: ...e into the drive bay on the right side of the computer 2 Tighten the screw on the back of the computer to secure the optical drive 3 Replace the back panel 4 Replace the battery 5 Follow the procedures in After Working Inside Your Computer Related Links Removing the Optical Drive 30 ...

Страница 31: ...ore Working On Your Computer 2 Remove the battery 3 Remove the back panel 4 Remove the screws that secure the hard drive bracket to the computer 5 Use the tab to pull the hard drive bracket upward and remove it from the computer 6 Remove the hard drive bracket screws 31 ...

Страница 32: ...ch the hard drive bracket to the hard drive 3 Tighten the hard drive bracket screws to ensure that the bracket is correctly aligned and holding the hard drive 4 Slide the hard drive into the bay towards the connector on the system board 5 Tighten the screws to secure the hard drive 6 Replace the back panel 7 Replace the battery 8 Follow the procedures in After Working Inside Your Computer Related ...

Страница 33: ...al Area Network WLAN Card 1 Follow the procedures in Before Working On Your Computer 2 Remove the battery 3 Remove the back panel 4 Disconnect the antenna cables from the WLAN card 5 Remove the screw that secures the WLAN card to system board 6 Remove the WLAN card 33 ...

Страница 34: ...WLAN card into its slot 2 Tighten the screw to secure the WLAN card to the computer 3 Connect the antenna cables according to the color code on the WLAN card 4 Replace the back panel 5 Replace the battery 6 Follow the procedures in After Working Inside Your Computer Related Links Removing the Wireless Local Area Network WLAN Card 34 ...

Страница 35: ...Area Network WWAN Card 1 Follow the procedures in Before Working On Your Computer 2 Remove the battery 3 Remove the back panel 4 Disconnect the antenna cables from the WWAN card 5 Remove the screw that secures the WWAN card to the system board 6 Remove the WWAN card 35 ...

Страница 36: ...WAN card into its slot 2 Tighten the screw to secure the WWAN card to the computer 3 Connect the antenna cables according to the color code on the WWAN card 4 Replace the back panel 5 Replace the battery 6 Follow the procedures in After Working Inside Your Computer Related Links Removing the Wireless Wide Area Network WWAN Card 36 ...

Страница 37: ... memory module 5 Remove the memory module from the computer Related Links Installing The Memory Module Installing the Memory Module 1 Insert the memory module into the slot in the computer 2 Press down the memory module until the retention clips secure the memory module 3 Replace the back panel 4 Replace the battery 5 Follow the procedures in After Working Inside Your Computer 37 ...

Страница 38: ...Related Links Removing the Memory Module 38 ...

Страница 39: ...crews that secure the CPU door to the computer 5 Remove the CPU door Related Links Installing the CPU Door Installing the CPU Door 1 Slide the CPU door downwards and towards the back of the computer 2 Tighten the screws to secure the CPU door 3 Replace the back panel 4 Replace the battery 5 Follow the procedures in After Working Inside Your Computer 39 ...

Страница 40: ...Related Links Removing the CPU Door 40 ...

Страница 41: ...5 Loosen the screws on the heat sink 6 Lift the heat sink and remove it from the computer Related Links Installing the Heat Sink Installing the Heat Sink 1 Tighten the screws as per the numerical sequence on the heat sink module 2 Replace the CPU door 3 Replace the back panel 4 Replace the battery 5 Follow the procedures in After Working Inside Your Computer 41 ...

Страница 42: ...Related Links Removing the Heat Sink 42 ...

Страница 43: ... 4 Remove the CPU door 5 Remove the heat sink 6 Rotate the processor cam screw in counter clockwise direction 7 Remove the processor Related Links Installing the Processor Installing the Processor 1 Insert the processor into the processor socket Ensure that the processor is seated securely 2 Replace the heat sink 3 Replace the CPU door 43 ...

Страница 44: ...4 Replace the back panel 5 Replace the battery 6 Follow the procedures in After Working Inside Your Computer Related Links Removing the Processor 44 ...

Страница 45: ...r 2 Remove the battery 3 Remove the back panel 4 Remove the keyboard trim 5 Remove the keyboard 6 Remove the optical drive 7 Remove the CPU door 8 Remove the screws from the bottom of the computer 9 Flip the computer and remove the screws on the palm rest 10 Disconnect the media button cable 45 ...

Страница 46: ...11 Disconnect the power LED cable 12 Disconnect the touchpad cable 13 Disconnect the power button cable 14 Disconnect the fingerprint cable 46 ...

Страница 47: ... left edge of the palm rest press the palm rest downwards on the computer on all the edges 2 Press down on all edges to ensure that the tabs are engaged 3 Connect all the cables to the palm rest 4 Tighten the screws to secure the palm rest 5 Flip the computer over and tighten the screws to secure the palm rest 6 Replace the CPU door 7 Replace the keyboard 8 Replace the keyboard trim 9 Replace the ...

Страница 48: ...10 Replace the back panel 11 Replace the battery 12 Follow the procedures in After Working Inside Your Computer Related Links Removing the Palm Rest 48 ...

Страница 49: ... battery 3 Remove the back panel 4 Remove the keyboard trim 5 Remove the keyboard 6 Remove the optical drive 7 Remove the CPU door 8 Remove the palm rest 9 Remove the screws that secure the ExpressCard Smart Card PCMCIA module to the computer 10 Remove the ExpressCard Smart Card PCMCIA module Related Links Installing the ExpressCard Smart Card PCMCIA module 49 ...

Страница 50: ...oard 2 Tighten the screws to secure the ExpressCard Smart Card PCMCIA module 3 Replace the palm rest 4 Replace the CPU door 5 Replace the keyboard trim 6 Replace the keyboard 7 Replace the optical drive 8 Replace the back panel 9 Replace the battery 10 Follow the procedures in After Working Inside Your Computer Related Links Removing the ExpressCard Smart Card PCMCIA Module 50 ...

Страница 51: ... 2 Remove the battery 3 Remove the back panel 4 Remove the keyboard trim 5 Remove the keyboard 6 Remove the optical drive 7 Remove the CPU door 8 Remove the palm rest 9 Disconnect the Bluetooth cable from the system board 10 Remove the screw that secures the Bluetooth card 11 Remove the Bluetooth card 51 ...

Страница 52: ...the computer 3 Tighten the screw to secure the Bluetooth card in the computer 4 Connect the Bluetooth cable to the system board 5 Replace the palm rest 6 Replace the CPU door 7 Replace the keyboard trim 8 Replace the keyboard 9 Replace the optical drive 10 Replace the back panel 11 Replace the battery 12 Follow the procedures in After Working Inside Your Computer Related Links Removing the Bluetoo...

Страница 53: ...ery 3 Remove the back panel 4 Remove the keyboard trim 5 Remove the keyboard 6 Remove the optical drive 7 Remove the hard drive 8 Remove the CPU door 9 Remove the palm rest 10 Disconnect the antenna cables 11 Remove the antenna cables from the routing channels 12 Disconnect the low voltage differential signaling LVDS cable 53 ...

Страница 54: ...Disconnect the camera cable 14 Pull the antenna cables through the opening at the top of the computer 15 Remove the screws that secure the display assembly to the computer 16 Remove the display assembly 54 ...

Страница 55: ... to system board 5 Push the antenna through the opening to the bottom of the computer 6 Secure the antenna cable to the routing channels 7 Connect the antenna to the WLAN WLAN cards 8 Replace the palm rest 9 Replace the CPU door 10 Replace the keyboard 11 Replace the keyboard trim 12 Replace the optical drive 13 Replace the hard drive 14 Replace the back panel 15 Replace the battery 16 Follow the ...

Страница 56: ...56 ...

Страница 57: ... Remove the keyboard 6 Remove the optical drive 7 Remove the CPU door 8 Remove the palm rest 9 Remove the display assembly 10 Remove the audio board 11 Remove the bluetooth card 12 Remove the modem card 13 Disengage the modem cable and remove the screw that secures the right support bracket 14 Remove the right support bracket 15 Disconnect the modem cable from the modem 57 ...

Страница 58: ...ble from the routing channel 17 Remove the screws that secure the left support bracket 18 Slide the left support bracket along the modem cable and remove it from the computer Related Links Installing the Support Brackets 58 ...

Страница 59: ...m card 6 Place the right support bracket in the original position 7 Tighten the screw to secure the right support bracket 8 Replace the modem card 9 Replace the Bluetooth card 10 Replace the audio board 11 Replace the display assembly 12 Replace the palm rest 13 Replace the CPU door 14 Replace the keyboard trim 15 Replace the keyboard 16 Replace the optical drive 17 Replace the back panel 18 Repla...

Страница 60: ...60 ...

Страница 61: ...rd trim 5 Remove the keyboard 6 Remove the optical drive 7 Remove the hard drive 8 Remove the CPU door 9 Remove the palm rest 10 Remove the display assembly 11 Disconnect the modem cable from the modem 12 Remove the screws that secure the modem card 13 Lift the modem card to disengage from the connector on the back of the card and remove it from the computer 61 ...

Страница 62: ...ure the modem card 3 Connect the modem card cable 4 Replace the display assembly 5 Replace the palm rest 6 Replace the CPU door 7 Replace the hard drive 8 Replace the optical drive 9 Replace the keyboard 10 Replace the keyboard trim 11 Replace the back panel 12 Replace the battery 13 Follow the procedures in After Working Inside Your Computer Related Links Removing the Modem Card 62 ...

Страница 63: ...Remove the back panel 4 Remove the keyboard trim 5 Remove the keyboard 6 Remove the optical drive 7 Remove the CPU door 8 Remove the palm rest 9 Remove the Bluetooth card 10 Disconnect the audio board cables from the system board 11 Remove the screw that secures the audio board to the computer 12 Remove the audio board 63 ...

Страница 64: ... 3 Connect the audio cables to the system board 4 Replace the bluetooth card 5 Replace the palm rest 6 Replace the CPU door 7 Replace the keyboard trim 8 Remove the keyboard 9 Replace the optical drive 10 Replace the back panel 11 Replace the battery 12 Follow the procedures in After Working Inside Your Computer Related Links Removing the Audio Board 64 ...

Страница 65: ... optical drive 10 Remove the hard drive 11 Remove the wireless local area network WLAN 12 Remove the wireless wide area network WWAN 13 Remove the CPU door 14 Remove the heat sink 15 Remove the processor 16 Remove the palm rest 17 Remove the ExpressCard Smart Card PCMCIA module 18 Remove the display assembly 19 Remove the audio board 20 Remove the Bluetooth 21 Remove the modem 22 Remove the suppor...

Страница 66: ... following cables speaker cable bluetooth cable audio board cable 27 Remove the screws that secure the system board to the computer 28 Lift the right edge of the system board to release it from the port connectors and remove the system board 66 ...

Страница 67: ...the connector on the back of the system board to the I O panel 3 Tighten the screws to secure the system board 4 Connect the following cables speaker cable audio board cable bluetooth cable 5 Connect the DC In cable to the system board 6 Connect the thermal fan cable to the system board 7 Connect the coin cell cable to the system board 8 Replace the support brackets 67 ...

Страница 68: ...8 Replace the wireless local area network WLAN 19 Replace the wireless wide area network WWAN 20 Replace the hard drive 21 Replace the optical drive 22 Replace the keyboard 23 Replace the keyboard trim 24 Replace the memory 25 Replace the back panel 26 Replace the secure digital SD card 27 Replace the subscriber identity module SIM card 28 Replace the battery 29 Follow the procedures in After Work...

Страница 69: ...oor 5 Lift the coin cell battery from the system board 6 Pry and remove the coin cell battery from the adhesive Related Links Installing the Coin Cell Battery Installing the Coin Cell Battery 1 Attach the coin cell battery to the coin cell compartment 2 Connect the coin cell battery to the system board 3 Replace the CPU door 4 Replace the back panel 5 Replace the battery 69 ...

Страница 70: ...6 Follow the procedures in After Working Inside Your Computer Related Links Removing the Coin Cell Battery 70 ...

Страница 71: ... the optical drive 10 Remove the hard drive 11 Remove the wireless wide area network WWAN 12 Remove the wireless local area network WLAN 13 Remove the CPU door 14 Remove the heat sink 15 Remove the processor 16 Remove the palm rest 17 Remove the ExpressCard Smart Card PCMCIA module 18 Remove the display assembly 19 Remove the audio board 20 Remove the Bluetooth card 21 Remove the modem card 22 Rem...

Страница 72: ...CMCIA module 10 Replace the palm rest 11 Replace the processor 12 Replace the heat sink 13 Replace the CPU door 14 Replace the wireless local area network WLAN 15 Replace the wireless wide area network WWAN 16 Replace the hard drive 17 Replace the optical drive 18 Replace the keyboard 19 Replace the keyboard trim 20 Replace the memory 21 Replace the modem card 22 Replace the subscriber identity mo...

Страница 73: ...ive 10 Remove the hard drive 11 Remove the wireless local area network WLAN 12 Remove the wireless wide area network WWAN 13 Remove the CPU door 14 Remove the heat sink 15 Remove the processor 16 Remove the palm rest 17 Remove the ExpressCard Smart Card PCMCIA module 18 Remove the display assembly 19 Remove the audio board 20 Remove the Bluetooth card 21 Remove the modem card 22 Remove the support...

Страница 74: ...le 9 Remove the palm rest 10 Replace the processor 11 Replace the heat sink 12 Remove the CPU door 13 Replace the wireless wide area network WWAN 14 Replace the wireless local area network WLAN 15 Replace the hard drive 16 Replace the optical drive 17 Remove the keyboard 18 Remove the keyboard trim 19 Replace the memory 20 Replace the back panel 21 Replace the secure digital SD card 22 Replace the...

Страница 75: ...he CPU door 9 Remove the palm rest 10 Remove the display assembly 11 Remove the support brackets 12 Remove the modem connector Related Links Installing the Modem Connector Installing the Modem Connector 1 Secure the modem connector into the routing channel on the thermal fan 2 Replace the support brackets 3 Replace the display assembly 4 Replace the palm rest 5 Replace the CPU door 6 Replace the h...

Страница 76: ...9 Replace the keyboard 10 Replace the keyboard trim 11 Replace the battery 12 Follow the procedures in After Working Inside Your Computer Related Links Removing the Modem Connector 76 ...

Страница 77: ...ptical drive 10 Remove the hard drive 11 Remove the wireless local area network WLAN 12 Remove the wireless wide area network WWAN 13 Remove the CPU door 14 Remove the heat sink 15 Remove the processor 16 Remove the palm rest 17 Remove the ExpressCard Smart Card PCMCIA module 18 Remove the display assembly 19 Remove the support brackets 20 Remove the system board 21 Disengage the DC In cable from ...

Страница 78: ...lace the ExpressCard Smart Card PCMCIA module 7 Replace the palm rest 8 Replace the processor 9 Replace the heat sink 10 Replace the CPU door 11 Replace the wireless local area network WLAN 12 Replace the wireless wide area network WWAN 13 Replace the hard drive 14 Replace the optical drive 15 Replace the keyboard 16 Replace the keyboard trim 17 Replace the memory 18 Replace the back panel 19 Repl...

Страница 79: ...21 Replace the battery 22 Follow the procedures in After Working Inside Your Computer Related Links Removing the Thermal Fan 79 ...

Страница 80: ...80 ...

Страница 81: ...ve the hard drive 11 Remove the wireless local area network WLAN 12 Remove the wireless wide area network WWAN 13 Remove the CPU door 14 Remove the heat sink 15 Remove the processor 16 Remove the palm rest 17 Remove the ExpressCard Smart Card PCMCIA module 18 Remove the display assembly 19 Remove the audio board 20 Remove the Bluetooth card 21 Remove the modem card 22 Remove the support brackets 2...

Страница 82: ...t brackets 6 Replace the modem card 7 Replace the Bluetooth card 8 Replace the audio board 9 Replace the display assembly 10 Replace the ExpressCard Smart Card PCMCIA module 11 Remove the palm rest 12 Replace the processor 13 Replace the heat sink 14 Replace the CPU door 15 Replace the wireless local area network WLAN 16 Replace the wireless wide area network WWAN 17 Replace the hard drive 18 Repl...

Страница 83: ...ce the back panel 23 Replace the secure digital SD card 24 Replace the subscriber identity module SIM card 25 Replace the battery 26 Follow the procedures in After Working Inside Your Computer Related Links Removing the Speakers 83 ...

Страница 84: ...84 ...

Страница 85: ...el 1 Follow the procedures in Before Working On Your Computer 2 Remove the battery 3 Pry up the bottom edge of the display bezel 4 Work your way around the sides and the top edge of the display bezel 5 Remove the display bezel Related Links 85 ...

Страница 86: ...el in the original position 2 From the top edge press downward on the display bezel to engage the tabs 3 Work your way around the side and the bottom edge 4 Replace the battery 5 Follow the procedures in After Working Inside Your Computer Related Links Removing the Display Bezel 86 ...

Страница 87: ...efore Working On Your Computer 2 Remove the battery 3 Remove the display bezel 4 Remove the screws that secure that back panel 5 Flip the display panel and disconnect the low voltage differential signalling LVDS cable 6 Remove the display panel from the display assembly 87 ...

Страница 88: ... display panel 3 Connect the low voltage differential signalling LVDS cable to the back of the display panel 4 Place the display panel in the display cover 5 Tighten the screws to secure the display panel 6 Replace the display bezel 7 Replace the battery 8 Follow the procedures in After Working Inside Your Computer Related Links Removing the Display Panel 88 ...

Страница 89: ...emove the keyboard trim 5 Remove the keyboard 6 Remove the optical drive 7 Remove the CPU door 8 Remove the palm rest 9 Remove the display assembly 10 Remove the display bezel 11 Remove the display panel 12 Remove the screws that secure the display hinges 13 Remove the display hinge caps 14 Rotate the right display hinge tower to a vertical position 89 ...

Страница 90: ...le routed through the right hinge tower through the opening on the right side 16 Pull the right hinge tower along the antenna cables and remove it 17 Remove the left display hinge cap 18 Remove the left display hinge tower 90 ...

Страница 91: ...Insert the antenna cables through the right hinge tower with the hinge tower offset facing inward 6 Position the antenna cables through the hinge tower slits towards the center of the display cover 7 Insert the right display hinge into the right hinge tower 8 Insert the right display hinge cap on the end of the right hinge 9 Replace and tighten the screws to secure the display hinges 10 Replace th...

Страница 92: ...20 Replace the battery 21 Follow the procedures in After Working Inside Your Computer Related Links Removing the Display Hinges 92 ...

Страница 93: ...res in Before Working On Your Computer 2 Remove the battery 3 Remove the display bezel 4 Remove the display panel 5 Disconnect the camera cable 6 Loosen the screw that secures the camera and the microphone module 7 Lift and remove the camera module 93 ...

Страница 94: ... display cover 2 Replace and tighten the screw to secure the camera 3 Connect the camera cable to the camera module 4 Replace the display panel 5 Replace the display bezel 6 Replace the battery 7 Follow the procedures in After Working Inside Your Computer Related Links Removing the Camera 94 ...

Страница 95: ...el HM65 Express chipset Latitude E5420m E5520m Intel GM45 Express chipset DRAM bus width 64 bit Flash EPROM SPI 32 Mbits PCIe Gen1 bus 100 MHz Processor Types Latitude 5420 E5420 5520 E5520 Intel Core i3 i5 i7 series Latitude E5420m E5520m Intel Core 2 series Intel Celeron Socket P series Memory Memory connector two SODIMM slots Memory capacity 1 GB 2 GB 4 GB or 8 GB Memory type Latitude 5420 E542...

Страница 96: ...controller Latitude 5420 E5420 5520 E5520 Intel HD Graphics Intel HD Graphics 3000 Latitude E5420m E5520m Intel GM45 Output 15 pin video connector 19 pin HDMI connector Communications Network adapter 10 100 1000 Mbps Ethernet LAN Wireless internal wireless local area network WLAN wireless wide area network WWAN and Bluetooth wireless support Ports and Connectors Audio microphone connector stereo h...

Страница 97: ...420 E5420m 324 00 mm 12 75 inches Latitude 5520 E55420 E5520m 360 00 mm 14 17 inches Z Height Latitude 5420 E5420 E5420m 5 20 mm 0 20 inch Latitude 5520 E55420 E5520m 5 80 mm 0 23 inch Diagonal Latitude 5420 E5420 E5420m 344 6 mm 14 00 inches Latitude 5520 E55420 E5520m 396 24 mm 15 60 inches Maximum resolution Latitude 5420 E5420 E5420m HD 1366 x 768 at 262 K colors HD 1600 x 900 at 262 K colors ...

Страница 98: ...keys Brazil 87 keys and Japan 90 keys Layout QWERTY AZERTY Kanji Touchpad Active Area X axis 80 00 mm Y axis 40 70 mm Battery Type 4 6 or 9 cell smart lithium ion Dimensions Height 4 6 and 9 cell 20 00 mm 0 79 inch Width 4 and 6 cell 208 00 mm 8 18 inches 9 cell 214 00 mm 8 43 inches Depth 4 and 6 cell 48 08 mm 1 89 inches 9 cell 71 79 mm 2 83 inches Weight 4 cell 240 00 g 0 53 lb 6 cell 344 73 g ...

Страница 99: ... 100 VAC to 240 VAC Input current maximum 1 5 A 1 6 A or 1 7 A Input frequency 50 Hz to 60 Hz Output power 65 W or 90 W Output current 65 W 90 W 3 34 A continuous 4 62 A continuous Rated output voltage 19 5 1 0 VDC Dimensions 65 W 90 W Height 16 00 mm 0 63 inch 16 00 mm 0 63 inch Width 66 00 mm 2 60 inches 70 00 mm 2 76 inches Length 127 00 mm 5 00 inches 147 00 mm 5 79 inches Temperature range Op...

Страница 100: ...kg 5 00 lb Latitude 5520 E5520 2 54 kg 5 60 lb Latitude E5520m 2 63 kg 5 80 lb Environmental Temperature Operating 0 C to 35 C 32 F to 95 F Storage 40 C to 65 C 40 F to 149 F Relative humidity maximum Operating 10 to 90 noncondensing Storage 5 to 95 noncondensing Altitude maximum Operating 15 20 m to 3048 m 50 ft to 10 000 ft Non Operating 15 20 m to 10 668 m 50 ft to 35 000 ft Airborne contaminan...

Страница 101: ...d has initialized This prompt can appear very quickly so you must watch for it to display and then press F2 If you press F2 before you are prompted this keystroke will be lost 4 If you wait too long and the operating system logo appears continue to wait until you see the Microsoft Windows desktop Then shut down your computer and try again System Setup Options NOTE Depending on the computer and its...

Страница 102: ...d w ImageServer Default Setting Enabled w PXE System Management Allows you to control the systems management mechanism The options are Disabled Alert Only ASF 2 0 DASH ASF 2 0 Default Setting Disabled Serial Port Identifies and defines the serial port settings You can set the serial port to Disabled Auto COM1 COM2 COM3 COM4 NOTE The operating system may allocate resources even though the setting i...

Страница 103: ...ble USB Controller Default Setting Enable USB Controller SMART Reporting Allows you to activate the Self Monitoring Analysis and Reporting Technology SMART Default Setting Disabled Diskette Drive Allows you to activate the diskette drives The options are Disabled Enabled Default Setting Disabled Miscellaneous Devices Allows you to enable or disable the following devices Internal Modem Fixed Bay eS...

Страница 104: ...efore you set the system or hard drive password NOTE Successful password changes take effect immediately NOTE Deleting the admin password automatically deletes the system password and the hard drive password NOTE Successful password changes take effect immediately Default Setting Not set System Password Allows you to set change or delete the system password NOTE Successful password changes take ef...

Страница 105: ...tions will permanently activate or disable the feature and no further changes will be allowed Default Setting Deactivate CPU XD Support Allows you to enable the Execute Disable mode of the processor Default Setting Enable CPU XD Support Non Admin Setup Changes Allows you to determine whether changes to the setup options are allowed when an Administrator Password is set If disabled the setup option...

Страница 106: ...C adapter is connected Default Setting Wake on AC is not selected Auto On Time Allows you to set the time at which the computer must turn on automatically The options are Disabled Every Day Weekdays Default Setting Disabled USB Wake Support Allows you to enable USB devices to wake the system from Standby NOTE This feature is only functional when the AC power adapter is connected If the AC power ad...

Страница 107: ... or disable the Legacy USB Emulation Default Setting Enable Legacy USB Emulation is selected Fn Key Emulation Allows you to set the option where the Scroll Lock key is used to simulate the Fn key feature Default Setting Enable Fn Key Emulation POST HotKeys Allows you enable the sign on screen message display indicating the keystroke sequence to access the System Setup option menu Default Setting E...

Страница 108: ... by default SERR Messages Controls the SERR message mechanism This option is not set by default Some graphics cards require that the SERR message mechanism be disabled System Logs BIOS Events Allows you to view and clear the System Setup BIOS POST events DellDiag Events Allows you to view and clear the DellDiag events Thermal Events Allows you to view and clear the Thermal events Power Events Allo...

Страница 109: ...ed to your laptop Alternately blinking amber light with steady blue light Temporary battery failure with AC adapter present Constantly blinking amber light Fatal battery failure with AC adapter present Light off Battery in full charge mode with AC adapter present Solid white light on Battery in charge mode with AC adapter present Battery Charge and Health To check the battery charge press and rele...

Страница 110: ... of the charge capacity remains and you should consider replacing the battery Keyboard Status Lights The lights located above the keyboard indicate the following Turns on when the numeric keypad is enabled Turns on when the Caps Lock function is enabled Turns on when the Scroll Lock function is enabled 110 ...

Страница 111: ... support and service options Availability varies by country and product and some services may not be available in your area To contact Dell for sales technical support or customer service issues 1 Visit support dell com 2 Select your support category 3 If you are not a U S customer select your country code at the bottom of the page or select All to see more choices 4 Select the appropriate service...

Отзывы: