background image

Steps

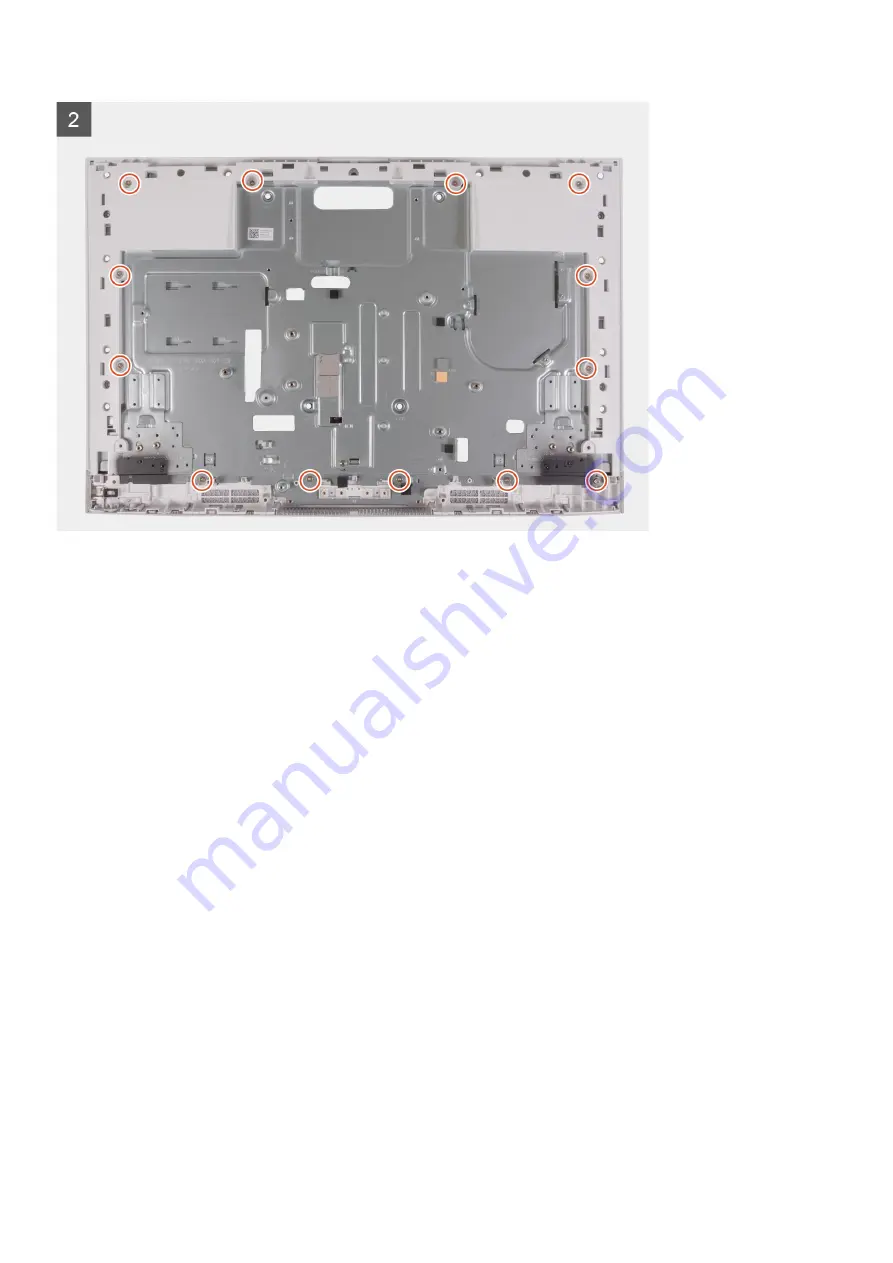
1. Place the base panel in an upright position.
2. Align the screw holes on the base panel with the screw holes on the display-assembly base.
3. Replace the 13 screws (M3x5) that secures the base panel to the display-assembly base.

Next steps

1. Install the 

display panel

.

2. Install the 

antennas

.

3. Install the 

power-button board

.

4. Install the 

display hinges

.

5. Install the 

microphones

.

6. Install the 

media-card reader

.

7. Install the 

system board

.

8. Install the 

retractable-camera assembly

.

9. Install the 

speakers

.

10. Install the 

heat sink

.

11. Install the 

fan

.

12. Install the 

coin-cell battery

.

13. Install the 

wireless card

.

14. Install the 

M.2 2230 solid-state drive

 or 

M.2 2280 solid-state drive

.

15. Install the 

memory module

.

16. Install the 

system-board shield

.

17. Install the 

hard drive

.

18. Install the 

I/O cover

.

19. Install the 

back cover

.

20. Install the 

stand

.

21. Follow the procedure in 

After working inside your computer

.

66

Removing and installing components

Содержание Inspiron 27 7710 All-in-One

Страница 1: ...Inspiron 27 7710 All in One Service Manual Regulatory Model W28C Regulatory Type W28C001 March 2022 Rev A00 ...

Страница 2: ...ential damage to hardware or loss of data and tells you how to avoid the problem WARNING A WARNING indicates a potential for property damage personal injury or death 2022 Dell Inc or its subsidiaries All rights reserved Dell EMC and other trademarks are trademarks of Dell Inc or its subsidiaries Other trademarks may be trademarks of their respective owners ...

Страница 3: ...O cover 18 Display hinges 19 Removing the display hinges 19 Installing the display hinges 20 Hard drive 21 Removing the hard drive 21 Installing the hard drive 22 System board shield 23 Removing the system board shield 23 Installing the system board shield 24 Memory module 25 Removing the memory module 25 Installing the memory module 26 Wireless card 27 Removing the wireless card 27 Installing the...

Страница 4: ...s 55 Removing the microphones 55 Installing the microphones 56 Antennas 57 Removing the antennas 57 Installing the antennas 58 Display panel 59 Removing the display panel 59 Installing the display panel 61 Base panel 63 Removing the base panel 63 Installing the base panel 65 Chapter 3 Drivers and downloads 67 Chapter 4 System setup 68 Entering BIOS setup program 68 Navigation keys 68 Boot Sequence...

Страница 5: ... Express Service Code of your Dell computer 81 Diagnostics 81 SupportAssist diagnostics 82 Built in self test BIST 82 LCD Built in Self Test BIST 82 Recovering the operating system 83 WiFi power cycle 83 Drain residual flea power perform hard reset 83 Chapter 6 Getting help and contacting Dell 85 Contents 5 ...

Страница 6: ...r computer For more safety best practices see the Regulatory Compliance home page at www dell com regulatory_compliance WARNING Disconnect your computer from all power sources before opening the computer cover or panels After you finish working inside the computer replace all covers panels and screws before connecting your computer to an electrical outlet CAUTION To avoid damaging the computer ens...

Страница 7: ...may cause degradation of memory integrity intermittent memory errors etc The more difficult type of damage to recognize and troubleshoot is the intermittent also called latent or walking wounded failure Perform the following steps to prevent ESD damage Use a wired ESD wrist strap that is properly grounded The use of wireless anti static straps is no longer allowed they do not provide adequate prot...

Страница 8: ...n static safe packaging Metal static shielded bags are preferred However you should always return the damaged part using the same ESD bag and packaging that the new part arrived in The ESD bag should be folded over and taped shut and all the same foam packing material should be used in the original box that the new part arrived in ESD sensitive devices should be removed from packaging only at an E...

Страница 9: ...re that no stray screws remain inside your computer 2 Connect any external devices peripherals or cables you removed before working on your computer 3 Replace any media cards discs or any other parts that you removed before working on your computer 4 Connect your computer and all attached devices to their electrical outlets 5 Turn on your computer Working inside your computer 9 ...

Страница 10: ...a screw storage box This is to ensure that the correct number of screws and correct screw type is restored when the component is replaced NOTE Some computers have magnetic surfaces Ensure that the screws are not left attached to such surfaces when replacing a component NOTE Screw color may vary with the configuration ordered Table 1 Screw list Component Screw type Quantity Screw image I O cover M3...

Страница 11: ...reader M3x3 5 1 Power button board M3x5 1 System board M3x5 6 Microphones M2x2 5 4 Base panel M3x5 13 Major components of Inspiron 27 7710 All in One The following image shows the major components of Inspiron 27 7710 All in One NOTE Depending on the configuration ordered some components may or may not be present in your computer Removing and installing components 11 ...

Страница 12: ...lay panel 12 Power button board with cable 13 Left Hinge 14 Right Hinge 15 Media card reader 16 Base panel 17 Hard drive 18 Hard drive bracket 19 Wireless card bracket 20 Wireless card 21 System board 22 M 2 2280 solid state drive if installed 23 M 2 2230 solid state drive if installed 24 System board shield 12 Removing and installing components ...

Страница 13: ... display flat on the surface with the stand hanging over the edge It is recommended to remove the stand to avoid accidental damage to the computer display during servicing NOTE The following procedure is applicable for both Y stand and Isosceles stand NOTE For replacement of stand or hinges the replacement kit is shipped with both stand and hinges and the service technician must replace both of th...

Страница 14: ...s About this task NOTE The following procedure is applicable for both Y stand and Isosceles stand NOTE For replacement of stand or hinges the replacement kit is shipped with both stand and hinges and the service technician must replace both of these components together Please refer to the procedure for removing the hinges and installing the hinges The following image indicates the location of the ...

Страница 15: ...orking inside your computer CAUTION When servicing the computer place it on an elevated clean and flat surface Place the display flat on the surface with the stand hanging over the edge It is recommended to remove the stand to avoid accidental damage to the computer display during servicing About this task The following image indicates the location of the back cover and provides a visual represent...

Страница 16: ...cover from the display assembly base Installing the back cover Prerequisites If you are replacing a component remove the existing component before performing the installation process About this task The following image indicates the location of the back cover and provides a visual representation of the installation procedure 16 Removing and installing components ...

Страница 17: ...in After working inside your computer I O cover Removing the I O cover Prerequisites 1 Follow the procedure in Before working inside your computer 2 Remove the stand 3 Remove the back cover About this task The following image indicates the location of the I O cover and provides a visual representation of the removal procedure Removing and installing components 17 ...

Страница 18: ...ay assembly base Installing the I O cover Prerequisites If you are replacing a component remove the existing component before performing the installation process About this task The following image indicates the location of the I O cover and provides a visual representation of the installation procedure 18 Removing and installing components ...

Страница 19: ...quisites 1 Follow the procedure in Before working inside your computer 2 Remove the stand 3 Remove the back cover 4 Remove the I O cover NOTE For replacement of stand or hinges the replacement kit is shipped with both stand and hinges and the service technician must replace both of these components together For more information about removing or installing the stand see removing the stand and inst...

Страница 20: ...forming the installation process About this task NOTE For replacement of stand or hinges the replacement kit is shipped with both stand and hinges and the service technician must replace both of these components together For more information about removing or installing the stand see removing the stand and installing the stand The following image indicates the location of the hinges and provides a...

Страница 21: ...O cover 2 Install the back cover 3 Install the stand 4 Follow the procedure in After working inside your computer Hard drive Removing the hard drive Prerequisites 1 Follow the procedure in Before working inside your computer 2 Remove the stand 3 Remove the back cover About this task The following image indicates the location of the hard drive and provides a visual representation of the removal pro...

Страница 22: ...ard drive 4 Remove the hard drive bracket off the hard drive Installing the hard drive Prerequisites If you are replacing a component remove the existing component before performing the installation process CAUTION Hard drives are fragile Exercise care when handling the hard drive About this task The following image indicates the location of the hard drive and provides a visual representation of t...

Страница 23: ...the display assembly base Next steps 1 Install the back cover 2 Install the stand 3 Follow the procedure in After working inside your computer System board shield Removing the system board shield Prerequisites 1 Follow the procedure in Before working inside your computer 2 Remove the stand 3 Remove the back cover 4 Remove the I O cover About this task The following image indicates the location of ...

Страница 24: ...bly base Installing the system board shield Prerequisites If you are replacing a component remove the existing component before performing the installation process About this task The following image indicates the location of the system board shield and provides a visual representation of the installation procedure 24 Removing and installing components ...

Страница 25: ... 4 Follow the procedure in After working inside your computer Memory module Removing the memory module Prerequisites 1 Follow the procedure in Before working inside your computer 2 Remove the stand 3 Remove the back cover 4 Remove the I O cover 5 Remove the system board shield About this task The following image indicates the location of the memory modules and provides a visual representation of t...

Страница 26: ...epeat step 1 and 2 if there are more than one memory module Installing the memory module Prerequisites If you are replacing a component remove the existing component before performing the installation process About this task The following image indicates the location of the memory module and provides a visual representation of the installation procedure 26 Removing and installing components ...

Страница 27: ...s 1 Install the system board shield 2 Install the I O cover 3 Install the back cover 4 Install the stand 5 Follow the procedure in After working inside your computer Wireless card Removing the wireless card Prerequisites 1 Follow the procedure in Before working inside your computer 2 Remove the stand 3 Remove the back cover 4 Remove the I O cover 5 Remove the system board shield About this task Th...

Страница 28: ...rd 4 Slide and remove the wireless card from the wireless card slot Installing the wireless card Prerequisites If you are replacing a component remove the existing component before performing the installation process About this task The following image indicates the location of the wireless card and provides a visual representation of the installation procedure 28 Removing and installing component...

Страница 29: ...lack AUX black triangle 2 Place the wireless card bracket on the wireless card 3 Align the notch on the wireless card with the tab on the wireless card slot 4 Slide the wireless card at an angle into the wireless card slot 5 Replace the screw M2x3 5 that secures the wireless card bracket to the wireless card Next steps 1 Install the system board shield 2 Install the I O cover 3 Install the back co...

Страница 30: ...he following image indicates the location of the solid state drive and provides a visual representation of the removal procedure Steps 1 Remove the screw M2x3 5 that secures the solid state drive to the system board 2 Slide and remove the solid state drive from the M 2 card slot on the system board Installing the M 2 2230 solid state drive Prerequisites If you are replacing a component remove the ...

Страница 31: ...epresentation of the installation procedure Steps 1 Ensure that the thermal pad covering the M 2 2230 solid state drive slot on the system board is in place 2 Align the notch on the solid state drive with the tab on the M 2 2230 solid state drive slot 3 Slide the solid state drive into the M 2 solid state drive slot on the system board 4 Replace the screw M2x3 5 that secures the solid state drive ...

Страница 32: ...ndicates the location of the solid state drive and provides a visual representation of the removal procedure Steps 1 Remove the screw M2x3 5 that secures the M 2 2280 solid state drive to the system board 2 Slide and remove the solid state drive from the M 2 solid state drive slot on the system board Installing the M 2 2280 solid state drive Prerequisites If you are replacing a component remove th...

Страница 33: ...n of the solid state drive and provides a visual representation of the installation procedure Steps 1 Ensure that the thermal pad covering the M 2 2280 solid state drive slot on the system board is in place 2 Align the notch on the solid state drive with the tab on the M 2 2280 solid state drive slot 3 Slide the solid state drive into the M 2 2280 solid state drive slot on the system board 4 Repla...

Страница 34: ...sk The following image indicates the location of the retractable camera assembly and provides a visual representation of the removal procedure Steps 1 Disconnect the camera cable from the system board 2 Peel the tape that secures the camera cable to the display assembly base 3 Remove the camera cable from the routing guide on the display assembly base 4 Remove the two screws M3x5 that secure the r...

Страница 35: ...eplace the two screws M3x5 that secure the retractable camera assembly to the display assembly base 3 Route the camera cable through the routing guide on the display assembly base 4 Adhere the tape that secures the camera cable to the display assembly base 5 Connect the camera cable to the system board Next steps 1 Install the system board shield 2 Install the I O cover 3 Install the back cover 4 ...

Страница 36: ...rom the routing guide on the display assembly base 3 Remove the three screws M2x2 5 that secure the fan to the display assembly base 4 Lift the fan along with its cable off the display assembly base Installing the fan Prerequisites If you are replacing a component remove the existing component before performing the installation process About this task The following image indicates the location of ...

Страница 37: ...em board shield 2 Install the I O cover 3 Install the back cover 4 Install the stand 5 Follow the procedure in After working inside your computer Speakers Removing the speakers Prerequisites 1 Follow the procedure in Before working inside your computer 2 Remove the stand 3 Remove the back cover 4 Remove the I O cover 5 Remove the system board shield About this task The following image indicates th...

Страница 38: ...ith the cable off the display assembly base Installing the speakers Prerequisites If you are replacing a component remove the existing component before performing the installation process About this task The following image indicates the location of the speakers and provides a visual representation of the installation procedure 38 Removing and installing components ...

Страница 39: ... Install the back cover 4 Install the stand 5 Follow the procedure in After working inside your computer Coin cell battery Removing the coin cell battery Prerequisites 1 Follow the procedure in Before working inside your computer 2 Remove the stand 3 Remove the back cover 4 Remove the I O cover 5 Remove the system board shield About this task The following image indicates the location of the coin ...

Страница 40: ... cell battery socket Installing the coin cell battery Prerequisites If you are replacing a component remove the existing component before performing the installation process About this task The following image indicates the location of the coin cell battery and provides a visual representation of the installation procedure 40 Removing and installing components ...

Страница 41: ...e stand 5 Follow the procedure in After working inside your computer Heat sink Removing the heat sink Prerequisites 1 Follow the procedure in Before working inside your computer 2 Remove the stand 3 Remove the back cover 4 Remove the I O cover 5 Remove the system board shield About this task The following image indicates the location of the heat sink and provides a visual representation of the rem...

Страница 42: ...rerequisites If you are replacing a component remove the existing component before performing the installation process About this task NOTE If either the system board or the heat sink is replaced use the thermal pad paste provided in the kit to ensure that thermal conductivity is achieved The following image indicates the location of the heat sink and provides a visual representation of the instal...

Страница 43: ...O cover 3 Install the back cover 4 Install the stand 5 Follow the procedure in After working inside your computer Media card reader Removing the media card reader Prerequisites 1 Follow the procedure in Before working inside your computer 2 Remove the stand 3 Remove the back cover 4 Remove the I O cover 5 Remove the system board shield About this task The following image indicates the location of ...

Страница 44: ...dia card reader along with its cable from the media card reader slot Installing the media card reader Prerequisites If you are replacing a component remove the existing component before performing the installation process About this task The following image indicates the location of the media card reader and provides a visual representation of the installation procedure 44 Removing and installing ...

Страница 45: ...isplay assembly base Next steps 1 Install the system board shield 2 Install the I O cover 3 Install the back cover 4 Install the stand 5 Follow the procedure in After working inside your computer Power button board Removing the power button board Prerequisites 1 Follow the procedure in Before working inside your computer 2 Remove the stand 3 Remove the back cover 4 Remove the I O cover 5 Remove th...

Страница 46: ...bs on the display assembly base 5 Open the latch and disconnect the power button board cable from the power button board 6 Lift the power button board off the display assembly base Installing the power button board Prerequisites If you are replacing a component remove the existing component before performing the installation process About this task The following image indicates the location of the...

Страница 47: ...secures the power button board to the display assembly base 4 Adhere the tape that secures the power button cable to the power button board 5 Replace the five screws M3x5 that secures the left display hinge to the display assembly base Next steps 1 Install the system board shield 2 Install the I O cover 3 Install the back cover 4 Install the stand 5 Follow the procedure in After working inside you...

Страница 48: ...ate changes again after you replace the system board NOTE Before disconnecting the cables from the system board note the location of the connectors so that you can reconnect the cables correctly after you replace the system board 2 Remove the stand 3 Remove the back cover 4 Remove the I O cover 5 Remove the system board shield 6 Remove the memory module 7 Remove the wireless card 8 Remove the M 2 ...

Страница 49: ...emory module slot DIMM1 8 Memory module slot DIMM2 9 Speaker cable connector 10 Microphone module cable connector 11 Media card reader cable connector 12 Wireless card slot 13 Power button board cable connector 14 Display cable connector The following image indicates the location of system board and provides a visual representation of the removal procedure Removing and installing components 49 ...

Страница 50: ...50 Removing and installing components ...

Страница 51: ...em board 8 Open the latch and disconnect the power button board cable from the system board 9 Disconnect the display cable from the system board 10 Remove the six screws M3x5 that secure the system board to the display assembly base 11 Remove the solid state drive screw mount M3x4 that secures the system board to the display assembly base 12 Lift the system board off the display assembly base Inst...

Страница 52: ...ory module slot DIMM1 8 Memory module slot DIMM2 9 Speaker cable connector 10 Microphone module cable connector 11 Media card reader cable connector 12 Wireless card slot 13 Power button board cable connector 14 Display cable connector The following image indicates the location of system board and provides a visual representation of the installation procedure 52 Removing and installing components ...

Страница 53: ...Removing and installing components 53 ...

Страница 54: ...stem board 9 Connect the fan cable to the system board 10 Connect the backlight cable to the system board 11 Connect the camera cable to the system board 12 Connect the touchscreen cable to the system board NOTE This cable is only available on computers that support touch option Next steps 1 Install the heat sink 2 Install the M 2 2230 solid state drive or M 2 2280 solid state drive 3 Install the ...

Страница 55: ...ive or M 2 2280 solid state drive as applicable 9 Remove the wireless card 10 Remove the fan 11 Remove the heat sink 12 Remove the media card reader 13 Remove the system board About this task The following image indicates the location of the microphones and provides a visual representation of the removal procedure Steps 1 Remove the four screws M2X2 5 that secure the microphone modules to the disp...

Страница 56: ...splay assembly base 3 Route the microphone cable through the routing guides on the display assembly base 4 Adhere the tape that secures the microphone cable to the display assembly base Next steps 1 Install the system board 2 Install the media card reader 3 Install the heat sink 4 Install the fan 5 Install the wireless card 6 Install the M 2 2230 solid state drive or M 2 2280 solid state drive 7 I...

Страница 57: ... display hinges 15 Remove the power button board About this task The following image indicates the location of the antennas and provides a visual representation of the removal procedure NOTE Note the routing of the antenna cables before removing the antenna cables form the routing guides Also note the location of the antenna modules that are printed on the display assembly base as ANT B black and ...

Страница 58: ... place 2 Adhere the copper foil that secures the antenna cables 2 to the display assembly base 3 Route the antenna cables through the routing guides on the display assembly base Next steps 1 Install the power button board 2 Install the display hinges 3 Install the media card reader 4 Install the system board 5 Install the speakers 6 Install the heat sink 7 Install the wireless card 8 Install the M...

Страница 59: ...drive 6 Remove the system board shield 7 Remove the memory module 8 Remove the M 2 2230 solid state drive or M 2 2280 solid state drive as applicable 9 Remove the wireless card 10 Remove the heat sink 11 Remove the system board About this task The following image indicates the location of display panel and provides a visual representation of the removal procedure Removing and installing components...

Страница 60: ...computer in an upright position 4 Holding the top corner push the display panel away from the display assembly base using the push holes available on the display assembly base 5 Slide the display backlight touchscreen and display cable on the display panel through slots on the display assembly base 6 Lift the display panel up from the display assembly base 60 Removing and installing components ...

Страница 61: ...a component remove the existing component before performing the installation process About this task The following image indicates the location of display panel and provides a visual representation of the installation procedure Removing and installing components 61 ...

Страница 62: ... the display panel to the display assembly base NOTE The screws that secure the middle frame and display panel to the display assembly base are silver in color and etched with LCD around the screw holes Next steps 1 Install the system board 2 Install the heat sink 3 Install the wireless card 4 Install the M 2 2230 solid state drive or M 2 2280 solid state drive 5 Install the memory module 6 Instal...

Страница 63: ...le 9 Remove the wireless card 10 Remove the fan 11 Remove the heat sink 12 Remove the coin cell battery 13 Remove the speakers 14 Remove the retractable camera assembly 15 Remove the system board 16 Remove the media card reader 17 Remove the microphones 18 Remove the display hinges 19 Remove the power button board 20 Remove the antennas 21 Remove the display panel About this task The following ima...

Страница 64: ...Steps 1 Remove the 13 screws M3x5 that secure the base panel to the display assembly base 64 Removing and installing components ...

Страница 65: ...nstalling the base panel Prerequisites If you are replacing a component remove the existing component before performing the installation process About this task The following image indicates the location of the base panel and provides a visual representation of the installation procedure Removing and installing components 65 ...

Страница 66: ...rophones 6 Install the media card reader 7 Install the system board 8 Install the retractable camera assembly 9 Install the speakers 10 Install the heat sink 11 Install the fan 12 Install the coin cell battery 13 Install the wireless card 14 Install the M 2 2230 solid state drive or M 2 2280 solid state drive 15 Install the memory module 16 Install the system board shield 17 Install the hard drive...

Страница 67: ...rivers and downloads When troubleshooting downloading or installing drivers it is recommended that you read the Dell Knowledge Based article Drivers and Downloads FAQ 000123347 3 Drivers and downloads 67 ...

Страница 68: ...t until you restart the system Keys Navigation Up arrow Moves to the previous field Down arrow Moves to the next field Enter Selects a value in the selected field if applicable or follow the link in the field Spacebar Expands or collapses a drop down list if applicable Tab Moves to the next focus area Esc Moves to the previous page until you view the main screen Pressing Esc in the main screen dis...

Страница 69: ...cessor type Maximum Clock Speed Displays the maximum processor clock speed Minimum Clock Speed Displays the minimum processor clock speed Current Clock Speed Displays the current processor clock speed Core Count Displays the number of cores on the processor Processor ID Displays the processor identification code Processor L2 Cache Displays the processor L2 Cache size Processor L3 Cache Displays th...

Страница 70: ...nce Enables or disables Windows Boot Manager and UEFI Hard Drive By default Windows Boot Manager is selected By default UEFI Hard Drive is selected Secure Boot Enable Secure Boot Enables secure boot using only validated boot software Default OFF Enable Microsoft UEFI CA Enables Microsoft UEFI CA Default ON Secure Boot Mode Changes to the Secure Boot operation mode Allows to switch between Deployed...

Страница 71: ...peration Configures operating mode of the integrated storage device controller Default RAID On Storage device is configured to support RAID functions When enabled all NVMe and SATA devices will be mapped under VMD controller Windows RST Intel Rapid Restore Technology driver or Linux kernel VMD driver must be loaded in order to boot the OS Storage Interface Port Enablement Enables or disables the o...

Страница 72: ...er menu Power USB PowerShare Enable USB PowerShare Enables or disables USB PowerShare Default OFF USB Wake Support Enable USB Wake Support Enables or disables USB Wake Support Default ON AC Behavior AC Recovery Enables to recover the last power state Default Power Off Block Sleep Blocks the computer from entering Sleep S3 mode in the operating system Default OFF NOTE If enabled the computer will n...

Страница 73: ...chedule a data wipe cycle for all storage devices connected to the system board on the next reboot Default OFF Absolute Enables disables or permanently disable the BIOS module interface of the optional Absolute Persistence Module service from Absolute Software Default Enabled UEFI Boot Path Security Determines if the system will prompt the user to enter the admin password if set when booting to a ...

Страница 74: ... support Default OFF NOTE Hard drive passwords must be cleared before the setting can be changed Allow Non Admin PSID Revert Enable Allow Non Admin PSID Revert Enables or disables Non Admin PSID Revert Default OFF Table 12 System setup options Update Recovery menu Update Recovery UEFI Capsule Firmware Updates Enable UEFI Capsule Firmware Updates Enables or disables BIOS updates through UEFI capsul...

Страница 75: ...Tag Displays the Service Tag of the computer Asset Tag Creates a system Asset Tag that can be used by an IT administrator to uniquely identify a particular system Once set in BIOS the Asset Tag cannot be changed Wake on LAN WLAN Wake on LAN WLAN Enable or disable Wake on LAN WLAN Default Disabled Auto On Time Controls automatic powering up of system for defined days and times Default Disabled Firs...

Страница 76: ...Virtualization Intel Virtualization Technology Enable Intel Virtualization Technology VT Enables the computer to run a virtual machine monitor VMM Default ON VT for Direct I O Enable Intel VT for Direct I O Enables the computer to perform Virtualization Technology for Direct I O VT d VT d is an Intel method that provides virtualization for memory map I O Default ON DMA protection Enable Pre Boot D...

Страница 77: ...ear Bios Event Log Select keep or clear BIOS events Default Keep System and setup password Table 19 System and setup password Password type Description System password Password that you must enter to log on to your system Setup password Password that you must enter to access and make changes to the BIOS settings of your computer You can create a system password and a setup password to secure your ...

Страница 78: ... In the System BIOS or System Setup screen select System Security and press Enter The System Security screen is displayed 2 In the System Security screen verify that Password Status is Unlocked 3 Select System Password update or delete the existing system password and press Enter or Tab 4 Select Setup Password update or delete the existing setup password and press Enter or Tab NOTE If you change t...

Страница 79: ... file 8 Double click the BIOS update file icon and follow the on screen instructions For more information see knowledge base article 000124211 at www dell com support Updating the BIOS using the USB drive in Windows Steps 1 Follow the procedure from step 1 to step 6 in Updating the BIOS in Windows to download the latest BIOS setup program file 2 Create a bootable USB drive For more information see...

Страница 80: ...f the USB drive AC power adapter that is connected to the computer Functional computer battery to flash the BIOS Perform the following steps to perform the BIOS update flash process from the F12 menu CAUTION Do not turn off the computer during the BIOS update process The computer may not boot if you turn off your computer Steps 1 From a turn off state insert the USB drive where you copied the flas...

Страница 81: ...linking Amber The computer is unable to boot to the operating system This indicates that the power supply is normal but another device in the computer is failing or not installed properly For example the power status light blinks amber two times followed by a pause and then blinks white three times followed by a pause This 2 3 pattern continues until the computer is turned off indicating No memory...

Страница 82: ...hat indicate if problems were encountered during the test NOTE Some tests are meant for specific devices and require user interaction Ensure that you are present in front of the computer when the diagnostic tests are performed For more information see SupportAssist Pre Boot System Performance Check Built in self test BIST LCD Built in Self Test BIST Dell All in One AIO have a built in diagnostic t...

Страница 83: ...serviceabilitytools Click SupportAssist and then click SupportAssist OS Recovery WiFi power cycle About this task If your computer is unable to access the internet due to WiFi connectivity issues a WiFi power cycle procedure may be performed The following procedure provides the instructions on how to conduct a WiFi power cycle NOTE Some ISPs Internet Service Providers provide a modem router combo ...

Страница 84: ...5 Turn on your computer NOTE For more information about performing a hard reset see the knowledge base article 000130881 at www dell com support 84 Troubleshooting ...

Страница 85: ...r Express Service Code at www dell com support For more information on how to find the Service Tag for your computer see Locate the Service Tag on your computer Dell knowledge base articles for a variety of computer concerns 1 Go to www dell com support 2 On the menu bar at the top of the Support page select Support Knowledge Base 3 In the Search field on the Knowledge Base page type the keyword t...

Отзывы: