background image

86

Solving Problems

www

.del

l.

com |

 su

ppo

rt.

d

e

ll.

co

m

If you have problems with a hard drive

E

NSURE


THAT


THE


DISK


IS


NOT


WRITE

-

PROTECTED

 — 

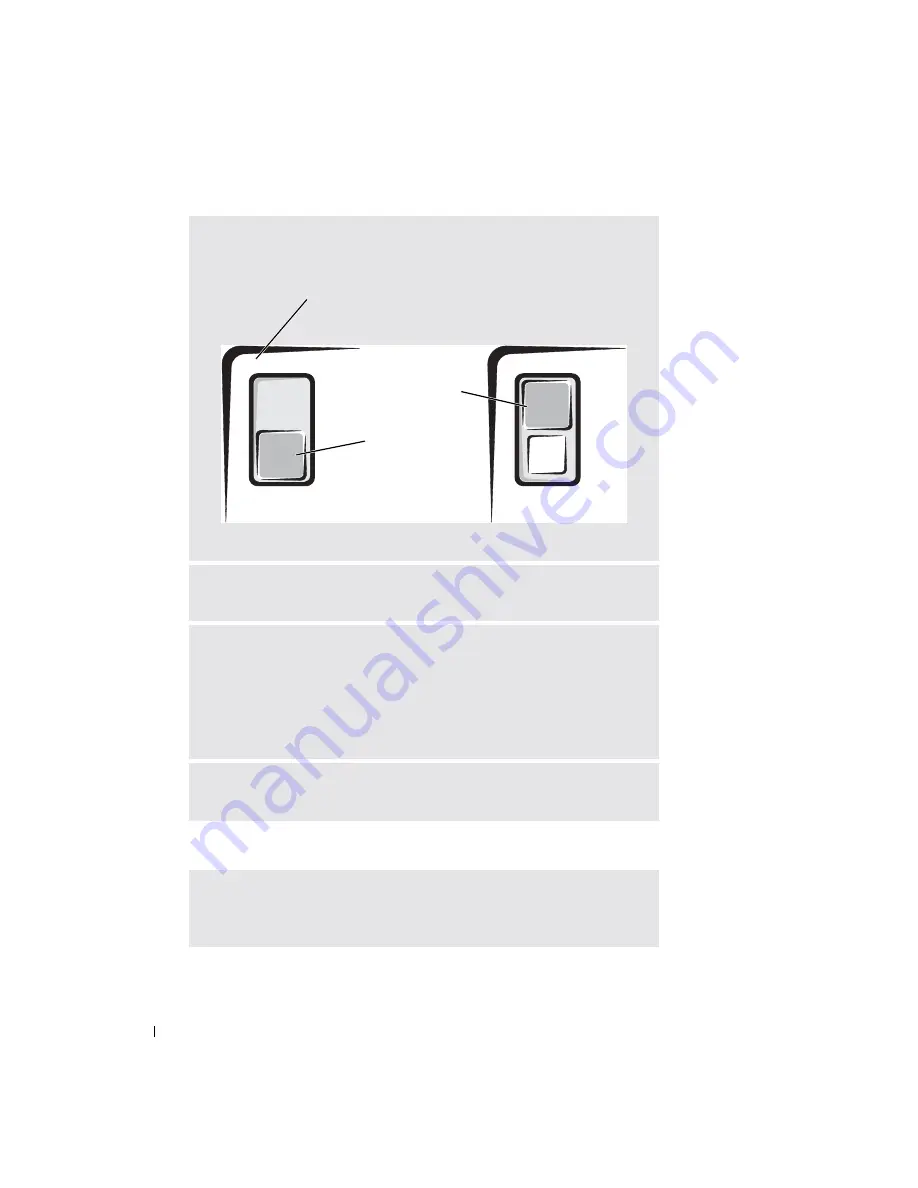
You cannot save data to a write-

protected disk. See the following figure.

T

RY


ANOTHER


FLOPPY


DISK

 — 

Insert another disk to eliminate the possibility that the 

original disk is defective.

R

EINSTALL


THE


DRIVE

 — 

1

Save and close any open files, exit any open programs, and shut down the 

computer.

2

Remove the drive from the module bay. See page 49 for instructions.

3

Reinstall the drive.

4

Turn on the computer.

C

LEAN


THE


DRIVE

 — 

 See "Cleaning Your Computer" in the 

Dell Inspiron Help 

file 

for instructions. To access the help file, see page 16.

A

LLOW


THE


COMPUTER


TO


COOL


BEFORE


TURNING


IT


ON

 — 

A hot hard drive may prevent 

the operating system from starting. Try allowing the computer to return to room 

temperature before turning it on.

not write-protected

back of floppy disk

write-protected

Содержание Inspirion

Страница 1: ...Thank you for purchasing this Factory Service Manual CD DVD from servicemanuals4u com Please check out our eBay auctions for more great deals on Factory Service Manuals servicemanuals4u ...

Страница 2: ...w w w d e l l c o m s u p p o r t d e l l c o m Dell Inspiron 510m Owner s Manual Model PP10L ...

Страница 3: ...document is subject to change without notice 2003 Dell Inc All rights reserved Reproduction in any manner whatsoever without the written permission of Dell Inc is strictly forbidden Trademarks used in this text Dell the DELL logo Latitude Inspiron Dimension OptiPlex Dell Precision Dell TravelLite and TrueMobile are trademarks of Dell Inc Intel and Pentium are registered trademarks of Intel Corpora...

Страница 4: ...ing Inside Your Computer 12 SAFETY Protecting Against Electrostatic Discharge 12 SAFETY Battery Disposal 13 Finding Information for Your Computer 15 1 A Tour of Your Computer Left View 22 Right View 24 Back View 25 Bottom View 29 2 Setting Up Your Computer Connecting to the Internet 31 Setting Up Your Internet Connection 31 Modem and Internet Connection Problems 32 E Mail Problems 34 Transferring ...

Страница 5: ...puter 39 3 Using a Battery Battery Performance 41 Checking the Battery Charge 42 Dell QuickSet Battery Meter 42 Microsoft Windows Power Meter 42 Charge Gauge 43 Low Battery Warning 43 Charging the Battery 43 Removing a Battery 44 Installing a Battery 44 Removing and Installing a Reserve Battery 44 Storing a Battery 46 Power Problems 46 4 Using the Module Bay About the Module Bay 49 About the Devic...

Страница 6: ...s Logo Key Functions 55 Touch Pad 56 Customizing the Touch Pad 57 Touch Pad or Mouse Problems 57 External Keyboard Problems 58 Unexpected Characters 58 6 Using CDs DVDs and other Multimedia Using CDs and DVDs 59 Drive Problems 59 If you cannot save a file to a floppy disk drive 59 If you cannot play a CD CD RW or DVD 60 If you cannot eject the CD CD RW or DVD drive tray 62 If you hear an unfamilia...

Страница 7: ...work 72 Determining Your Network Type 73 Connecting to a Wireless Network in Microsoft Windows XP 73 Finalizing Your Wireless Network Connection Security Settings 76 Connecting to a Network Without Security Related Requirements 77 Connecting to a Network With Wi Fi Protected Access WPA Security Requirements 77 Connecting to a Network With Wired Equivalent Protocol WEP Security Requirements 78 8 So...

Страница 8: ...ge Your Computer 90 Drivers 90 What Is a Driver 90 Identifying Drivers 90 Reinstalling Drivers and Utilities 91 Resolving Software and Hardware Incompatibilities 93 Using Microsoft Windows XP System Restore 93 Creating a Restore Point 94 Restoring the Computer to an Earlier Operating State 94 Undoing the Last System Restore 94 Dell Diagnostics 95 When to Use the Dell Diagnostics 95 Reinstalling Mi...

Страница 9: ...endix Specifications 117 Using the System Setup Program 123 Overview 123 Viewing the System Setup Screens 123 System Setup Screens 123 Commonly Used Options 124 Changing the Boot Sequence 124 Changing Printer Modes 125 Changing COM Ports 125 Enabling the Infrared Sensor 125 Contacting Dell 127 Regulatory Notices 143 NOM Information Mexico Only 144 Index 145 ...

Страница 10: ...erate with the base resting directly on exposed skin for extended periods of time The surface temperature of the base will rise during normal operation particularly when AC power is present Allowing sustained contact with exposed skin can cause discomfort or eventually a burn Do not use your computer in a wet environment for example near a bath tub sink or swimming pool or in a wet basement If you...

Страница 11: ...sion Do not carry a battery pack in your pocket purse or other container where metal objects such as car keys or paper clips could short circuit the battery terminals The resulting excessive current flow can cause extremely high temperatures and may result in damage to the battery pack or cause fire or burns The battery poses a burn hazard if you handle it improperly Do not disassemble it Handle a...

Страница 12: ... battery available in case you are asked to turn on the computer When traveling with the hard drive removed from the computer wrap the drive in a nonconducting material such as cloth or paper If you have the drive checked by hand be ready to install the drive in the computer You can put the hard drive through an X ray security machine but never put the drive through a metal detector When traveling...

Страница 13: ...stalling memory modules or a Mini PCI card Bluetooth card or reserve battery NOTICE Wait 5 seconds after turning off the computer before disconnecting a device or removing a memory module Mini PCI card Bluetooth card or reserve battery to help prevent possible damage to the system board 1 Shut down your computer and turn off any attached devices 2 Disconnect your computer and devices from electric...

Страница 14: ...n lithium ion battery and a reserve battery For instructions about replacing the lithium ion battery in your computer refer to Replacing the Battery on page 44 The reserve battery is a long life battery and it is very possible that you will never need to replace it However should you need to replace it see page 41 for instructions Do not dispose of the battery along with household waste Contact yo...

Страница 15: ...14 CAUTION Safety Instructions w w w d e l l c o m s u p p o r t d e l l c o m ...

Страница 16: ...umentation My device documentation Drivers and Utilities CD also known as the ResourceCD Documentation and drivers are already installed on your computer You can use the CD to reinstall drivers run the Dell Diagnostics or access your documentation Readme files may be included on your CD to provide last minute updates about technical changes to your computer or advanced technical reference material...

Страница 17: ... guides and click User s guides 3 Click Dell Inspiron Help Service Tag and Express Service Code Microsoft Windows License Label Service Tag and Microsoft Windows License These labels are located on your computer Use the Service Tag to identify your computer when you use support dell com or contact technical support Enter the Express Service Code to direct your call when contacting technical suppor...

Страница 18: ...er documentation product specifications and white papers How to use Windows XP Documentation for my computer Documentation for devices such as a modem Windows Help and Support Center 1 Click the Start button and click Help and Support 2 Type a word or phrase that describes your problem and click the arrow icon 3 Click the topic that describes your problem 4 Follow the instructions on the screen Ho...

Страница 19: ...18 Finding Information for Your Computer w w w d e l l c o m s u p p o r t d e l l c o m ...

Страница 20: ...page 16 POWER BUTTON Press the power button to turn on the computer or exit a power management mode NOTICE To avoid losing data turn off your computer by performing a Microsoft Windows operating system shutdown rather than by pressing the power button display display latch power button speakers keyboard keyboard status light touch pad device status light touch pad button ...

Страница 21: ...ta NOTICE To avoid loss of data never turn off the computer while the light is flashing Turns on steadily or blinks to indicate battery charge status Turns on when Bluetooth technology is enabled NOTE Bluetooth is an optional feature so the light turns on only if you ordered Bluetooth with your computer For more information see the documentation that came with your Bluetooth technology To turn off...

Страница 22: ...range The battery charge is critically low KEYBOARD The keyboard includes a numeric keypad as well as the Windows logo key For information on supported keyboard shortcuts see page 53 DISPLAY LATCH Keeps the display closed SPEAKERS To adjust the volume of the integrated speakers press the volume control buttons mute button or volume control keyboard shortcuts For more information see page 53 TOUCH ...

Страница 23: ...running Restricting the airflow can damage the computer or cause a fire PC CARD SLOT Supports one PC Card such as a modem or network adapter For more information see the Dell Inspiron Help file To access the help file see page 16 INFRARED SENSOR Lets you transfer files from your computer to another infrared compatible device without using cable connections Turns on when the numeric keypad is enabl...

Страница 24: ... on transferring data see the Help and Support Center or the documentation that came with your infrared compatible device AUDIO CONNECTORS SECURITY CABLE SLOT Lets you attach a commercially available antitheft device to the computer For more information see the instructions included with the device NOTICE Before you buy an antitheft device ensure that it will work with the security cable slot Atta...

Страница 25: ...he instructions included with the device NOTICE Before you buy an antitheft device ensure that it will work with the security cable slot MODULE BAY You can install devices such as an optical drive or a Dell TravelLite module in the module bay For more information see page 49 DEVICE LATCH RELEASE Releases the module bay device See page 49 for instructions security cable slot module bay device latch...

Страница 26: ...amage the computer or cause a fire USB CONNECTORS Connect USB devices such as a mouse keyboard or printer You can also connect the optional floppy drive directly to a USB connector using the optional floppy drive cable USB connectors 2 S video TV out connector modem connector RJ 11 network connector RJ 45 parallel connector video connector serial connector AC adapter connector ...

Страница 27: ... m S VIDEO TV OUT CONNECTOR MODEM CONNECTOR RJ 11 Connects your computer to a TV For more information see page 65 Connect the telephone line to the modem connector For information on using the modem see the online modem documentation supplied with your computer See page 15 ...

Страница 28: ...e computer to a network The green and yellow lights next to the connector indicate activity for both wired and wireless network communications For information on using the network adapter see the device user s guide supplied with your computer See page 15 Connects a parallel device such as a printer Connects an external monitor For more information see the Dell Inspiron Help file To access the hel...

Страница 29: ...g an incompatible cable or improperly connecting the cable to the power strip or electrical outlet may cause fire or equipment damage NOTICE When you disconnect the AC adapter cable from the computer grasp the connector not the cable itself and pull firmly but gently to avoid damaging the cable NOTE The computer turns on the fan when the computer gets hot Fan noise is normal and does not indicate ...

Страница 30: ... docking device See the documentation that came with your docking device for additional information FAN The computer uses an internal fan to create airflow through the vents which prevents the computer from overheating NOTE The computer turns on the fan when the computer gets hot Fan noise is normal and does not indicate a problem with the fan or the computer CAUTION Do not store your computer in ...

Страница 31: ...30 A Tour of Your Computer w w w d e l l c o m s u p p o r t d e l l c o m MINI PCI CARD COVER Covers the compartment that contains the Mini PCI card See page 107 HARD DRIVE Stores software and data ...

Страница 32: ...ovide high speed Internet access through your local cable TV line If you are using a dial up connection connect a telephone line to the modem connector on your computer and to the telephone wall jack before you set up your Internet connection If you are using a DSL or cable modem connection contact your ISP for setup instructions Setting Up Your Internet Connection To set up an AOL or MSN connecti...

Страница 33: ...Problems If you cannot connect to the Internet but have successfully connected in the past the ISP might have a service outage Contact your ISP to check the service status or try connecting again later Modem and Internet Connection Problems NOTICE Connect the modem to an analog telephone wall jack only Connecting the modem to a digital telephone network damages the modem NOTICE Modem and network c...

Страница 34: ...ephone directory for instructions on deactivating this feature Then adjust the dial up networking connection properties 1 Click the Start button and click Control Panel 2 Click Printers and Other Hardware click Phone and Modem Options click the Dialing Rules tab and then click Edit 3 In the Edit Location window ensure that To disable call waiting dial is checked and then select the proper code as ...

Страница 35: ...xt 3 On the Which computer is this screen click New Computer and click Next 4 On the Do you have a Windows XP CD screen click I will use the wizard from the Windows XP CD and click Next 5 When the Now go to your old computer screen appears go to your old or source computer Do not click Next at this time To copy data from the old computer 1 On the old computer insert the Windows XP Operating System...

Страница 36: ...ee the documentation that came with the printer for setup information including how to Obtain and install updated drivers Connect the printer to the computer Load paper and install the toner or ink cartridge Contact the printer manufacturer for technical assistance Printer Cable Your printer connects to your computer with either a USB cable or a parallel cable Your printer may not come with a prin...

Страница 37: ...er Connecting a USB Printer NOTE You can connect USB devices while the computer is turned on 1 Complete the operating system setup if you have not already done so 2 Install the printer driver if necessary See the documentation that came with your printer 3 Attach the USB printer cable to the USB connectors on the computer and the printer The USB connectors fit only one way parallel printer cable p...

Страница 38: ...perly connected to the computer see page 35 TEST THE ELECTRICAL OUTLET Ensure that the electrical outlet is working by testing it with another device such as a lamp ENSURE THAT THE PRINTER IS TURNED ON See the documentation supplied with the printer USB printer cable USB connector on computer USB connector on printer ...

Страница 39: ...rotect against power fluctuations or power interruptions caused by nearby lightning strikes When lightning occurs in your area disconnect the telephone line from the telephone wall jack and disconnect your computer from the electrical outlet Many surge protectors have a telephone jack for modem protection See the surge protector documentation for modem connection instructions NOTICE Not all surge ...

Страница 40: ...ery charges while AC power is available See the UPS manufacturer documentation for information on battery operating time and to ensure that the device is approved by Underwriters Laboratories UL Turning Off Your Computer NOTICE To avoid losing data turn off your computer by performing a Microsoft Windows operating system shutdown as described next rather than by pressing the power button NOTE As a...

Страница 41: ...40 Setting Up Your Computer w w w d e l l c o m s u p p o r t d e l l c o m ...

Страница 42: ... battery see page 49 Operating time is significantly reduced when you perform operations including but not limited to the following Using DVD DVD R and CD RW drives Using wireless communications devices PC Cards or USB devices Using high brightness display settings 3D screen savers or other power intensive programs such as 3D games Running the computer in maximum performance mode NOTE It is recomm...

Страница 43: ... the battery in your computer In addition when your computer is connected to a docking device docked the Battery Meter window includes a Dock Battery tab which displays the charge level and current status of the docking device battery The following icons appear in the Battery Meter window For more information about QuickSet right click the icon in the taskbar and click Help Microsoft Windows Power...

Страница 44: ...ut low battery alarms and to access Power Management see the Dell Inspiron Help file To access the help file see page 16 Charging the Battery NOTE The AC adapter charges a completely discharged battery in approximately 1 hour with the computer turned off Charge time is longer with the computer turned on You can leave the battery in the computer as long as you like The battery s internal circuitry ...

Страница 45: ...loses any unsaved data 1 Ensure that the computer is turned off suspended in a power management mode or connected to an electrical outlet 2 If the computer is connected to a docking device docked undock it See the documentation that came with your docking device for instructions 3 Slide and hold the battery bay latch release on the bottom of the computer and then remove the battery from the bay In...

Страница 46: ...Battery 45 3 Slide the reserve battery toward the connector and pull the battery out of its compartment 4 Disconnect the reserve battery cable from the connector reserve battery cable connector reserve battery ...

Страница 47: ...ended period of time A battery discharges during prolonged storage After a long storage period recharge the battery fully before you use it Power Problems NOTE For information on standby mode see the Dell Inspiron Help file To access the help file see page 16 CHECK THE POWER LIGHT When the power light is lit or blinking the computer has power If the power light is blinking the computer is in stand...

Страница 48: ... orange the battery may be defective Contact Dell see page 127 TEST THE ELECTRICAL OUTLET Ensure that the electrical outlet is working by testing it with another device such as a lamp CHECK THE AC ADAPTER Check the AC adapter cable connections If the AC adapter has a light ensure that the light is on CONNECT THE COMPUTER DIRECTLY TO AN ELECTRICAL OUTLET Bypass power protection devices power strips...

Страница 49: ...48 Using a Battery w w w d e l l c o m s u p p o r t d e l l c o m ...

Страница 50: ...ter ships with a CD DVD drive installed in the module bay and a device security screw which is not installed in the CD DVD drive but packaged separately When you install a module in the bay you can install the device security screw to prevent the module from being easily removed Removing the Device Security Screw If the device security screw is installed you must remove the screw to remove the mod...

Страница 51: ...ned Off NOTE If the device security screw is not installed you can remove and install devices while the computer is running and connected to a docking device docked NOTICE To prevent damage to devices store them in a safe dry place when they are not installed in the computer Avoid pressing down on them or placing heavy objects on top of them 1 If the device security screw is installed remove it 2 ...

Страница 52: ...ing 1 Before ejecting the device double click the Safely Remove Hardware icon on the taskbar click the device you want to eject and click Stop 2 If the device security screw is installed remove it NOTICE To prevent damage to devices store them in a safe dry place when they are not installed in the computer Avoid pressing down on them or placing heavy objects on top of them ...

Страница 53: ... t d e l l c o m 3 Press the device latch release 4 Pull the device out of the module bay 5 Push the new device into the bay until it clicks The operating system automatically recognizes the device 6 If necessary enter your password to unlock your computer ...

Страница 54: ...ad functions like the numeric keypad on an external keyboard Each key on the keypad has multiple functions The keypad numbers and symbols are marked in blue on the right of the keypad keys To type a number or symbol enable the keypad hold down Fn and press the desired key To enable the keypad press Num Lk The light indicates that the keypad is active To disable the keypad press Num Lk again 9 ...

Страница 55: ...e video image to the next display in the following sequence the integrated display only the integrated display and an external CRT monitor simultaneously an external CRT monitor only the integrated display and an external DVI monitor simultaneously and an external DVI monitor only Increases brightness on the integrated display only not on an external monitor Decreases brightness on the integrated ...

Страница 56: ...ses the volume of the integrated speakers and external speakers if attached Decreases the volume of the integrated speakers and external speakers if attached Enables and disables the integrated speakers and external speakers if attached Minimizes all open windows Maximizes all windows Runs Windows Explorer Opens the Run dialog box Opens the Search Results dialog box Opens the Search Results Comput...

Страница 57: ...lect an object lightly tap once on the surface of the touch pad or use your thumb to press the left touch pad button To select and move or drag an object position the cursor on the object and tap down up down on the touch pad On the second down motion leave your finger on the touch pad and move the selected object by sliding your finger across the surface To double click an object position the cur...

Страница 58: ...on click Control Panel and then click Printers and Other Hardware 2 Click Mouse 3 Try adjusting the settings CHECK THE MOUSE CABLE Shut down the computer see page 39 Disconnect the mouse cable and check it for damage For PS 2 cables check the cable connector for bent or broken pins Firmly reconnect the cable If you are using a mouse extension cable disconnect it and connect the mouse directly to t...

Страница 59: ...rom the Windows desktop click the Start button point to Programs point to Accessories and click Notepad 4 Type some characters on the external keyboard and verify that they appear on the display If you cannot verify these steps you may have a defective external keyboard TO VERIFY THAT THE PROBLEM IS WITH THE EXTERNAL KEYBOARD CHECK THE INTEGRATED KEYBOARD 1 Turn off the computer 2 Disconnect the e...

Страница 60: ...isk see the Dell Inspiron Help file To access the help file see page 16 If you cannot save a file to a floppy disk drive ENSURE THAT WINDOWS RECOGNIZES THE DRIVE Click the Start button and click My Computer If the drive is not listed perform a full scan with your antivirus software to check for and remove viruses Viruses can sometimes prevent Windows from recognizing the drive Insert a bootable di...

Страница 61: ...E PROTECTED You cannot save data to a write protected disk See the following figure TRY ANOTHER FLOPPY DISK Insert another disk to eliminate the possibility that the original disk is defective REINSTALL THE DRIVE 1 Save and close any open files exit any open programs and shut down the computer 2 Remove the drive See page 49 for instructions 3 Reinstall the drive 4 Turn on the computer CLEAN THE DR...

Страница 62: ...p and that the sound is not muted IDENTIFY THE DISC THAT IS NOT PLAYING If you have one CD CD RW or DVD in the fixed drive device and one in the module bay device 1 Click the Start button and click My Computer 2 Double click the drive letter of the device that you are verifying REINSTALL THE DRIVE 1 Save and close any open files exit any open programs and shut down the computer 2 Remove the drive ...

Страница 63: ...BLE STANDBY MODE IN WINDOWS BEFORE WRITING TO A CD RW Search for the keyword standby in the Help and Support Center To access the Help and Support Center see page 17 CHANGE THE WRITE SPEED TO A SLOWER RATE See the help files for your CD creation software EXIT ALL OTHER OPEN PROGRAMS Exiting all other open programs before writing to the CD RW may alleviate the problem ALLOW THE COMPUTER TO COOL BEF...

Страница 64: ...TALL THE SOUND AUDIO DRIVER See Reinstalling Software on page 91 CHECK THE SPEAKER CABLE CONNECTIONS See the setup diagram supplied with the speakers TEST THE ELECTRICAL OUTLET Ensure that the electrical outlet is working by testing it with another device such as a lamp ENSURE THAT THE SPEAKERS ARE TURNED ON See the setup diagram supplied with the speakers ADJUST THE WINDOWS VOLUME CONTROL Double ...

Страница 65: ... support sonic com NOTE Most commercial DVDs have copyright protection and cannot be copied using Sonic RecordNow 1 Click the Start button point to All Programs Sonic RecordNow RecordNow 2 Click either the audio tab or the data tab depending on the kind of CD you are planning to copy 3 Click Exact Copy 4 To copy the CD or DVD If you have one CD or DVD drive ensure that the settings are correct and...

Страница 66: ...Use a blank CD RW to practice CD recording until you are familiar with CD recording techniques If you make a mistake you can erase the data on the CD RW and try again You can also use blank CD RWs to test music file projects before you record the project permanently to a blank CD R See the Sonic support website at support sonic com for additional information Connecting a Television to the Computer...

Страница 67: ...Television on page 70 to ensure that the computer recognizes and works properly with the television S Video Connection Before you begin ensure that you have the following cables 1 Shut down the computer and the television and or audio device you want to connect 2 Plug one end of the S video cable in to the S video connector on the computer S video cable audio cable ...

Страница 68: ...on your computer 5 Plug the two RCA connectors on the other end of the audio cable in to the audio input connectors on your television or audio device 6 Turn on the television turn on any audio device you connected and then turn on the computer 7 See Enabling the Display Settings for a Television on page 70 to ensure that the computer recognizes and works properly with the television ...

Страница 69: ...e video input only use a composite TV out adapter cable available from Dell Before you begin ensure that you have the following cables 1 Turn off the computer and the television and or audio device you want to connect 2 Connect the composite TV out adapter cable to the S video TV out connector on the computer composite TV out adapter cable composite video cable audio cable ...

Страница 70: ...mposite TV out adapter cable 4 Plug the other end of the composite video cable in to the composite video connector on the television 5 Plug the single connector end of the audio cable in to the headphone connector on the computer composite video connector composite TV out adapter cable S video TV out connector S video connector ...

Страница 71: ...le click the Display icon click the Settings tab and then click Advanced 3 Click the Intel R Extreme Graphics tab 4 Click the Graphic Properties button 5 If you want to use only a television without using the computer display or any other display options a In the new window click Television so that a red check mark appears over the television icon b Ensure that the settings are correct 6 If you wa...

Страница 72: ... to it To connect a network cable NOTE Insert the cable until it clicks into place and then gently pull it to ensure that it is secure 1 Connect the network cable to the network adapter connector on the back of your computer NOTE Do not use a network cable with a telephone wall jack 2 Connect the other end of the network cable to a network connection device such as a network wall jack network adap...

Страница 73: ...reless Local Area Network NOTE These networking instructions do not apply to Bluetooth or cellular products Before you can connect to a wireless LAN you must have specific information about your network Be sure to get the name of your wireless network along with any special security settings from your network administrator The settings are unique to your network and cannot be provided by Dell CHEC...

Страница 74: ... in Microsoft Windows XP Your wireless network card requires specific software and drivers in order to connect to a network The software is already installed If the software is removed or corrupted follow the instructions included in the user s guide for your wireless network card The user s guide is located on your Drivers and Utilities CD that came with your computer in the User s Guides Network...

Страница 75: ... the left hand pane click Change settings of this connection The Wireless Network Connection Properties window appears 5 Click the Wireless Networks tab NOTE The names of wireless networks that your computer can detect are listed under Available Networks 6 Click Add The Wireless network properties window appears ...

Страница 76: ...ame SSID field 8 If you are connecting to an ad hoc network which does not use any routers or access points click to check the This is a computer to computer ad hoc network wireless access points are not used check box 9 Click OK Your new network name appears in the Preferred networks field ...

Страница 77: ...ose one of the following connection options based on the security settings for your network Connecting to a Network without Security Related Requirements common for home and small business networks Connecting to a Network with Wi Fi Protected Access WPA Security Requirements Connecting to a Network with Wired Equivalent Protocol WEP Security Requirements NOTE Network security settings are only pro...

Страница 78: ...o a WPA network If your network requires a user name password or domain settings consult the setup instructions in the user s guide for your wireless network card NOTE WPA protocols require that you know the network authentication and data encryption settings for your wireless network In addition your WPA protected network may require special settings such as a network key user name password and d...

Страница 79: ...r wireless network requires a key enter it in the Network key field NOTE Your computer can take up to 1 minute to connect to the network 6 Click OK Your network setup is complete Connecting to a Network With Wired Equivalent Protocol WEP Security Requirements 1 In the Preferred networks field click the name of your wireless network 2 Click Properties 3 From the Network Authentication drop down men...

Страница 80: ...on drop down menu select WEP 5 If the wireless network does not require a network key such as a password go to step 8 6 Click to uncheck the The key is provided for me automatically check box 7 Enter the WEP network key provided by your network administrator in the Network key field 8 Enter the WEP network key again in the Confirm network key field NOTE Your computer can take up to 1 minute to con...

Страница 81: ...80 Setting Up a Home and Office Network w w w d e l l c o m s u p p o r t d e l l c o m ...

Страница 82: ... a nonbootable floppy disk or CD Insert a bootable floppy disk or CD NON SYSTEM DISK OR DISK ERROR A floppy disk is in the floppy drive Remove the floppy disk and restart the computer NOT ENOUGH MEMORY OR RESOURCES EXIT SOME PROGRAMS AND TRY AGAIN You have too many programs open Close all windows and open the program that you want to use OPERATING SYSTEM NOT FOUND Contact Dell See page 127 A REQUI...

Страница 83: ...ET Ensure that the electrical outlet is working by testing it with another device such as a lamp CHECK THE AC ADAPTER Check the AC adapter cable connections If the AC adapter has a light ensure that the light is on CONNECT THE COMPUTER DIRECTLY TO AN ELECTRICAL OUTLET Bypass power protection devices power strips and the extension cable to verify that the computer turns on To access the help file s...

Страница 84: ...can cause poor picture quality ADJUST THE WINDOWS DISPLAY SETTINGS 1 Click the Start button and then click Control Panel 2 Click Appearance and Themes 3 Click the area you want to change or click the Display icon 4 Try different settings for Color quality and Screen resolution SEE ERROR MESSAGES If an error message appears see page 81 CONNECT AN EXTERNAL MONITOR 1 Shut down your computer and conne...

Страница 85: ...e splitter then bypass them and use the telephone line to connect the modem directly to the telephone wall jack CHECK THE CONNECTION Verify that the telephone line is connected to the modem CHECK THE TELEPHONE LINE Try using a different telephone line If you are using a line that is 3 m 10 ft or more in length try a shorter one IRREGULAR DIAL TONE If you have voice mail service you might hear an i...

Страница 86: ...ommands receive responses the modem is operating properly CHECK THE POWER CABLE CONNECTION Ensure that the scanner power cable is firmly connected to a working electrical power source and that the scanner is turned on CHECK THE SCANNER CABLE CONNECTION Ensure that the scanner cable is firmly connected to the computer and to the scanner UNLOCK THE SCANNER Ensure that your scanner is unlocked if it ...

Страница 87: ... and close any open files exit any open programs and shut down the computer 2 Remove the drive from the module bay See page 49 for instructions 3 Reinstall the drive 4 Turn on the computer CLEAN THE DRIVE See Cleaning Your Computer in the Dell Inspiron Help file for instructions To access the help file see page 16 ALLOW THE COMPUTER TO COOL BEFORE TURNING IT ON A hot hard drive may prevent the ope...

Страница 88: ...k Start CHECK THE PC CARD Ensure that the PC Card is properly inserted into the connector ENSURE THAT THE CARD IS RECOGNIZED BY WINDOWS Double click the Safely Remove Hardware icon in the Windows taskbar Ensure that the card is listed IF YOU HAVE PROBLEMS WITH A DELL PROVIDED PC CARD Contact Dell See page 127 IF YOU HAVE PROBLEMS WITH A PC CARD NOT PROVIDED BY DELL Contact the PC Card manufacturer...

Страница 89: ...rns off Press the power button again to restart the computer The computer restarts REVIEW ERROR MESSAGES ON PAGE 81 Look up the message and take the appropriate action See the software documentation GO TO THE DELL SUPPORT WEBSITE Go to support dell com for help with general usage installation and troubleshooting questions E MAIL DELL Go to support dell com and then click E Mail Dell in the Communi...

Страница 90: ...ery and put it in a safe place to dry 7 Remove the hard drive see page 109 8 Remove the memory module s see page 49 9 Open the display and place the computer right side up across two books or similar props to let air circulate all around it Let the computer dry for at least 24 hours in a dry area at room temperature NOTICE Do not use artificial means such as a hair dryer or a fan to speed the dryi...

Страница 91: ...rogram A driver acts like a translator between the device and any other programs that use the device Each device has its own set of specialized commands that only its driver recognizes Dell ships your computer to you with required drivers already installed no further installation or configuration is needed NOTICE The Drivers and Utilities CD may contain drivers for operating systems that are not o...

Страница 92: ...ystem Properties window click the Hardware tab 5 Click Device Manager 6 Right click the device for which the new driver was installed and click Properties 7 Click the Drivers tab 8 Click Roll Back Driver If Device Driver Rollback does not resolve the problem then use System Restore to return your computer to the operating state that existed before you installed the new driver Using the Drivers and...

Страница 93: ...structions and then read the readme file If instructed to navigate to the driver files click the CD directory on the driver information window to display the files associated with that driver Manually Reinstalling Drivers NOTE If you are reinstalling an infrared sensor driver you must first enable the infrared sensor in the system setup program before continuing with the driver installation For in...

Страница 94: ...onfigure the devices or remove the devices from the Device Manager See the documentation that came with the device for information on configuring the device To resolve incompatibilities using the Hardware Troubleshooter 1 Click the Start button and click Help and Support 2 Type hardware troubleshooter in the Search field and click the arrow to start the search 3 Click Hardware Troubleshooter in th...

Страница 95: ...e to which you want to restore your computer The Select a Restore Point screen provides a calendar that allows you to see and select restore points All calendar dates with available restore points appear in boldface type 4 Select a restore point and click Next If a calendar date has only one restore point then that restore point is automatically selected If two or more restore points are available...

Страница 96: ...NOTICE The Dell Diagnostics works only on Dell computers The Dell Diagnostics is located on a hidden diagnostic utility partition on your hard drive NOTE If your computer cannot display a screen image contact Dell See page 127 1 Shut down the computer See page 39 2 If the computer is connected to a docking device docked undock it See the documentation that came with your docking device for instruc...

Страница 97: ...the message Booting Dell Diagnostic Utility Partition Press any key to continue 6 Press any key to start the Dell Diagnostics from the diagnostics utility partition on your hard drive 7 When the Dell Diagnostics Main Menu appears select the test you want to run Dell Diagnostics Main Menu 1 After the Dell Diagnostics loads and the Main Menu screen appears click the button for the option you want Op...

Страница 98: ...ct a problem with a newly installed driver first try using Windows XP Device Driver Rollback For information on Device Driver Rollback see page 91 If Device Driver Rollback does not resolve the problem then use System Restore to return your operating system to the operating state it was in before you installed the new device driver For information on System Restore see page 93 Tab Function Results...

Страница 99: ...ake 1 to 2 hours to complete After you reinstall the operating system you must also reinstall the device drivers virus protection program and other software NOTICE The Operating System CD provides options for reinstalling Windows XP The options can overwrite files and possibly affect programs installed on your hard drive Therefore do not reinstall Windows XP unless a Dell technical support represe...

Страница 100: ...r location and click Next 7 Enter your name and organization optional in the Personalize Your Software screen and click Next 8 If you are reinstalling Windows XP Home Edition at the What s your computer s name window enter a name for your computer or accept the name provided and click Next If you are reinstalling Windows XP Professional at the Computer Name and Administrator Password window enter ...

Страница 101: ... the Ready to register with Microsoft screen appears select No not at this time and click Next 16 When the Who will use this computer screen appears you can enter up to five users 17 Click Next 18 Click Finish to complete the setup and remove the CD 19 Reinstall the appropriate drivers with the Drivers and Utilities CD 20 Reinstall your virus protection software ...

Страница 102: ... you begin any of the procedures in this section follow the safety instructions at the beginning of this document NOTICE Only a certified service technician should perform repairs on your computer Damage due to servicing that is not authorized by Dell is not covered by your warranty CAUTION Handle components and cards with care Do not touch the components or contacts on a card Hold a card by its e...

Страница 103: ...docking device for instructions NOTICE To disconnect a network cable first unplug the cable from your computer and then unplug it from the network wall jack 5 Disconnect any telephone or telecommunication lines from the computer 6 Disconnect your computer and all attached devices from their electrical outlets and then press the power button to ground the system board NOTICE To connect a network ca...

Страница 104: ...r information on the memory supported by your computer Install only memory modules that are intended for your computer NOTE Memory modules purchased from Dell are covered under your computer warranty CAUTION Before working inside your computer read the safety instructions at the front of this document 1 Follow the procedures in Before You Begin on page 101 2 Turn the computer over loosen the capti...

Страница 105: ...y module connector do not use tools to spread the memory module securing clips 3 If you are replacing a memory module remove the existing module a Use your fingertips to carefully spread apart the securing clips on each end of the memory module connector until the module pops up b Remove the module from the connector ...

Страница 106: ...4 Ground yourself and install the new memory module NOTE If the memory module is not installed properly the computer may not boot properly No error message indicates this failure a Align the notch in the module edge connector with the tab in the connector slot b Slide the module firmly into the slot at a 45 degree angle and rotate the module down until it clicks into place If you do not feel the c...

Страница 107: ...amage your computer 6 Insert the battery into the battery bay or connect the AC adapter to your computer and an electrical outlet 7 Turn on the computer As the computer boots it detects the additional memory and automatically updates the system configuration information To confirm the amount of memory installed in the computer click the Start button click Help and Support and then click Computer I...

Страница 108: ... 802 11b g Mini PCI card follow the instructions noted below Only products approved for use in your portable computer may be installed Approved Mini PCI cards may be purchased only from Dell NOTE 2 4 GHz Wireless LAN PC Cards may be removed and installed by the user If you ordered a Mini PCI card with your computer the card is already installed CAUTION Before working inside your computer read the ...

Страница 109: ...e metal securing tabs until the card pops up slightly c Lift the Mini PCI card out of its connector NOTICE To avoid damaging the Mini PCI card never place cables on top of or under the card NOTICE The connectors are keyed to ensure correct insertion If you feel resistance check the connectors and realign the card 5 Align the Mini PCI card with the connector at a 45 degree angle and press the Mini ...

Страница 110: ... when the drive is hot do not touch the metal housing of the hard drive CAUTION Before working inside your computer read the safety instructions at the front of this document NOTICE To prevent data loss turn off your computer before removing the hard drive Do not remove the hard drive while the computer is on in standby mode or in hibernate mode NOTICE Hard drives are extremely fragile even a slig...

Страница 111: ...ut of the computer 4 Remove the new drive from its packaging Save the original packaging for storing or shipping the hard drive NOTICE Use firm and even pressure to slide the drive into place If you use excessive force you may damage the connector 5 Insert the drive into the bay and lift the hard drive door Push the hard drive until it is fully seated in the bay Press the hard drive door down 6 Re...

Страница 112: ...nd Replacing Parts 111 Returning a Hard Drive to Dell Return your old hard drive to Dell in its original or comparable foam packaging Otherwise the hard drive may be damaged in transit hard drive foam packaging ...

Страница 113: ...wrist grounding strap or by periodically touching an unpainted metal surface such as the back panel on the computer 1 Turn the computer top side up and open it 2 Remove the center control cover a Open the display all the way 180 degrees so that it lies flat against your work surface b Starting on the right side of the computer use a plastic scribe to pry up the center control cover Lift it away fr...

Страница 114: ...e fragile easily dislodged and time consuming to replace Be careful when removing and handling the keyboard b Rotate the keyboard up and slide it forward c Hold the keyboard up and slightly forward to allow access to the keyboard connector d Pull up on the keyboard connector tab to disconnect the keyboard connector from the system board center control cover ...

Страница 115: ...lose any open files exit any open programs and then shut down the computer see page 39 3 If the computer is connected to a docking device docked undock it See the documentation that came with your docking device for instructions 4 Disconnect the computer from the electrical outlet 5 Wait 10 to 20 seconds and then disconnect any attached devices 6 Remove any installed PC Cards batteries and module ...

Страница 116: ...nnector 9 Pull the cable to remove the Bluetooth card from the computer NOTE When replacing the Bluetooth card ensure the Bluetooth cable is routed correctly so that you do not damage the cable when you install the hard drive system board connector Bluetooth card connector cable Bluetooth card ...

Страница 117: ...116 Adding and Replacing Parts w w w d e l l c o m s u p p o r t d e l l c o m ...

Страница 118: ...ernal bus frequency 400 MHz source synchronous processor system bus System Information Data bus width 64 bits DRAM bus width 64 bits Microprocessor address bus width 32 bits Flash EPROM 1MB PCI bus 32 bits PC Card CardBus controller PCI4510 CardBus controller PC Card connector supports one Type I or Type II card Cards supported 3 3 V and 5 V PC Card connector size 68 pins Data width maximum PCMCIA...

Страница 119: ...directional bidirectional or ECP Video 15 hole connector Audio microphone miniconnector stereo headphones speakers miniconnector USB two 4 pin USB 2 0 compliant connectors Infrared sensor sensor compatible with IrDA Standard 1 1 Fast IR and IrDA Standard 1 0 Slow IR S video TV out 7 pin mini DIN connector optional S video to composite video adapter cable Mini PCI Type IIIA Mini PCI card slot Modem...

Страница 120: ...dblaster and Microsoft Windows Sound System Audio controller Intel AC 97 Stereo conversion 20 bit stereo digital to analog 18 bit stereo analog to digital Interfaces Internal AC 97 External microphone miniconnector stereo headphones speakers miniconnector Speaker two 4 ohm speakers Internal speaker amplifier 2 W channel into 4 ohms Volume controls keyboard shortcuts or program menus Display Type a...

Страница 121: ... controlled through keyboard shortcuts Keyboard Number of keys 87 U S and Canada 88 Europe 91 Japan Key travel 2 7 mm 0 3 mm 0 11 inch 0 016 inch Key spacing 19 05 mm 0 3 mm 0 75 inch 0 012 inch Layout QWERTY AZERTY Kanji Touch Pad X Y position resolution graphics table mode 240 cpi Size Width 64 88 mm 2 55 inch sensor active area Height 48 88 mm 1 92 inch rectangle Battery Type 6 cell smart lithi...

Страница 122: ...wer intensive conditions Life span approximate 300 discharge charge cycles Temperature range Operating 0 to 35 C 32 to 95 F Storage 20 to 65 C 4 to 149 F AC Adapter Input voltage 90 264 VAC Input current maximum 1 7 A Input frequency 47 63 Hz Output current 3 34A 65 W 4 62A 90 W Output power 65 W or 90 W Rated output voltage 19 5 VDC Dimensions Height 28 2 mm 1 11 inches 65 W 34 2 mm 1 35 inches 9...

Страница 123: ...5 99 lb Computer Environmental Temperature range Operating 0 to 35 C 32 to 95 F Storage 40 to 65 C 40 to 149 F Relative humidity maximum Operating 10 to 90 noncondensing Storage 5 to 95 noncondensing Maximum vibration using a random vibration spectrum that simulates user environment Operating 0 66 GRMS Storage 1 30 GRMS Maximum shock measured with hard drive in head parked position and a 2 ms half...

Страница 124: ...he system setup settings Certain changes might make your computer work incorrectly Viewing the System Setup Screens 1 Turn on or restart your computer 2 When the DELL logo appears press F2 immediately If you wait too long and the Windows logo appears continue to wait until you see the Windows desktop Then shut down your computer and try again System Setup Screens NOTE For information about a speci...

Страница 125: ...h enabled device for the operating system start up files When the computer finds the files it stops searching and starts the operating system To control the boot devices select highlight a device by pressing the down arrow or up arrow key and then enable or disable the device or change its order in the list To enable or disable a device highlight the item and press the space bar Enabled items appe...

Страница 126: ...ows you to map the serial port COM address or disable the serial port and its address which frees computer resources for another device to use Enabling the Infrared Sensor 1 Enter system setup a Turn on your computer b Press F2 when the Dell logo appears 2 Press Alt P until you locate Infrared Data Port under Basic Device Configuration NOTE Ensure that the COM port that you select is different fro...

Страница 127: ...bled click Yes to restart the computer NOTE If neither Fast IR nor Slow IR work contact the infrared device manufacturer After you enable the infrared sensor you can use it to establish a link to an infrared device To set up and use an infrared device see the infrared device documentation and the Microsoft Windows XP Help and Support Center ...

Страница 128: ... Code City Code Department Name or Service Area Website and E Mail Address Area Codes Local Numbers and Toll Free Numbers Anguilla General Support toll free 800 335 0031 Antigua and Barbuda General Support 1 800 805 5924 Argentina Buenos Aires International Access Code 00 Country Code 54 City Code 11 Website www dell com ar Tech Support and Customer Care toll free 0 800 444 0733 Sales 0 810 444 33...

Страница 129: ...E mail tech_be dell com E mail for French Speaking Customers support euro dell com be fr emaildell Technical Support 02 481 92 88 Customer Care 02 481 91 19 Corporate Sales 02 481 91 00 Fax 02 481 92 99 Switchboard 02 481 91 00 Bermuda General Support 1 800 342 0671 Bolivia General Support toll free 800 10 0238 Brazil International Access Code 00 Country Code 55 City Code 51 Website www dell com b...

Страница 130: ...ll free 1 800 847 4096 Technical Support med large bus government toll free 1 800 387 5757 Sales Home Sales Small Business toll free 1 800 387 5752 Sales med large bus government toll free 1 800 387 5755 Spare Parts Sales Extended Service Sales 1 866 440 3355 Cayman Islands General Support 1 800 805 7541 Chile Santiago Country Code 56 City Code 2 Sales Customer Support and Technical Support toll f...

Страница 131: ...ducation toll free 800 858 2955 Large Corporate Accounts East toll free 800 858 2020 Large Corporate Accounts East Government and Education toll free 800 858 2669 Large Corporate Accounts Queue Team toll free 800 858 2572 Large Corporate Accounts South toll free 800 858 2355 Large Corporate Accounts West toll free 800 858 2811 Large Corporate Accounts Spare Parts toll free 800 858 2621 Colombia Ge...

Страница 132: ...001 Dominica General Support toll free 1 866 278 6821 Dominican Republic General Support 1 800 148 0530 Ecuador General Support toll free 999 119 El Salvador General Support 01 899 753 0777 Finland Helsinki International Access Code 990 Country Code 358 City Code 9 Website support euro dell com E mail fin_support dell com E mail Support servers Nordic_support dell com Technical Support 09 253 313 ...

Страница 133: ...4 719 Customer Care 0825 338 339 Switchboard 01 55 94 71 00 Sales 01 55 94 71 00 Fax 01 55 94 71 01 Germany Langen International Access Code 00 Country Code 49 City Code 6103 Website support euro dell com E mail tech_support_central_europe dell com Technical Support 06103 766 7200 Home Small Business Customer Care 0180 5 224400 Global Segment Customer Care 06103 766 9570 Preferred Accounts Custome...

Страница 134: ...ss Code 001 Country Code 852 Website support ap dell com E mail ap_support dell com Technical Support Dimension and Inspiron 296 93188 Technical Support OptiPlex Latitude and Dell Precision 296 93191 Customer Service non technical post sales issues 800 93 8291 Transaction Sales toll free 800 96 4109 Large Corporate Accounts HK toll free 800 96 4108 Large Corporate Accounts GCP HK toll free 800 90 ...

Страница 135: ...d Sales 01 204 4444 U K Sales dial within U K only 0870 907 4000 Fax SalesFax 01 204 0103 Switchboard 01 204 4444 Italy Milan International Access Code 00 Country Code 39 City Code 02 Website support euro dell com E mail support euro dell com it it emaildell Home and Small Business Technical Support 02 577 826 90 Customer Care 02 696 821 14 Fax 02 696 821 13 Switchboard 02 696 821 12 Corporate Tec...

Страница 136: ...6 4240 Business Sales Division up to 400 employees 044 556 1465 Preferred Accounts Division Sales over 400 employees 044 556 3433 Large Corporate Accounts Sales over 3500 employees 044 556 3430 Public Sales government agencies educational institutions and medical institutions 044 556 1469 Global Segment Japan 044 556 3469 Individual User 044 556 1760 Switchboard 044 556 4300 Korea Seoul Internatio...

Страница 137: ... 02 481 92 99 Switchboard Brussels Belgium 02 481 91 00 Macao Country Code 853 Technical Support toll free 0800 582 Customer Service Penang Malaysia 604 633 4949 Transaction Sales toll free 0800 581 Malaysia Penang International Access Code 00 Country Code 60 City Code 4 Technical Support toll free 1 800 888 298 Customer Service 04 633 4949 Transaction Sales toll free 1 800 888 202 Corporate Sales...

Страница 138: ...stomer Care 020 674 42 00 Relational Customer Care 020 674 4325 Home Small Business Sales 020 674 55 00 Relational Sales 020 674 50 00 Home Small Business Sales Fax 020 674 47 75 Relational Sales Fax 020 674 47 50 Switchboard 020 674 50 00 Switchboard Fax 020 674 47 50 New Zealand International Access Code 00 Country Code 64 E mail New Zealand nz_tech_support dell com E mail Australia au_tech_supp...

Страница 139: ... 011 Country Code 48 City Code 22 Website support euro dell com E mail pl_support_tech dell com Customer Service Phone 57 95 700 Customer Care 57 95 999 Sales 57 95 999 Customer Service Fax 57 95 806 Reception Desk Fax 57 95 998 Switchboard 57 95 999 Portugal International Access Code 00 Country Code 351 Website support euro dell com E mail support euro dell com pt en emaildell Technical Support 7...

Страница 140: ...011 709 7707 Sales 011 709 7700 Fax 011 706 0495 Switchboard 011 709 7700 Southeast Asian and Pacific Countries Customer Technical Support Customer Service and Sales Penang Malaysia 604 633 4810 Spain Madrid International Access Code 00 Country Code 34 City Code 91 Website support euro dell com E mail support euro dell com es es emaildell Home and Small Business Technical Support 902 100 130 Custo...

Страница 141: ...ode 41 City Code 22 Website support euro dell com E mail swisstech dell com E mail for French speaking HSB and Corporate Customers support euro dell com ch fr emaildell Technical Support Home and Small Business 0844 811 411 Technical Support Corporate 0844 822 844 Customer Care Home and Small Business 0848 802 202 Customer Care Corporate 0848 821 721 Fax 022 799 01 90 Switchboard 022 799 01 01 Tai...

Страница 142: ...d Accounts PAD 1000 employees 0870 908 0500 Technical Support direct PAD and general 0870 908 0800 Global Accounts Customer Care 01344 373 186 Home and Small Business Customer Care 0870 906 0010 Corporate Customer Care 01344 373 185 Preferred Accounts 500 5000 employees Customer Care 0870 906 0010 Central Government Customer Care 01344 373 193 Local Government Education Customer Care 01344 373 199...

Страница 143: ... Purchase Program EPP Customers toll free 1 800 695 8133 Projectors Technical Support toll free 1 877 459 7298 Public government education and healthcare Customer Service and Technical Support toll free 1 800 456 3355 Employee Purchase Program EPP Customers toll free 1 800 234 1490 Dell Sales toll free 1 800 289 3355 or toll free 1 800 879 3355 Dell Outlet Store Dell refurbished computers toll fre...

Страница 144: ...y together in the electronic environment While this computer has been designed and determined to be compliant with regulatory agency limits for EMI there is no guarantee that interference will not occur in a particular installation If this equipment does cause interference with radio communications services which can be determined by turning the equipment off and on you are encouraged to try to co...

Страница 145: ...Exporter Dell Inc One Dell Way Round Rock TX 78682 Importer Dell Computer de México S A de C V Paseo de la Reforma 2620 11 Piso Col Lomas Altas 11950 México D F Ship to Dell Computer de México S A de C V al Cuidado de Kuehne Nagel de México S de R L Avenida Soles No 55 Col Peñon de los Baños 15520 México D F Model number PP10L Supply voltage 100 240 VAC Frequency 50 60 Hz Current Consumption 1 5 A...

Страница 146: ...4 helpful tips 65 how to copy a CD 64 crashes 87 D damaged computer testing 90 Dell contacting 127 support site 17 Dell Diagnostics 95 device latch release description 24 29 system view 24 29 device security screw about 49 removing 49 device status lights 20 description 20 diagnostics Dell 95 Drivers and Utilities CD 15 display description 19 system view 19 display latch description 21 system view...

Страница 147: ...ting up 31 IR sensor description 22 23 system view 22 23 IRQ conflicts 93 K keyboard description 21 fixing problems 58 replacing 112 shortcuts 54 system view 21 unexpected characters 58 keyboard status lights description 21 system view 21 keypad numeric 53 L labels Microsoft Windows 16 Service Tag 16 M memory adding 103 removing 104 Microsoft Windows label 16 Mini PCI card installing 107 Mini PCI ...

Страница 148: ...es CD 15 ResourceCD 15 Windows XP 97 ResourceCD Dell Diagnostics 95 S safety instructions 9 security device security screw 49 security cable slot description 23 24 system view 23 24 serial connector description 27 system view 27 Service Tag 16 setup diagram 16 software conflicts 93 fixing problems 87 speakers description 21 system view 21 specifications system 117 support contacting Dell 127 suppo...

Страница 149: ...d problems 87 power problems 46 program crash 87 program stopped responding 88 restore to previous state 93 scanner problems 84 unexpected characters 58 wet computer 89 U USB connector description 25 system view 25 V video connector description 27 system view 27 W wet computer 89 Windows XP Device Driver Rollback 91 Hardware Troubleshooter 93 Help and Support Center 17 printer 38 reinstalling 97 S...

Отзывы: