background image

3.

If applicable, remove the system feet or wheel assembly.

4.

Open the system.

5.

Remove the system left side cover.

6.

Remove the system top cover. See Removing The System Top Cover.

7.

Remove the control panel. See Removing The Control Panel—Tower Mode.

8.

Remove the LCD module. See Removing The LCD Module—Tower Mode.

9.

Install the VGA module. See Installing the VGA Module.

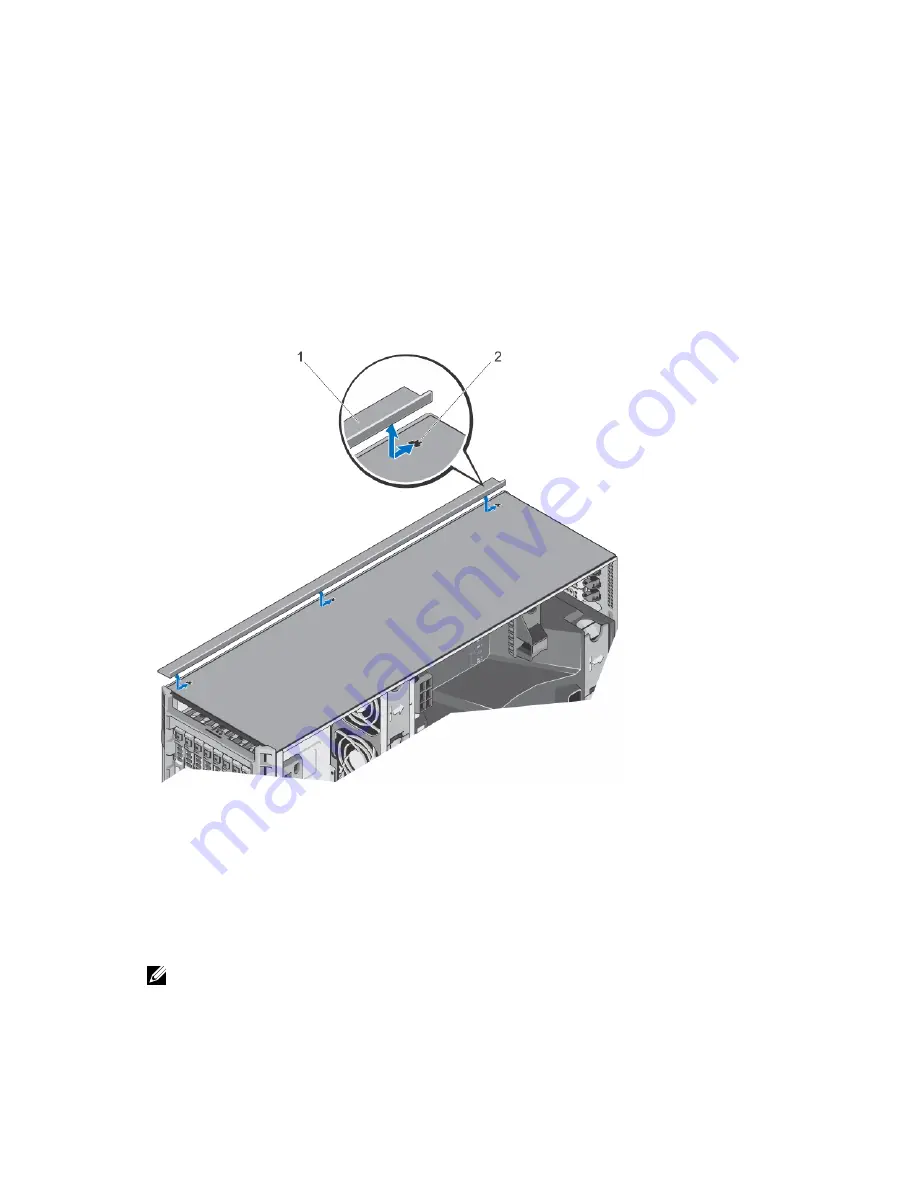
10. Install the rack slide cover.
11. To install the rack slide cover, follow the steps below:

a) Align the tabs on the plastic slide to the slots on the chassis.
b) Slide the plastic slide toward the back of the system to lock the slide tabs into the slots on the chassis.

Figure 71. Removing and Installing the Rack Slide Cover

1. system slide cover
2. slots

12. Install the control panel to the control panel module in the rack mode. See Installing The Control Panel Module—

Rack Mode.

13. Install the control panel module. See Installing The Control Panel Module—Rack Mode.
14. Remove the dummy LCD panel.

NOTE: The dummy LCD panel is a plastic panel located on the left side of your system in the tower orientation.

15. Install the plastic LCD panel to the LCD module.
16. Install the LCD module. See Installing The LCD Module—Rack Mode.

130

Содержание External OEMR XL T620

Страница 1: ...Dell PowerEdge T620 Systems Owner s Manual Regulatory Model E17S Series Regulatory Type E17S001 ...

Страница 2: ... Sempron are trademarks of Advanced Micro Devices Inc Microsoft Windows Windows Server Internet Explorer MS DOS Windows Vista and Active Directory are either trademarks or registered trademarks of Microsoft Corporation in the United States and or other countries Red Hat and Red Hat Enterprise Linux are registered trademarks of Red Hat Inc in the United States and or other countries Novell and SUSE...

Страница 3: ...23 Entering System Setup 24 Responding To Error Messages 24 Using The System Setup Navigation Keys 24 System Setup Options 24 System Setup Main Screen 25 System BIOS Screen 25 System Information Screen 25 Memory Settings Screen 26 Processor Settings Screen 26 SATA Settings Screen 28 Boot Settings Screen 28 Integrated Devices Screen 28 Serial Communications Screen 29 System Profile Settings Screen ...

Страница 4: ...alling The System Feet 41 Wheel Assembly Optional Tower Mode 41 Installing The Wheel Assembly 41 Removing The Wheel Assembly 41 Opening And Closing The System 42 Opening The System 43 Closing The System 43 Inside The System 44 Bezel Blank 45 Removing The Bezel Blank 45 Installing The Bezel Blank 46 Cooling Shroud 46 Removing The Cooling Shroud 46 Installing The Cooling Shroud 47 System Memory 47 G...

Страница 5: ...emoving The Cooling Fan Assembly Optional 67 Installing The Cooling Fan Assembly Optional 68 Internal USB Memory Key Optional 69 Replacing The Internal USB Key 69 PCIe Card Holder 69 Removing The PCIe Card Holder 70 Installing The PCIe Card Holder 70 GPU Card Holder Optional 71 Removing The GPU Card Holder 71 Installing The GPU Card Holder 72 Expansion Cards 73 Expansion Card Installation Guidelin...

Страница 6: ... Drive Backplane 96 Removing The Hard Drive Backplane 96 Installing The Hard Drive Backplane 114 System Top Cover 114 Removing The System Top Cover 114 Installing The System Top Cover 115 System Left Side Cover 115 Removing The System Left Side Cover 115 Installing The System Left Side Cover 116 Control Panel 117 Removing The Control Panel Tower Mode 117 Installing The Control Panel Tower Mode 118...

Страница 7: ...ubleshooting A Damaged System 135 Troubleshooting The System Battery 136 Troubleshooting Power Supplies 136 Troubleshooting Cooling Problems 136 Troubleshooting Cooling Fans 137 Troubleshooting System Memory 137 Troubleshooting An Internal USB Key 138 Troubleshooting An SD Card 138 Troubleshooting An Optical Drive 139 Troubleshooting A Hard Drive 139 Troubleshooting Expansion Cards 140 Troubleshoo...

Страница 8: ...ns 147 9 System Messages 153 LCD Messages 153 Viewing LCD Messages 153 Removing LCD Messages 153 System Error Messages 153 Warning Messages 169 Diagnostic Messages 169 Alert Messages 169 10 Getting Help 171 Contacting Dell 171 ...

Страница 9: ...1 About Your System Front Panel Features And Indicators Tower Mode Figure 1 Front Panel Features and Indicators 2 5 Inch Hard Drive Chassis 9 ...

Страница 10: ...on Description 1 Optical drive optional One optional SATA DVD ROM drive or DVD RW drive 2 vFlash media card slot Allows you to insert a vFlash media card 3 Power on indicator power button The power on indicator lights when the system power is on The power button controls the power supply output to the system 10 ...

Страница 11: ...ystem ID button for more than five seconds to enter BIOS progress mode To reset iDRAC if not disabled in F2 iDRAC setup press and hold for more than 15 seconds 6 LCD menu buttons Allows you to navigate the control panel LCD menu 7 Information tag A slide out label panel which allows you to record system information such as Service Tag NIC MAC address and so on as per your need 8 LCD panel Displays...

Страница 12: ...ront Panel Features and Indicators 2 5 Inch Hard Drive Chassis NOTE If your system is a rack it comes preconfigured with the rack ears and does not have the system feet Item Indicator Button or Connector Icon Description 1 11 USB connectors 2 Allows you to connect USB devices to the system The ports are USB 2 0 compliant 2 Optical drive optional One optional SATA DVD ROM drive or DVD RW drive 3 Ha...

Страница 13: ...ned on or off 5 LCD menu buttons Allows you to navigate the control panel LCD menu 6 vFlash media card slot Allows you to insert a vFlash media card 7 Power on indicator power button The power on indicator lights when the system power is on The power button controls the power supply output to the system NOTE On ACPI compliant operating systems turning off the system using the power button causes t...

Страница 14: ...ides system information and status and error messages to indicate when the system is operating correctly or when the system needs attention See System Error Messages for information about specific error codes The LCD backlight lights blue during normal operating conditions and lights amber to indicate an error condition The LCD backlight is off when the system is in standby mode and can be turned ...

Страница 15: ...etwork mode If Static IP is selected the available fields are IP Subnet Sub and Gateway Gtw Select Setup DNS to enable DNS and to view domain addresses Two separate DNS entries are available Set error Select SEL to display LCD error messages in a format that matches the IPMI description in the SEL This is useful when trying to match an LCD message with an SEL entry Select Simple to display LCD err...

Страница 16: ...ive status indicator green and amber NOTE If the hard drive is in Advanced Host Controller Interface AHCI mode the status indicator on the right side does not function and remains off Drive Status Indicator Pattern RAID Only Condition Blinks green two times per second Identifying drive or preparing for removal Off Drive ready for insertion or removal NOTE The drive status indicator remains off unt...

Страница 17: ...tatus Indicator Pattern RAID Only Condition Blinks green three seconds amber three seconds and off six seconds Rebuild aborted Back Panel Features And Indicators Figure 6 Back Panel Features and Indicators 17 ...

Страница 18: ... to enter the BIOS progress mode To reset iDRAC if not disabled in F2 iDRAC setup press and hold for more than 15 seconds 5 System identification connector Allows you to connect the optional system status indicator assembly through the optional cable management arm 6 iDRAC Enterprise port Dedicated management port NOTE The port is available for use only if the iDRAC Enterprise license is installed...

Страница 19: ...0 Gbps Link indicator is amber The NIC is connected to a valid network at less than its maximum port speed Activity indicator is blinking green Network data is being sent or received Power Indicator Codes Each AC power supply has an illuminated translucent handle and each DC power supply has an LED that serves as an indicator to show whether power is present or whether a power fault has occurred F...

Страница 20: ...C power supplies support both 220 V and 110 V input voltages When two identical power supplies receive different input voltages they can output different wattages and trigger a mismatch CAUTION If two power supplies are used they must be of the same type and have the same maximum output power CAUTION Combining AC and DC power supplies is not supported and triggers a mismatch Flashing green When ho...

Страница 21: ... your system that provides documentation and tools for configuring and managing your system including those pertaining to the operating system system management software system updates and system components that you purchased with your system For the full name of an abbreviation or acronym used in this document see the Glossary at www dell com support manuals NOTE Always check for updates on www d...

Страница 22: ...22 ...

Страница 23: ...re configuration Enable or disable integrated devices Set performance and power management thresholds Manage system security You can access the System Setup using the Standard graphical browser which is enabled by default Text browser which is enabled using Console Redirection To enable Console Redirection in System Setup select System BIOS Serial Communication screen Serial Communication select O...

Страница 24: ...es If an error message is displayed while the system is booting make a note of the message For more information see System Error Messages NOTE After installing a memory upgrade it is normal for your system to display a message the first time you start your system Using The System Setup Navigation Keys Keys Action Up arrow Moves to the previous field Down arrow Moves to the next field Enter Allows ...

Страница 25: ...o on SATA Settings Displays options to enable or disable the integrated SATA controller and ports Boot Settings Displays options to specify the boot mode BIOS or UEFI Enables you to modify UEFI and BIOS boot settings Integrated Devices Displays options to enable or disable integrated device controllers and ports and to specify related features and options Serial Communication Displays options to e...

Страница 26: ...pare with Advanced ECC Mode By default the Memory Operating Mode option is set to Optimizer Mode NOTE The Memory Operating Mode can have different defaults and available options based on the memory configuration Node Interleaving If this field is Enabled memory interleaving is supported if a symmetric memory configuration is installed If Disabled the system supports Non Uniform Memory architecture...

Страница 27: ...e or disable Data Cache Unit IP prefetcher By default the DCU IP Prefetcher option is set to Enabled Execute Disable Allows you enable or disable execute disable memory protection technology By default the Execute Disable option is set to Enabled Logical Processor Idling Allows you to enable or disable the OS capability to put logical processors in the idling state in order to reduce power consump...

Страница 28: ...y with non UEFI operating systems By default the Boot Mode option is set to BIOS NOTE Setting this field to UEFI disables BIOS Boot Settings menu Setting this field to BIOS disables the UEFI Boot Settings menu Boot Sequence Retry Allows you to enable or disable the boot sequence retry feature If this field is enabled and the system fails to boot the system reattempts the boot sequence after 30 sec...

Страница 29: ...e operating system By default the OS Watchdog Timer option is set to Disabled Embedded Video Controller Allows you to enable or disable the Embedded Video Controller By default the embedded video controller is Enabled SR IOV Global Enable Allows you to enable or disable the BIOS configuration of Single Root I O Virtualization SR IOV devices By default the SR IOV Global Enable option is set to Disa...

Страница 30: ...ofile Allows you to set the system profile If you set the System Profile option to a mode other than Custom the BIOS automatically sets the rest of the options You can only change the rest of the options if the mode is set to Custom By default the System Profile option is set to Performance Per Watt Optimized DAPC DAPC is Dell Active Power Controller NOTE The following parameters are available onl...

Страница 31: ...set the system password This option is set to Enabled by default and is read only if the password jumper is not installed in the system Setup Password Allows you to set the setup password This option is read only if the password jumper is not installed in the system Password Status Allows you to lock the system password By default the Password Status option is set to Unlocked TPM Security Allows y...

Страница 32: ...r AC Power Recovery Delay is selected Miscellaneous Settings Menu Item Description System Time Allows you to set the time on the system System Date Allows you to set the date on the system Asset Tag Displays the asset tag and allows you to modify it for security and tracking purposes Keyboard NumLock Allows you to set whether the system boots with the NumLock enabled or disabled By default the Key...

Страница 33: ... select System BIOS and press Enter The System BIOS screen is displayed 3 In the System BIOS screen select System Security and press Enter The System Security screen is displayed 4 In the System Security screen verify that Password Status is Unlocked 5 Select System Password enter your system password and press Enter or Tab Use the following guidelines to assign the system password A password can ...

Страница 34: ...ternate system password 1 Turn on or reboot your system 2 Type your password and press Enter When Password Status is Locked type the password and press Enter when prompted at reboot If an incorrect system password is entered the system displays a message and prompts you to re enter your password You have three attempts to enter the correct password After the third unsuccessful attempt the system d...

Страница 35: ...sage F11 UEFI Boot Manager If your operating system begins to load before you press F11 allow the system to finish booting and then restart your system and try again Using The Boot Manager Navigation Keys Key Description Up arrow Moves to the previous field Down arrow Moves to the next field Enter Allows you to type in a value in the selected field if applicable or follow the link in the field Spa...

Страница 36: ...t Option Displays the list of available UEFI boot options marked with asterisks select the boot option you wish to use and press Enter Add Boot Option Adds a new boot option Delete Boot Option Deletes an existing boot option Boot From File Sets a one time boot option not included in the boot option list Embedded System Management The Dell Lifecycle Controller provides advanced embedded systems man...

Страница 37: ... iDRAC Settings screen is displayed Changing The Thermal Settings The iDRAC Settings utility enables you to select and customize the thermal control settings for your system 1 Enter the iDRAC Settings utility 2 Under iDRAC Settings Thermal User Option select between the following options Default Maximum Exhaust Temperature Fan Speed Offset NOTE When the User Option is set to the default Auto setti...

Страница 38: ...38 ...

Страница 39: ...ving insulation from size 10 AWG solid or stranded insulated copper wire NOTE Use alpha wire part number 3080 or equivalent 65 30 stranding Front Bezel Optional Installing The Front Bezel 1 Locate the keys on the inside of the front bezel 2 Remove the bezel key from the inside of the front bezel 3 Insert the bezel tabs into the bezel tab slots in the chassis 4 Press the top end of the bezel into t...

Страница 40: ...ystem Feet Tower Mode The system feet provide stability to the system in the tower mode Removing The System Feet NOTE It is recommended that you remove the system feet only when you are converting the system from the tower mode to the rack mode or when you are replacing the system feet with the wheel assembly 1 Rotate the system feet inward 2 Lay the system on its side on a flat stable surface 3 R...

Страница 41: ...of the system and secure the unit in place using a single screw 6 Align the two retention hooks on the front wheel assembly with the two slots on the base of the chassis and insert the hooks into the slots 7 Offset the front wheel assembly slightly to the front and secure the unit in place using a screw 8 Place the system upright on a sturdy stable surface Removing The Wheel Assembly 1 Lay the sys...

Страница 42: ...tem is on may expose you to a risk of electric shock CAUTION Many repairs may only be done by a certified service technician You should only perform troubleshooting and simple repairs as authorized in your product documentation or as directed by the online or telephone service and support team Damage due to servicing that is not authorized by Dell is not covered by your warranty Read and follow th...

Страница 43: ...he system from the electrical outlet 2 Rotate the latch release lock counter clockwise to the unlocked position 3 Press down on the cover release latch and rotate the latch end of the cover away from the system 4 Grasp the cover on both sides and carefully move the cover away from the system Figure 13 Opening and Closing the System 1 system 2 system side cover 3 cover release latch 4 latch release...

Страница 44: ...roduct documentation or as directed by the online or telephone service and support team Damage due to servicing that is not authorized by Dell is not covered by your warranty Read and follow the safety instructions that came with the product NOTE Components that are hot swappable are marked orange and touch points on the components are marked blue Figure 14 Inside the System 1 cooling fan assembly...

Страница 45: ... not authorized by Dell is not covered by your warranty Read and follow the safety instructions that came with the product 1 If installed remove the front bezel 2 Open the system 3 Identify the bezel blank to be removed and push the metal tab to disengage the blank from the slot in the chassis NOTE The metal tab is visible on the right side of the open system in the tower mode 4 Pull the bezel bla...

Страница 46: ...place 3 Close the system 4 If applicable install the front bezel Cooling Shroud Removing The Cooling Shroud CAUTION Many repairs may only be done by a certified service technician You should only perform troubleshooting and simple repairs as authorized in your product documentation or as directed by the online or telephone service and support team Damage due to servicing that is not authorized by ...

Страница 47: ... cooling shroud in the system chassis ensure that the cables inside the system are routed along the chassis wall and secured using the cable securing bracket 1 Align the tabs on the cooling shroud with the securing slots on the chassis 2 Lower the cooling shroud into the chassis until firmly seated 3 If applicable install the system cooling fans in the cooling shroud 4 Close the system 5 Reconnect...

Страница 48: ... of the processors The system contains 24 memory sockets split into two sets of 12 sockets one set per processor Each 12 socket set is organized into four channels In each channel the release levers of the first socket are marked white the second socket black and the third socket green NOTE DIMMs in sockets A1 to A12 are assigned to processor 1 and DIMMs in sockets B1 to B12 are assigned to proces...

Страница 49: ...and LRDIMMs must not be mixed x4 and x8 DRAM based DIMMs can be mixed For more information see Mode Specific Guidelines A maximum of two UDIMMs can be populated in a channel Up to two quad rank RDIMMs and up to three dual or single rank RDIMMs can be populated per channel When a quad rank RDIMM is populated in the first slot with white release levers the third DIMM slot in the channel with green r...

Страница 50: ...ite release tabs must be identical and similar rule applies for sockets with black and green release tabs This ensures that identical DIMMs are installed in matched pairs for example A1 with A2 A3 with A4 A5 with A6 and so on NOTE Advanced ECC with Mirroring is not supported Memory Optimized Independent Channel Mode This mode supports SDDC only for memory modules that use x4 device width and does ...

Страница 51: ...DIMMs respectively Table 1 Memory Configurations Single Processor System Capacity in GB DIMM Size in GB Number of DIMMs DIMM Rank Organization and Frequency DIMM Slot Population 2 2 1 1R x8 1333 MT s 1R x8 1600 MT s A1 4 2 2 1R x8 1333 MT s 1R x8 1600 MT s A1 A3 8 2 4 1R x8 1333 MT s 1R x8 1600 MT s A1 A2 A3 A4 12 2 6 1R x8 1333 MT s 1R x8 1600 MT s A1 A2 A3 A4 A5 A6 16 2 8 1R x8 1333 MT s A1 A2 A...

Страница 52: ...1333 MT s 2R x4 1600 MT s A1 A2 A3 A4 B1 B2 B3 B4 96 4 24 2R x8 1333 MT s A1 A2 A3 A4 A5 A6 A7 A8 A9 A10 A11 A12 B1 B2 B3 B4 B5 B6 B7 B8 B9 B10 B11 B12 8 12 2R x4 1333 MT s 2R x4 1600 MT s A1 A2 A3 A4 A5 A6 B1 B2 B3 B4 B5 B6 128 8 16 2R x4 1333 MT s A1 A2 A3 A4 A5 A6 A7 A8 B1 B2 B3 B4 B5 B6 B7 B8 16 8 2R x4 1333 MT s 2R x4 1600 MT s A1 A2 A3 A4 B1 B2 B3 B4 160 8 20 2R x4 1333 MT s A1 A2 A3 A4 A5 A...

Страница 53: ...UTION Many repairs may only be done by a certified service technician You should only perform troubleshooting and simple repairs as authorized in your product documentation or as directed by the online or telephone service and support team Damage due to servicing that is not authorized by Dell is not covered by your warranty Read and follow the safety instructions that came with the product 1 Turn...

Страница 54: ...ed service technician You should only perform troubleshooting and simple repairs as authorized in your product documentation or as directed by the online or telephone service and support team Damage due to servicing that is not authorized by Dell is not covered by your warranty Read and follow the safety instructions that came with the product 1 Turn off the system including any attached periphera...

Страница 55: ... incorrect one or more of the memory modules may not be installed properly Repeat step 4 through step 8 of this procedure checking to ensure that the memory modules are firmly seated in their sockets 16 Run the system memory test in the system diagnostics Flex Bays Your system s flex bay supports one of the following configurations Sixteen 2 5 inch hard drives Four Dell PowerEdge Express Flash dev...

Страница 56: ...he chassis until the tabs click into place 3 Close the system 4 If applicable install the front bezel Hard Drives All hard drives connect to the system board through the hard drive backplane Hard drives are supplied in hot swappable hard drive carriers that fit in the hard drive slots CAUTION Before attempting to remove or install a hard drive while the system is running see the documentation for ...

Страница 57: ...drive slot Figure 20 Removing and Installing a 2 5 Inch Hard Drive Blank 1 hard drive blank 2 release button Installing A 2 5 Inch Hard Drive Blank 1 If installed remove the front bezel 2 Insert the hard drive blank into the hard drive slot until the release button clicks into place 3 If applicable install the front bezel Removing A 3 5 Inch Hard Drive Blank CAUTION To maintain proper system cooli...

Страница 58: ... management software prepare the hard drive for removal Wait until the indicators on the hard drive carrier signal that the hard drive can be removed safely For more information see the documentation for the storage controller If the hard drive is online the green activity fault indicator flashes as the drive is turned off When the hard drive indicators are off the hard drive is ready for removal ...

Страница 59: ... attempting to lock its handle next to a partially installed carrier can damage the partially installed carrier s shield spring and make it unusable CAUTION To prevent data loss ensure that your operating system supports hot swap drive installation See the documentation supplied with your operating system CAUTION When a replacement hot swappable hard drive is installed and the system is powered on...

Страница 60: ...tation or as directed by the online or telephone service and support team Damage due to servicing that is not authorized by Dell is not covered by your warranty Read and follow the safety instructions that came with the product 1 Insert the hard drive into the hard drive carrier with the connector end of the hard drive toward the back 2 Align the screw holes on the hard drive with the back set of ...

Страница 61: ... from the chassis 5 Close the system 6 If applicable install the front bezel Figure 24 Removing and Installing the Slim Optical Drive Blank 1 slim optical drive blank 2 optical drive blank lock Installing The Slim Optical Drive Blank CAUTION Many repairs may only be done by a certified service technician You should only perform troubleshooting and simple repairs as authorized in your product docum...

Страница 62: ...tem including any attached peripherals and disconnect the system from the electrical outlet and peripherals NOTE For systems installed with the wheel assembly ensure that you lay the system on a sturdy stable surface with the wheel assembly extending off the edge of the surface 3 Open the system 4 Disconnect the power and data cable from the back of the drive Note the routing of the power and data...

Страница 63: ... or Tape Drive 1 optical drive tape drive 2 optical drive tape drive drive blank 3 release latch NOTE The figure below shows the cabling diagram for an optical drive tape drive with an x16 backplane All backplanes x8 x12 and x16 have an ODD connector 63 ...

Страница 64: ...ternal tape adapter 3 ODD2 TBU connector on system board 4 ODD1 TBU connector on system board 5 power connector on x16 backplane 6 SAS tape drive data power connector 7 optical drive 2 power connector 8 optical drive 2 data connector 9 optical drive 1 power connector 10 optical drive 1 data connector 64 ...

Страница 65: ...rive or the drive blank 7 Align the drive with the drive bay 8 Slide the drive into the slot until the latch snaps into place 9 Connect the power and data cable to the back of the drive 10 Connect the power and data cables to the backplane and the system board The system board connectors are ODD1 TBU and ODD2 TBU The system can connect up to two optical drives or one optical drive with one SATA ta...

Страница 66: ...authorized by Dell is not covered by your warranty Read and follow the safety instructions that came with the product CAUTION The cooling fans are hot swappable To maintain proper cooling while the system is on replace only one fan at a time CAUTION Do not operate the system with the cover removed for a duration exceeding five minutes NOTE The procedure for removing an individual fan from the cool...

Страница 67: ...oling fan with the connector on the system board 2 Slide the cooling fan into the securing slots until the tabs lock into place 3 Close the system Removing The Cooling Fan Assembly Optional CAUTION Many repairs may only be done by a certified service technician You should only perform troubleshooting and simple repairs as authorized in your product documentation or as directed by the online or tel...

Страница 68: ... authorized by Dell is not covered by your warranty Read and follow the safety instructions that came with the product NOTE Ensure that the cables are correctly installed and retained by cable retention bracket before installing the cooling fan assembly Incorrectly installed cables may get damaged 1 Align the cooling fan assembly slots with the guide pins on the chassis side walls 2 Slide the cool...

Страница 69: ...s as authorized in your product documentation or as directed by the online or telephone service and support team Damage due to servicing that is not authorized by Dell is not covered by your warranty Read and follow the safety instructions that came with the product 1 Turn off the system including any attached peripherals and disconnect the system from the electrical outlet and peripherals 2 Open ...

Страница 70: ...d holder out of the chassis Figure 30 Removing and Installing the PCIe Card Holder 1 tab 2 PCIe card holder Installing The PCIe Card Holder CAUTION Many repairs may only be done by a certified service technician You should only perform troubleshooting and simple repairs as authorized in your product documentation or as directed by the online or telephone service and support team Damage due to serv...

Страница 71: ... including any attached peripherals and disconnect the system from the electrical outlet and peripherals 2 If applicable rotate the system feet inward and lay the system on its side on a flat stable surface NOTE For systems installed with the wheel assembly ensure that you lay the system on a sturdy stable surface with the wheel assembly extending off the edge of the surface 3 Open the system 4 Re...

Страница 72: ...ached peripherals and disconnect the system from the electrical outlet and peripherals 2 If applicable rotate the system feet inward and lay the system on its side on a flat stable surface NOTE For systems installed with the wheel assembly ensure that you lay the system on a sturdy stable surface with the wheel assembly extending off the edge of the surface 3 Open the system 4 Align the GPU card h...

Страница 73: ...cessors must be installed NOTE The expansion card slots are not hot swappable The following table provides a guide for installing expansion cards to ensure proper cooling and mechanical fit The expansion cards with the highest priority must be installed first using the slot priority indicated All other expansion cards must be installed in card priority and slot priority order Table 4 Expansion Car...

Страница 74: ...rds must be installed Only on the x16 PCIe Generation 2 interfaces available on slots 2 4 5 and 7 On systems that support one 5 25 inch removable media storage devices On systems with six fan configuration On systems that have the 1100 W power supply NOTE When you have more than two GPU cards on your system you will need two 1100 W PSUs installed on your system Removing An Expansion Card CAUTION M...

Страница 75: ... the safety instructions that came with the product 1 Unpack the expansion card and prepare it for installation For instructions see the documentation accompanying the card 2 Turn off the system including any attached peripherals and disconnect the system from the electrical outlet and peripherals 3 Open the system 4 Remove the PCIe card holder 5 If applicable remove any cables from the PCIe card ...

Страница 76: ... by the online or telephone service and support team Damage due to servicing that is not authorized by Dell is not covered by your warranty Read and follow the safety instructions that came with the product 1 Turn off the system including any attached peripherals and disconnect the system from the electrical outlet and peripherals 2 Lay the system on its side 3 Open the system 4 Remove the PCIe ca...

Страница 77: ...ice and support team Damage due to servicing that is not authorized by Dell is not covered by your warranty Read and follow the safety instructions that came with the product NOTE Ensure that the GPU card is installed in the x16 slot 1 Turn off the system including any attached peripherals and disconnect the system from the electrical outlet and peripherals 2 Lay the system on its side 3 Open the ...

Страница 78: ...m manuals Replacing An SD vFlash Card 1 Locate the vFlash media slot on the system For more information see About Your System 2 To remove the vFlash media card push inward on the card to release it and pull the card from the card slot Figure 33 Removing and Installing the SD vFlash Card 1 vFlash media card 2 vFlash media card slot 3 To install the vFlash media card with the label side facing up in...

Страница 79: ...n the IDSDM connector on the system board 4 If applicable remove the SD card s 5 Pull the dual SD module and remove it from the system board 6 Close the system 7 Reconnect the system to its electrical outlet and turn the system on including any attached peripherals Figure 34 Removing and Installing the Internal Dual SD Module 1 SD card connector 2 internal dual SD card module 3 SD card Installing ...

Страница 80: ...elease it from the slot and remove the card 4 Close the system 5 Reconnect the system to its electrical outlet and turn the system on including any attached peripherals Installing An Internal SD Card CAUTION Many repairs may only be done by a certified service technician You should only perform troubleshooting and simple repairs as authorized in your product documentation or as directed by the onl...

Страница 81: ... install the update on your system 2 Turn off the system including any attached peripherals and disconnect the system from the electrical outlet When disconnected from the power source press and hold the power button for three seconds to fully drain the system of stored power prior to removing the cover 3 Open the system 4 Remove the cooling shroud WARNING The heat sink and processor are hot to th...

Страница 82: ...not firmly grasped 9 Position your thumb firmly over the processor socket release lever near the unlock icon and release the lever from the locked position by pushing down and out from under the tab 10 Similarly position your thumb firmly over the processor socket release lever near the lock icon and release the lever from the locked position by pushing down and out from under the tab Rotate the l...

Страница 83: ...he tab on the processor shield and rotate it upward and out of the way 12 Lift the processor out of the socket and leave the release lever up so that the socket is ready for the new processor NOTE If you are permanently removing the processor you must install a socket protective cap in the vacant socket to protect the socket pins and keep the socket free of dust 83 ...

Страница 84: ...Read and follow the safety instructions that came with the product NOTE If you are installing a single processor it must be installed in socket CPU1 1 Before upgrading your system download the latest system BIOS version from support dell com and follow the instructions included in the compressed download file to install the update on your system NOTE You can update the system BIOS using the Lifecy...

Страница 85: ...ed in position f Similarly rotate the socket release lever near the lock symbol to the locked position CAUTION Applying too much thermal grease can result in excess grease coming in contact with and contaminating the processor socket 12 If applicable install the heat sink a Open the grease applicator included with your processor kit and apply all of the thermal grease in the applicator to the cent...

Страница 86: ...he active power supply is greater than 50 and to sleep the redundant power supply if the load falls below 20 You can configure the Hot Spare feature using the iDRAC settings For more information on iDRAC settings see the iDRAC7 User s Guide at support dell com manuals Removing An AC Power Supply CAUTION Many repairs may only be done by a certified service technician You should only perform trouble...

Страница 87: ...output power NOTE The maximum output power shown in Watts is listed on the power supply label 2 If applicable remove the power supply blank 3 Slide the new power supply into the chassis until the power supply is fully seated and the release latch snaps into place NOTE If you unlatched the cable management arm re latch it For information about the cable management arm see the system s rack document...

Страница 88: ...t Requirements Supply voltage 48 60 V DC Current consumption 32 A maximum Kit Contents Dell part number 6RYJ9 terminal block or equivalent 1 6 32 nut equipped with lock washer 1 Required Tools Wire stripper pliers capable of removing insulation from size 10 AWG solid or stranded insulated copper wire NOTE Use alpha wire part number 3080 or equivalent 65 30 stranding Required Wires One UL 10 AWG 2 ...

Страница 89: ...o servicing that is not authorized by Dell is not covered by your warranty Read and follow all safety instructions that came with the product 1 Strip the insulation from the ends of the DC power wires exposing approximately 13 mm 0 5 inch of copper wire WARNING Reversing polarity when connecting DC power wires can permanently damage the power supply or the system 2 Insert the copper ends into the ...

Страница 90: ...ot authorized by Dell is not covered by your warranty Read and follow all safety instructions that came with the product CAUTION The system requires one power supply for normal operation On power redundant systems remove and replace only one power supply at a time in a system that is powered on NOTE You may have to unlatch and lift the optional cable management arm if it interferes with power supp...

Страница 91: ... maximum output power NOTE The maximum output power shown in Watts is listed on the power supply label 2 If applicable remove the power supply blank 3 Slide the new power supply into the chassis until the power supply is fully seated and the release latch snaps into place NOTE If you unlatched the cable management arm re latch it For information about the cable management arm see the system s rack...

Страница 92: ...y bay To install the power supply blank align the blank with the power supply bay and insert it into the chassis until it clicks into place Power Interposer Board And Power Distribution Board Removing The Power Interposer Board CAUTION Many repairs may only be done by a certified service technician You should only perform troubleshooting and simple repairs as authorized in your product documentati...

Страница 93: ...pin and detach the PIB from the PDB 7 Slide and lift the PIB up until the grooves on the PIB are free of the pins on the chassis Figure 43 Removing and Installing The Power Interposer Board 1 power interposer board 2 release pin 3 power distribution board Removing The Power Distribution Board CAUTION Many repairs may only be done by a certified service technician You should only perform troublesho...

Страница 94: ...install the power interposer board 4 Connect the power cables to the system board and the hard drive backplane 5 Install the power supply module s in their original locations 6 Close the system 7 If applicable place the system upright on a flat stable surface and rotate the system feet outward 8 Reconnect the system to its electrical outlet and turn the system on including any attached peripherals...

Страница 95: ...e your safety information for additional information CAUTION Many repairs may only be done by a certified service technician You should only perform troubleshooting and simple repairs as authorized in your product documentation or as directed by the online or telephone service and support team Damage due to servicing that is not authorized by Dell is not covered by your warranty Read and follow th...

Страница 96: ...3 5 inch x12 SAS SATA backplane or 2 5 inch x16 SAS SATA backplane Depending on your configuration your system supports the following backplane combination 3 5 inch x8 SAS SATA backplane and 2 5 inch x4 PCIe SSD backplane 2 5 inch x16 SAS SATA backplane and 2 5 inch x4 PCIe SSD backplane Removing The Hard Drive Backplane CAUTION Many repairs may only be done by a certified service technician You s...

Страница 97: ...out from the system NOTE For a Dell PowerEdge Express Flash PCIe SSD backplane press down on the release tab to unlock the hard drive backplane and release it from the hard drive bay Figure 45 Removing and Installing The PCIe SSD Hard Drive Backplane 1 hard drive connector 2 PCIe SSD hard drive backplane 3 release tab 4 PCIe cable 5 power cable 6 signal cable 97 ...

Страница 98: ...Figure 46 Removing and Installing a 3 5 Inch x8 SAS SATA Backplane 1 backplane power connector 2 backplane power cable 3 release pin 4 signal cable 5 backplane 6 SAS A cable 98 ...

Страница 99: ... 5 Inch x8 SAS SATA Backplane 1 power connector on backplane 2 SAS A connector on backplane 3 SAS A connector on system board 4 power connector on PDB 5 signal connector on system board 6 signal connector on backplane 99 ...

Страница 100: ...Figure 48 Removing and Installing a 3 5 Inch x8 SAS SATA Backplane With a Single PERC Card 1 power connector 2 power cable 3 release pin 4 SAS B cable 5 signal cable 6 backplane 7 SAS A cable 100 ...

Страница 101: ...ingle PERC Card 1 power connector on backplane 2 SAS A connector on backplane 3 SAS B connector on PERC card 4 SAS A connector on PERC card 5 Power connector on PDB 6 signal cable on system board 7 signal cable on backplane 8 SAS B connector on backplane 101 ...

Страница 102: ...g a 3 5 Inch x8 Plus 2 5 Inch x4 SAS SATA Backplane 1 PCIe C cable 2 power connector 3 PCIe D cable 4 PCIe B cable 5 signal cable 6 PCIe B cable 7 power cable 8 release pin 9 SAS B cable 10 signal cable 11 SAS A cable 12 backplane 102 ...

Страница 103: ...d 4 SAS A cable from 3 5 inch backplane on PERC card 5 PCIe D cable from PCIe SSD backplane to PCIe extender card 6 PCIe C cable from PCIe SSD backplane to PCIe extender card 7 PCIe B cable from PCIe SSD backplane to PCIe extender card 8 PCIe D cable from PCIe SSD backplane to PCIe extender card 9 PCIe SSD backplane power cable 10 x8 backplane power cable 11 x8 backplane signal cable 103 ...

Страница 104: ...kplane power connector 16 PCIe SSD backplane signal cable 17 PCIe D cable on PCIe SSD backplane 18 PCIe C cable on PCIe SSD backplane Figure 52 Removing and Installing a 3 5 Inch x12 SAS SATA Backplane 1 power connector 2 power cable 3 SAS B cable 4 release pin 5 SAS A cable 6 signal cable 7 backplane 104 ...

Страница 105: ...plane 1 power connector on backplane 2 SAS B connector on backplane 3 SAS B connector on PERC 4 SAS A connector on PERC 5 power connector on PDB 6 signal connector on system board 7 SAS A connector on backplane 8 signal connector on backplane 105 ...

Страница 106: ...Figure 54 Removing and Installing 2 5 Inch x16 SAS SATA Backplane 1 backplane 2 signal cable 3 release pin 4 power cable 5 power connector 6 SAS A cable 7 SAS B cable 106 ...

Страница 107: ...plane 1 SAS B connector on PERC 2 SAS A connector on PERC 3 power connector on PDB 4 signal connector on system board 5 SAS A connector on backplane 6 SAS B connector on backplane 7 power connector on backplane 8 signal connector on backplane 107 ...

Страница 108: ...5 Inch x16 Plus 2 5 Inch x4 SAS SATA Backplane 1 backplane 2 PCIe D cable 3 power cable 4 PCIe C cable 5 PCIe B cable 6 signal cable 7 PCIe A cable 8 release pin 9 signal cable 10 power cable 11 SAS A cable 12 SAS B cable 13 backplane 108 ...

Страница 109: ...bridge card 7 PCIe B cable on PCIe bridge card 8 PCIe A cable on PCIe bridge card 9 PCIe SSD backplane power connector on PDB 10 backplane power connector on PDB 11 SAS A connector on backplane 12 SAS B connector on backplane 13 power connector on backplane 14 signal connector on backplane 15 signal connector on PCIe SSD backplane 16 power connector on PCIe SSD backplane 17 PCIe D cable on PCIe SS...

Страница 110: ...ving and Installing 2 5 Inch x32 SAS SATA Backplane With Two PERC Cards 1 signal cable 2 release pin 3 power cable 4 SAS A cable 5 SAS B cable 6 signal cable 7 power cable 8 SAS A cable 9 SAS B cable 10 backplane 110 ...

Страница 111: ...wer connector on PDB 6 backplane 2 power connector on PDB 7 signal connector 1 on system board 8 signal connector 2 on system board 9 SAS A connector on backplane 2 10 SAS B connector on backplane 2 11 power connector on backplane 2 12 signal connector on backplane 2 13 power connector on backplane 1 14 SAS B connector on backplane 1 15 SAS A connector on backplane 1 16 signal connector on backpla...

Страница 112: ... 5 Inch x32 SAS SATA Backplane With a Single PERC Card 1 signal cable 2 release pin 3 power connector 4 SAS A cable 5 SAS B cable 6 SAS A1 cable 7 SAS B1 cable 8 signal cable 9 power cable 10 SAS A1 cable 11 SAS B1 cable 12 backplane 112 ...

Страница 113: ...connector on PERC 6 backplane 1 power connector on PDB 7 backplane 2 power connector on PDB 8 backplane 1 signal connector on system board 9 backplane 2 signal connector on system board 10 backplane 2 SAS A connector 11 backplane 2 SAS B connector 12 backplane 2 power connector 13 backplane 2 signal connector 14 backplane 1 power connector 15 backplane 1 SAS B1 connector 16 backplane 1 SAS A1 conn...

Страница 114: ... system to its electrical outlet and turn the system on including any attached peripherals 9 If applicable install the front bezel System Top Cover Use the following procedure when removing and installing the control panel in the tower mode LCD module VGA module Removing The System Top Cover CAUTION Many repairs may only be done by a certified service technician You should only perform troubleshoo...

Страница 115: ...he screws System Left Side Cover Use the following procedure when removing and installing the control panel in the tower mode LCD module in either mode Removing The System Left Side Cover CAUTION Many repairs may only be done by a certified service technician You should only perform troubleshooting and simple repairs as authorized in your product documentation or as directed by the online or telep...

Страница 116: ...ently dislocate the cover by pushing up the cover from the bottom 6 Remove the cover away from the system Figure 62 Removing and Installing the System Left Side Cover 1 left side cover 2 bottom screw 3 screws 3 Installing The System Left Side Cover NOTE It is recommended that you always use a static mat and static strap while working on components in the interior of the system 1 Replace the system...

Страница 117: ...ncluding any attached peripherals and disconnect the system from the electrical outlet and peripherals 3 Open the system 4 Remove the left side cover See Removing The Left Side Cover 5 Remove the top cover See Removing The System Top Cover 6 Remove the screw securing the control panel to the chassis 7 If applicable remove the cooling fan assembly CAUTION Do not use excessive force when removing th...

Страница 118: ...its electrical outlet and turn the system on including any attached peripherals 10 If applicable install the front bezel Removing The Control Panel Rack Mode CAUTION Many repairs may only be done by a certified service technician You should only perform troubleshooting and simple repairs as authorized in your product documentation or as directed by the online or telephone service and support team ...

Страница 119: ...ng and Installing the Control Panel Module Rack Mode 1 control panel module 2 screw Figure 65 Removing and Installing the Control Panel From the Control Panel Module Rack Mode 1 control panel 2 control panel cable 119 ...

Страница 120: ...d 5 Close the system 6 Reconnect the system to its electrical outlet and turn the system on including any attached peripherals 7 If applicable install the front bezel Removing The Control Panel Board CAUTION Many repairs may only be done by a certified service technician You should only perform troubleshooting and simple repairs as authorized in your product documentation or as directed by the onl...

Страница 121: ...and support team Damage due to servicing that is not authorized by Dell is not covered by your warranty Read and follow the safety instructions that came with the product 1 Align the control panel board with the control panel CAUTION Take care not to damage the mylar covering the ID switch 2 Tighten the three screws to secure the control panel board to the control panel 3 Install the control panel...

Страница 122: ...moving The System Left Side Cover 4 Remove the top cover See Removing The System Top Cover 5 Remove the control panel assembly 6 Disconnect the LCD cable 7 Remove the screw securing the LCD module to the control panel 8 Remove the LCD module out of the control panel assembly Figure 67 Removing and Installing the LCD Module in the Tower Mode 1 LCD module 2 screw 3 LCD cable Installing The LCD Modul...

Страница 123: ...ected by the online or telephone service and support team Damage due to servicing that is not authorized by Dell is not covered by your warranty Read and follow the safety instructions that came with the product 1 If installed remove the front bezel 2 Turn off the system including any attached peripherals and disconnect the system from the electrical outlet and peripherals 3 Remove the system from...

Страница 124: ...with the product 1 Route the LCD cable through the cable securing bracket and through the inside wall of the chassis next to the LCD module slot 2 If applicable remove the LCD module blank 3 Insert the LCD module into the LCD module slot 4 Connect the LCD cable to the LCD module 5 Replace the screw 6 Connect the LCD cable to the system board 7 Replace the system left side cover See Installing The ...

Страница 125: ...em from the electrical outlet and peripherals 3 Open the system 4 Remove the control panel 5 Release the hooks securing the VGA module to the control panel board and remove the VGA module Figure 69 Removing and Installing the VGA Module 1 control panel 2 VGA module 3 control panel cable 4 control panel USB cable Installing The VGA Module CAUTION Many repairs may only be done by a certified service...

Страница 126: ...e sure to create and safely store this recovery key If you replace this system board you must supply the recovery key when you restart your system or program before you can access the encrypted data on your hard drives 1 Turn off the system including any attached peripherals and disconnect the system from the electrical outlet 2 Open the system 3 Remove the following a cooling shroud b cooling fan...

Страница 127: ... that came with the product 1 Unpack the new system board assembly CAUTION Do not lift the system board assembly by grasping a memory module processor or other components 2 Hold the touch points and lower the system board into the chassis 3 Push the system board toward the back of the chassis until the board clicks into place 4 Replace the following a heat sink s and processor s b internal dual SD...

Страница 128: ...stem to its electrical outlet and turn the system on including any attached peripherals 8 Import your new or existing iDRAC Enterprise license For more information see iDRAC7 User s Guide at support dell com manuals 128 ...

Страница 129: ...th your system Observe the following precautions for stability and safety of the system in rack mode Before installing your equipment in a rack install the front and side rack stabilizers Failure to install stabilizers can allow the rack to tip over Always load from the bottom up and load the heaviest items first Do not overload the AC power supply branch circuit that provides power to the rack Do...

Страница 130: ... to the slots on the chassis b Slide the plastic slide toward the back of the system to lock the slide tabs into the slots on the chassis Figure 71 Removing and Installing the Rack Slide Cover 1 system slide cover 2 slots 12 Install the control panel to the control panel module in the rack mode See Installing The Control Panel Module Rack Mode 13 Install the control panel module See Installing The...

Страница 131: ...rking on chassis 2 mylar cover 18 Install the system left side cover 19 Close the system 20 Install the rack ears 21 To attach the rack ears follow the steps below a Align the three screw holes on the right rack ear with the screw holes on the right side of the rack system b Install the three screws using a 2 Phillips screwdriver c Repeat step a and step b to install the left rack ear 131 ...

Страница 132: ...Figure 73 Removing and Installing the System Ears 1 system in rack mode 2 rack ears 2 3 screws 3 22 Install the system in the rack For more information see the system s Rack Installation Guide 132 ...

Страница 133: ...ecurely attached to the external connectors on your system before troubleshooting any external devices Troubleshooting The Video Subsystem 1 Check the system and power connections to the monitor 2 Check the video interface cabling from the system to the monitor 3 Run the appropriate diagnostic test If the tests run successfully the problem is not related to video hardware If the tests fail see Get...

Страница 134: ...for any system messages pertaining to the NIC controller 3 Check the appropriate indicator on the NIC connector If the link indicator does not light check all cable connections If the activity indicator does not light the network driver files might be damaged or missing Remove and reinstall the drivers if applicable See the NIC s documentation If applicable change the autonegotiation setting Use a...

Страница 135: ...em CAUTION Many repairs may only be done by a certified service technician You should only perform troubleshooting and simple repairs as authorized in your product documentation or as directed by the online or telephone service and support team Damage due to servicing that is not authorized by Dell is not covered by your warranty Read and follow the safety instructions that came with the product 1...

Страница 136: ...efective battery Troubleshooting Power Supplies CAUTION Many repairs may only be done by a certified service technician You should only perform troubleshooting and simple repairs as authorized in your product documentation or as directed by the online or telephone service and support team Damage due to servicing that is not authorized by Dell is not covered by your warranty Read and follow the saf...

Страница 137: ...ripherals and unplug the system from the power source Wait at least 10 seconds and then reconnect the system to power 3 Turn on the system and attached peripherals and note the messages on the screen If an error message is displayed indicating a fault with a specific memory module go to step 12 4 Enter the System Setup and check the system memory setting Make any changes to the memory settings if ...

Страница 138: ...CAUTION Many repairs may only be done by a certified service technician You should only perform troubleshooting and simple repairs as authorized in your product documentation or as directed by the online or telephone service and support team Damage due to servicing that is not authorized by Dell is not covered by your warranty Read and follow the safety instructions that came with the product NOTE...

Страница 139: ...ed service technician You should only perform troubleshooting and simple repairs as authorized in your product documentation or as directed by the online or telephone service and support team Damage due to servicing that is not authorized by Dell is not covered by your warranty Read and follow the safety instructions that came with the product CAUTION This troubleshooting procedure can erase data ...

Страница 140: ...iate diagnostic test For more information see Using System Diagnostics If the tests fail see Getting Help 11 For each expansion card you removed in step 8 perform the following steps a Turn off the system and attached peripherals and disconnect the system from the electrical outlet b Open the system c Reinstall one of the expansion cards d Close the system e Run the appropriate diagnostic test For...

Страница 141: ...werEdge Diagnostics User s Guide under Software Serviceability Tools at support dell com manuals Dell Embedded System Diagnostics NOTE Also known as Enhanced Pre boot System Assessment ePSA diagnostics The embedded system diagnostics provides a set of options for particular device groups or devices allowing you to Run tests automatically or in an interactive mode Repeat tests Display or save test ...

Страница 142: ...tatus information of all detected devices Results Displays the results of all tests that are executed System Health Provides the current overview of the system performance Event Log Displays a time stamped log of the results of all tests run on the system This is displayed if at least one event description is recorded For information about embedded system diagnostics see the Dell Enhanced Pre boot...

Страница 143: ...System Board Jumper Settings Jumper Setting Description PWRD_EN default The password feature is enabled pins 2 4 The password feature is disabled pins 4 6 BIOS local access is unlocked at the next AC power cycle NVRAM_CLR default The configuration settings are retained at the next system boot pins 3 5 The configuration settings are cleared at system boot pins 1 3 143 ...

Страница 144: ...or 1 2 SLOT2 PCIe card connector 2 3 SLOT3 PCIe card connector 3 4 SLOT4 PCIe card connector 4 5 NIC1 NIC1 connector 6 NIC2 NIC2 connector 7 B1 B5 B9 B2 B6 B10 Memory module sockets 8 FAN1 Cooling shroud fan connector 9 ID_BTN System identification button 10 CMA_JACK Cable management arm system identification connector 144 ...

Страница 145: ... 26 INTRUSION Chassis intrusion switch connector 27 A10 A6 A2 A9 A5 A1 Memory module sockets 28 BP_SIG2 Backplane signal connector 2 29 FAN5 System fan connector 30 PWR_CONN_1 Power connector 31 BP_SIG0 BP_SIG1 Dell PowerEdge Express Flash PCIe SSD signal connector backplane signal connector 1 32 FAN4 System fan connector 33 LCD LCD panel connector 34 A3 A7 A11 A4 A8 A12 Memory module sockets 35 C...

Страница 146: ...system 3 Move the jumper on the system board jumper from pins 2 and 4 to pins 4 and 6 4 Close the system The existing passwords are not disabled erased until the system boots with the Jumper on pins 4 and 6 However before you assign a new system and or setup password you must move the jumper back to pins 2 and 4 NOTE If you assign a new system and or setup password with the jumper on pins 4 and 6 ...

Страница 147: ...ors must be installed to use slots 5 through 7 Slot 5 One full height full length x16 link Slot 6 One full height full length x8 link Slot 7 One full height full length x16 link Memory Architecture 800 MT s 1066 MT s 1333 MT s or 1600 MT s DDR3 registered unbuffered or load reduced Error Correcting Code ECC DIMMs Support for advanced ECC or memory optimized operation Memory module sockets Twenty f...

Страница 148: ...vices PCIe SSDs Sixteen hard drive systems Up to sixteen 2 5 inch internal hot swappable SAS SATA SATA SSD or Nearline SAS hard drives hard drive slots 0 through 7 and 8 through 15 Up to sixteen 2 5 inch internal hot swappable SAS SATA hard drives and four SATA SSDs Sixteen plus four hard drive systems Up to sixteen 2 5 inch internal hot swappable SAS SATA or SATA SSD hard drives plus four PCIe SS...

Страница 149: ...emory 16 MB shared Expanded Operating Temperature NOTE When operating in the expanded temperature range system performance may be impacted NOTE When operating in the expanded temperature range ambient temperature warnings may be reported on the LCD and in the System Event Log 10 of annual operating hours 5 C to 40 C at 5 to 85 RH with 26 C dew point NOTE Outside the standard operating temperature ...

Страница 150: ...pported Non redundant power supplies are not supported Non Dell qualified peripheral cards and or peripheral cards greater than 25 W are not supported Environmental NOTE For additional information about environmental measurements for specific system configurations see dell com environmental_datasheets Temperature Maximum Temperature Gradient Operating and Storage 20 C h 36 F h Storage Temperature ...

Страница 151: ...hat levels of particulates or gaseous pollution are beyond the limits specified below and are the reason for the damage and or failures to your equipment it may be necessary for you to re mediate the environmental conditions that are causing the damage and or failures Re mediation of environmental conditions will be the responsibility of the customer Air Filtration NOTE Applies to data center envi...

Страница 152: ...mum corrosive contaminant levels measured at 50 relative humidity Copper Coupon Corrosion Rate 300 Å month per Class G1 as defined by ANSI ISA71 04 1985 Silver Coupon Corrosion Rate 200 Å month as defined by AHSRAE TC9 9 152 ...

Страница 153: ...the display Clear the SEL You can perform this task remotely but you will lose the event history for the system Power cycle Turn off the system and disconnect it from the electrical outlet wait approximately 10 seconds reconnect the power cable and restart the system System Error Messages System messages appear on the monitor to notify you of a possible problem with the system These messages refer...

Страница 154: ...ew system configuration changes 4 If the issue persists see Getting Help ASR0000 Message The watchdog timer expired Details The operating system or an application failed to communicate within the time out period Action Check the operating system application hardware and system event log for exception events ASR0001 Message The watchdog timer reset the system Details The operating system or an appl...

Страница 155: ...lem persists see Getting Help CPU0000 Message CPU number has an internal error IERR LCD Message CPU number has an internal error IERR Details System Event Log and Operating System Logs may indicate that the exception is external to the processor Action Review System Event Log and Operating System Logs If the issue persists see Getting Help CPU0001 Message CPU number has a thermal trip over tempera...

Страница 156: ...em and remove input power for one minute 2 Ensure the processor is seated correctly 3 Reapply input power and turn on the system 4 If the issue persists see Getting Help CPU0700 Message CPU number initialization error detected LCD Message CPU number initialization error detected Power cycle system Details System BIOS was unable to initialize the processor Action 1 Turn off the system and remove in...

Страница 157: ...or detected LCD Message CPU bus initialization error detected Power cycle system Details System event log and operating system logs may indicate that the exception is external to the processor Action 1 Check system and operating system logs for exceptions If no exceptions are found continue 2 Turn off the system and remove input power for one minute 3 Ensure the processor is seated correctly 4 Rea...

Страница 158: ...install failed fans or install additional fans HWC1001 Message The name is absent LCD Message The name is absent Check hardware Details The absent device may be necessary for proper operation System functionality may be degraded Action Reinstall or reconnect the hardware HWC2003 Message The storage name cable is not connected or is improperly connected LCD Message Storage name cable or interconnec...

Страница 159: ...ion check memory device at location location LCD Message Unsupported memory configuration Check memory location Details The memory may not be seated correctly misconfigured or has failed Memory size is reduced Action Check the memory configuration Re seat the memory modules If the issue persists see Getting Help MEM0701 Message Correctable memory error rate exceeded for location Details The memory...

Страница 160: ...eing corrected but no longer logged Action Review system logs for memory exceptions Reinstall memory at location location PCI1302 Message A bus time out was detected on a component at bus bus device device function func Details System performance may be degraded The device has failed to respond to a transaction Action Cycle input power update component drivers if device is removable reinstall the ...

Страница 161: ...age A PCI parity error was detected on a component at slot number LCD Message PCI parity error on slot number Re seat PCI card Details System performance may be degraded or system may fail to operate Action Cycle input power update component drivers if device is removable reinstall the device PCI1360 Message A bus fatal error was detected on a component at slot number LCD Message Bus fatal error o...

Страница 162: ...pare system memory installation to supported system memory configurations PSU0001 Message Power supply number failed LCD Message PSU number failed Check PSU Action Remove and reinstall the power supply If the issue persists see Getting Help PSU0002 Message A predictive failure detected on power supply number LCD Message Predictive failure on PSU number Check PSU Details System performance and powe...

Страница 163: ...sage Cannot communicate with PSU number Re seat PSU Details The power supply may operate however power supply monitoring is degraded System performance may be degraded Action Remove and reinstall the power supply If the issue persists see Getting Help PSU0032 Message The temperature for power supply number is in a warning range Details System performance may be degraded Action Check the system ope...

Страница 164: ...current fault detected on power supply number LCD Message An over current fault detected on PSU number Check PSU Details This failure may be the result of an electrical issue with cables or subsystem components in the system Action 1 Remove and reinstall the power supply 2 Check cables and subsystem components in the system for damage 3 If the issue persists see Getting Help PSU0037 Message Fan fa...

Страница 165: ...performance degraded because power capacity has changed Details The system may power down or operate in a performance degraded state Action Check the event log for power supply failures Review system configuration and power consumption and upgrade or install power supplies accordingly PWR1005 Message The system performance degraded because the user defined power capacity has changed Details The us...

Страница 166: ...2001 Message Internal Dual SD Module name is absent LCD Message Internal Dual SD Module name is absent Check SD Card Details The SD card module is not detected or not installed Action If unintended reinstall the SD module RFM2002 Message Internal Dual SD Module name is offline Details The SD card module is installed but may be improperly installed or configured incorrectly Action Reinstall the SD ...

Страница 167: ...r Action If unintended re enable logging SEL0008 Message Log is full Details When the event log is full additional events are not written to the log Older events may be overwritten and lost This message may also appear if the user disabled event logging Action Backup and clear log SEL0012 Message Could not create or initialize the system event log Details If the system event log fails to initializ...

Страница 168: ...arning threshold LCD Message System inlet temperature is outside of range Details Ambient air temperature is too warm or one or more fans may have failed Action Check the system operating environment and review event log for fan failures TMP0121 Message The system inlet temperature is greater than the upper critical threshold LCD Message System inlet name temperature is outside of range Check Fans...

Страница 169: ...require you to respond by typing y yes or n no NOTE Warning messages are generated by either the application or the operating system For more information see the documentation that accompanied the operating system or application Diagnostic Messages The system diagnostic utilities may issue messages if you run diagnostic tests on your system See Using System Diagnostics chapter for more information...

Страница 170: ...170 ...

Страница 171: ...ne based support and service options Availability varies by country and product and some services may not be available in your area To contact Dell for sales technical support or customer service issues 1 Visit dell com support 2 Select your support category 3 Verify your country or region in the Choose a Country Region drop down menu at the top of page 4 Select the appropriate service or support ...

Отзывы: