background image

Optical Drive (Optional)

Removing The Optical Drive

CAUTION: Many repairs may only be done by a certified service technician. You should only perform 
troubleshooting and simple repairs as authorized in your product documentation, or as directed by the online or 
telephone service and support team. Damage due to servicing that is not authorized by Dell is not covered by your 
warranty. Read and follow the safety instructions that came with the product.

NOTE: This procedure applies only to the 8-hard drive system.

1.

If installed, remove the front bezel.

2.

Turn off the system, including any attached peripherals, and disconnect the system from the electrical outlet and 

peripherals.

3.

Open the system.

4.

Disconnect the power/data cable from the back of the drive.
Note the routing of the power/data cable on the side of the system as you remove them from the system board and 
drive. You must route these cables properly when you replace them to prevent them from being pinched or 
crimped.

5.

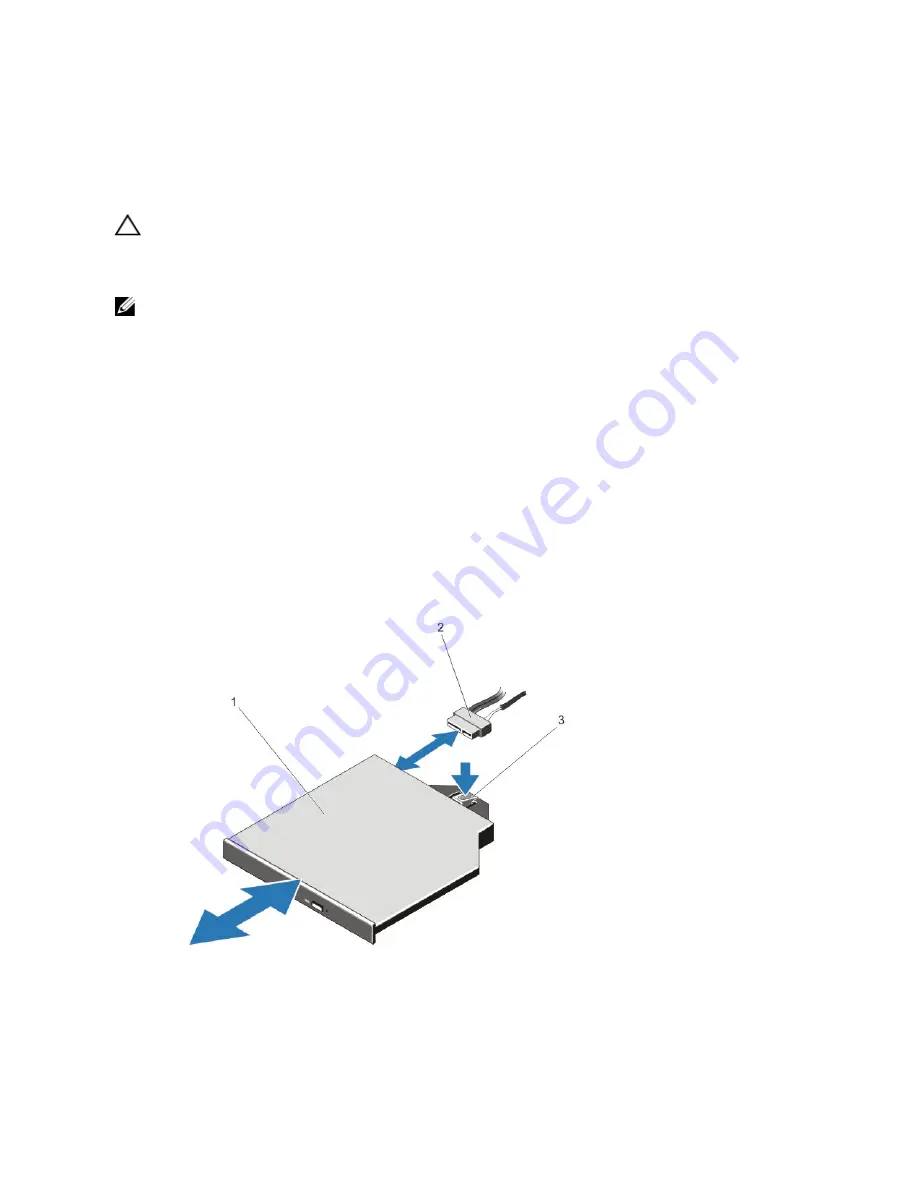
To release the drive, press down and push the blue release tab toward the front of the system.

6.

Slide the optical drive out of the system until it is free of the drive bay.

7.

If you are not adding a new optical drive, install the optical drive blank.

8.

Close the system.

9.

Reconnect the system to its electrical outlet and turn the system on, including any attached peripherals.

10. If applicable, install the front bezel.

Figure 20. Removing and Installing the Optical Drive

1. optical drive
2. power and data cable

52

Содержание External OEMR R620

Страница 1: ...Dell PowerEdge R620 Owner s Manual Regulatory Model E16S Series Regulatory Type E16S001 ...

Страница 2: ...arks of Advanced Micro Devices Inc Microsoft Windows Windows Server Internet Explorer MS DOS Windows Vista and Active Directory are either trademarks or registered trademarks of Microsoft Corporation in the United States and or other countries Red Hat and Red Hat Enterprise Linux are registered trademarks of Red Hat Inc in the United States and or other countries Novell and SUSE are registered tra...

Страница 3: ... Setup 22 Responding To Error Messages 22 Using The System Setup Navigation Keys 22 System Setup Options 22 System Setup Main Screen 23 System BIOS Screen 23 System Information Screen 23 Memory Settings Screen 24 Processor Settings Screen 24 SATA Settings Screen 25 Boot Settings Screen 26 Integrated Devices Screen 26 Serial Communications Screen 27 System Profile Settings Screen 28 System Security...

Страница 4: ...ing Shroud 39 Installing The Cooling Shroud 40 System Memory 40 General Memory Module Installation Guidelines 42 Mode Specific Guidelines 43 Sample Memory Configurations 44 Removing Memory Modules 46 Installing Memory Modules 47 Hard Drives 48 Removing A 2 5 Inch Hard Drive Blank 48 Installing A 2 5 Inch Hard Drive Blank 49 Removing A Hot Swap Hard Drive 49 Installing A Hot Swap Hard Drive 50 Remo...

Страница 5: ...65 Removing The Network Daughter Card 65 Installing The Network Daughter Card 66 Processors 66 Removing A Processor 67 Installing A Processor 70 Power Supplies 71 Hot Spare Feature 72 Removing An AC Power Supply 72 Installing An AC Power Supply 73 Wiring Instructions For A DC Power Supply 74 Removing A DC Power Supply 76 Installing A DC Power Supply 77 Removing The Power Supply Blank 78 Installing...

Страница 6: ...bleshooting A Damaged System 99 Troubleshooting The System Battery 100 Troubleshooting Power Supplies 100 Troubleshooting Cooling Problems 100 Troubleshooting Cooling Fans 101 Troubleshooting System Memory 101 Troubleshooting An Internal USB Key 102 Troubleshooting An SD Card 102 Troubleshooting An Optical Drive 103 Troubleshooting A Tape Backup Unit 103 Troubleshooting A Hard Drive 104 Troublesho...

Страница 7: ...ord 112 7 Technical Specifications 113 8 System Messages 117 LCD Messages 117 Viewing LCD Messages 117 Removing LCD Messages 117 System Error Messages 117 Warning Messages 131 Diagnostic Messages 131 Alert Messages 131 9 Getting Help 133 Contacting Dell 133 ...

Страница 8: ...8 ...

Страница 9: ...Use this button only if directed to do so by qualified support personnel or by the operating system s documentation 3 System identification button The identification buttons on the front and back panels can be used to locate a particular system within a rack When one of these buttons is pressed the LCD panel on the front and the system status indicator on the back flashes blue until one of the but...

Страница 10: ...slide out label panel which allows you to record system information such as Service Tag NIC MAC address and so on as per your need 10 Video connector Allows you to connect a VGA display to the system 11 Hard drives 8 Up to eight 2 5 inch hot swappable hard drives Up to four 2 5 hot swappable hard drives and up to two 2 5 inch Dell PowerEdge Express Flash devices PCIe SSDs Figure 2 Front Panel Feat...

Страница 11: ...er BIOS progress mode To reset the iDRAC if not disabled in F2 iDRAC setup press and hold the button for more than 15 seconds 6 Mini USB connector Allows you to connect USB devices to the system The port is USB 2 0 compliant 7 Hard drives 10 Up to ten 2 5 inch hot swappable hard drives 8 Information tag A slide out label panel which allows you to record system information such as Service Tag NIC M...

Страница 12: ...standby mode the LCD backlight turns off after five minutes of inactivity if there are no error messages Press one of the three navigation buttons Select Left or Right to view the Home screen To navigate to the Home screen from another menu continue to select the up arrow until the Home icon is displayed and then select the Home icon From the Home screen press the Select button to enter the main m...

Страница 13: ...g or the Service tag for the system Power Displays the power output of the system in BTU hr or Watts The display format can be configured in the Set home submenu of the Setup menu Temperature Displays the temperature of the system in Celsius or Fahrenheit The display format can be configured in the Set home submenu of the Setup menu Diagnostic Indicators The diagnostic indicators on the system fro...

Страница 14: ...ive Action The indicator blinks amber if a memory error occurs See the system event log or system messages for the location of the failed memory Reinstall the memory device If the problem persists see Getting Help Hard Drive Indicator Patterns Figure 4 Hard Drive Indicators 1 hard drive activity indicator green 2 hard drive status indicator green and amber NOTE If the hard drive is in Advanced Hos...

Страница 15: ...nels can be used to locate a particular system within a rack When one of these buttons is pressed the LCD panel on the front and the system status indicator on the back blink until one of the buttons is pressed again Press to toggle the system ID on and off If the system stops responding during POST press and hold the system ID button for more than five seconds to enter BIOS progress mode To reset...

Страница 16: ... 6 Back Panel Features and Indicators 10 Hard Drive System and 8 Hard Drive System 3 PCIe Expansion Cards Item Indicator Button or Connector Icon Description 1 System identification button The identification buttons on the front and back panels can be used to locate a particular system within a rack 10 Hard Drive System When one of these buttons is pressed the system status indicator on the back f...

Страница 17: ...nnector Allows you to connect a serial device to the system 6 Video connector Allows you to connect a VGA display to the system 7 PCIe expansion card slot riser 2 Allows you to connect a PCIe expansion card 8 USB connectors 2 Allows you to connect USB devices to the system The ports are USB 2 0 compliant 9 Ethernet connectors 4 Four integrated 10 100 1000 Mbps NIC connectors or Four integrated con...

Страница 18: ...ork at less than its maximum port speed Activity indicator is blinking green Network data is being sent or received Power Indicator Codes Each AC power supply has an illuminated translucent handle and each DC power supply when available has an LED that serves as an indicator to show whether power is present or whether a power fault has occurred Figure 8 AC Power Supply Status Indicator 1 AC power ...

Страница 19: ... the power supply is mismatched with the other power supply in terms of efficiency feature set health status and supported voltage Replace the power supply that has the flashing indicator with a power supply that matches the capacity of the other installed power supply Other Information You May Need WARNING See the safety and regulatory information that shipped with your system Warranty informatio...

Страница 20: ...20 ...

Страница 21: ...re configuration Enable or disable integrated devices Set performance and power management thresholds Manage system security You can access the System Setup using the Standard graphical browser which is enabled by default Text browser which is enabled using Console Redirection To enable Console Redirection in System Setup select System BIOS Serial Communication screen Serial Communication select O...

Страница 22: ...es If an error message is displayed while the system is booting make a note of the message For more information see System Error Messages NOTE After installing a memory upgrade it is normal for your system to display a message the first time you start your system Using The System Setup Navigation Keys Keys Action Up arrow Moves to the previous field Down arrow Moves to the next field Enter Allows ...

Страница 23: ...o on SATA Settings Displays options to enable or disable the integrated SATA controller and ports Boot Settings Displays options to specify the boot mode BIOS or UEFI Enables you to modify UEFI and BIOS boot settings Integrated Devices Displays options to enable or disable integrated device controllers and ports and to specify related features and options Serial Communication Displays options to e...

Страница 24: ...pare with Advanced ECC Mode By default the Memory Operating Mode option is set to Optimizer Mode NOTE The Memory Operating Mode can have different defaults and available options based on the memory configuration Node Interleaving If this field is Enabled memory interleaving is supported if a symmetric memory configuration is installed If Disabled the system supports Non Uniform Memory architecture...

Страница 25: ... you to enable or disable Data Cache Unit IP prefetcher By default the DCU IP Prefetcher option is set to Enabled Execute Disable Allows you enable or disable execute disable memory protection technology By default the Execute Disable option is set to Enabled Number of Cores per Processor Allows you to control the number of enabled cores in each processor By default the Number of Cores per Process...

Страница 26: ...boot the system reattempts the boot sequence after 30 seconds By default the Boot Sequence Retry option is set to Disabled BIOS Boot Settings Allows you to enable or disable BIOS Boot options NOTE This option is enabled only if the boot mode is BIOS UEFI Boot Settings Allows you to enable or disable UEFI Boot options NOTE This option is enabled only if the boot mode is UEFI One Time Boot Allows yo...

Страница 27: ...e specified slot CAUTION Slot disablement must be used only when the installed peripheral card is preventing booting into the Operating System or causing delays in system startup If the slot is disabled both the Option ROM and UEFI driver are disabled Serial Communications Screen Menu Item Description Serial Communication Allows you to select serial communication devices Serial Device 1 and Serial...

Страница 28: ...urbo Boost Allows you to enable or disable the processor to operate in turbo boost mode By default the Turbo Boost option is set to Enabled C1E Allows you to enable or disable the processor to switch to a minimum performance state when it is idle By default the C1E option is set to Enabled C States Allows you to enable or disable the processor to operate in all available power states By default th...

Страница 29: ...ng system Allows you to clear all the contents of the TPM By default the TPM Clear option is set to No Intel TXT Allows you enable or disable Intel Trusted Execution Technology To enable Intel TXT Virtualization Technology must be enabled and TPM Security must be Enabled with Pre boot measurements By default the Intel TXT option is set to Off BIOS Update Control Allows you to update the BIOS using...

Страница 30: ... For more information on the password jumper settings see System Board Jumper Settings System password This is the password that you must enter to log on to your system Setup password This is the password that you must enter to access and make changes to the BIOS or UEFI settings of your system CAUTION The password features provide a basic level of security for the data on your system CAUTION Anyo...

Страница 31: ...leting Or Changing An Existing System And Or Setup Password Ensure that the Password jumper is set to enabled and the Password Status is Unlocked before attempting to delete or change the existing System and or Setup password You cannot delete or change an existing System or Setup password if the Password Status is Locked To delete or change the existing System and or Setup password 1 To enter Sys...

Страница 32: ...ost of the System Setup options If you do not enter the correct password in three attempts the system displays the message Invalid Password Number of unsuccessful password attempts x System Halted Must power down Even after you shut down and restart the system the error message is displayed until the correct password is entered The following options are exceptions If System Password is not Enabled...

Страница 33: ...ect until you restart the system Boot Manager Screen Menu Item Description Continue Normal Boot The system attempts to boot to devices starting with the first item in the boot order If the boot attempt fails the system continues with the next item in the boot order until the boot is successful or no more boot options are found BIOS Boot Menu Displays the list of available BIOS boot options marked ...

Страница 34: ...ecycle Controller For more information about setting up the Lifecycle Controller configuring hardware and firmware and deploying the operating system see the Lifecycle Controller documentation at support dell com manuals iDRAC Settings Utility The iDRAC Settings utility is an interface to setup and configure the iDRAC parameters using UEFI You can enable or disable various iDRAC parameters using t...

Страница 35: ...Wire stripper pliers capable of removing insulation from size 10 AWG solid or stranded insulated copper wire AMP 90871 1 hand crimping tool or equivalent NOTE Use alpha wire part number 3080 or equivalent 65 30 stranding Front Bezel Optional Removing The Front Bezel 1 Unlock the keylock at the left end of the bezel 2 Lift the release latch next to the keylock 3 Rotate the left end of the bezel awa...

Страница 36: ... authorized in your product documentation or as directed by the online or telephone service and support team Damage due to servicing that is not authorized by Dell is not covered by your warranty Read and follow the safety instructions that came with the product CAUTION Do not operate the system without the cover for a duration exceeding five minutes Opening The System NOTE It is recommended that ...

Страница 37: ...ect the system to its electrical outlet and turn the system on including any attached peripherals Inside The System CAUTION Many repairs may only be done by a certified service technician You should only perform troubleshooting and simple repairs as authorized in your product documentation or as directed by the online or telephone service and support team Damage due to servicing that is not author...

Страница 38: ...ring bracket 5 cooling shroud 6 power supplies 2 7 chassis intrusion switch 8 riser card 3 9 network daughter card 10 riser card 2 11 storage controller card 12 network daughter card cooling shroud 13 DIMMs 24 14 heat sink for processor 2 15 hard drive backplane 16 control panel 17 hard drives 8 18 optical drive optional 38 ...

Страница 39: ...technician You should only perform troubleshooting and simple repairs as authorized in your product documentation or as directed by the online or telephone service and support team Damage due to servicing that is not authorized by Dell is not covered by your warranty Read and follow the safety instructions that came with the product CAUTION Never operate your system with the cooling shroud removed...

Страница 40: ...h the securing slots on the chassis 2 Lower the cooling shroud into the chassis until it is firmly seated 3 If applicable replace the full length PCIe card 4 Close the system 5 Reconnect the system to its electrical outlet and turn the system on including any attached peripherals System Memory Your system supports DDR3 unbuffered ECC DIMMs ECC UDIMMs registered DIMMs RDIMMs and load reduced DIMMs ...

Страница 41: ...et are marked white the second socket black and the third socket green NOTE DIMMs in sockets A1 to A12 are assigned to processor 1 and DIMMs in sockets B1 to B12 are assigned to processor 2 Figure 15 Memory Socket Locations Memory channels are organized as follows Processor 1 channel 0 slots A1 A5 and A9 channel 1 slots A2 A6 and A10 channel 2 slots A3 A7 and A11 channel 3 slots A4 A8 and A12 41 ...

Страница 42: ...nes A maximum of two UDIMMs can be populated in a channel Up to two quad rank RDIMMs and up to three dual or single rank RDIMMs can be populated per channel When a quad rank RDIMM is populated in the first slot with white release levers the third DIMM slot in the channel with green release levers cannot be populated Up to three LRDIMMs can be populated regardless of rank count Populate DIMM socket...

Страница 43: ...es that identical DIMMs are installed in matched pairs for example A1 with A2 A3 with A4 A5 with A6 and so on NOTE Advanced ECC with Mirroring is not supported Memory Optimized Independent Channel Mode This mode supports SDDC only for memory modules that use x4 device width and does not impose any specific slot population requirements Memory Sparing NOTE To use memory sparing this feature must be ...

Страница 44: ...Single Processor System Capacity in GB DIMM Size in GB Number of DIMMs DIMM Rank Organization and Frequency DIMM Slot Population 2 2 1 1R x8 1333 MT s 1R x8 1600 MT s A1 4 2 2 1R x8 1333 MT s 1R x8 1600 MT s A1 A3 8 2 4 1R x8 1333 MT s 1R x8 1600 MT s A1 A2 A3 A4 12 2 6 1R x8 1333 MT s 1R x8 1600 MT s A1 A2 A3 A4 A5 A6 16 2 8 1R x8 1333 MT s A1 A2 A3 A4 A5 A6 A7 A8 4 4 2R x8 1333 MT s 2R x8 1600 M...

Страница 45: ... 16 1R x8 1333 MT s A1 A2 A3 A4 A5 A6 A7 A8 B1 B2 B3 B4 B5 B6 B7 B8 32 4 8 2R x8 1333 MT s 2R x8 1600 MT s A1 A2 A3 A4 B1 B2 B3 B4 64 4 16 2R x8 1333 MT s A1 A2 A3 A4 A5 A6 A7 A8 B1 B2 B3 B4 B5 B6 B7 B8 8 8 2R x4 1333 MT s 2R x4 1600 MT s A1 A2 A3 A4 B1 B2 B3 B4 96 4 24 2R x8 1333 MT s A1 A2 A3 A4 A5 A6 A7 A8 A9 A10 A11 A12 B1 B2 B3 B4 B5 B6 B7 B8 B9 B10 B11 B12 8 12 2R x4 1333 MT s 2R x4 1600 MT ...

Страница 46: ...y Modules WARNING The memory modules are hot to the touch for some time after the system has been powered down Allow time for the memory modules to cool before handling them Handle the memory modules by the card edges and avoid touching the components on the memory module CAUTION Many repairs may only be done by a certified service technician You should only perform troubleshooting and simple repa...

Страница 47: ...ime for the memory modules to cool before handling them Handle the memory modules by the card edges and avoid touching the components on the memory module CAUTION Many repairs may only be done by a certified service technician You should only perform troubleshooting and simple repairs as authorized in your product documentation or as directed by the online or telephone service and support team Dam...

Страница 48: ...ady changed the value to reflect the newly installed memory 13 If the value is incorrect one or more of the memory modules may not be installed properly Repeat step 4 through step 7 of this procedure checking to ensure that the memory modules are firmly seated in their sockets 14 Run the appropriate diagnostic test For more information see Using System Diagnostics Hard Drives All hard drives conne...

Страница 49: ... management software prepare the hard drive for removal Wait until the indicators on the hard drive carrier signal that the hard drive can be removed safely For more information see the documentation for the storage controller If the hard drive is online the green activity fault indicator flashes as the drive is turned off When the hard drive indicators are off the hard drive is ready for removal ...

Страница 50: ... attempting to lock its handle next to a partially installed carrier can damage the partially installed carrier s shield spring and make it unusable CAUTION To prevent data loss ensure that your operating system supports hot swap drive installation See the documentation supplied with your operating system CAUTION When a replacement hot swappable hard drive is installed and the system is powered on...

Страница 51: ...le repairs as authorized in your product documentation or as directed by the online or telephone service and support team Damage due to servicing that is not authorized by Dell is not covered by your warranty Read and follow the safety instructions that came with the product 1 Insert the hard drive into the hard drive carrier with the connector end of the hard drive toward the back 2 Align the scr...

Страница 52: ...ctrical outlet and peripherals 3 Open the system 4 Disconnect the power data cable from the back of the drive Note the routing of the power data cable on the side of the system as you remove them from the system board and drive You must route these cables properly when you replace them to prevent them from being pinched or crimped 5 To release the drive press down and push the blue release tab tow...

Страница 53: ...any attached peripherals 9 If applicable install the front bezel Cooling Fans Your system supports hot swappable cooling fans NOTE In the event of a problem with a particular fan the fan number is referenced by the system s management software allowing you to easily identify and replace the proper fan by noting the fan numbers on the cooling fan assembly Removing A Cooling Fan WARNING Opening or r...

Страница 54: ...t 1 Open the system 2 Align the plug at the base of the cooling fan with the connector on the system board 3 Slide the cooling fan into the securing slots until the tabs lock into place 4 Close the system Internal USB Memory Key Optional An optional USB memory key installed inside your system can be used as a boot device security key or mass storage device The USB connector must be enabled by the ...

Страница 55: ...System Board Connectors 4 If installed remove the USB key 5 Insert the USB key into the USB connector 6 Close the system 7 Reconnect the system to its electrical outlet and turn the system on including any attached peripherals 8 Enter the System Setup and verify that the USB key is detected by the system Figure 22 Replacing the Internal USB Key 1 USB memory key connector 2 USB memory key Expansion...

Страница 56: ...ter card is installed you cannot install the GPU card NOTE You can install expansion cards only on one slot on riser 2 NOTE Both the processors must be installed to use the x16 link on the riser 2 slot The following table provides a guide for installing expansion cards to ensure proper cooling and mechanical fit The expansion cards with the highest priority must be installed first using the slot p...

Страница 57: ...ansion card riser 4 To remove the expansion card lift the expansion card latch 5 Grasp the expansion card by its edges and remove it from the expansion card connector on the riser 6 If you are removing the card permanently install a metal filler bracket over the empty expansion slot opening and close the expansion card latch NOTE You must install a filler bracket over an empty expansion slot to ma...

Страница 58: ...ated 8 Slide the expansion card latch into position 9 If applicable connect cables to the expansion card NOTE When installing a GPU card on riser 3 connect the GPU card power cable to the power connector on riser 3 10 Close the system 11 Reconnect the system to its electrical outlet and turn the system on including any attached peripherals 12 Install any device drivers required for the card as des...

Страница 59: ...oving and Installing the Expansion Card Riser 1 1 expansion card riser 1 2 expansion card 3 riser guide back right 4 riser guide back left 5 connector Figure 25 Removing and Installing the Expansion Card Riser 3 59 ...

Страница 60: ...ide pin on the system board 3 Lower the expansion card riser into place until the expansion card riser connector is fully seated in the connector 4 Close the system 5 Reconnect the system to its electrical outlet and turn the system on including any attached peripherals 6 Install any device drivers required for the card as described in the documentation for the card SD vFlash Card A vFlash SD card...

Страница 61: ...hould only perform troubleshooting and simple repairs as authorized in your product documentation or as directed by the online or telephone service and support team Damage due to servicing that is not authorized by Dell is not covered by your warranty Read and follow the safety instructions that came with the product 1 Turn off the system including any attached peripherals and disconnect the syste...

Страница 62: ...m Damage due to servicing that is not authorized by Dell is not covered by your warranty Read and follow the safety instructions that came with the product 1 Turn off the system including any attached peripherals and disconnect the system from the electrical outlet and peripherals 2 Open the system 3 Locate the J_RIPS connector on the system board 4 Align the connectors on the system board and the...

Страница 63: ... online or telephone service and support team Damage due to servicing that is not authorized by Dell is not covered by your warranty Read and follow the safety instructions that came with the product NOTE To use an SD card with your system ensure that the internal SD card port is enabled in the System Setup 1 Turn off the system including any attached peripherals and disconnect the system from the...

Страница 64: ...that came with the product 1 Turn off the system including any attached peripherals and disconnect the system from the electrical outlet 2 Open the system 3 Push down on the two tabs at the edge of the card and lift the card off the extractors As the card releases from the standoffs the connector under the card disengages from the system board connector 4 Angle the card so that the other end of th...

Страница 65: ...ystem on including any attached peripherals Network Daughter Card CAUTION If the GPU card is installed you cannot install the 10 GbE network daughter card Removing The Network Daughter Card CAUTION Many repairs may only be done by a certified service technician You should only perform troubleshooting and simple repairs as authorized in your product documentation or as directed by the online or tel...

Страница 66: ...instructions that came with the product NOTE If you are installing the 10 Gb network daughter card ensure that you install the network daughter card cooling shroud in your system 1 Angle the card so that the RJ 45 connectors fit through the slot in the back panel 2 Align the captive screws at back end of the card with the screw holes on the system board 3 Press the touch point on the card to ensur...

Страница 67: ...ur system NOTE You can update the system BIOS using the Lifecycle Controller 2 Turn off the system including any attached peripherals and disconnect the system from the electrical outlet When disconnected from the power source press and hold the power button for three seconds to fully drain the system of stored power prior to removing the cover 3 Open the system 4 Remove the cooling shroud WARNING...

Страница 68: ...enly if not firmly grasped 8 Position your thumb firmly over the processor socket release lever near the unlock icon and release the lever from the locked position by pushing down and out from under the tab 9 Similarly position your thumb firmly over the processor socket release lever near the lock icon and release the lever from the locked position by pushing down and out from under the tab Rotat...

Страница 69: ...nently damaged Be careful not to bend the pins in the socket when removing the processor out of the socket 11 Lift the processor out of the socket and leave the release lever up so that the socket is ready for the new processor NOTE If you are permanently removing the processor you must install a processor blank and a heat sink blank in the vacant socket to ensure proper system cooling NOTE Instal...

Страница 70: ...thorized in your product documentation or as directed by the online or telephone service and support team Damage due to servicing that is not authorized by Dell is not covered by your warranty Read and follow the safety instructions that came with the product NOTE If you are installing a single processor it must be installed in socket CPU1 1 Before upgrading your system download the latest system ...

Страница 71: ...d 10 Rotate the socket release lever near the lock icon until it is locked in position 11 Similarly rotate the socket release lever near the unlock icon until it is locked in position 12 Using a clean lint free cloth remove the thermal grease from the heat sink CAUTION Applying too much thermal grease can result in excess grease coming in contact with and contaminating the processor socket 13 Open...

Страница 72: ...r supply defaults are to wake both power supplies if the load on the active power supply is greater than 50 and to sleep the redundant power supply if the load falls below 20 You can configure the Hot Spare feature using the iDRAC settings For more information on iDRAC settings see the iDRAC7 User s Guide at support dell com manuals Removing An AC Power Supply CAUTION Many repairs may only be done...

Страница 73: ...output power NOTE The maximum output power shown in Watts is listed on the power supply label 2 If applicable remove the power supply blank 3 Slide the new power supply into the chassis until the power supply is fully seated and the release latch snaps into place NOTE If you unlatched the cable management arm re latch it For information about the cable management arm see the system s rack document...

Страница 74: ...t Requirements Supply voltage 48 60 V DC Current consumption 32 A maximum Kit Contents Dell part number 6RYJ9 terminal block or equivalent 1 6 32 nut equipped with lock washer 1 Required Tools Wire stripper pliers capable of removing insulation from size 10 AWG solid or stranded insulated copper wire NOTE Use alpha wire part number 3080 or equivalent 65 30 stranding Required Wires One UL 10 AWG 2 ...

Страница 75: ...o servicing that is not authorized by Dell is not covered by your warranty Read and follow all safety instructions that came with the product 1 Strip the insulation from the ends of the DC power wires exposing approximately 13 mm 0 5 inch of copper wire WARNING Reversing polarity when connecting DC power wires can permanently damage the power supply or the system 2 Insert the copper ends into the ...

Страница 76: ...ot authorized by Dell is not covered by your warranty Read and follow all safety instructions that came with the product CAUTION The system requires one power supply for normal operation On power redundant systems remove and replace only one power supply at a time in a system that is powered on NOTE You may have to unlatch and lift the optional cable management arm if it interferes with power supp...

Страница 77: ... maximum output power NOTE The maximum output power shown in Watts is listed on the power supply label 2 If applicable remove the power supply blank 3 Slide the new power supply into the chassis until the power supply is fully seated and the release latch snaps into place NOTE If you unlatched the cable management arm re latch it For information about the cable management arm see the system s rack...

Страница 78: ...pply blank align the blank with the power supply bay and insert it into the chassis until it clicks into place System Battery Replacing The System Battery WARNING There is a danger of a new battery exploding if it is incorrectly installed Replace the battery only with the same or equivalent type recommended by the manufacturer See your safety information for additional information CAUTION Many rep...

Страница 79: ...attery cover 2 network daughter card cooling shroud 3 touch points 4 Locate the battery socket CAUTION To avoid damage to the battery connector you must firmly support the connector while installing or removing a battery 5 To remove the battery press down firmly on the positive side of the connector and lift the battery out of the securing tabs at the negative side of the connector Figure 38 Repla...

Страница 80: ...repairs may only be done by a certified service technician You should only perform troubleshooting and simple repairs as authorized in your product documentation or as directed by the online or telephone service and support team Damage due to servicing that is not authorized by Dell is not covered by your warranty Read and follow the safety instructions that came with the product 1 If installed re...

Страница 81: ... Removing and Installing the 2 5 Inch x4 Hard Drive Backplane 1 hard drive backplane 2 backplane signal cable 3 backplane power cable 4 release tab 5 SAS A cable Figure 40 Cabling Diagram 2 5 Inch x4 Systems 81 ...

Страница 82: ...Figure 41 Removing and Installing the 2 5 Inch x4 SAS Hard Drive and x2 Dell PowerEdge Express Flash PCIe SSD Backplane 1 backplane signal cable 2 PCIe A cable 3 backplane signal cable 4 PCIe B cable 5 backplane power cable 6 release tabs 2 7 SAS B cable 8 SAS hard drive connector on backplane 9 PCIe connector on backplane 82 ...

Страница 83: ...and x2 PCIe SSD Hard Drive Backplane 1 cable retention bracket 2 system board 3 PCIe SSD card 4 integrated SAS controller card 5 SAS connector on system board 6 SAS and PCIe SSD backplane Figure 43 Removing and Installing the 2 5 Inch x8 Hard Drive Backplane 83 ...

Страница 84: ...e power cable 3 SAS A cable 4 release tabs 2 5 SAS B cable Figure 44 Cabling Diagram 2 5 Inch x8 Systems 1 cable retention bracket 2 system board 3 integrated storage controller card 4 SAS connector on the system board 5 SAS backplane 84 ...

Страница 85: ...Figure 45 Cabling Diagram 2 5 Inch x8 Systems 1 cable retention bracket 2 system board 3 SAS controller card 4 SAS backplane Figure 46 Removing and Installing the 2 5 Inch x10 Hard Drive Backplane 85 ...

Страница 86: ...onnector on system board 5 SAS backplane expander card Installing The Hard Drive Backplane CAUTION Many repairs may only be done by a certified service technician You should only perform troubleshooting and simple repairs as authorized in your product documentation or as directed by the online or telephone service and support team Damage due to servicing that is not authorized by Dell is not cover...

Страница 87: ...hould only perform troubleshooting and simple repairs as authorized in your product documentation or as directed by the online or telephone service and support team Damage due to servicing that is not authorized by Dell is not covered by your warranty Read and follow the safety instructions that came with the product 1 If installed remove the front bezel 2 Turn off the system including any attache...

Страница 88: ... chassis CAUTION The display module connector is a ZIF zero insertion force connector Ensure that the locking tab on the connector is released before removal and insertion The locking tab must be engaged after insertion 3 Connect control panel and display module cables to the control panel board 4 If required route the power data cables along the chassis wall 5 Close the system 6 If applicable ins...

Страница 89: ...ted at the bottom of the chassis that secures the control module to the chassis NOTE Apart from the screw the control panel has three tabs one on the left and two tabs on top that secure it to the chassis CAUTION Applying excessive force while pulling upward may damage the control panel 6 Hold the top edge of the control panel at the corners and pull upward until the control panel tabs release 7 H...

Страница 90: ...ing tab must be engaged after insertion 5 Connect the display module cable to the control panel board 6 Close the system 7 If applicable install the front bezel 8 Reconnect the system to its electrical outlet and turn the system on including any attached peripherals Removing The Control Panel 10 Hard Drive System CAUTION Many repairs may only be done by a certified service technician You should on...

Страница 91: ...uthorized in your product documentation or as directed by the online or telephone service and support team Damage due to servicing that is not authorized by Dell is not covered by your warranty Read and follow the safety instructions that came with the product 1 Route the control panel cable through the chassis and connect the control panel cable to the control panel 2 Push the control panel into ...

Страница 92: ...ocumentation or as directed by the online or telephone service and support team Damage due to servicing that is not authorized by Dell is not covered by your warranty Read and follow the safety instructions that came with the product NOTE This procedure applies only to the 8 hard drive system 1 If installed remove the front bezel 2 Turn off the system including any attached peripherals and disconn...

Страница 93: ...ions that came with the product 1 Push the VGA module into the chassis and align the threaded screw hole on the VGA module with the screw hole on the chassis 2 Using a 2 Philips screwdriver replace the screw at the bottom of the chassis that secures the VGA module to the chassis 3 Replace the control panel 4 Connect the VGA module cable to the VGA module CAUTION The display module connector is a Z...

Страница 94: ...nect the system from the electrical outlet 2 If installed remove the front bezel 3 Open the system 4 Remove the following a cooling shroud b memory modules c cooling fans d power supply s e all expansion card risers WARNING The heat sink is hot to touch for some time after the system has been powered down Ensure that you do not touch the heat sink s while removing the system board f heat sink s he...

Страница 95: ...ng the system board from the chassis 7 Grasp the system board holder lift the blue release pin slide the system board toward the front of the system and lift the system board out of the chassis CAUTION Do not lift the system board assembly by grasping a memory module processor or other components Figure 52 Removing and Installing the System Board 1 system board 2 system board holder 3 release pin ...

Страница 96: ...assis 3 Push the system board toward the back of the chassis until the board clicks into place 4 Replace the following a hard drive backplane b hot swap hard drives c internal USB key if installed d internal dual SD module e network daughter card f all expansion cards and the integrated storage controller card g heat sink s heat sink blanks and processors s processor blanks h all expansion card ri...

Страница 97: ...securely attached to the external connectors on your system before troubleshooting any external devices Troubleshooting The Video Subsystem 1 Check the system and power connections to the monitor 2 Check the video interface cabling from the system to the monitor 3 Run the appropriate diagnostic test If the tests run successfully the problem is not related to video hardware If the tests fail see Ge...

Страница 98: ... for any system messages pertaining to the NIC controller 3 Check the appropriate indicator on the NIC connector If the link indicator does not light check all cable connections If the activity indicator does not light the network driver files might be damaged or missing Remove and reinstall the drivers if applicable See the NIC s documentation If applicable change the autonegotiation setting Use ...

Страница 99: ...em CAUTION Many repairs may only be done by a certified service technician You should only perform troubleshooting and simple repairs as authorized in your product documentation or as directed by the online or telephone service and support team Damage due to servicing that is not authorized by Dell is not covered by your warranty Read and follow the safety instructions that came with the product 1...

Страница 100: ...efective battery Troubleshooting Power Supplies CAUTION Many repairs may only be done by a certified service technician You should only perform troubleshooting and simple repairs as authorized in your product documentation or as directed by the online or telephone service and support team Damage due to servicing that is not authorized by Dell is not covered by your warranty Read and follow the saf...

Страница 101: ...ripherals and unplug the system from the power source Wait at least 10 seconds and then reconnect the system to power 3 Turn on the system and attached peripherals and note the messages on the screen If an error message is displayed indicating a fault with a specific memory module go to step 12 4 Enter the System Setup and check the system memory setting Make any changes to the memory settings if ...

Страница 102: ...CAUTION Many repairs may only be done by a certified service technician You should only perform troubleshooting and simple repairs as authorized in your product documentation or as directed by the online or telephone service and support team Damage due to servicing that is not authorized by Dell is not covered by your warranty Read and follow the safety instructions that came with the product NOTE...

Страница 103: ...le is properly connected to the drive 9 Close the system If the problem is not resolved see Getting Help Troubleshooting A Tape Backup Unit CAUTION Many repairs may only be done by a certified service technician You should only perform troubleshooting and simple repairs as authorized in your product documentation or as directed by the online or telephone service and support team Damage due to serv...

Страница 104: ...card are installed and are configured correctly See the operating system documentation for more information 4 Restart the system and enter the System Setup 5 Verify that the controller is enabled and the drives are displayed in the System Setup If the problem persists try troubleshooting the expansion cards or see Getting Help Troubleshooting A Storage Controller CAUTION Many repairs may only be d...

Страница 105: ... instructions that came with the product NOTE When troubleshooting an expansion card see the documentation for your operating system and the expansion card 1 Run the appropriate diagnostic test For more information see Using System Diagnostics 2 Turn off the system and attached peripherals and disconnect the system from the electrical outlet 3 Open the system 4 Ensure that each expansion card is f...

Страница 106: ...covered by your warranty Read and follow the safety instructions that came with the product 1 Run the appropriate diagnostics test See Using System Diagnostics for available diagnostic tests 2 Turn off the system and attached peripherals and disconnect the system from the electrical outlet 3 Open the system 4 Ensure that the processor and heat sink are properly installed 5 Close the system 6 Run t...

Страница 107: ...werEdge Diagnostics User s Guide under Software Serviceability Tools at support dell com manuals Dell Embedded System Diagnostics NOTE Also known as Enhanced Pre boot System Assessment ePSA diagnostics The embedded system diagnostics provides a set of options for particular device groups or devices allowing you to Run tests automatically or in an interactive mode Repeat tests Display or save test ...

Страница 108: ...tatus information of all detected devices Results Displays the results of all tests that are executed System Health Provides the current overview of the system performance Event Log Displays a time stamped log of the results of all tests run on the system This is displayed if at least one event description is recorded For information about embedded system diagnostics see the Dell Enhanced Pre boot...

Страница 109: ...System Board Jumper Settings Jumper Setting Description PWRD_EN default The password feature is enabled pins 4 6 The password feature is disabled pins 2 4 iDRAC local access is unlocked at the next AC power cycle NVRAM_CLR default The configuration settings are retained at system boot pins 1 3 The configuration settings are cleared at the next system boot pins 3 5 109 ...

Страница 110: ...CD Optical drive SATA connector 3 J_BP0 Hard drive backplane power connector 4 J_TBU Tape backup unit power connector 5 J_PS1 PSU 1 power connector 6 J_RIPS Redundant internal persistent storage unit connector 7 J_NDC Network daughter card connector 8 J_RISER_3A Riser 3 connector 9 J_RISER_3B Riser 3 connector 10 J_USB USB connector 110 ...

Страница 111: ...ctor 24 BAT Battery connector 25 CPU2 Processor socket 2 26 B1 B5 B9 B2 B6 B10 Memory module sockets 27 J_FAN2U_7 Cooling fan connector 28 J_FAN2U_6 Cooling fan connector 29 J_FAN2U_5 Cooling fan connector 30 J_FAN2U_4 Cooling fan connector 31 A1 A5 A9 A2 A6 A10 B3 B7 B11 B4 B8 B12 Memory module sockets 32 J_FAN1U_3 Cooling fan connector 33 J_BP1 Backplane power connector 34 J_FAN1U_2 Cooling fan ...

Страница 112: ...system 3 Move the jumper on the system board jumper from pins 4 and 6 to pins 2 and 4 4 Close the system The existing passwords are not disabled erased until the system boots with the Jumper on pins 2 and 4 However before you assign a new system and or setup password you must move the jumper back to pins 4 and 6 NOTE If you assign a new system and or setup password with the jumper on pins 2 and 4 ...

Страница 113: ...and the x16 link on riser 2 Riser 3 Slot 1 One full height three fourth length x16 link or one half height half length x16 link Memory Architecture 1066 MT s 1333 MT s or 1600 MT s registered or unbuffered Error Correcting Code ECC DIMMs Support for Advanced ECC or memory optimized operation Memory module sockets Twenty four 240 pin Memory module capacities LRDIMM 8 GB 16 GB or 32 GB single dual o...

Страница 114: ...ernal hot swappable SAS SATA or Nearline SAS hard drives 10 hard drive systems Up to ten 2 5 inch internal hot swappable SAS SATA or Nearline SAS hard drives Optical drive 8 hard drive system only One optional SATA DVD ROM drive or DVD RW drive NOTE DVD devices are data only Connectors Back NIC Four 10 100 1000 Mbps or two 10 100 1000 Mbps and two 100 Mbps 1 Gbps 10 Gbps Serial 9 pin DTE 16550 com...

Страница 115: ...nge system performance may be impacted NOTE When operating in the expanded temperature range ambient temperature warnings may be reported on the LCD and in the System Event Log 10 of annual operating hours 5 C to 40 C at 5 to 85 RH with 26 C dew point NOTE Outside the standard operating temperature 10 C to 35 C the system can operate down to 5 C or up to 40 C for a maximum of 10 of its annual oper...

Страница 116: ...10 000 ft PCIe SSDs are not supported GPU is not supported LRDIMM is not supported 130 W 4 core and 135 W processor is not supported Redundant power supplies are required Non Dell qualified peripheral cards and or peripheral cards greater than 25 W are not supported Storage Temperature 40 C to 65 C 40 F to 149 F with a maximum temperature gradation of 20 C per hour 116 ...

Страница 117: ...the display Clear the SEL You can perform this task remotely but you will lose the event history for the system Power cycle Turn off the system and disconnect it from the electrical outlet wait approximately 10 seconds reconnect the power cable and restart the system System Error Messages System messages appear on the monitor to notify you of a possible problem with the system These messages refer...

Страница 118: ...stem or an application failed to communicate within the time out period Action Check the operating system application hardware and system event log for exception events ASR0001 Message The watchdog timer reset the system Details The operating system or an application failed to communicate within the time out period The system was reset Action Check the operating system application hardware and sys...

Страница 119: ...ing Help CPU0001 Message CPU number has a thermal trip over temperature event LCD Message CPU number has a thermal trip Check CPU heat sink Details The processor temperature increased beyond the operational range Action Review the logs for fan failures If no fan failures are detected check inlet temperature if available and reinstall processor heat sink If the problem persists see Getting Help CPU...

Страница 120: ...n on the system 4 If the issue persists see Getting Help CPU0701 Message CPU number protocol error detected LCD Message CPU number protocol error detected Power cycle system Details System event log and operating system logs may indicate that the exception is external to the processor Action 1 Check system and operating system logs for exceptions If no exceptions are found continue 2 Turn off the ...

Страница 121: ... Power cycle system Details System event log and operating system logs may indicate that the exception is external to the processor Action 1 Check system and operating system logs for exceptions If no exceptions are found continue 2 Turn off the system and remove input power for one minute 3 Ensure the processor is seated correctly 4 Reapply input power and turn on the system 5 If the issue persis...

Страница 122: ...may be necessary for proper operation System functionality may be degraded Action Check if the cable is present then reinstall or reconnect MEM0000 Message Persistent correctable memory errors detected on a memory device at location s location Details This is an early indicator of a possible future uncorrectable error Action Re seat the memory modules If the issue persists see Getting Help MEM0001...

Страница 123: ...ly misconfigured or has failed Action Check the memory configuration Re seat the memory modules If the issue persists see Getting Help MEM1208 Message Memory spare redundancy is lost Check memory device at location location LCD Message Memory spare lost on location Power cycle system Details Memory sparing is no longer available Action Re seat the memory modules If the issue persists see Getting H...

Страница 124: ...l the device PCI1342 Message A bus time out was detected on a component at slot number Details System performance may be degraded or system may fail to operate Action Cycle input power update component drivers if device is removable reinstall the device PCI1348 Message A PCI parity error was detected on a component at slot number LCD Message PCI parity error on slot number Re seat PCI card Details...

Страница 125: ...gure the memory for system operation Action Compare system memory installation to supported system memory configurations PSU0001 Message Power supply number failed LCD Message PSU number failed Check PSU Action Remove and reinstall the power supply If the issue persists see Getting Help PSU0002 Message A predictive failure detected on power supply number LCD Message Predictive failure on PSU numbe...

Страница 126: ...sts see Getting Help PSU0032 Message The temperature for power supply number is in a warning range Details System performance may be degraded Action Check the system operating environment including airflow and inlet temperature Check system logs for temperature and thermal component failures PSU0033 Message The temperature for power supply number is outside of the allowable range LCD Message PSU n...

Страница 127: ...supply number is rated for value watts LCD Message PSU wattage mismatch PSU number value watts Details Power supplies should be of the same input type and power rating Action Install matched power supplies and review this manual for proper configuration PSU1201 Message Power supply redundancy is lost Details The power supply tries to operate in a degraded state System Performance and power redunda...

Страница 128: ...etails An error was reported during a SD card read or write Action Reseat the flash media If the problem persists see Getting Help RFM1014 Message Removable Flash Media name is write protected LCD Message Removable Flash Media name is write protected Check SD Card Details The card is write protected by the physical latch on the SD card A write protected card cannot be used Action If unintended rem...

Страница 129: ...The chassis is open while the power is off LCD Message Intrusion detected Check chassis cover Details The chassis was opened while the power was off System security may have been compromised Action Close the chassis and verify hardware inventory Check system logs SEL0006 Message All event logging is disabled Details This message is displayed when all event logging has been disabled by the user Act...

Страница 130: ...et temperature is greater than the upper warning threshold LCD Message System inlet temperature is outside of range Details Ambient air temperature is too warm or one or more fans may have failed Action Check the system operating environment and review event log for fan failures TMP0121 Message The system inlet temperature is greater than the upper critical threshold LCD Message System inlet name ...

Страница 131: ...n or the operating system For more information see the documentation that accompanied the operating system or application Diagnostic Messages The system diagnostic utilities may issue messages if you run diagnostic tests on your system See Using System Diagnostics chapter for more information about system diagnostics Alert Messages Systems management software generates alert messages for your syst...

Страница 132: ...132 ...

Страница 133: ...d service options Availability varies by country and product and some services may not be available in your area To contact Dell for sales technical support or customer service issues 1 Visit support dell com 2 Select your support category 3 If you are not a U S customer select your country code at the bottom of the support dell com page or select All to see more choices 4 Select the appropriate s...

Отзывы: