background image

2. Remove the 

side cover

.

3. Remove the 

hard-drive assembly

.

About this task

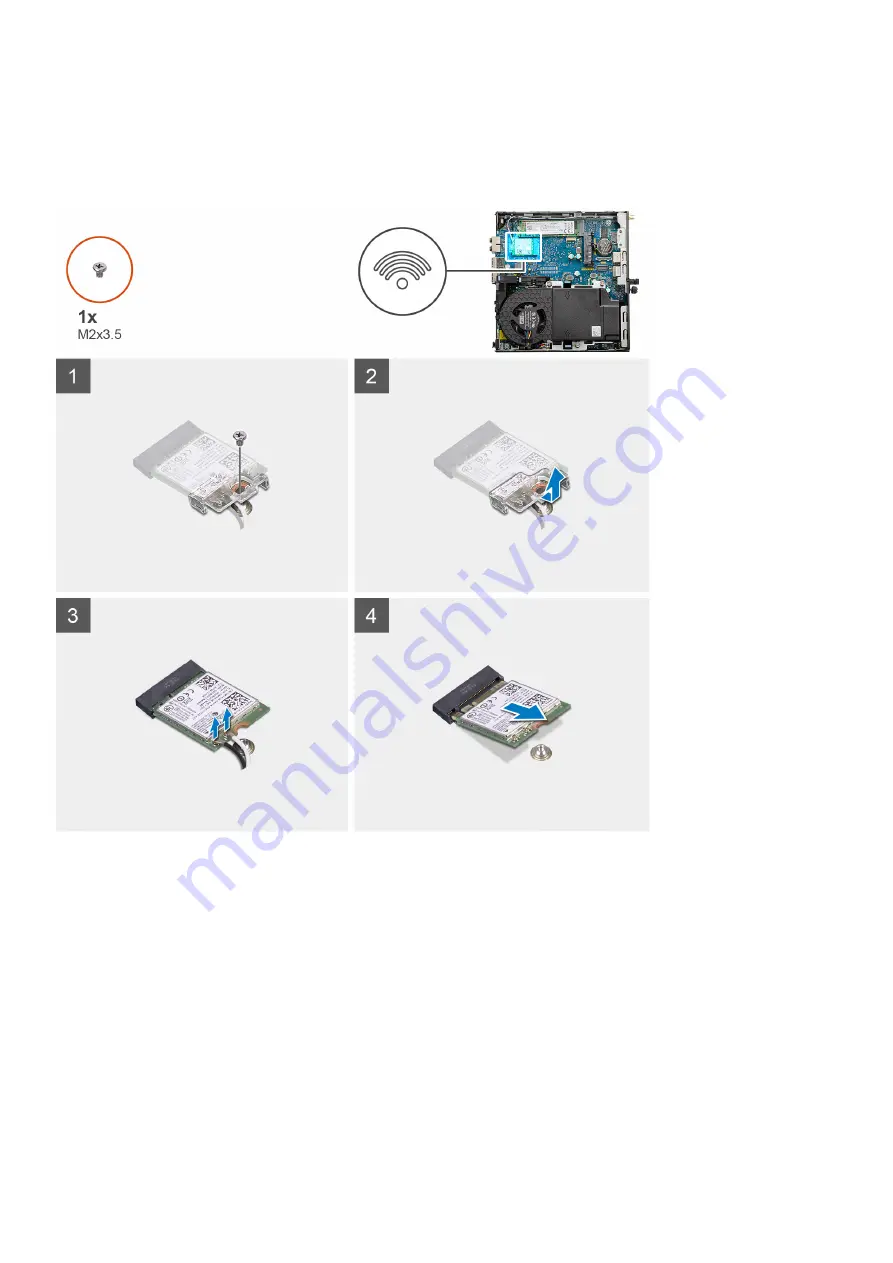
The following images indicate the location of the wireless card and provide a visual representation of the removal procedure.

Steps

1. Remove the (M2x3.5) screw that secures the WLAN card bracket to the system board.
2. Slide and lift the WLAN card bracket away from the WLAN card.
3. Disconnect the antenna cables from the WLAN card.
4. Slide and remove the WLAN card from the connector on the system board.

Installing the WLAN card

Prerequisites

If you are replacing a component, remove the existing component before performing the installation procedure.

About this task

The following image indicates the location of the wireless card and provides a visual representation of the installation procedure.

Removing and installing components

31

Содержание D14U

Страница 1: ...OptiPlex 3090 Micro Service Manual Regulatory Model D14U Regulatory Type D14U001 October 2021 Rev A00 ...

Страница 2: ...ential damage to hardware or loss of data and tells you how to avoid the problem WARNING A WARNING indicates a potential for property damage personal injury or death 2021 Dell Inc or its subsidiaries All rights reserved Dell EMC and other trademarks are trademarks of Dell Inc or its subsidiaries Other trademarks may be trademarks of their respective owners ...

Страница 3: ...emoving the hard drive bracket 19 Installing the hard drive bracket 20 Installing the 2 5 in hard drive assembly 21 Solid state drive 22 Removing the M 2 2230 PCIe solid state drive 22 Installing the M 2 2230 PCIe solid state drive 23 Removing the M 2 2280 PCIe solid state drive 24 Installing the M 2 2280 PCIe solid state drive 25 Fan assembly 26 Removing the fan assembly 26 Installing the fan ass...

Страница 4: ... boot options 57 Intel Software Guard Extensions options 58 Performance 58 Power management 59 Post behavior 59 Virtualization support 60 Wireless options 60 Maintenance 61 System logs 61 Advanced configuration 61 SupportAssist System Resolution 62 Updating the BIOS 62 Updating the BIOS in Windows 62 Updating the BIOS in Linux and Ubuntu 62 Updating the BIOS using the USB drive in Windows 62 Updat...

Страница 5: ...Recovering the operating system 68 Backup media and recovery options 68 WiFi power cycle 68 Chapter 6 Getting help 69 Contacting Dell 69 Contents 5 ...

Страница 6: ...ructions that is shipped with the product or at www dell com regulatory_compliance CAUTION Before touching anything inside your computer ground yourself by touching an unpainted metal surface such as the metal at the back of the computer While you work periodically touch an unpainted metal surface to dissipate static electricity which could harm internal components CAUTION When you disconnect a ca...

Страница 7: ... done through the use of a field service electrostatic discharge ESD kit When connecting a bonding wire ensure that it is connected to bare metal and never to a painted or non metal surface The wrist strap should be secure and in full contact with your skin and ensure that you remove all jewelry such as watches bracelets or rings prior to bonding yourself and the equipment Electrostatic discharge ...

Страница 8: ...ecommended to test the wrist strap and bonding wire at least once per week ESD Wrist Strap Tester The wires inside of an ESD strap are prone to damage over time When using an unmonitored kit it is a best practice to regularly test the strap prior to each service call and at a minimum test once per week A wrist strap tester is the best method for doing this test If you do not have your own wrist st...

Страница 9: ...ensitive components After working inside your computer About this task CAUTION Leaving stray or loose screws inside your computer may severely damage your computer Steps 1 Replace all screws and ensure that no stray screws remain inside your computer 2 Connect any external devices peripherals or cables you removed before working on your computer 3 Replace any media cards discs or any other parts t...

Страница 10: ...y of screws and then place them in a screw storage box This is to ensure that the correct number of screws and correct screw type is restored when the component is replaced NOTE Some computers have magnetic surfaces Ensure that the screws are not left attached to such surfaces when replacing a component NOTE Screw color may vary with the configuration ordered Table 1 Screw list Component Screw typ...

Страница 11: ...Table 1 Screw list continued Component Screw type Quantity Image System board M3x4 6 32 2 4 Removing and installing components 11 ...

Страница 12: ...Major components of your system 1 Side cover 12 Removing and installing components ...

Страница 13: ...lable according to warranty coverages purchased by the customer Contact your Dell sales representative for purchase options Side cover Removing the side cover Prerequisites 1 Follow the procedure in before working inside your computer NOTE Ensure that you remove the security cable from the security cable slot if applicable About this task The following images indicate the location of the side cove...

Страница 14: ...Steps 1 Loosen the thumbscrew 6x32 that secures the side cover to the system 14 Removing and installing components ...

Страница 15: ...rerequisites If you are replacing a component remove the existing component before performing the installation procedure About this task The following image indicates the location of the side cover and provides a visual representation of the installation procedure Removing and installing components 15 ...

Страница 16: ...system Next steps 1 Follow the procedure in after working inside your computer Front bezel Removing the front bezel Prerequisites 1 Follow the procedure in before working inside your computer 2 Remove the side cover About this task The following images indicate the location of the front bezel and provide a visual representation of the removal procedure 16 Removing and installing components ...

Страница 17: ...ing the front bezel Prerequisites If you are replacing a component remove the existing component before performing the installation procedure About this task The following image indicates the location of the front bezel and provides a visual representation of the installation procedure Removing and installing components 17 ...

Страница 18: ...rocedure in after working inside your computer Hard drive assembly Removing the hard drive assembly Prerequisites 1 Follow the procedure in before working inside your computer 2 Remove the side cover About this task The following images indicate the location of the hard drive assembly and provide a visual representation of the removal procedure 18 Removing and installing components ...

Страница 19: ...orientation of the hard drive so that you can replace it correctly Removing the hard drive bracket Prerequisites 1 Follow the procedure in before working inside your computer 2 Remove the side cover 3 Remove the 2 5 in hard drive assembly About this task The following images indicate the location of the hard drive bracket and provide a visual representation of the removal procedure Removing and in...

Страница 20: ...cket Installing the hard drive bracket Prerequisites If you are replacing a component remove the existing component before performing the installation procedure About this task The following image indicates the location of the hard drive bracket and provides a visual representation of the installation procedure 20 Removing and installing components ...

Страница 21: ...assembly 2 Install the side cover 3 Follow the procedure in after working inside your computer Installing the 2 5 in hard drive assembly Prerequisites If you are replacing a component remove the existing component before performing the installation procedure About this task The following image indicates the location of the hard drive assembly and provides a visual representation of the installatio...

Страница 22: ...ase tabs clicks into place Next steps 1 Install the side cover 2 Follow the procedure in after working inside your computer Solid state drive Removing the M 2 2230 PCIe solid state drive Prerequisites 1 Follow the procedure in before working inside your computer 2 Remove the side cover 3 Remove the hard drive assembly 22 Removing and installing components ...

Страница 23: ...m board 2 Slide and lift the solid state drive off the system board Installing the M 2 2230 PCIe solid state drive Prerequisites If you are replacing a component remove the existing component before performing the installation procedure About this task The following image indicates the location of the solid state drive and provides a visual representation of the installation procedure Removing and...

Страница 24: ...board Next steps 1 Install the hard drive assembly 2 Install the side cover 3 Follow the procedure in after working inside your computer Removing the M 2 2280 PCIe solid state drive Prerequisites 1 Follow the procedure in before working inside your computer 2 Remove the side cover 3 Remove the hard drive assembly About this task The following images indicate the location of the solid state drive a...

Страница 25: ...alling the M 2 2280 PCIe solid state drive Prerequisites If you are replacing a component remove the existing component before performing the installation procedure About this task The following image indicates the location of the solid state drive and provides a visual representation of the installation procedure Removing and installing components 25 ...

Страница 26: ...e drive to the system board Next steps 1 Install the hard drive assembly 2 Install the side cover 3 Follow the procedure in after working inside your computer Fan assembly Removing the fan assembly Prerequisites 1 Follow the procedure in before working inside your computer 2 Remove the side cover About this task The following images indicate the location of the fan assembly and provide a visual re...

Страница 27: ...Removing and installing components 27 ...

Страница 28: ...t the fan cable from the connector on the system board Lift the fan assembly out of the system Installing the fan assembly Prerequisites If you are replacing a component remove the existing component before performing the installation procedure About this task The following images indicate the location of the fan assembly and provide a visual representation of the removal procedure 28 Removing and...

Страница 29: ...Removing and installing components 29 ...

Страница 30: ...n the system until it clicks into place 4 Route the speaker cable through the routing guides on the fan assembly Next steps 1 Install the side cover 2 Follow the procedure in after working inside your computer WLAN card Removing the WLAN card Prerequisites 1 Follow the procedure in before working inside your computer 30 Removing and installing components ...

Страница 31: ...t the WLAN card bracket away from the WLAN card 3 Disconnect the antenna cables from the WLAN card 4 Slide and remove the WLAN card from the connector on the system board Installing the WLAN card Prerequisites If you are replacing a component remove the existing component before performing the installation procedure About this task The following image indicates the location of the wireless card an...

Страница 32: ...uxiliary black triangle Black 2 Place the WLAN card bracket to secure the antenna cables 3 Align the notch on the WLAN card with the tab on the WLAN card slot Insert the WLAN card into the connector on the system board 4 Replace the M2x3 5 screw to secure the WLAN card bracket to the WLAN card Next steps 1 Install the hard drive assembly 2 Install the side cover 3 Follow the procedure in after wor...

Страница 33: ...is task The following images indicate the location of the heat sink and provide a visual representation of the removal procedure Steps 1 Loosen the three captive screws that secure the heat sink to the system NOTE Loosen the screw in the sequential order 1 2 3 as printed on the heat sink 2 Lift the heat sink from the system board Removing and installing components 33 ...

Страница 34: ... the installation procedure Steps 1 Align the screws of the heat sink with the holders on the system board and place the heat sink on the processor 2 Tighten the captive screws that secure the heat sink to the system board NOTE Tighten the screws in a sequential order 1 2 3 as printed on the heat sink Next steps 1 Install the fan assembly 2 Install the side cover 3 Follow the procedure in after wo...

Страница 35: ...tion of the coin cell battery and provide a visual representation of the removal procedure Steps 1 Using a plastic scribe gently pry the coin cell battery out of the battery socket on the system board 2 Remove the coin cell battery out of the system Installing the coin cell battery Prerequisites If you are replacing a component remove the existing component before performing the installation proce...

Страница 36: ... computer Memory modules Removing the memory modules Prerequisites 1 Follow the procedure in before working inside your computer 2 Remove the side cover 3 Remove the fan assembly About this task The following images indicate the location of the memory modules and provide a visual representation of the removal procedure CAUTION To prevent damage to the memory module hold the memory module by the ed...

Страница 37: ...le slot Installing the memory modules Prerequisites If you are replacing a component remove the existing component before performing the installation procedure About this task The following image indicates the location of the memory modules and provides a visual representation of the installation procedure Removing and installing components 37 ...

Страница 38: ...d reinstall it Next steps 1 Install the fan assembly 2 Install the side cover 3 Follow the procedure in after working inside your computer Speaker Removing the speaker Prerequisites 1 Follow the procedure in before working inside your computer 2 Remove the side cover 3 Remove the fan assembly About this task The following images indicate the location of the speaker and provide a visual representat...

Страница 39: ...system board Installing the speaker Prerequisites If you are replacing a component remove the existing component before performing the installation procedure About this task The following image indicates the location of the speaker and provides a visual representation of the installation procedure Removing and installing components 39 ...

Страница 40: ... O modules Type C HDMI VGA DP Serial Prerequisites 1 Follow the procedure in before working inside your computer 2 Remove the side cover About this task The following images indicate the location of the optional I O Modules and provide a visual representation of the removal procedure Steps 1 Remove the two M3X3 screws that secure the optional I O module to the computer chassis 2 Disconnect the I O...

Страница 41: ...re replacing a component remove the existing component before performing the installation procedure About this task The following images indicate the location of the system board and provide a visual representation of the installation procedure Removing and installing components 41 ...

Страница 42: ...42 Removing and installing components ...

Страница 43: ...Removing and installing components 43 ...

Страница 44: ... optional video ports This is not applicable if you are replacing a defective module 2 Insert the optional I O module Type C HDMI VGA DP Serial into its slot from the inside of your computer 3 Connect the I O cable to the connector on the system board 4 Replace the two M3X3 screws to secure the optional I O module to the system Next steps 1 Install the side cover 2 Follow the procedure in after wo...

Страница 45: ...ly 4 Remove the heat sink About this task The following images indicate the location of the processor and provide a visual representation of the removal procedure Steps 1 Press down and push the release lever away from the processor to release it from the securing tab 2 Lift the lever upward to lift the processor cover Removing and installing components 45 ...

Страница 46: ...f you are replacing a component remove the existing component before performing the installation procedure About this task The following image indicates the location of the processor and provides a visual representation of the installation procedure Steps 1 Align the pin 1 corner of the processor with the pin 1 corner of the processor socket and then place the processor in the processor socket 46 ...

Страница 47: ...ll the heat sink 2 Install the fan assembly 3 Install the side cover 4 Follow the procedure in after working inside your computer System board Removing the system board Prerequisites 1 Follow the procedure in before working inside your computer 2 Remove the side cover 3 Remove the hard drive assembly 4 Remove the solid state drive 5 Remove the WLAN card 6 Remove the fan assembly 7 Remove the heat ...

Страница 48: ...48 Removing and installing components ...

Страница 49: ...ure the system board to the chassis 4 Lift the system board away from the chassis Installing the system board Prerequisites If you are replacing a component remove the existing component before performing the installation procedure About this task The following image indicates the location of the system board and provides a visual representation of the installation procedure Removing and installin...

Страница 50: ...50 Removing and installing components ...

Страница 51: ...e caddy support with system board and place the hard drive caddy on the system board 4 Replace the screw 6 32 to secure the hard drive caddy support to the system board Next steps 1 Install the processor 2 Install the optional IO module 3 Install the speaker 4 Install the memory modules 5 Install the heat sink 6 Install the fan assembly 7 Install the WLAN card 8 Install the solid state drive 9 Ins...

Страница 52: ...rivers and downloads When troubleshooting downloading or installing drivers it is recommended that you read the Dell Knowledge Based article Drivers and Downloads FAQ 000123347 3 52 Drivers and downloads ...

Страница 53: ...g or disabling base devices BIOS overview The BIOS manages data flow between the computer s operating system and attached devices such as hard disk video adapter keyboard mouse and printer Entering BIOS setup program Steps 1 Turn on your computer 2 Press F2 immediately to enter the BIOS setup program NOTE If you wait too long and the operating system logo appears continue to wait until you see the...

Страница 54: ...tem Information Displays the following information System Information Displays BIOS Version Service Tag Asset Tag Ownership Tag Manufacture Date Ownership Date and the Express Service Code Memory Information Displays Memory Installed Memory Available Memory Speed Memory Channel Mode Memory Technology DIMM 1 Size and DIMM 2 Size PCI Information Displays Slot1_M 2 Slot2_M 2 Processor Information Dis...

Страница 55: ...n Allows you to enable or disable the integrated USB controller for Enable USB Boot Support Enable Front USB Ports Enable Rear USB Ports All the options are enabled by default Front USB Configuration Allows you to enable or disable the front USB ports All the ports are enabled by default Rear USB Configuration Allows you to enable or disable the back USB ports All the ports are enabled by default ...

Страница 56: ...passwords when powered on from the off state a cold boot Also the system will always prompt for passwords on any module bay HDDs that may be present Password Change This option lets you determine whether changes to the System and Hard Disk passwords are permitted when an administrator password is set Allow Non Admin Password Changes This option is enabled by default UEFI Capsule Firmware Updates T...

Страница 57: ...eature Secure Boot Enable This option is not selected by default Secure Boot Mode Allows you to modify the behavior of Secure Boot to allow evaluation or enforcement of UEFI driver signatures Deployed Mode default Audit Mode Expert key Management Allows you to manipulate the security key databases only if the system is in Custom Mode The Enable Custom Mode option is disabled by default The options...

Страница 58: ...ulti Core Support This field specifies whether the process has one or all cores enabled The performance of some applications improves with the additional cores All Default 1 2 3 Intel SpeedStep Allows you to enable or disable the Intel SpeedStep mode of processor Enable Intel SpeedStep This option is set by default C States Control Allows you to enable or disable the additional processor sleep sta...

Страница 59: ...a special LAN signal This feature only works when the computer is connected to AC power supply Disabled Does not allows the system to power on by special LAN signals when it receives a wake up signal from the LAN or wireless LAN LAN or WLAN Allows the system to be powered on by special LAN or wireless LAN signals LAN Only Allows the system to be powered on by special LAN signals LAN with PXE Boot ...

Страница 60: ...e when warning or errors are detected Choose any one of the option Prompt on Warnings and Errors default Continue on Warnings Continue on Warnings and Errors Virtualization support Table 13 Virtualization Support Option Description Virtualization This option specifies whether a Virtual Machine Monitor VMM can utilize the additional hardware capabilities provided by the Intel Virtualization technol...

Страница 61: ...y from Hard Drive This option is set by default Allows you to recover the corrupted BIOS from a recovery file on the HDD or an external USB key NOTE BIOS Recovery from Hard Drive field must be enabled Always Perform Integrity Check Performs integrity check on every boot First Power On Date Allows you the set Ownership date The option Set Ownership Date is not set by default System logs Table 16 Sy...

Страница 62: ...nter the Service Tag of your computer and then click Search NOTE If you do not have the Service Tag use the SupportAssist feature to automatically identify your computer You can also use the product ID or manually browse for your computer model 3 Click Drivers Downloads Expand Find drivers 4 Select the operating system installed on your computer 5 In the Category drop down list select BIOS 6 Selec...

Страница 63: ...em re install For more information on this subject see Knowledge Article https www dell com support article sln153694 BIOS Update You can run the BIOS update file from Windows using a bootable USB drive or you can also update the BIOS from the F12 One Time boot menu on the computer Most of the Dell computers built after 2012 have this capability and you can confirm by booting your computer to the ...

Страница 64: ...ord only when the status is in Not Set About this task To enter the system setup press F12 immediately after a power on or reboot Steps 1 In the System BIOS or System Setup screen select Security and press Enter The Security screen is displayed 2 Select System Admin Password and create a password in the Enter the new password field Use the following guidelines to assign the system password A passw...

Страница 65: ...nd press Enter or Tab NOTE If you change the System and or Setup password reenter the new password when prompted If you delete the System and or Setup password confirm the deletion when prompted 5 Press Esc and a message prompts you to save the changes 6 Press Y to save the changes and exit from System Setup The computer restarts Clearing BIOS System Setup and System passwords About this task To c...

Страница 66: ...equire user interaction Always ensure that you are present at the computer terminal when the diagnostic tests are performed For more information see https www dell com support kbdoc 000180971 Running the SupportAssist Pre Boot System Performance Check Steps 1 Turn on your computer 2 As the computer boots press the F12 key as the Dell logo appears 3 On the boot menu screen select the Diagnostics op...

Страница 67: ...set Error Clock failure Gate A20 failure Super I O failure Keyboard controller failure Flash latest BIOS version If problem persists replace the system board 3 1 CMOS battery failure Reset the CMOS battery connection If problem persists replace the RTS battery 3 2 PCI or Video card chip failure Replace the system board 3 3 BIOS Recovery image not found Flash latest BIOS version If problem persists...

Страница 68: ...due to software or hardware failures For more information about the Dell SupportAssist OS Recovery see Dell SupportAssist OS Recovery User s Guide at www dell com serviceabilitytools Click SupportAssist and then click SupportAssist OS Recovery Backup media and recovery options It is recommended to create a recovery drive to troubleshoot and fix problems that may occur with Windows Dell proposes mu...

Страница 69: ...ne based support and service options Availability varies by country and product and some services may not be available in your area To contact Dell for sales technical support or customer service issues Steps 1 Go to Dell com support 2 Select your support category 3 Verify your country or region in the Choose a Country Region drop down list at the bottom of the page 4 Select the appropriate servic...

Отзывы: