background image

Loading Paper

47

7

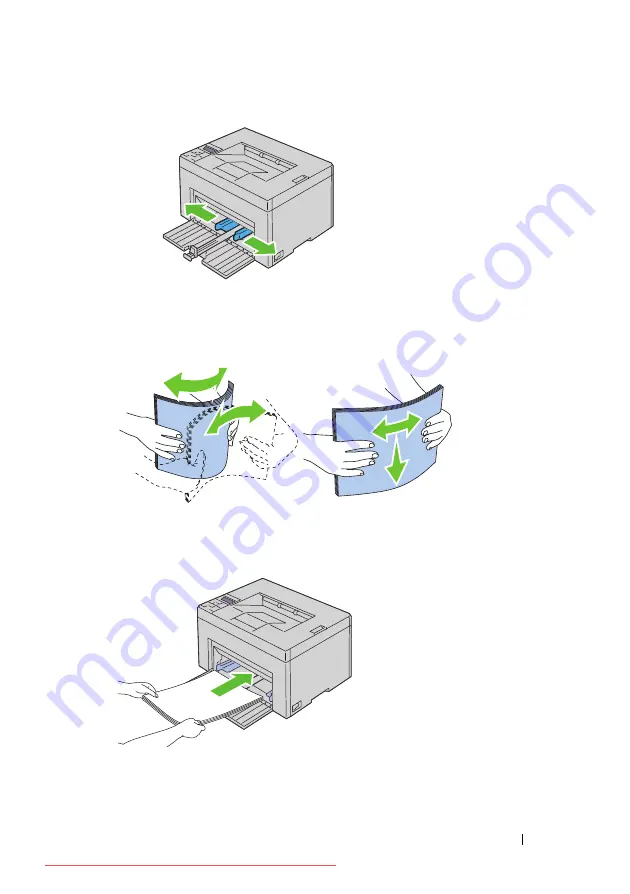
Before loading the print media, flex the sheets back and forth, and then 

fan them. Straighten the edges of the stack on a level surface.

8

Load print media on the MPF with the top edge first and with the 

recommended print side facing up.

9

Adjust the width guides until they rest lightly against the edges of the 

stack of print media.

Downloaded from ManualsPrinter.com Manuals

Содержание 1350CNW

Страница 1: ...www dell com support dell com Dell 1350cnw Color Printer User s Guide Downloaded from ManualsPrinter com Manuals ...

Страница 2: ...Downloaded from ManualsPrinter com Manuals ...

Страница 3: ...www dell com support dell com Dell 1130n Mono Laser Printer User s Guide Downloaded from ManualsPrinter com Manuals ...

Страница 4: ...Downloaded from ManualsPrinter com Manuals ...

Страница 5: ...olor Printer User s Guide 17 2 Finding Information 19 3 Product Features 23 4 About the Printer 25 Front View 25 Rear View 26 Space Requirements 26 Operator Panel 27 Securing the Printer 28 Ordering Supplies 28 Setting Up Printer Printer Setup 31 Downloaded from ManualsPrinter com Manuals ...

Страница 6: ...inting and Checking the Printer Settings Page 42 The Operator Panel 42 The Tool Box 42 7 Loading Paper 45 Loading Print Media in the Multipurpose Feeder MPF 45 Loading Print Media in the Priority Sheet Inserter PSI 50 8 Installing Printer Drivers on Computers Running Windows 53 Identifying Printer Driver Pre install Status For Network Connection Setup 53 The Operator Panel 53 The Tool Box 53 Disab...

Страница 7: ...ttings 70 Using Advanced Setup to Configure Wireless Settings 72 Setting up a New Wireless Network Environment for Your Computer When you need to setup your wireless connectivity with your computer 81 Setting Up for Shared Printing 91 Point and Print 93 Peer to Peer 96 9 Installing Printer Drivers on Computers Running Macintosh 101 Installing the Drivers and Software 101 Adding a Printer on Mac OS...

Страница 8: ...118 Changing the Settings of the Menu Items 119 Details of the Menu Items 119 Printer Status 121 Printer Jobs 123 Printer Settings 124 Print Server Settings 134 Copy Printer Settings 152 Print Volume 153 11 Print Media Guidelines 155 Paper 155 Paper Characteristics 155 Recommended Paper 156 Unacceptable Paper 157 Selecting Paper 157 Selecting Preprinted Media and Letterhead 158 Printing on Letterh...

Страница 9: ...elopes in the Multipurpose Feeder MPF 170 Loading Letterhead 173 Loading Print Media in the Priority Sheet Inserter PSI 173 Loading an Envelope in the Priority Sheet Inserter PSI 175 Loading Letterhead 178 Manual Duplex Printing Windows Printer Driver Only 179 When Using the Multipurpose Feeder MPF 179 When Using the Priority Sheet Inserter PSI 180 Using the Output Tray Extension 181 13 Operator P...

Страница 10: ...mputer Running Windows 188 Printing a Report Page 189 Printing a Printer Settings Page 189 The Operator Panel 189 The Tool Box 189 Printer Settings 190 Using the Operator Panel to Change Printer Settings 190 Using the Tool Box to Change the Printer Settings 191 Adjusting the Language 192 Know Your Printer 195 15 Understanding the Tool Box Menus 197 Printer Settings Report 197 Printer Information 1...

Страница 11: ...Toner 208 BTR Refresh Mode 208 TCP IP Settings 209 Network Settings 209 Diagnosis 210 Chart Print 210 Machine Check 210 Environment Sensor Info 211 Developer Stir Mode 211 Refresh Mode 212 Resetting Defaults 212 16 Understanding the Printer Menus 215 Report List 215 Admin Menu 216 Network 216 USB Settings 223 System Settings 223 Maintenance 226 Secure Settings 233 Downloaded from ManualsPrinter co...

Страница 12: ...upplies Management System 237 Software Update 238 Quick Launch Utility 238 User Setup Disk Creating Tool 239 Macintosh 240 Status Monitor Widget 240 18 Understanding Printer Messages 245 19 Printing with Web Services on Devices WSD 251 Adding Roles of Print Services 251 Printer Setup 252 Installing a Printer Driver Using the Add Printer Wizard 252 20 Specifications 255 Operating System Compatibili...

Страница 13: ...aining Your Printer 261 Determining the Status of Supplies 261 Conserving Supplies 261 Storing Print Media 262 Storing Consumables 262 Replacing Toner Cartridges 263 Removing the Toner Cartridges 263 Installing a Toner Cartridge 264 Cleaning Inside the Printer 266 Cleaning the Color Toner Density CTD Sensor 269 Adjusting Color Registration 270 Performing Auto Correct 271 Downloaded from ManualsPri...

Страница 14: ...of the Printer 280 Clearing Paper Jams From the Output Tray 282 Troubleshooting 285 23 Troubleshooting 287 Basic Printer Problems 287 Display Problems 287 Printing Problems 288 Print Quality Problems 290 The output is too light 290 Toner smears or print comes off Stain on back side 291 Random spots Blurred images 292 The entire output is blank 293 Streaks appear on the output 294 Pitched color dot...

Страница 15: ...tration is out of alignment 301 Protrudent Bumpy paper 302 Noise 303 Jam 304 Misfeed jam 305 Multi feed jam 306 Other Problems 307 Contacting Service 307 Appendix 309 B Appendix 311 Dell Technical Support Policy 311 Online Services 311 Warranty and Return Policy 312 Recycling Information 312 Contacting Dell 312 Downloaded from ManualsPrinter com Manuals ...

Страница 16: ...12 Contents Downloaded from ManualsPrinter com Manuals ...

Страница 17: ...13 Before Beginning Downloaded from ManualsPrinter com Manuals ...

Страница 18: ...Downloaded from ManualsPrinter com Manuals ...

Страница 19: ...ks of the Wi Fi Alliance XML Paper Specification XPS This product may incorporate intellectual property owned by Microsoft Corporation The terms and conditions upon which Microsoft is licensing such intellectual property may be found at http go microsoft com fwlink LinkId 52369 DES This product includes software developed by Eric Young eay mincom oz au AES Copyright 2003 Dr Brian Gladman Worcester...

Страница 20: ... Use duplication or disclosure by the Government is subject to restrictions as set forth in subparagraph c 1 ii of the Rights in Technical Data and Computer Software clause at DFARS 252 227 7013 and in applicable FAR provisions Dell Inc One Dell Way Round Rock Texas 78682 USA September 2010 Rev A00 Downloaded from ManualsPrinter com Manuals ...

Страница 21: ... follow the procedure below a Navigate to x abc Dell Printers Additional Color Software Reorder where x abc is the location where the printer software is installed b Click the file DLRMM EXE c Click File on the toolbar d Choose Send To from the drop down menu and then click Desktop create shortcut on the submenu that appears 2 Visit the Dell Printer Supplies website at www dell com supplies or ord...

Страница 22: ...18 Dell 1350cnw Color Printer User s Guide Downloaded from ManualsPrinter com Manuals ...

Страница 23: ...lities CD contains setup video documentation and drivers for your printer You can use the CD to install re install drivers or access your setup video and documentation Readme files may be included on your CD to provide last minute updates about technical changes to your printer or advanced technical reference material for experienced users or technicians How to use my printer Quick Reference Guide...

Страница 24: ...AUTION Read and follow all safety instructions in your Product Information Guide prior to setting up and operating your printer How to set up my printer Setup diagram Troubleshooting Troubleshooting on page 287 What are you looking for Find it here Downloaded from ManualsPrinter com Manuals ...

Страница 25: ...ns Troubleshooting hints and tips articles from technicians and online courses Upgrades Upgrade information for components such as printer driver Customer Care Contact information order status warranty and repair information Downloads Drivers Manuals Printer documentation and product specifications Go to support dell com Select your region and fill in the requested details to access help tools and...

Страница 26: ...22 Finding Information Downloaded from ManualsPrinter com Manuals ...

Страница 27: ...r consumption For more information see Manual Duplex Printing Windows Printer Driver Only on page 179 Priority Sheet Inserter PSI Print media loaded on the PSI are given precedence over those loaded on the Multipurpose Feeder MPF Using the PSI allows you to use other types or sizes of print media preferentially over the regular print media loaded on the MPF For more information see Loading Print M...

Страница 28: ...nting without a wired connection to your computer For more information see Configuring Wireless Settings on page 69 Multiple Up in the Layout tab N up Print N up Print enables you to print multiple pages on a single sheet of paper This feature allows you to reduce the paper consumption For more information see the printer driver s help Downloaded from ManualsPrinter com Manuals ...

Страница 29: ...View 1 Operator Panel 2 Output Tray 3 Output Tray Extension 4 Print Head Cleaning Rod 5 Toner Access Cover 6 Power Switch 7 Paper Width Guides 8 Multipurpose Feeder MPF 9 Front Cover 10 Length Guide 11 MPF Extension 12 Priority Sheet Inserter PSI 1 7 5 6 7 10 11 12 9 8 4 2 3 Downloaded from ManualsPrinter com Manuals ...

Страница 30: ... space for using the printer feeder and covers 1 Wall Jack Connector 2 Rear Cover Release Handle 3 USB Port 4 Ethernet Port 5 Security Slot 6 Rear Cover 7 Transfer Roller 8 Paper Chute 9 Paper Feed Roller 10 Transfer Belt 11 Fuser Release Lever 1 6 7 8 9 10 11 2 3 4 5 Downloaded from ManualsPrinter com Manuals ...

Страница 31: ...ct sunlight with the front cover opened Operator Panel For more information on the operator panel see Operator Panel on page 183 69 mm 2 7 inches 225 mm 8 9 inches 295 5 mm 11 6 inches 300 mm 11 8 inches 329 5 mm 13 inches 307 mm 12 1 inches 394 mm 15 5 inches 100 mm 3 9 inches Downloaded from ManualsPrinter com Manuals ...

Страница 32: ... Tool and click the Order Supplies at to order toner for your printer You can also order toner cartridges by the following method 1 Click Start All Programs Dell Printers Additional Color Laser Software Dell Supplies Management System The Dell Supplies Management System window appears 2 Select your printer from the Select Printer Model list 3 If ordering from the web a Select a web address from th...

Страница 33: ...ide the toner access cover of your printer Dell supplies web site appears If you order by phone call the number that appears in the Order by Phone section Service Tag Express Service Code xxxxxxx 000 000 000 00 Downloaded from ManualsPrinter com Manuals ...

Страница 34: ...30 About the Printer Downloaded from ManualsPrinter com Manuals ...

Страница 35: ...31 Setting Up Printer Printer Setup Downloaded from ManualsPrinter com Manuals ...

Страница 36: ...32 Downloaded from ManualsPrinter com Manuals ...

Страница 37: ...nter interconnection cable must meet the following requirements Connection type Connection specifications USB USB 2 0 compatible Wireless IEEE 802 11b 802 11g 802 11n Ethernet 10 Base T 100 Base TX compatible 1 USB Port 2 Ethernet Port 1 2 Downloaded from ManualsPrinter com Manuals ...

Страница 38: ...ws XP Microsoft Windows XP 64 bit Edition Windows Server 2003 Windows Server 2003 x64 Edition Windows Server 2008 Windows Server 2008 64 bit Edition Windows Server 2008 R2 Windows Vista Windows Vista 64 bit Edition Windows 7 Windows 7 64 bit Edition Mac OS X 10 3 9 10 4 11 10 5 10 6 To attach the printer to a computer 1 Ensure that the printer computer and any other attached devices are turned off...

Страница 39: ...Ensure that the printer computer and any other connected devices have been turned off and all cables have been disconnected 2 Connect the Ethernet cable NOTE Connect the Ethernet cable only if you need to setup a wired connection To connect the printer to the network connect one end of an Ethernet cable into the Ethernet port on the back of the printer and the other end to a LAN port or LAN hub Do...

Страница 40: ...e operator panel For more information see Network on page 216 Turning On the Printer CAUTION Do not use extension cords or power strips CAUTION The printer should not be connected to a UPS system 1 Connect the power cable to the wall jack connector on the back of your printer see Rear View on page 26 2 Connect the other end of the cable to the power source 3 Turn on the printer Downloaded from Man...

Страница 41: ...Connecting Your Printer 37 Downloaded from ManualsPrinter com Manuals ...

Страница 42: ...38 Connecting Your Printer Downloaded from ManualsPrinter com Manuals ...

Страница 43: ... NOTE Assigning an IP address is considered as an advanced function and is normally done by a system administrator NOTE Depending on the address class the range of the IP address assigned may be different On Class A for example an IP address in the range from 0 0 0 0 to 127 255 255 255 will be assigned For assignment of IP addresses contact your system administrator You can assign the IP address b...

Страница 44: ...ess and then press the button 14 Press the button and ensure that IP Address appears 15 Press the button until Subnet Mask appears and then press the button The cursor is located at the first digit of the subnet mask 16 Press the or the button to enter the numbers for the subnet mask 17 Press the button The next digit is selected 18 Repeat step 16 and step 17 and set subnet mask and then press the...

Страница 45: ...nter the values in IP Address Subnet Mask and Gateway Address 5 Press the Apply New Settings button to take effect The IP address is assigned to your printer To verify the setting open the web browser on any computer connected to the network and enter the IP address into the address bar on the browser If the IP address is set up correctly the Dell Printer Configuration Web Tool displays in your br...

Страница 46: ...on 2 Ensure that Report List appears and then press the button 3 Ensure that Printer Setting appears and then press the button The printer settings page is printed 4 Confirm the IP address next to IP Address under Network on the printer settings page If the IP address shows anything other than 0 0 0 0 the factory default or 169 254 xx xx the printer has an IP address assigned and stored Go to Veri...

Страница 47: ...ed 4 Click the Printer Settings button The printer settings page is printed If the IP address is 0 0 0 0 the factory default or 169 254 xx xx an IP address has not been assigned To assign an IP address for your printer see Assigning an IP Address for IPv4 mode on page 39 Downloaded from ManualsPrinter com Manuals ...

Страница 48: ...44 Setting the IP Address Downloaded from ManualsPrinter com Manuals ...

Страница 49: ...not use ink jet paper in your printer NOTE For printing envelopes see Loading Print Media on page 165 Loading Print Media in the Multipurpose Feeder MPF 1 Open the front cover by pulling out the instruction sheet 2 Pull the priority sheet inserter PSI out 3 Remove the instruction sheet attached to the PSI with adhesive tape Downloaded from ManualsPrinter com Manuals ...

Страница 50: ...PSI ensure that you to read the instruction sheet 4 Pull the length guide forward until it stops 5 Pull the MPF extension forward until it stops 6 Adjust the paper width guides to their maximum width Downloaded from ManualsPrinter com Manuals ...

Страница 51: ...them Straighten the edges of the stack on a level surface 8 Load print media on the MPF with the top edge first and with the recommended print side facing up 9 Adjust the width guides until they rest lightly against the edges of the stack of print media Downloaded from ManualsPrinter com Manuals ...

Страница 52: ...rds the printer until it touches the print media NOTE Depending on the size of print media first slide the length guide backward until it stops and then slide the MPF extension until it touches print media Downloaded from ManualsPrinter com Manuals ...

Страница 53: ...ing on the paper tray 12 Select the paper type from the printer driver if the loaded print media is not standard plain paper If a user specified print media is loaded in the MPF you must specify the paper size setting by using the printer driver Downloaded from ManualsPrinter com Manuals ...

Страница 54: ...pen the front cover 2 Slide the PSI forward and then align the PSI to the marking on the paper tray 3 Before loading the print media flex the sheets back and forth and then fan them Straighten the edges of the stack on a level surface Downloaded from ManualsPrinter com Manuals ...

Страница 55: ...ides until they rest lightly against the edges of the stack of print media 6 Select the paper type from the printer driver if the loaded print media is not standard plain paper If a user specified print media is loaded in the PSI you must specify the paper size setting by using the printer driver Downloaded from ManualsPrinter com Manuals ...

Страница 56: ...52 Loading Paper Downloaded from ManualsPrinter com Manuals ...

Страница 57: ...ettings page is printed 4 Find the IP address under Network Wired Wireless on the printer settings page If the IP address is 0 0 0 0 wait for a few minutes to resolve the IP address automatically and then print the printer settings page again If the IP address is not resolved automatically see Assigning an IP Address for IPv4 mode on page 39 The Tool Box NOTE 1 Click Start All Programs Dell Printe...

Страница 58: ...ows Server 2008 Windows XP 1 Click Start Help and Support NOTE For Windows Server 2008 R2 and Windows 7 operating systems if you use Online Help switch to Offline Help on Windows Help and Support window 2 In the Search box type firewall and then press Enter In the list click Turn Windows Firewall on or off and then follow the instructions on the screen Enable the firewall after the installation of...

Страница 59: ... a print server using a USB If your printer is attached to a network and not your computer see Network Connection Setup on page 58 For installing XML Paper Specification XPS printer driver NOTE Download and install the XPS printer driver at support dell com support NOTE XPS driver is supported on the following operating systems Windows 7 Windows 7 64 bit Edition Windows Vista Windows Vista 64 bit ...

Страница 60: ...rint a test page 12 Click Finish Windows Server 2008 or Windows Server 2008 64 bit Edition NOTE You must log in as an administrator 1 Extract the zip file you downloaded to your desired location 2 Click Start Control Panel Hardware and Sound Printers 3 Click Add a printer 4 Click Add a local printer 5 Select the port connected to this product and then click Next 6 Click Have Disk to display the In...

Страница 61: ...rator on the computer click Yes otherwise contact your administrator to continue the desired action 5 Click Add a local printer 6 Select the port connected to this product and then click Next 7 Click Have Disk to display the Install From Disk dialog box 8 Click Browse and then select the extracted folder in step 1 9 Click OK 10 Select your printer name and click Next 11 To change the printer name ...

Страница 62: ...ting up this printer on a server check box NOTE When using AutoIP 0 0 0 0 is displayed in the installer Before you can continue you must enter a valid IP address NOTE If you are running any of the following operating systems a Windows Security Alert is displayed Windows Vista Windows Vista 64 bit Edition Windows Server 2008 Windows Server 2008 64 bit Edition Windows Server 2008 R2 64 bit Edition W...

Страница 63: ...bit Edition Windows Vista or Windows Vista 64 bit Edition 1 Extract the zip file you downloaded to your desired location 2 Click Start Control Panel Hardware and Sound Printers 3 Click Add a printer 4 Click Add a network wireless or Bluetooth printer 5 Select printer or click The printer that I want isn t listed 6 Select Add a printer using a TCP IP address or host name and then click Next 7 Selec...

Страница 64: ...nter 4 Click Add a network wireless or Bluetooth printer 5 Select your printer or click The printer that I want isn t listed When you select your printer go to step 8 When you click The printer that I want isn t listed go to step 6 6 Select Add a printer using a TCP IP address or host name and then click Next 7 Select TCP IP Device from Device type and enter the IP address for Hostname or IP addre...

Страница 65: ...een appears Find your printer on this screen If the User Account Control dialog box appears click Yes NOTE If you are an administrator on the computer click Yes otherwise contact your administrator to continue the desired action 6 Click Have Disk to display the Install From Disk dialog box 7 Click Browse then select the extracted folder in step 1 and then click OK 8 Select your printer name and cl...

Страница 66: ...g box appears click Yes NOTE If you are an administrator on the computer click Yes otherwise contact your administrator to continue the desired action 8 Click Have Disk to display the Install From Disk dialog box 9 Click Browse then select the extracted folder in step 1 and then click OK 10 Select your printer name and click Next 11 To change the printer name enter the printer name in the Printer ...

Страница 67: ...d Windows Server 2008 1 Click Start All Programs for Windows Vista only Accessories for Windows Vista only Run 2 Type gpedit msc and then click OK 3 Click Computer Configuration Administrative Templates Printers 4 Right click Allow Print Spooler to accept client connections and select Properties 5 On the Setting tab select Enabled and then click OK 6 Restart the computer For Windows Server 2008 R2...

Страница 68: ... Vista 1 Click Start Control Panel 2 Select Security 3 Click Windows Firewall 4 Click Change settings 5 Click Continue 6 On the Exceptions tab check the File and Printer Sharing check box and then click OK For Windows Server 2008 1 Click Start Control Panel 2 Double click Windows Firewall 3 Click Change settings 4 On the Exceptions tab check the File and Printer Sharing check box and then click OK...

Страница 69: ...ista only 6 Right click Remote Registry and select Start 7 Right click Remote Registry and select Properties 8 Change Startup type to Automatic and then click OK Disable User Account Control NOTE Disabling the User Account Control might leave the system vulnerable to virus attacks NOTE This step is required for Windows Vista Windows Vista 64 bit Edition Windows Server 2008 Windows Server 2008 64 b...

Страница 70: ...lider to the bottom and then click OK 6 Click Yes 7 Restart the computer For Windows 7 1 Click Start Control Panel 2 Select User Accounts and Family Safety 3 Click User Accounts 4 Click Change User Account Control Settings 5 Move the slider to the bottom and then click OK 6 Click Yes in User Account Control dialog box 7 Restart the computer Enable Network Discovery and File Sharing for all Public ...

Страница 71: ...ct Properties Network an Sharing Center screen appears 3 Click the down arrow button next to either Network discovery 4 To allow your computer to be found on the network and to allow other computers on the network to share the files and folders on your computer click Turn on network discovery 5 Click Apply 6 If the User Account Control dialog box appears confirm that the action it displays is what...

Страница 72: ...our computer The Easy Setup Navigator file launches automatically 2 Click Software Installation Install Printer Driver and Software screen appears 3 Select Network Installation and then click Next 4 Select Remote Installation and then click Next 5 Enter the Administrator user name and password of the client computer then select the clients or servers and then Next NOTE If you are running any of th...

Страница 73: ...guring Wireless Settings This section describes how to configure wireless settings through Easy Setup Navigator The specifications of wireless setting function are described below You can select a method to configure a wireless setting from the following Item Specification Connectivity Wireless Connectivity Standard IEEE 802 11b 802 11g 802 11n compliant Bandwidth 2 4 GHz Data Transfer Rate IEEE 8...

Страница 74: ...tion Web Tool WPS PIN 1 WPS PBC 2 1 WPS PIN Wi Fi Protected Setup Personal Identification Number is a method to authenticate and register devices required for wireless configuration by entering PIN assignments in the printer and computer This setting performed through access point is available only when the access points of your wireless router supports WPS 2 WPS PBC Wi Fi Protected Setup Push But...

Страница 75: ... setting method selection window appears 4 Ensure that Wizard is selected and then click Next 5 Follow the instructions until Check Setup screen appears 6 Confirm there are no errors displayed in the operator panel and then click NO If you see any errors click YES and follow the instruction Downloaded from ManualsPrinter com Manuals ...

Страница 76: ...of the printer manually 10 Select the required items on the Enter Printer Settings screen and then click Next 11 Select the software to be installed and then click Install Congratulations screen appears 12 Click Finish to exit this tool Wireless Configuration is complete Using Advanced Setup to Configure Wireless Settings To use the Advanced Setup display the Configuration Wireless Setting screen ...

Страница 77: ...le WPS PIN WPS PBC Operator Panel Dell Printer Configuration Web Tool Ethernet Cable 1 Select Ethernet Cable and then click Next 2 Follow the instructions and then click Next Advanced Configuration Tool screen appears 3 Select the printer to be configured in the Select Printer screen and then click Next NOTE If the printer to be configured is not listed in the Select Printer screen try the followi...

Страница 78: ...ess of your printer Subnet Musk Gateway Address When IPv6 is selected Configure the following a Select Use Manual Address b Enter IP address of your printer c Enter gateway address of your network When Dual Stack both IPv4 and IPv6 is selected Configure the both setting IPv4 and IPv6 8 Click Next 9 Ensure that the wireless settings is displayed and then click Apply Complete configuration screen ap...

Страница 79: ...TE If the printer to be installed is not listed in the Select Printer screen try the following steps Click Refresh to update the information Click Add Printer and then enter the details of the printer manually 16 Configure the required items on the Enter Printer Settings screen and then click Next 17 Select the software to be installed and then click Install Congratulations screen appears 18 Click...

Страница 80: ...ck Setup screen appears 3 Confirm there are no errors displayed on the operator panel and then click NO on the Check Setup screen NOTE If you see any errors click YES and follow the instruction 4 Select Local Installation and then click Next 5 Check if the printer to be installed is listed in the Select Printer and then click Next NOTE If the printer to be installed is not listed in the Select Pri...

Страница 81: ...ticate and register devices required for wireless configuration by pressing the button provided on the access point via wireless routers and then performing WPS PBC setting on the operator panel This setting is available only when the access point supports WPS 1 Select WPS PBC and then click Next 2 Follow the instructions until Check Setup screen appears 3 Confirm there are no errors displayed on ...

Страница 82: ...talled and then click Install Congratulations screen appears 8 Click Finish to exit this tool Wireless Configuration is complete NOTE For WPS PBC operation on the wireless LAN access point refer to the manual supplied with the wireless LAN access point When the WPS PBC operation is successful and the printer is rebooted wireless LAN connection is completed Operator Panel 1 Select Operator Panel an...

Страница 83: ...etails of the printer manually 6 Configure the required items on the Enter Printer Settings screen and then click Next 7 Select the software to be installed and then click Install Congratulations screen appears 8 Click Finish to exit this tool Wireless Configuration is complete Dell Printer Configuration Web Tool 1 Select Dell Printer Configuration Web Tool and then click Next 2 Follow the instruc...

Страница 84: ...the following steps Click Refresh to update the information Click Add Printer and then enter the details of the printer manually 6 Configure the required items on the Enter Printer Settings screen and then click Next 7 Select the software to be installed and then click Install Congratulations screen appears 8 Click Finish to exit this tool Wireless Configuration is complete When the Dell Printer C...

Страница 85: ...on and select Properties c Select the Wireless Networks tab d Ensure that the check box for Use Windows to configure my wireless network settings is checked NOTE Make note of the wireless settings on the Advanced window step f and the Wireless Network Properties window step g You may require these settings later e Click the Advanced button f Select Computer to Computer ad hoc networks only and clo...

Страница 86: ...he network items listed in Connect to a network f Select Connect Anyway in the warning dialog box indicating you are entering an unsecured area g Click Close in the dialog box after confirming the connection is a success For Windows Server 2008 a Open Control Panel b Select Network and Sharing Center c Select Connect to a network d Select dell_device from the network items listed in Connect to a n...

Страница 87: ... IP address assigned by AutoIP on the printer a Press the Menu on the printer operator panel b Press the button until Admin Menu appears and then press the button c Press the button until Network appears and then press the button d Press the button until TCP IP appears and then press the button e Press the button until IPv4 appears and then press the button f Press the button until IP Address appe...

Страница 88: ...s in the address bar on your web browser Dell Printer Configuration Web Tool page appears 5 Create wireless setting of the printer on Dell Printer Configuration Web Tool 6 Reboot the printer 7 Restore the wireless settings on your computer Downloaded from ManualsPrinter com Manuals ...

Страница 89: ... settings is checked f Click Advanced g You can either set the printer to the ad hoc mode or the infrastructure mode For Adhoc mode Select Computer to Computer ad hoc networks only and close the Advanced dialog box For Infrastructure mode Select Access point Infrastructure networks only and close the Advanced dialog box h Click Add to display Wireless network properties i Enter the setting that yo...

Страница 90: ... 2008 R2 and Windows 7 a Open Control Panel b Select Network and Internet c Select Network and Sharing Center d Select Connect to a network e Select the network and then click Connect f Enter the Security key and click OK if necessary For Fixed IP networks 1 Set up your computer for wireless connectivity NOTE If the operating system on your computer provides a wireless configuration software use i...

Страница 91: ...se the Advanced dialog box g Click the Add button to display Wireless network properties h On the Association tab enter the following information and click OK Network name SSID dell_device Network Authentication Open Data encryption Disabled Ad hoc network checked i Click the Move up button to move the newly added SSID to the top of the list j Click OK to close the Property dialog box For Windows ...

Страница 92: ...ct to a network d Select dell_device from the network items listed in Connect to a network e Select Connect Anyway in the warning dialog box indicating you are entering an unsecured area f Click Close in the dialog box after confirming the connection is a success For Windows Server 2008 R2 and Windows 7 a Open Control Panel b Select Network and Internet c Select Network and Sharing Center d Select...

Страница 93: ...igning an IP Address for IPv4 mode on page 39 4 Enter the IP address in the address bar on your web browser Dell Printer Configuration Web Tool page appears 5 Change the wireless setting of the printer on Dell Printer Configuration Web Tool 6 Reboot the printer Downloaded from ManualsPrinter com Manuals ...

Страница 94: ...gure my wireless network settings is checked e Click Advanced f You can either set the printer to the ad hoc mode or the infrastructure mode For Adhoc mode Select Computer to Computer ad hoc networks only and close the Advanced dialog box For Infrastructure mode Select Access point Infrastructure networks only and close the Advanced dialog box g Click Add to display Wireless network properties h E...

Страница 95: ...l b Select Network and Internet c Select Network and Sharing Center d Select Connect to a network e Select the network and then click Connect f Enter the Security key and click OK if necessary Setting Up for Shared Printing You can share your new printer on the network using the Drivers and Utilities CD that shipped with your printer or using Windows Point and Print or peer to peer method However ...

Страница 96: ...ntrol Panel Hardware and Sound Printers 2 Right click the printer icon and select Sharing 3 Click Change sharing options button 4 The Windows needs your permission to continue appears 5 Click Continue button 6 Select the Share this printer check box and then type a name in the Share name text box 7 Select Additional Drivers and select the operating systems of all network clients using this printer...

Страница 97: ...shared The share icon is shown under the printer icon Browse Network or My Network Places Find the host name of the server and look for the shared name you assigned to the printer Now that the printer is shared you can install the printer on network clients using the Point and Print method or the peer to peer method Point and Print Point and Print is a Microsoft Windows technology that allows you ...

Страница 98: ...a Click start Start for Windows Server 2003 Windows Server 2003 x64 Edition Settings for Windows XP Windows XP 64 bit Edition Printers and Faxes b Select the printer you have installed c Click File Properties d On the General tab click Print Test Page When a test page is printed successfully installation is complete For Windows Vista Windows Vista 64 bit Edition 1 Click Start Network 2 Locate and ...

Страница 99: ...etwork 2 Locate the host name of the server computer and then double click the host name 3 Right click the shared printer name and then click Connect 4 Click Install driver 5 Wait until the driver is copied from the server to the client computer A new printer object will be added to the Printers folder The time taken for these activities varies based on network traffic 6 Print a test page to verif...

Страница 100: ...est page is printed successfully installation is complete Peer to Peer If you use the peer to peer method the printer driver is installed on each client computer The client computers can modify the drivers and handle the print jobs For Windows XP Windows XP 64 bit Edition Windows Server 2003 Windows Server 2003 x64 Edition 1 Click start Start for Windows Server 2003 Windows Server 2003 x64 Edition...

Страница 101: ...lt printer and then click Next If you want to verify installation click Yes to print a test page 7 Click Finish When a test page prints successfully installation is complete For Windows Vista Windows Vista 64 bit Edition 1 Click Start Control Panel Hardware and Sound Printers 2 Click Add a Printer to launch the Add Printer wizard 3 Select Add a network wireless or Bluetooth printer and then click ...

Страница 102: ... to verify installation click Print a test page 7 Click Finish When a test page is printed successfully installation is complete For Windows Server 2008 Windows Server 2008 64 bit Edition 1 Click Start Control Panel Printers 2 Click Add a Printer to launch the Add Printer wizard 3 Select Add a network wireless or Bluetooth printer and then click Next If the printer is listed select the printer and...

Страница 103: ... 3 Select Add a network wireless or Bluetooth printer If the printer is listed select the printer and click Next or select The printer that I want isn t listed Click Select a shared printer by name and type in the path of the printer in the text box and then click Next For example server host name shared printer name The server host name is the name of the server computer that identifies it to the...

Страница 104: ...100 Installing Printer Drivers on Computers Running Windows Downloaded from ManualsPrinter com Manuals ...

Страница 105: ... to continue the installation process 7 Confirm the installation location and then click Continue 8 Click Install to perform the standard installation If you choose the custom installation click Customize select the items that you want to install and then click Install Printer Driver Status Monitor Widget 9 Type the administrator s name and password and then click OK 10 Click Install to proceed wi...

Страница 106: ...k Print Fax 4 Click the Plus sign and click Default 5 Select the printer connected via Bonjour from the Printer Name list 6 Name and Print Using are automatically entered 7 Click Add When Using IP Printing 1 Turn on the printer 2 Ensure that Macintosh computer and the printer are connected If you use wired connection connect the LAN cable between the printer and the network If you use wireless con...

Страница 107: ...a USB from the Printer list 7 Name and Print Using are automatically entered 8 Click Add When Using Bonjour 1 Turn on the printer 2 Ensure that Macintosh computer and the printer are connected If you use wired connection connect the LAN cable between the printer and the network If you use wireless connection ensure that wireless connection is configured properly on your Macintosh computer and prin...

Страница 108: ...n the Printer Browser dialog box 6 Select Line Printer Daemon LPD for Protocol 7 Type the IP address for the printer in the Address area 8 Select the model of your printer for Print Using NOTE When the printing is set up using IP printing the queue name is displayed as blank You do not need to specify it 9 Click Add Adding a Printer on Mac OS X 10 3 9 When Using a USB connection 1 Turn on the prin...

Страница 109: ...er 7 Click Add When Using IP Printing 1 Turn on the printer 2 Ensure that Macintosh computer and the printer are connected If you use wired connection connect the LAN cable between the printer and the network If you use wireless connection ensure that wireless connection is configured properly on your Macintosh computer and printer 3 Start Printer Setup Utility NOTE You can find Printer Setup Util...

Страница 110: ...106 Installing Printer Drivers on Computers Running Macintosh 9 Click Add Downloaded from ManualsPrinter com Manuals ...

Страница 111: ...107 Using Your Printer Downloaded from ManualsPrinter com Manuals ...

Страница 112: ...108 Downloaded from ManualsPrinter com Manuals ...

Страница 113: ... is the E Mail Alert Setup which sends an e mail to you or the key operator when the printer needs supplies or intervention To fill out printer inventory reports requiring the asset tag number of all the printers in your area use the Printer Information feature in the Dell Printer Configuration Web Tool Enter the IP address of each printer on the network to display the asset tag number Downloaded ...

Страница 114: ...on The printer settings page is printed 4 Confirm the IP address next to IP Address under Network on the printer settings page If the IP address is 0 0 0 0 wait for a few minutes to resolve the IP address automatically and then print the printer settings page again If the IP address is not resolved automatically see Assigning an IP Address for IPv4 mode on page 39 The Tool Box NOTE When the printe...

Страница 115: ...rinter Jobs menu to contain information on the Job List page and Completed Jobs page These pages show the details of the status regarding each protocol or job Printer Settings Use the Printer Settings menu to change printer settings and view the settings in the operator panel remotely Print Server Settings Use the Print Server Settings menu to change the type of printer interface and necessary con...

Страница 116: ... settings you selected NOTE You must log in as an administrator to use this feature Online Help Click Online Help to visit the Dell Support web site Order Supplies at www dell com supplies Contact Dell Support at support dell com Setting Up the Dell Printer Configuration Web Tool Ensure that you activate JavaScript in your browser before using the Dell Printer Configuration Web Tool It is recommen...

Страница 117: ...mple Italian Italy it IT Spanish Traditional Sort es ES tradnl German Germany de DE French France fr FR English United States en us Danish da DK Dutch Netherlands nl NL Norwegian Bokmal no Swedish sv SE Setting the IP Address of the printer to Non Proxy 1 Select Internet Options from the Tools menu 2 Click LAN Settings under Local Area Network LAN settings in the Connections tab 3 You can configur...

Страница 118: ...Firefox 3 0 click Choose in the Content tab 4 Specify the display language in order of preference in the Languages in order of preference list For example English en or English United States en us Italian it Spanish es German de French fr Dutch nl Norwegian no Swedish sv Danish da Setting the IP Address of the printer to Non Proxy 1 Select Options from the Tools menu 2 Click Advanced tab 3 Click N...

Страница 119: ...utomatic proxy configuration URL check box After setting the language and proxy enter http nnn nnn nnn nnn the IP address of your printer in the URL entry field of the browser to activate the Dell Printer Configuration Web Tool Setting Up From Operator Panel You can launch the Dell Printer Configuration Web Tool only when EWS is set to Enable the factory default on the operator panel Check the ope...

Страница 120: ... page 4 Contact Person Displays the administrator name of the printer The name can be changed in the Basic Information on the Print Server Settings page 5 Event Panel Displays the condition of the printer If an error occurs the error code and message are displayed For example 077 090 Paper jam Open 6 Printer Bitmap Shows the bitmap image of the printer The Printer Status menu appears in the right ...

Страница 121: ...e displayed in the left frame 1 Printer Status Links to the Printer Status menu 2 Printer Jobs Links to the Printer Jobs menu 3 Printer Settings Links to the Printer Settings Report menu 4 Print Server Settings Links to the Print Server Reports menu 5 Copy Printer Settings Links to the Copy Printer Settings menu 6 Print Volume Links to the Print Volume menu 7 Printer Information Links to the Print...

Страница 122: ...isplayed in the right frame see Details of the Menu Items on page 119 Buttons in the Right Frame 8 E Mail Alert Links to the Print Server Settings menu 9 Set Password Links to the Security menu 10 Online Help Links to the Dell Support website 11 Order Supplies at Links to the Dell web page 12 Contact Dell Support at Links to the Dell support page web address support dell com 1 2 3 Downloaded from ...

Страница 123: ... the password in the Set Password page in the Security menu For more information see Set Password on page 151 Details of the Menu Items 1 Refresh button Receives the current printer configuration and updates the latest information in the right frame 2 Apply New Settings button Submits new settings made on the Dell Printer Configuration Web Tool to the printer The new settings replace the old setti...

Страница 124: ...nt Color Registration Adjustments Clean Developer BTR Refresh Maintenance Chart Reset Defaults Non Dell Toner Adjust Altitude Web Link Customization Print Server Settings Print Server Reports Print Server Setup Page E Mail Alert Setup Page Print Server Settings Basic Information Port Settings TCP IP E Mail Alert Bonjour mDNS SNMP LLTD Wireless LAN 1 Reset Print Server Security Set Password IP Filt...

Страница 125: ...vel Displays the percentage of toner remaining in each toner cartridge When a cartridge is empty a message appears The text Call or Order is linked to the Dell Printer Supplies website Paper Trays Status OK Indicates that there is some paper in the tray but the quantity is unknown Add Paper Indicates that there is no paper in the tray Capacity Displays the maximum capacity of the output tray Size ...

Страница 126: ...ng speed Location Displays the location where the error occurred Details Displays the details of the error Dell Service Tag Number Displays Dell s service tag number Express Service Code Displays the express service code of the printer Asset Tag Number Displays the asset tag number of the printer Printer Serial Number Displays the serial number of the printer Memory Capacity Displays the memory ca...

Страница 127: ...ck the Refresh button to update the screen Values ID Displays the job ID Job Name Displays the file name of the job being printed Owner Displays the name of the job owner Host Name Displays the name of the host computer Job Status Displays the status of the job being printed Host I F Displays the status of the host interface Job Submitted Time Displays the date when the print job was submitted ID ...

Страница 128: ...b Host I F Displays the status of the host interface Job Submitted Time Displays the date when the job was submitted System Settings Power Saver Time Sleep Displays the time taken by the printer before it enters Sleep mode after it finishes a job Power Saver Time Deep Sleep Displays the time taken by the printer before it enters Deep Sleep mode after it goes into Sleep mode Fault Time Out Displays...

Страница 129: ...ator fails to log in Paper Density Plain Displays the paper density of plain paper Label Displays the paper density of labels Adjust BTR Plain Displays the voltage setting of the transfer roller for plain paper Plain Thick Displays the voltage setting of the transfer roller for thick plain paper Covers Displays the voltage setting of the transfer roller for cover paper Label Displays the voltage s...

Страница 130: ... of the fuser for recycled paper Auto Registration Adjustment Displays whether to automatically adjust color registration Adjust Altitude Displays the altitude of the location where the printer is installed BTR Refresh Displays whether to execute counter measures for curling separating discharge of the paper Non Dell Toner Displays whether to use toner cartridge of another manufacturer Web Link Cu...

Страница 131: ...it enters Sleep mode after it finishes a job Power Saver Time Deep Sleep Specifies the time taken by the printer before it enters Deep Sleep mode after it goes into Sleep mode Fault Time Out Specifies the time taken by the printer before it cancels jobs that stop abnormally The print job is cancelled if it times out Job Time Out Specifies the amount of time that the printer waits for data to arriv...

Страница 132: ...the printer ready to operate with minimum warm up time Select a value between 5 and 30 minutes for the Sleep mode if you want a balance between energy consumption and a shorter warm up period The printer automatically returns to the standby mode from the Sleep mode when it receives data from the computer You can also return the printer to the standby mode by pressing any button on the operator pan...

Страница 133: ...tion Adjustments Clean Developer BTR Refresh Maintenance Chart Reset Defaults Non Dell Toner Adjust Altitude and Web Link Customization pages Paper Density Purpose To specify the paper density Values Adjust BTR Purpose To specify the optimum voltage settings for printing for the transfer roller BTR To lower the voltage set negative values To increase set positive values The default settings may no...

Страница 134: ... paper within the range of 3 to 3 Covers Sets the reference voltage setting for the transfer roller for cover paper within the range of 3 to 3 Label Sets the reference voltage setting for the transfer roller for labels within the range of 3 to 3 Coated Sets the reference voltage setting for the transfer roller for coated paper within the range of 3 to 3 Envelope Sets the reference voltage setting ...

Страница 135: ... the fuser for coated paper within the range of 3 to 3 Envelope Sets the temperature settings for the fuser for envelopes within the range of 3 to 3 Recycled Sets the temperature settings for the fuser for recycled paper within the range of 3 to 3 Auto Correct Click Start to automatically correct color registration Color Regi Chart Click Start to print a color registration chart The color registra...

Страница 136: ...nts Enter Number Specifies lateral perpendicular to paper feed direction and process paper feed direction color adjustment values individually for Y Yellow M Magenta C Cyan LY Left Yellow LM Left Magenta LC Left Cyan RY Right Yellow RM Right Magenta and RC Right Cyan within the range of 5 to 5 Clean Developer Click Start to stir the toner in the toner cartridge Yellow Toner Refresh Click Start to ...

Страница 137: ...does not provide warranty coverage for problems caused by using accessories parts or components not supplied by Dell NOTE Before you use toner cartridge of another manufacturer be sure to restart the printer Adjust Altitude Purpose To specify the altitude of the location where the printer is installed Ghost Click Start to print a chart to check for ghost printing 4Colors Click Start to print bands...

Страница 138: ...unications The following tabbed pages are displayed in the top of the right frame Print Server Reports The Print Server Reports tab contains the Print Server Setup Page and E Mail Alert Setup Page Print Server Setup Page Purpose To verify the current settings of TCP IP Transmission Control Protocol Internet Protocol and printing ports On this page you can only verify the settings of items If you w...

Страница 139: ...rol MAC address of the printer Wireless Settings 2 Wireless LAN Displays whether to enable wireless connection SSID Displays the name that identifies the network Network Type Displays the network type from either the Ad Hoc or Infrastructure mode MAC Address Displays the MAC address of the wireless printer setting Link Channel Displays the channel number of the connection Link Quality Displays the...

Страница 140: ...gateway address IPv6 4 Enable Stateless Address Displays whether to enable the stateless address Use Manual Address Displays whether to set the IP address manually Manual Address 5 Displays the IP address Stateless Address 1 3 6 Displays the stateless addresses Link Local Address 6 Displays the link local address Manual Gateway Address 5 Displays the gateway address Auto Configure Gateway Address ...

Страница 141: ...her to use the DNS Name Resolution feature LPD Port Status Displays the port status Connection Time Out Displays the connection time out period Port9100 Port Status Displays the port status Port Number Displays the port number Connection Time Out Displays the connection time out period WSD Port Status Displays the WSD Web Services on Devices port status Port Number Displays the WSD port number Rec...

Страница 142: ... Status Displays the port status LLTD Port Status Displays the port status IP Filter IPv4 8 Address Displays the list of IP addresses that are permitted or denied access to the printer Address Mask Displays the list of subnet mask that are permitted or denied access to the printer Active Mode Displays whether to be permitted or denied access to the printer 1 This item is displayed only when the pr...

Страница 143: ... List 1 Displays the acceptable e mail addresses for the E Mail Alert feature specified in E mail List 1 Select Alerts for List 1 Supplies Alerts Displays the e mail alert receive status for consumables Paper Handling Alerts Displays the e mail alert receive status for paper handling Service Call Displays the e mail alert receive status for service calls E Mail List 2 Displays the acceptable e mai...

Страница 144: ...ecifies the name of the printer using up to 31 alphanumeric characters Location Specifies the location of the printer using up to 63 alphanumeric characters Contact Person Specifies the contact name number and other information of the administrator and service center using up to 63 alphanumeric characters Administrator E Mail Address Specifies the contact address of the administrator and service c...

Страница 145: ...the default value 100Base TX Half Duplex Selects 100Base TX Half Duplex as the default value 100Base TX Full Duplex Selects 100Base TX Full Duplex as the default value Current Ethernet Settings Displays the current settings of Ethernet MAC Address Displays the MAC address of the printer Port Status LPD Specifies whether to enable LPD Port9100 Specifies whether to enable Port9100 WSD Specifies whet...

Страница 146: ...the subnet mask Manual Gateway Address Manually sets the gateway address IPv6 Enable Stateless Address To enable the stateless address Use Manual Address To set the IP address manually Manual Address Manually sets the IP address To specify an IPv6 address enter the address Followed by a slash and then 64 For details consult your system administrator Manual Gateway Address Manually sets the gateway...

Страница 147: ...cifies if the printer receives the DNS server address automatically from the DHCPv6 lite server Manual DNS Server Address Sets the DNS server address Priority to IPv6 DNS Name Resolution Specifies whether to enable the DNS Name Resolution feature LPD Connection Time Out Sets the connection time out period from 1 to 1000 seconds IP Filter IPv4 Click IP Filter IPv4 to set the IP filter settings on t...

Страница 148: ...otification Time Out Sets the notification time out period from 1 to 60 seconds Maximum Number of TTL Sets the maximum number of TTL from 1 to 10 Maximum Number of Notification Sets the maximum number of notifications from 10 to 20 HTTP Port Number Sets the port number This must be 80 or between 8000 and 9999 Simultaneous Connections Displays the maximum number of connections received simultaneous...

Страница 149: ...ssword again to confirm POP3 Server Address 1 Specifies the POP3 server address in IP address format of aaa bbb ccc ddd or as a DNS host name using up to 63 characters POP3 Port Number 1 Specifies the POP3 server port number This must be 110 or between 5000 and 65535 POP User Name 1 Specifies the POP3 account user name Up to 63 alphanumeric characters periods hyphens underscores and at symbols can...

Страница 150: ...r service calls E Mail List 2 Sets acceptable e mail addresses for the E Mail Alert feature using up to 255 alphanumeric characters Select Alerts for List 2 Supplies Alerts Specifies whether to receive an e mail alert for consumables Paper Handling Alerts Specifies whether to receive an e mail alert for paper handling Service Call Specifies whether to receive an e mail alert for service calls 1 Th...

Страница 151: ...ing up to 31 alphanumeric characters The original setting will remain valid if nothing is entered Characters entered for community name in the previous settings will not be displayed on the screen The default Read Write Community is private Re enter Community Name Read Write 1 Enter the community name to access read and write data again to confirm Community Name Trap 1 Specifies the community name...

Страница 152: ...and 255 Note that values 127 and 224 254 are not valid for the first three digits only IP socket mmmmm is a variable value between 0 and 65535 IPv6 Specifies the IP address and IP socket in the xxxx xxxx xxxx xxxx xxxx xxxx xxxx xxxx mmm mm format Each section of xxxx is a hexadecimal variable value between 0 and ffff IP socket mmmmm is a variable value between 0 and 65535 Port Number Enter the SN...

Страница 153: ...lays the MAC address of the wireless network setting of the printer Link Channel Displays the channel number of the wireless connection of the printer Link Quality Displays the quality of the wireless network connection of the printer Security Settings Encryption Select the security method from the list No Security Specifies No Security to configure the wireless setting without specifying a securi...

Страница 154: ...onfirm WEP Key 2 Enter the WEP key when WEP is selected from Encryption of Security Settings Re enter WEP Key 2 Enter the WEP key 2 again to confirm WEP Key 3 Enter the WEP key when WEP is selected from Encryption of Security Settings Re enter WEP Key 3 Enter the WEP key 3 again to confirm WEP Key 4 Enter the WEP key when WEP is selected from Encryption of Security Settings Re enter WEP Key 4 Ente...

Страница 155: ...NVRAM Memory and restart printer Click the Start button to initialize NVM Network settings will revert to the factory default settings and reboot the network capability Restart Printer Click the Start button to reboot the printer Administrator Password Sets the password using up to 10 alphanumeric characters The password will appear as asterisks in the field when it is entered Re enter Administrat...

Страница 156: ...ing the settings is complete The connection time out period is 60 seconds After that you can check whether the settings were copied to this page And you need to click the Copy the settings to the Host in the above list and reboot the machine button of the Dell Printer Configuration Web Tool in the destination printer to verify if the settings were actually copied or not Address Specifies the IP ad...

Страница 157: ... Copy Printer Settings Report Purpose To verify the histories of copying NOTE The history is cleared by turning off the printer Print Volume Purpose Use the Print Volume menu to verify the number of printed pages Values Printer Page Count Displays the total number of pages printed since the printer was shipped from the factory Paper Used Displays the number of pages printed for each paper size Dow...

Страница 158: ...154 Dell Printer Configuration Web Tool Downloaded from ManualsPrinter com Manuals ...

Страница 159: ...ommended print side on the paper package and load the paper accordingly See Loading Print Media in the Multipurpose Feeder MPF on page 45 and Loading Print Media in the Priority Sheet Inserter PSI on page 50 for detailed loading instructions Paper Characteristics The following paper characteristics affect print quality and reliability It is recommended that you follow these guidelines when evaluat...

Страница 160: ...mance Grain Direction Grain refers to the alignment of the paper fibers in a sheet of paper Grain is either grain long running the length of the paper or grain short running the width of the paper For 60 to 135 g m2 16 to 36 lb bond paper grain long fibers are recommended For paper heavier than 135 g m2 36 lb bond grain short is preferred Fiber Content Most high quality xerographic paper is made f...

Страница 161: ...cognition OCR forms In some cases you can adjust registration with your software program to successfully print on these forms Coated paper erasable bond synthetic paper thermal paper Rough edged rough or heavily textured surface paper or curled paper Recycled paper containing more than 25 post consumer waste that do not meet DIN 19 309 Multiple part forms or documents Print quality may deteriorate...

Страница 162: ...hic or engraved printing process Select paper that absorb ink but do not bleed Avoid paper with rough or heavily textured surfaces Use paper printed with heat resistant inks designed for use in xerographic copiers The ink must withstand temperatures of 225 C 437 F without melting or releasing hazardous emissions Use inks that are not affected by the resin in toner or the silicone in the fuser Inks...

Страница 163: ... be possible to print on the paper to depending on the placement of holes on the paper To select and use pre punched paper Test paper from several manufacturers before ordering and using large quantities of pre punched paper Paper should be punched at the paper manufacturer and not drilled into paper already packaged in a ream Drilled paper can cause jams when multiple sheets feed through the prin...

Страница 164: ...s Envelopes with 100 cotton content must not exceed 90 g m2 24 lb bond weight Use only freshly unpackaged undamaged envelopes Use envelopes that can withstand temperatures of 205 C 401 F without sealing excessive curling wrinkling or releasing hazardous emissions If you have any doubts about the envelopes you are considering check with the envelope supplier Adjust the guide to fit the width of the...

Страница 165: ... buying large quantities of any print media it is recommended that you try a sample first When printing on labels Use labels that can withstand temperatures of 205 C 401 F without sealing excessive curling wrinkling or releasing hazardous emissions Set the paper type to Label from the printer driver Do not load labels together with paper in the same tray Do not print within 1 mm 0 04 inches of the...

Страница 166: ...n print quality For best results store print media in an environment where the temperature is approximately 21 C 70 F and the relative humidity is 40 Store cartons of print media on a pallet or shelf rather than directly on the floor If you store individual packages of print media out of the original carton ensure that they rest on a flat surface so that the edges do not buckle or curl Do not plac...

Страница 167: ... the paper loading NOTE Not available when the XPS Printer Driver is used 2 Custom width 76 2 mm 3 00 inches to 215 9 mm 8 50 inches The maximum width for envelope DL LEF 220 mm 8 66 inches Custom length 127 mm 5 00 inches to 355 6 mm 14 00 inches For the PSI 191 mm 7 50 inches to 355 6 mm 14 00 inches The maximum length for envelope Monarch LEF 98 4 mm 3 87 inches 3 Only the administrator user ca...

Страница 168: ...cycled Side 2 Y Y Label Y Y Covers Y Y Covers Side 2 Y Y Envelope Y Y Coated Y Y Coated Side 2 Y Y Values marked by an asterisk are the factory default menu settings Paper type Weight gsm Remarks Plain Paper 60 90 Plain Thick Paper 91 105 Covers 106 163 Coated 106 163 Inkjet printer paper cannot be used Label Inkjet printer paper cannot be used Envelopes Recycled 60 105 Downloaded from ManualsPrin...

Страница 169: ...ets of standard paper 16 2 mm 0 64 inches of thick paper One sheet of coated paper 16 2 mm 0 64 inches of post cards Five envelopes 16 2 mm 0 64 inches of labels Priority Sheet Inserter PSI can hold 10 sheets of standard paper or one sheet of other paper Print Media Dimensions The MPF accepts print media within the following dimensions Width 76 2 mm 3 00 inches to 215 9 mm 8 50 inches Length 127 m...

Страница 170: ...oading Print Media in the Multipurpose Feeder MPF NOTE Use only laser print media Do not use ink jet paper in this printer 1 Open the front cover 2 Pull the priority sheet inserter PSI out 3 Pull the length guide forward until it stops Downloaded from ManualsPrinter com Manuals ...

Страница 171: ...rward until it stops 5 Adjust the paper width guides to their maximum width 6 Before loading the print media flex the sheets back and forth and then fan them Straighten the edges of the stack on a level surface Downloaded from ManualsPrinter com Manuals ...

Страница 172: ...ge first and with the recommended print side facing up 8 Adjust the width guides until they rest lightly against the edges of the stack of print media 9 Slide the length guide towards the printer until it touches the print media Downloaded from ManualsPrinter com Manuals ...

Страница 173: ...int media first slide the length guide backward until it stops and then slide the MPF extension until it touches print media 10 Insert the PSI into the printer and then align the PSI to the marking on the paper tray Downloaded from ManualsPrinter com Manuals ...

Страница 174: ...fied the print image will be rotated 180 degrees When Loading Envelope 10 DL or Monarch Load envelopes with the side to be printed on facing up the flap side facing down and the flap turned to the right To prevent DL and Monarch from being wrinkled they are recommended to be loaded with the print side facing up flap opened and facing you Downloaded from ManualsPrinter com Manuals ...

Страница 175: ...e envelopes with windows or coated linings These lead to paper jams and can cause damage to the printer NOTE If you do not load envelopes in the MPF right after they have been removed from the packaging they may bulge To avoid jams flatten them as shown below when loading them in the MPF Downloaded from ManualsPrinter com Manuals ...

Страница 176: ...envelopes as shown in the following illustration The amount of the bending shall be 5mm 0 20 inches or less NOTE To confirm the correct orientation of each print media such as envelopes see the instruction on the Envelope Paper Setup Navigator on the printer driver Downloaded from ManualsPrinter com Manuals ...

Страница 177: ...de facing down when loading paper into the MPF Loading Print Media in the Priority Sheet Inserter PSI NOTE To avoid paper jams do not remove the PSI while printing is in progress NOTE Use only laser print media Do not use ink jet paper in this printer 1 Open the front cover 2 Slide the PSI forward and then align the PSI to the marking on the paper tray Downloaded from ManualsPrinter com Manuals ...

Страница 178: ...h 4 Before loading the print media flex the sheets back and forth and then fan them Straighten the edges of the stack on a level surface 5 Load print media on the PSI with the top edge first and with the recommended print side facing up Downloaded from ManualsPrinter com Manuals ...

Страница 179: ...r driver Loading an Envelope in the Priority Sheet Inserter PSI NOTE Be sure to fully insert the envelope until it stops Otherwise print media that is loaded on the MPF will be fed NOTE When you print on envelopes be sure to specify the envelope setting on the printer driver If not specified the print image will be rotated 180 degrees When Loading Envelope 10 DL or Monarch Load an envelope with th...

Страница 180: ...rch from being wrinkled they are recommended to be loaded with the print side facing up flap opened and facing you When Loading C5 Load envelopes with the side to be printed on facing up with the flap open Downloaded from ManualsPrinter com Manuals ...

Страница 181: ... the PSI right after they have been removed from the packaging they may bulge To avoid jams flatten them as shown below when loading them in the PSI NOTE If envelopes are still not fed correctly add some bending to the flap of the envelopes as shown in the following illustration The amount of the bending shall be 5mm 0 20 inches or less Downloaded from ManualsPrinter com Manuals ...

Страница 182: ...on the Envelope Paper Setup Navigator on the printer driver Loading Letterhead The letterhead must be toward the top edge of the PSI with the print side facing up However the letterhead must be inserted top edge first with the print side facing down when loading paper into the PSI Downloaded from ManualsPrinter com Manuals ...

Страница 183: ...es rear sides For a six page document rear sides are printed in the order of page 6 page 4 then page 2 The orange LED lights and the message appears on the LCD when the even pages finish printing 2 After the printing of even pages is complete remove the paper stack from the output tray NOTE Warped or curled prints can cause paper jams Straighten them before setting them 3 Next stack the prints and...

Страница 184: ...r sides For a six page document rear sides are printed in the order of page 6 page 4 then page 2 The orange LED lights and the message appears on the LCD when the even pages finish printing 2 After the printing of even pages is complete remove the paper stack from the output tray NOTE Warped or curled prints can cause paper jams Straighten them before setting them Downloaded from ManualsPrinter co...

Страница 185: ...page 3 rear of page 4 then page 5 rear of page 6 NOTE Printing on both sides of the paper is not possible if the document consists of various sizes of papers Using the Output Tray Extension The output tray extension is designed to prevent print media from falling from the printer after the print job is complete Before printing a document ensure that the output tray extension is fully extended Down...

Страница 186: ...182 Loading Print Media Downloaded from ManualsPrinter com Manuals ...

Страница 187: ...e printer is ready or sleeping and blinks when data is being received Lights up orange when an error occurs and blinks when an unrecoverable print error occurs 2 LCD Panel 3 buttons Selects submenus or setting values in the Menu mode 4 button Displays the selected menu or item and determines the selected value in the Menu mode 5 Cancel button 1 6 7 5 3 4 2 Downloaded from ManualsPrinter com Manual...

Страница 188: ... operator panel menus The Operator Panel 1 Press the Menu button 2 Ensure that Report List appears and then press the button 3 Press the button until Device Settings appears and then press the button The device settings page is printed The Tool Box NOTE 1 Click Start All Programs Dell Printers Dell 1350cnw Color Printer Tool Box NOTE When multiple printer drivers are installed on your computer the...

Страница 189: ...Operator Panel 185 The Reports page is displayed 4 Click the Device Settings button The device settings page is printed Downloaded from ManualsPrinter com Manuals ...

Страница 190: ...186 Operator Panel Downloaded from ManualsPrinter com Manuals ...

Страница 191: ...6 Loading Print Media in the Priority Sheet Inserter PSI on page 173 Avoiding Jams on page 277 If you experience a jam see Jam on page 304 for instructions Sending a Job to Print To support all of the printer features use the printer driver When you choose Print from a software program a window representing the printer driver opens Select the appropriate settings for the specific job you are sendi...

Страница 192: ... From the Operator Panel To cancel a job after it has started printing 1 Press the Cancel button NOTE Printing is canceled only for the current job All the following jobs will continue to print Canceling a Job From the Computer Running Windows Canceling a Job From the Taskbar When you send a job to print a small printer icon appears in the right corner of the taskbar 1 Double click the printer ico...

Страница 193: ...enu you can print a various of settings for your printer including printer settings This section describes two examples of printing from the Report List menu Printing a Printer Settings Page To verify detailed printer settings print a printer settings page See Understanding the Printer Menus on page 215 or Understanding the Tool Box Menus on page 197 to identify the display and operator panel butt...

Страница 194: ...en you first enter the menus from the operator panel you see an asterisk next to a value in the menus This asterisk indicates the factory default menu setting These settings are the original printer settings NOTE Factory defaults may vary for different countries When you select a new setting from the operator panel an asterisk appears next to the setting to identify it as the current user default ...

Страница 195: ...ue setting other items select the desired menu To quit setting new values press the Cancel button Driver settings may have precedence over changes previously made In such case change the defaults of the operator panel Using the Tool Box to Change the Printer Settings You can select menu items and corresponding values from the Tool Box NOTE NOTE Factory defaults may vary for different countries The...

Страница 196: ...operator panel The Operator Panel 1 Press the Menu button 2 Press the until Panel Language appears and then press the button 3 Press the until the desired language appears and then press the button The Tool Box NOTE 1 Click Start All Programs Dell Printers Dell 1350cnw Color Printer Tool Box NOTE The Select Printer window appears in this step when multiple printer drivers are installed on your com...

Страница 197: ...Printing 193 4 Select the desired language from Panel Language and then press the Apply New Settings button Downloaded from ManualsPrinter com Manuals ...

Страница 198: ...194 Printing Downloaded from ManualsPrinter com Manuals ...

Страница 199: ...195 Know Your Printer Downloaded from ManualsPrinter com Manuals ...

Страница 200: ...196 Downloaded from ManualsPrinter com Manuals ...

Страница 201: ...ware on page 237 Printer Settings Report The Printer Settings Report tab contains the Printer Information Menu Settings Reports and TCP IP Settings pages NOTE Values marked by an asterisk are the factory default menu settings Printer Information Purpose To display the information of your printer Values Dell Service Tag Number Displays Dell s service tag number Express Service Code Displays the exp...

Страница 202: ... enters Sleep mode after it finishes a job Power Saver Timer Deep Sleep Displays the time taken by the printer before it enters Deep Sleep mode after it goes into Sleep mode Fault Time Out Displays the time taken by the printer before it cancels jobs that stop abnormally Job Time Out Displays the amount of time that the printer waits for data to arrive from the computer Auto Log Print Displays whe...

Страница 203: ...d Displays the voltage setting of the transfer roller for coated paper Envelope Displays the voltage setting of the transfer roller for envelopes Label Displays the voltage setting of the transfer roller for labels Adjust Fuser Plain Displays the temperature setting of the fuser for plain paper Plain Thick Displays the temperature setting of the fuser for thick plain paper Recycled Displays the te...

Страница 204: ...led Non Dell Toner Displays whether to use toner cartridge of another manufacturer BTR Refresh Mode Displays whether to execute counter measures for curling separating discharge of the paper Printer Settings Click to print a detailed list of the printer settings Device Settings Click to print a detailed list of the device settings Job History Click to print the completed jobs history Error History...

Страница 205: ...oner alert message setting Values Sleep 1 5 minutes Specifies the time taken by the printer before it enters Sleep mode after it finishes a job 5 30 minutes Deep Sleep 6 minutes Specifies the time taken by the printer before it enters Deep Sleep mode after it goes into Sleep mode 1 6 minutes Fault Time Out 0 Off Disables the fault time out 60 seconds Specifies the time taken by the printer before ...

Страница 206: ...o be used on the operator panel French German Italian Spanish Danish Dutch Norwegian Swedish Default Print Paper Size 2 A4 Specifies the default paper size Letter Low Toner Alert Message On Shows the alert message when the toner is low Off Does not show the alert message Apply New Settings After you complete the settings press the Apply New Settings button to apply the changes Restart printer to a...

Страница 207: ...e if your printer is in constant use In most circumstances this keeps the printer ready to operate with minimum warm up time Select a value between 5 and 30 minutes for the Sleep mode if you want a balance between energy consumption and a shorter warm up period The printer automatically returns to the standby mode from the Sleep mode when it receives data from the computer You can also return the ...

Страница 208: ... paper has curled try to lower the temperature When the toner does not fuse on the paper properly try to increase the temperature NOTE The print quality changes depending on the values you select for this item Values Plain 0 3 3 Plain Thick 0 3 3 Recycled 0 3 3 Covers 0 3 3 Coated 0 3 3 Envelope 0 3 3 Label 0 3 3 Apply New Settings After you complete the settings press the Apply New Settings butto...

Страница 209: ...t Color registration adjustments need to be made during the initial setup of the printer or when the printer is moved to a different location Values Plain 0 3 3 Plain Thick 0 3 3 Recycled 0 3 3 Covers 0 3 3 Coated 0 3 3 Envelope 0 3 3 Label 0 3 3 Apply New Settings After you complete the settings press the Apply New Settings button to apply the changes Restart printer to apply new settings Press t...

Страница 210: ...stments 1 Y Yellow 0 Specifies lateral perpendicular to paper feed direction color adjustment values individually 5 5 M Magenta 0 5 5 C Cyan 0 5 5 LY Left Yellow 0 Specifies process paper feed direction color adjustment values individually 5 5 LM Left Magenta 0 5 5 LC Left Cyan 0 5 5 RY Right Yellow 0 5 5 RM Right Magenta 0 5 5 RC Right Cyan 0 5 5 Apply New Settings After you complete the settings...

Страница 211: ...see Resetting Defaults on page 212 Values 1 This item is available only when Auto Registration Adjustment is set to Off 2 The color registration chart prints a lattice pattern of yellow magenta and cyan lines On the chart find the values on the right side that are next to the line that is perfectly straight for each of the three colors If the value for this line is 0 color registration is not need...

Страница 212: ...es BTR Refresh Mode Purpose To execute counter measures for curling separating discharge of the paper Values Start Click to initialize the system parameters Non Dell Toner Off Does not use toner cartridge of another manufacturer On Use toner cartridge of another manufacturer Apply New Settings After you complete the settings press the Apply New Settings button to apply the changes Restart printer ...

Страница 213: ...utoIP Automatically sets the IP address DHCP Uses DHCP to set the IP address BOOTP Uses BOOTP to set the IP address RARP Uses RARP to set the IP address Manually Set Manually sets the IP address IP Address Manually sets the IP address allocated to the printer Subnet Mask Manually sets the subnet mask Gateway Address Manually sets the gateway address Apply New Settings After you complete the settin...

Страница 214: ...er Configuration Web Tool Apply New Settings After you complete the settings press the Apply New Settings button to apply the changes Restart printer to apply new settings Press the Restart printer to apply new settings button to apply the changes Paper Size A4 Selects the paper size to print charts Letter Ghost Configuration Chart Click to print a chart to check for ghost printing 4 Colors Config...

Страница 215: ...the feed roll Confirm the motor sound REGI CLUTCH Operation Check Click Start to operate the REGI CLUTCH Confirm that you can hear the clutch clicking Dispense Motor Check Yellow Click Start to operate the dispense motor for each toner cartridge Confirm the motor sound Dispense Motor Check Magenta Dispense Motor Check Cyan Dispense Motor Check Black Play of Sound Click to play back through speaker...

Страница 216: ...inter Tool Box NOTE When multiple printer drivers are installed on your computer the Select Printer window appears In this case click the name of Dell 1350cnw Color Printer listed in Printer Name and then click OK The Tool Box opens 2 Click the Printer Maintenance tab 3 Select Reset Defaults from the list at the left side of the page The Reset Defaults page is displayed Start Click to stir the ton...

Страница 217: ...Understanding the Tool Box Menus 213 4 Click Start The printer restarts automatically to apply the settings Downloaded from ManualsPrinter com Manuals ...

Страница 218: ...214 Understanding the Tool Box Menus Downloaded from ManualsPrinter com Manuals ...

Страница 219: ... settings selected from the operator panel Report List Use the Report List menu to print the settings and history information of your printer NOTE A Password is required to enter the Report List menu when Panel Lock Set is set to Enable In this case enter the password you specified and press the button Printer Setting Purpose To print a list of the information such as the printer name service tag ...

Страница 220: ...nter settings affecting jobs sent to the printer through the wired or wireless network NOTE Values marked by an asterisk are the factory default menu settings Ethernet Purpose To specify the communication speed and the duplex settings of Ethernet The change becomes effective after the printer is turned off and then on Values NOTE This item is displayed only when the printer is connected with a wir...

Страница 221: ...lues NOTE This item is displayed only when the printer is connected with a wireless network and Wireless LAN is set to Enable Wireless Setup Purpose To configure the wireless network interface Values Good Indicates good signal strength Acceptable Indicates marginal signal strength Low Indicates insufficient signal strength No Reception Indicates that no signal is received Downloaded from ManualsPr...

Страница 222: ...ng without specifying a security method from WEP WPA PSK TKIP and WPA2 PSK AES WEP 64Bit Specify the WEP Key 64Bit to use through the wireless network Up to 10 hexadecimal characters can be entered Transmit Key Specify the transmit key from WEP Key 1 WEP Key 2 WEP Key 3 and WEP Key 4 WEP 128Bit Specify the WEP Key 128Bit to use through the wireless network Up to 26 hexadecimal characters can be en...

Страница 223: ...Encryption Ad hoc Select to configure the wireless setting without the access point such as a wireless router No Security Specify No Security to configure the wireless setting without specifying the security method from WEP WEP 64Bit Specify the WEP Key 64Bit to use through the wireless network Up to 10 hexadecimal characters can be entered Transmit Key Specify the transmit key from WEP Key 1 WEP ...

Страница 224: ...IP Purpose To configure TCP IP settings The change becomes effective after the printer is turned off and then on Values WPS Push Btn Ctrl Configures the wireless setting with the security method of WPS PBC PIN Code Start Config Configures the wireless setting using the PIN code assigned automatically by the printer Print PIN Code Prints the PIN code Confirm it when you enter the PIN code to your c...

Страница 225: ...eway Address Manually sets the gateway address LPD Enable Enables the LPD port Disable Disables the LPD port Port9100 Enable Enables the Port9100 port Disable Disables the Port9100 port WSD Enable Enables the WSD port Disable Disables the WSD port SNMP UDP Enable Enables the UDP port Disable Disables the UDP port E Mail Alert Enable Enables the E mail Alert feature Disable Disables the E mail Aler...

Страница 226: ...s function and rebooting the printer all wired network settings are reset to their default values Wireless LAN Purpose To enable the wireless connection LLTD Disable Disables the LLTD Enable Enables the LLTD No n Address n is 1 5 Sets the IP address for Filter n No n Mask n is 1 5 Sets the address mask for Filter n No n Mode n is 1 5 Off Disables the feature for Filter n Accept Accepts an access f...

Страница 227: ...the System Settings menu to configure the power saving mode time out time job log auto print mm inch setting default paper size setting and low toner alert setting NOTE Values marked by an asterisk are the factory default menu settings PowerSaver Time Purpose To specify the time for transition to power saver mode Options Enable Enables the USB interface Disable Disables the USB interface Sleep 5mi...

Страница 228: ... to the standby mode from the Sleep mode when it receives data from the computer You can also return the printer to the standby mode by pressing any button on the operator panel Fault Time Out Purpose To specify the time taken by the printer before it cancels jobs that stop abnormally The print job is cancelled if it times out Options Job Time Out Purpose To specify the amount of time that the pri...

Страница 229: ...r size Values NOTE The default for Def Paper Size varies depending on country specific factory default Auto Log Print Purpose To automatically print a job history report after every 10 jobs Values NOTE The job history report can also be printed using the Report List menu millimeter mm Specifies the default measurement unit inch A4 Letter Off Does not automatically print a job history report On Aut...

Страница 230: ...ty settings NOTE Values marked by an asterisk are the factory default menu settings F W Version Purpose To display the version of the controller Service Tag Purpose To display the service tag of the printer Express Code Purpose To display the express service code of the printer Paper Density Purpose To specify the paper density Values On Shows the alert message when the toner is low Off Does not s...

Страница 231: ...ve the best output on all paper types If you see mottles on the print output try to increase the voltage If you see white spots on the print output try to decrease the voltage NOTE The print quality changes depending on the values you select for this item Values Plain Normal Light Label Normal Light Plain 0 3 3 Plain Thick 0 3 3 Covers 0 3 3 Label 0 3 3 Coated 0 3 3 Envelope 0 3 3 Recycled 0 3 3 D...

Страница 232: ...types When the printed paper has curled try to lower the temperature When the toner does not fuse on the paper properly try to increase the temperature NOTE The print quality changes depending on the values you select for this item Values Auto Reg Adj Purpose To specify whether to automatically adjust color registration Values Plain 0 3 3 Plain Thick 0 3 3 Covers 0 3 3 Label 0 3 3 Coated 0 3 3 Env...

Страница 233: ...on Off Does not automatically adjust color registration Auto Correct Automatically corrects color registration ColorRegi Chart Prints a color registration chart The color registration chart prints a lattice pattern of yellow magenta and cyan lines On the chart find the values on the right side that are next to the line that is perfectly straight for each of the three colors If the value for this l...

Страница 234: ...s lateral perpendicular to paper feed direction color adjustment values individually for Y Yellow M Magenta C Cyan 5 5 M 0 5 5 C 0 5 5 LY 0 Specifies process paper feed direction color adjustment values individually for LY Left Yellow LM Left Magenta LC Left Cyan RY Right Yellow RM Right Magenta and RC Right Cyan 5 5 LM 0 5 5 LC 0 5 5 RY 0 5 5 RM 0 5 5 RC 0 5 5 Yellow Cleans the toner in the yello...

Страница 235: ...For details see Resetting Defaults on page 236 Cyan Cleans the toner in the cyan toner cartridge Black Cleans the toner in the black toner cartridge Off Does not automatically execute counter measures for curling separating discharge of the paper On Automatically executes counter measures for curling separating discharge of the paper Ghost Prints a chart to check for ghost printing 4Colors Prints ...

Страница 236: ...nufacturer be sure to restart the printer Values Adjust Altitude Purpose To specify the altitude of the location where the printer is installed The discharge phenomenon for charging the photo conductor varies with barometric pressure Adjustments are performed by specifying the altitude of the location where the printer is being used NOTE An incorrect altitude adjustment setting leads to poor print...

Страница 237: ... Password Purpose To change a password to limit access to the menus Values NOTE This item is displayed only when Panel Lock set is set to Enable Disable Does not restrict access to Admin Menu and Report List Enable Restricts access to Admin Menu and Report List with a password New Password Sets a password required to access Admin Menu and Report List Re enter Enters the new password again to confi...

Страница 238: ...on the operator panel Values Panel Lock Function This feature prevents unauthorized users from changing settings made by the administrator However you can select settings for individual print jobs using the printer driver Enabling the Panel Lock 1 Press the Menu button Off Does not set the maximum number of failed login attempts On 5times Sets the maximum number of failed login attempts 1 10times ...

Страница 239: ...Press the button to select Yes then press the button The display will briefly indicate the password has been initialized NOTE If you change the password perform steps 1 and 2 Enter the current password and then press the button Perform steps 3 and 4 Press the button until Change Password appears and then press the button Enter the current password and then press the button Perform step 7 and 8 Thi...

Страница 240: ...lues 1 Press the Menu button 2 Press the button until Admin Menu appears and then press the button 3 Press the button until Maintenance appears and then press the button 4 Press the button until Reset Defaults appears and then press the button 5 Ensure that Are you sure appears and then press the button The printer restarts automatically to apply the settings Downloaded from ManualsPrinter com Man...

Страница 241: ...hen printing in Printing Status Window Properties You can also check the toner level of your printer Status Monitor Console Use the Status Monitor Console to manage multiple instances of the Status Window for a particular printer Select a printer from the list view or Printer Selection by clicking its name to open a Status Window for a particular printer Dell Supplies Management System You can lau...

Страница 242: ...updates can be downloaded from the Dell Support website located at support dell com Quick Launch Utility Using the Quick Launch Utility window you can open Status Window Tool Box Updater and Troubleshooting To use the Quick Launch Utility select to install the Quick Launch Utility when you install the Dell software For information about installing the software see Setting Up for Shared Printing on...

Страница 243: ...the printer driver with the same settings to multiple computers running on the same operating system create a setup disk in a floppy disk or in a server on the network Using the setup disk that you have created will reduce the amount of work required when installing the printer driver Install the Dell 1350cnw Color Printer driver in the computer on which the setup disk is to be created The setup d...

Страница 244: ...If the Select a printer message is displayed select your printer in Preferences For more information on Preference see Preferences on page 242 Status Monitor window appears 1 Printer Status Message Area Displays a message of the current printer status NOTE The Status Monitor Widget automatically obtains the printer information at the updated interval that can be specified in Preferences Also the p...

Страница 245: ...ormation is displayed 2 Printer Status Image Area Displays the image of printer condition Estimated Toner Level image Displays the estimated toner level of each color if the printer is functioning properly NOTE If the utility does not receive a response from the printer the Unknown toner image is displayed Less than 29 Less than 9 Unknown Downloaded from ManualsPrinter com Manuals ...

Страница 246: ...utton Click this button to open Preferences NOTE The Info i button appears on the lower right corner of the window when the cursor is over the Status Monitor window Printer Displays a list of available printer names in the drop down list The first printer displayed in this list is set as default Status Update Interval You can update the interval of the printer status By default it is set to obtain...

Страница 247: ...rotocol community name if using default community name public Up to 31 characters can be entered Service Tag button Click Get Tag button to obtain the service tag done button Click this button to return to the Printer Status window Order Online Select a web address from the drop down list and click Visit Dell printer supplies ordering web site hyperlink to access the web site for ordering Dell pri...

Страница 248: ...244 Understanding Your Printer Software Downloaded from ManualsPrinter com Manuals ...

Страница 249: ...TICE When an error code is displayed the print data remaining on the printer and the information accumulated in the memory of the printer are not secured 1 Ready Error indicator 2 LCD Panel 3 buttons 4 button 5 Cancel button 6 Menu button 7 buttons Lights up green when the printer is ready or sleeping and blinks when data is being received Lights up orange when an error occurs and blinks when an u...

Страница 250: ...g Dell on page 312 003 340 003 356 006 370 007 340 007 371 009 654 010 354 010 377 016 302 016 313 016 315 016 317 016 324 016 338 016 340 016 344 016 345 016 346 016 347 016 370 016 383 Press the button Contact Dell if this message appears repeatedly See Contacting Dell on page 312 016 384 016 385 016 386 016 387 016 391 Downloaded from ManualsPrinter com Manuals ...

Страница 251: ... specified paper See Loading Print Media in the Multipurpose Feeder MPF on page 166 or Loading Print Media in the Priority Sheet Inserter PSI on page 173 024 969 Load the appropriate paper See Loading Print Media in the Multipurpose Feeder MPF on page 166 or Loading Print Media in the Priority Sheet Inserter PSI on page 173 027 452 Change IP address to avoid duplication Turn off the printer and tu...

Страница 252: ...093 426 093 919 Re install or replace the specified toner cartridge See Replacing Toner Cartridges on page 263 093 920 093 921 093 922 093 930 Remove the specified toner cartridge and install a new one If you do not replace the toner cartridge print quality problems may occur Order a new consumable from www dell com supplies See Replacing Toner Cartridges on page 263 093 931 093 932 093 933 093 94...

Страница 253: ...e on page 264 093 971 093 972 093 973 093 974 124 333 Turn off the printer and then on If this does not solve the problem contact Dell See Contacting Dell on page 312 191 310 193 700 This message indicates the printer is in the non Dell toner mode Error Code What you can do Downloaded from ManualsPrinter com Manuals ...

Страница 254: ...250 Understanding Printer Messages Downloaded from ManualsPrinter com Manuals ...

Страница 255: ... Windows Server 2008 1 Click Start Administrative Tools Server Manager 2 Select Add Roles from the Action menu 3 Check the Print Services check box on the Server Roles window in the Add Roles Wizard and then click Next 4 Check the Print Server check box and then click Next 5 Click Install For Windows Server 2008 R2 1 Click Start Administrative Tools Server Manager 2 Select Add Roles from the Actio...

Страница 256: ...er To enter the printer s IP address manually follow the instructions below For Windows Server 2008 R2 to create a WSD printer you must be a member of Administrators group 1 Click The printer that I want isn t listed 2 Select Add a printer using a TCP IP address or hostname and click Next 3 Select Web Services Device from Device type 4 Enter the printer s IP address in the Hostname or IP address t...

Страница 257: ... and Windows 7 b Right click the printer you just created and then click Properties Printer properties for Windows Server 2008 R2 and Windows 7 On the Options tab set each setting item and then click Apply c On the General tab click Print Test Page When a test page is printed successfully installation is complete Downloaded from ManualsPrinter com Manuals ...

Страница 258: ...254 Printing with Web Services on Devices WSD Downloaded from ManualsPrinter com Manuals ...

Страница 259: ...al support from the manufacturer of the operating system in order to get technical assistance beyond 30 days 2 If the customer has other operating systems and has purchased Gold Technical Support for more information on Gold Technical Support see http www1 us dell com content topics global aspx services en gts c us cs 555 l en s biz the telephone support will be a best effort attempt to resolve th...

Страница 260: ...cnw Color Printer complies with standard industry MIB specifications allowing the printer to be recognized and managed by various printer and network management software systems Base memory 128 MB PDL Emulations Host based printing system OSes Microsoft Windows 7 Windows 7 64 bit Edition Windows Vista Windows Vista 64 bit Edition Windows Server 2008 Windows Server 2008 64 bit Edition Windows Serve...

Страница 261: ...ture 10 32 C Relative humidity 10 85 RH no condensation Temperature 15 28 C Relative humidity 20 70 RH no condensation Temperature range 20 40 C Storage humidity range 5 85 RH no condensation Operating Up to 3 100 m 10 000 feet Storage 70 9275 Kpa Downloaded from ManualsPrinter com Manuals ...

Страница 262: ... Cables Your interconnection cable must meet the following requirements Connection type Connection specifications and symbols 1 USB USB 2 0 2 Ethernet 10 Base T 100 Base TX 1 2 Downloaded from ManualsPrinter com Manuals ...

Страница 263: ...259 Maintaining Your Printer Downloaded from ManualsPrinter com Manuals ...

Страница 264: ...260 Downloaded from ManualsPrinter com Manuals ...

Страница 265: ...ert Setup feature that notifies you when the printer requires new supplies type your name or the name of the key operator in the e mail list box On the operator panel you can also confirm the following Any supply or maintenance items that require attention replacing However the printer can only display information about one item at a time Amount of toner remaining in each toner cartridge Conservin...

Страница 266: ...e print media packages Storing Consumables Store consumables in their original packaging until you need to use them Do not store consumables in Temperatures greater than 40 C 104 F An environment with extreme changes in humidity or temperature Direct sunlight Dusty places Print media Multiple Up in the Layout tab of the printer driver The printer prints two or more pages on one side of a sheet The...

Страница 267: ... To order by phone see Contacting Dell on page 312 It is recommended that you use Dell toner cartridges for your printer Dell does not provide warranty coverage for problems caused by using accessories parts or components not supplied by Dell CAUTION Never throw used toner cartridges into fire The residual toner could explode resulting in burns and injuries CAUTION Do not shake the used toner cart...

Страница 268: ... out slowly so that you do not spill any toner 4 Pull the toner cartridge out Installing a Toner Cartridge 1 Unpack a new toner cartridge of the desired color and shake it five to six times to distribute the toner evenly Downloaded from ManualsPrinter com Manuals ...

Страница 269: ...cing it NOTE Handle the toner cartridge carefully to avoid spillage of the toner 2 Remove the tape from the toner cartridge 3 Adjust the toner cartridge to the associated cartridge holder and then insert it firmly by pressing near the center of the label until the cartridge clicks Downloaded from ManualsPrinter com Manuals ...

Страница 270: ... Printer CAUTION To prevent electric shock always turn off the printer and disconnect the power cable from the grounded outlet before performing maintenance 1 Confirm that the printer is not in operation and open the toner access cover Y Downloaded from ManualsPrinter com Manuals ...

Страница 271: ... Printer 267 2 Pinch the cartridge firmly as shown in the illustration 3 Pull the toner cartridge out 4 Pull the other three cartridges out as well 5 Pull the cleaning rod out Downloaded from ManualsPrinter com Manuals ...

Страница 272: ...le beside the arrow on the printer until its tip reaches the interior of the printer as illustrated below and then pull it out 7 Repeat the same procedure for the other three holes 8 Return the cleaning rod to its original location Downloaded from ManualsPrinter com Manuals ...

Страница 273: ...artridge clicks 10 Replace the other three cartridges as well 11 Close the toner access cover Cleaning the Color Toner Density CTD Sensor Clean the CTD sensor only when an alert for the CTD sensor is shown on the Status Monitor or operator panel 1 Ensure that the printer is turned off 2 Push the rear cover release handle and open the rear cover Downloaded from ManualsPrinter com Manuals ...

Страница 274: ... printer with a clean dry cotton swab 4 Close the rear cover Adjusting Color Registration This section describes how to adjust the color registration when you first install the printer or after moving it to a new location Downloaded from ManualsPrinter com Manuals ...

Страница 275: ... button 6 Ensure that Are you sure appears and then press the button Auto correct is performed Printing the Color Registration Chart The Operator Panel 1 Load paper For details about loading paper see Loading Paper on page 45 2 Press the Menu button 3 Press the button until Admin Menu appears and then press the button 4 Press the button until Maintenance appears and then press the button 5 Press t...

Страница 276: ...e Color Registration Adjustment page is displayed 4 Click the Start button next to Color Regi Chart The color registration chart is printed Determining Values On the color registration chart printed find the straightest lines where the two black lines and the colored line are most closely aligned for each color Y M and C If you find the straightest line make a note of the value 5 5 indicated by th...

Страница 277: ...r Panel Using the operator panel enter the values that you found in the color registration chart to make adjustments 1 Load paper For details about loading paper see Loading Paper on page 45 2 Press the Menu button Downloaded from ManualsPrinter com Manuals ...

Страница 278: ... Press the or button until you reach the value for example 3 displayed on the chart 12 Press the button once and move the cursor to the next value 13 Repeat steps 11 and 12 to enter all of the digits and then press the button 14 Ensure that Enter RY RM RC appears 15 Press the or button until you reach the value for example 3 displayed on the chart 16 Press the button once and move the cursor to th...

Страница 279: ...lect Color Registration Adjustment from the list at the left side of the page The Color Registration Adjustment page is displayed 4 Select the value with the straight line and then click the Apply New Settings button 5 Click the Start button next to Print Color Regi Chart The color registration chart is printed with the new values 6 Adjust till all straight lines are at the value of 0 Show image o...

Страница 280: ...276 Maintaining Your Printer Downloaded from ManualsPrinter com Manuals ...

Страница 281: ...edia height does not exceed the maximum height indicated by the line with an arrow on each width guide Do not load wrinkled creased damp or curled print media Flex fan and straighten print media before you load it If a jam occurs with print media try feeding one sheet at a time through the MPF or the PSI Do not use print media that you have cut or trimmed yourself Do not mix print media sizes weig...

Страница 282: ...ools or instruments This may permanently damage the printer The following illustration shows where paper jams may occur along the print media path 1 Output Tray 2 Transfer Belt 3 Fuser Release Lever 4 Rear Cover 5 Front Cover 6 Multipurpose Feeder MPF 1 2 3 6 5 4 Downloaded from ManualsPrinter com Manuals ...

Страница 283: ...nd follow the safety instructions in your Product Information Guide NOTE To resolve the error displayed on the operator panel you must clear all print media from the print media path 1 Pull the PSI out 2 Remove any paper jammed from the front of the printer 3 Replace the PSI in the printer Downloaded from ManualsPrinter com Manuals ...

Страница 284: ...ON To prevent electric shock always turn off the printer and disconnect the power cable from the grounded outlet before performing maintenance CAUTION To avoid burns do not clear paper jams immediately after printing The fuser becomes extremely hot during use NOTE To resolve the error displayed on the operator panel you must clear all print media from the print media path 1 Push the rear cover rel...

Страница 285: ...Clearing Jams 281 3 Remove any paper jammed from the back of the printer 4 Lower the fuser release levers to their original position 5 Close the rear cover Downloaded from ManualsPrinter com Manuals ...

Страница 286: ...nd disconnect the power cable from the grounded outlet before performing maintenance CAUTION To avoid burns do not clear paper jams immediately after printing The fuser becomes extremely hot during use NOTE To resolve the error displayed on the operator panel you must clear all print media from the print media path 1 Push the rear cover release handle and open the rear cover 2 Lift up the fuser re...

Страница 287: ...from the back of the printer If no paper is found in the paper path then remove any paper jammed out of the output tray 4 Lower the fuser release levers to their original position 5 Close the rear cover Downloaded from ManualsPrinter com Manuals ...

Страница 288: ...284 Clearing Jams Downloaded from ManualsPrinter com Manuals ...

Страница 289: ...285 Troubleshooting Downloaded from ManualsPrinter com Manuals ...

Страница 290: ...286 Downloaded from ManualsPrinter com Manuals ...

Страница 291: ...cted between the printer and the computer When your printer is connected to the computer with the USB cable the Ethernet cable is not connected between the printer and the network If you have checked all of the above and still have a problem turn off the printer wait for 10 seconds and then turn on the printer This often fixes the problem Display Problems Problem Action After the printer is turned...

Страница 292: ...ady to Print Ensure that print media is loaded in the printer Press the Menu button to return to Ready to Print Verify that you are using the correct printer driver Ensure that you are using the correct Ethernet or USB cable and that it is securely connected to the printer Verify that the correct print media size is selected If you are using a print spooler verify that the spooler has not stalled ...

Страница 293: ...d try printing again to see if feeding improves Do not mix print media types Do not mix reams of print media Remove the top and bottom curled sheets of a ream before loading the print media Load a print media source only when it is empty The envelope is creased after printing Ensure that the envelope is loaded as instructed in Loading Print Media in the Multipurpose Feeder MPF on page 166 or Loadi...

Страница 294: ... is too light Action Yes No 1 The toner cartridges may be low or need to be replaced Confirm the amount of toner in each toner cartridge 1 Check the toner level in the Status tab in the Status Monitor 2 Replace the toner cartridges as necessary Is the problem recovered The task is complete Go to action 2 2 Verify that the print media is not damp and the correct print media is used See Supported Pa...

Страница 295: ...Load dry not damp and corrected print media and then click Print Test Page in Properties of the printer driver Is the problem recovered The task is complete Go to action 4 4 Disable the Toner Saving Mode in the printer driver 1 On the Advanced tab in Printing Preferences of the printer driver ensure that the Toner Saving Mode check box is not selected Is the problem recovered The task is complete ...

Страница 296: ...ction 2 2 Verify that the correct print media is being used See Supported Paper Sizes on page 162 If not use the print media recommended for the printer Is the problem recovered The task is complete Go to action 3 3 Adjust the fuser temperature 1 Launch the Tool Box click Adjust Fuser on the Printer Maintenance tab 2 Adjust the fixing temperature by turning up the value for your printing media 3 C...

Страница 297: ...on 2 2 If you use non Dell brand toner cartridges install Dell brand toner cartridges Is the problem recovered The task is complete Go to action 3 3 Clean up the fuser unit 1 Load one sheet of paper on the MPF and then print a solid image all over paper 2 Load the printed sheet with the side to be printed on facing down and then print a blank sheet of paper Is the problem recovered The task is com...

Страница 298: ...94 Troubleshooting Streaks appear on the output If this trouble comes out contact Dell Pitched color dots If this trouble comes out contact Dell Vertical blanks Downloaded from ManualsPrinter com Manuals ...

Страница 299: ...blem recovered The task is complete Contact Dell Action Yes No 1 Adjust the transfer bias 1 Launch the Tool Box click Adjust BTR on the Printer Maintenance tab 2 Adjust the setting for the type of print media being used Is the problem recovered The task is complete Go to action 2 2 If you use non recommended print media use the print media recommended for the printer Is the problem recovered The t...

Страница 300: ... uneven Try changing the Paper Type setting in the printer driver For example change the plain paper to thick 1 On the Paper Output tab in Printing Preferences of the printer driver change the Paper Type setting Is the problem recovered The task is complete Go to action 3 3 Adjust the fuser temperature 1 Launch the Tool Box and click Adjust Fuser on the Printer Maintenance tab 2 Adjust the fixing ...

Страница 301: ...e page printed light Contact Dell Go to action 2 2 Start Developer Stir Mode 1 Launch the Tool Box click Developer Stir Mode on the Diagnosis tab 2 Click the Start button Is the problem recovered The task is complete Contact Dell Downloaded from ManualsPrinter com Manuals ...

Страница 302: ... is complete Contact Dell Action Yes No 1 The toner cartridges may be low or need to be replaced Confirm the amount of toner in each toner cartridge 1 Check the toner level in the Status tab in the Status Monitor 2 Replace the toner cartridges as necessary Is the problem recovered The task is complete Contact Dell 2 Start Developer Stir Mode 1 Launch the Tool Box click Developer Stir Mode on the D...

Страница 303: ...ction 2 If printing on print media other than envelopes contact Dell 2 Check the crease Is the crease within 30 mm of the four edges of the envelope This type of crease is considered normal Your printer is not at fault If the envelope is 220 mm or longer C5 or Envelope 10 go to action 3a If the envelope is shorter than 220 mm Monarch or DL go to action 3b 3a Does the envelope have a flap on the lo...

Страница 304: ... Load the envelope in the MPF with the flap open and facing up For details see When Loading C5 on page 171 Is the problem recovered The task is complete Contact Dell 4b Use a different size envelope Is the problem recovered The task is complete Contact Dell Action Yes No 1 Ensure that the margins are set correctly on the application being used Is the problem recovered The task is complete Contact ...

Страница 305: ...ton next to Auto Correct Is the problem recovered The task is complete Go to action 2 2 Clean the CTD sensor 1 Clean the CTD sensor See Cleaning the Color Toner Density CTD Sensor on page 269 2 Launch the Tool Box and click Color Registration Adjustment on the Printer Maintenance tab 3 Click the Start button next to Auto Correct Is the problem recovered The task is complete Go to action 3 Download...

Страница 306: ...tration on page 270 for details 4 Click the Apply New Settings button 5 Click the Start button next to Color Regi Chart to print the Color Registration Chart again Is the problem recovered The task is complete Contact Dell Action Yes No 1 Clean up the fuser unit 1 Load one sheet of paper on the MPF and then print a solid image all over paper 2 Load the printed sheet with the side to be printed on ...

Страница 307: ... page 109 Action Yes No 1 Locate the cause of the problem by removing the toner cartridges 1 Remove the toner cartridges See Replacing Toner Cartridges on page 263 2 Launch the Tool Box and click Machine Check on the Diagnosis tab 3 Select Main Motor Operation Check from the drop down list box and click the Start button 4 Click the Play of Sound button to check the motor sound Does the noise gener...

Страница 308: ...lack from the drop down list box and click the Start button 3 Click the Play of Sound button to check the motor sound 4 Repeat steps 1 and 2 to perform Dispense Motor Check for the rest of the toner cartridges NOTE You can perform Dispense Motor Check for CMYK in any order you desire NOTE Do not check the operation of the dispense motor repeatedly Does the noise generated from the printer match wi...

Страница 309: ...forming duplex printing go to action 2e 2a Use thick paper that is 216 gsm or less Is the problem recovered The task is complete Go to action 3a 2b Use thin paper that is 60 gsm or more Is the problem recovered The task is complete Go to action 3a 2c Ensure that the envelope is properly loaded in the MPF as instructed in Loading Envelopes in the Multipurpose Feeder MPF on page 170 Is the problem r...

Страница 310: ...plete Go to action 4 4 Use print media that is not damp Is the problem recovered The task is complete Contact Dell Action Yes No 1 Remove the paper from the PSI and then ensure that papers are inserted properly in the MPF Is the problem recovered The task is complete Go to action 2 2 Is the print media damp Go to action 3a Go to action 3b 3a Use print media that is not damp Is the problem recovere...

Страница 311: ...nd serial number See the label located inside the side door of your printer Problem Action Condensation has occurred inside the printer This usually occurs within several hours after you heat the room in winter This also occurs when the printer is operating in a location where relative humidity reaches 85 or more Adjust the humidity or relocate the printer to an appropriate environment Downloaded ...

Страница 312: ...308 Troubleshooting Downloaded from ManualsPrinter com Manuals ...

Страница 313: ...309 Appendix Downloaded from ManualsPrinter com Manuals ...

Страница 314: ...310 Downloaded from ManualsPrinter com Manuals ...

Страница 315: ...vailable for purchase Dell provides limited technical support for the printer and any Dell installed software and peripherals Support for third party software and peripherals is provided by the original manufacturer including those purchased and or installed through Software Peripherals DellWare ReadyWare and Custom Factory Integration CFI DellPlus Online Services You can learn about Dell products...

Страница 316: ...re new or equivalent to new in accordance with industry standard practices For information about the Dell warranty for your printer see support dell com Recycling Information It is recommended that customers dispose of their used computer hardware monitors printers and other peripherals in an environmentally sound manner Potential methods include reuse of parts or whole products and recycling of p...

Страница 317: ... sales technical support or customer service issues 1 Visit support dell com 2 Verify your country or region in the Choose A Country Region drop down menu at the bottom of the page 3 Click Contact Us on the left side of the page 4 Select the appropriate service or support link based on your need 5 Choose the method of contacting Dell that is convenient for you Downloaded from ManualsPrinter com Ma...

Страница 318: ...314 Appendix Downloaded from ManualsPrinter com Manuals ...

Страница 319: ...Password 151 Advanced Setup 72 Altitude 257 Appendix 311 Apply New Settings Button 119 Asset Tag Number 122 Assigning an IP address for IPv4 Mode 39 Authenticate Error Trap 148 Auto Log Print 125 127 225 Auto Reg Adj 228 Auto Registration Adjustment 126 131 Avoiding jam 277 Avoiding Paper Jam 187 B B5 162 Base memory 256 Basic Information 140 Basic printer problem 287 Bonjour mDNS 141 146 221 BTR ...

Страница 320: ... Color Registration Adjustment 205 Color Registration Adjustments 131 132 Color registration chart 271 Color Test Page 127 216 Community Name 147 Community Name Read only 147 Community Name Read Write 147 Community Name Trap 147 Completed Jobs 111 123 Connecting Printer to Computer or Network 34 Connecting your printer 33 Connection specification 33 258 Connection type 33 258 Conserving supplies 2...

Страница 321: ...D 19 E E Mail Alert 112 118 141 144 221 E Mail Alert Settings 139 146 E mail Alert Setup Page 138 E Mail Server Settings 139 145 Emulations 256 Encryption 149 150 Entering Values 273 Envelope 125 126 130 131 160 204 205 227 228 Envelope 10 163 Environment 257 Environment Sensor Info 211 Error History 127 216 Ethernet 135 141 258 Ethernet Port 26 33 Ethernet Settings 141 Event Panel 116 EWS 221 EWS...

Страница 322: ...ddress 39 116 148 IP Filter 138 IPv4 136 138 142 143 148 IPv6 136 137 142 143 148 J Jam 304 Job History 127 215 Job List 111 123 Job Name 123 Job Status 123 Job Submitted Time 123 124 Job Time Out 124 127 224 K Kensington lock 28 L Label 125 126 130 131 161 204 205 227 228 LCD 183 LCD Panel 183 245 Left frame 117 Legal 163 Length Guide 25 Letter 163 Link Channel 149 Link Quality 149 Liquid crystal...

Страница 323: ...inting 179 Maximum Number of Devices 148 Memory 256 Memory Capacity 122 Menu button 184 245 Menu Settings 124 198 MIB compatibility 256 mm inch 124 127 225 Monarch 163 Monarch LEF 163 Mottle 295 MPF Extension 25 Multiple Up 262 Multipurpose Feeder MPF 25 278 N NCR 157 Network 216 Ethernet 216 IP Filter 222 Protocol 221 Reset LAN 222 Reset Wireless 220 TCP IP 220 Network Connection 35 Network Conne...

Страница 324: ...content 156 Grain direction 156 Moisture content 156 Smoothness 156 Weight 155 Paper Chute 26 Paper Density 125 129 203 226 Paper Feed Roller 26 Paper jam location 278 Paper Trays 121 Paper Type 164 Paper Used 153 Paper Width Guides 25 Parts name 25 PDL 256 Peer to Peer 96 Plain 125 126 130 204 205 227 228 Plain Thick 125 126 130 204 205 227 228 Point and Print 93 Port Settings 140 Port Status 138...

Страница 325: ...inter Serial Number 122 Printer Settings 111 117 124 127 215 Printer Settings Report 124 Printer software 237 Printer specification 255 Printer Status 111 117 121 Printer Type 121 Printing 187 Printing on letterhead 158 Printing problem 288 Printing Speed 122 Printing Status Window 237 Printing with Web Services on Devices WSD 251 Priority Sheet Inserter PSI 25 Processor Speed 122 Product Features...

Страница 326: ...ted letterhead 158 Selecting preprinted media 158 Selecting pre punched paper 159 Sending print job 187 Service code 21 Service Tag 21 226 Set button 183 245 Set Password 112 118 151 Setting the IP Address 39 Setup diagram 20 Shared Printing 91 SNMP 138 141 146 SNMP UDP 221 Software Update 238 SSID 149 Status Monitor Console 237 Status Monitor Widget 240 Status of supplies 261 Storage 257 Storage ...

Страница 327: ...TRICTED RIGHTS 16 USB 258 USB Cable 34 USB Port 26 33 125 128 223 USB Settings 125 128 223 User Setup Disk Creating Tool 239 V Verifying IP settings 41 W Wall Jack Connector 26 Warranty 312 Warranty information 20 Web Link Customization 126 134 WEP 149 150 Wireless LAN 149 222 Wireless Settings 135 149 Wireless Setup 217 Wireless Status 217 Wizard Setup 70 WPA PSK 150 WPA PSK TKIP 149 WSD 137 141 ...

Страница 328: ...324 Index Downloaded from ManualsPrinter com Manuals ...

Отзывы: