3
USING YOUR REMOTE CONTROL
1.
LED indicator:
when pressing any buttons, the LED
indicator will flash to indicate activation of the pressed button.
2.
HI speed button:
press it to turn on the fan at high speed.
3.
MED speed button:
press it to turn on the fan at medium
speed.
4.
LOW speed button:
press it to turn on the fan at low speed.
5.
OFF speed button:
press it to turn off the fan.
6.
Light button:
Press it to turn on/off the light
(if fan installed with light).
PAIRING OF THE FAN RECEIVER AND REMOTE
NOTE: The remote and receiver have already been paired
during manufacturing. When the ceiling fan is installed for
the first time, pairing of the remote and receiver may not be
required.
Should the remote and receiver lose pairing after installation or
during use, the remote and the receiver must be re-paired.
Below are the operating symptoms and method to
re-pair the pairing of the AC ceiling fan remote and receiver.
Issue:
Loss of control - Remote cannot communicate with the receiver.
Solution:
1. Switch off the main power to ceiling fan for 30 seconds.
2. Press and hold the “OFF” button on
remote handset
for 5 seconds (within 30 seconds of switching
the power ON to the receiver of the ceiling fan). A long “beep” will be heard that indicates successful
pairing. Release your finger from the “OFF” button.
3. Press the “HI” button to start the fan operation and change the speed of the ceiling fan via the remote
to check the operation and confirm successful paring.
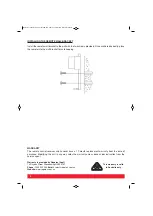
INSTALLING/REPLACING BATTERIES IN THE REMOTE CONTROL
Loosen the screw from the battery cover and install
2 x AAA 1.5V DC battery into the compartment.
Please make sure the polarity of the batteries are correct as illustrated.
Reinstall the battery cover, ensuring the screw is firmly screwed back
into place.
Fig. 4
1
2
3
4
5
6
Remote control instructions_Nov20.qxp_Layout 1 20/11/20 9:07 am Page 3


