1 2
| O A S I S P O L Y C A R B O N A T E V E R A N D A I N S T A L L A T I O N G U I D E
www.deponti.com
Patio Roof Manual – Type Bosco
15
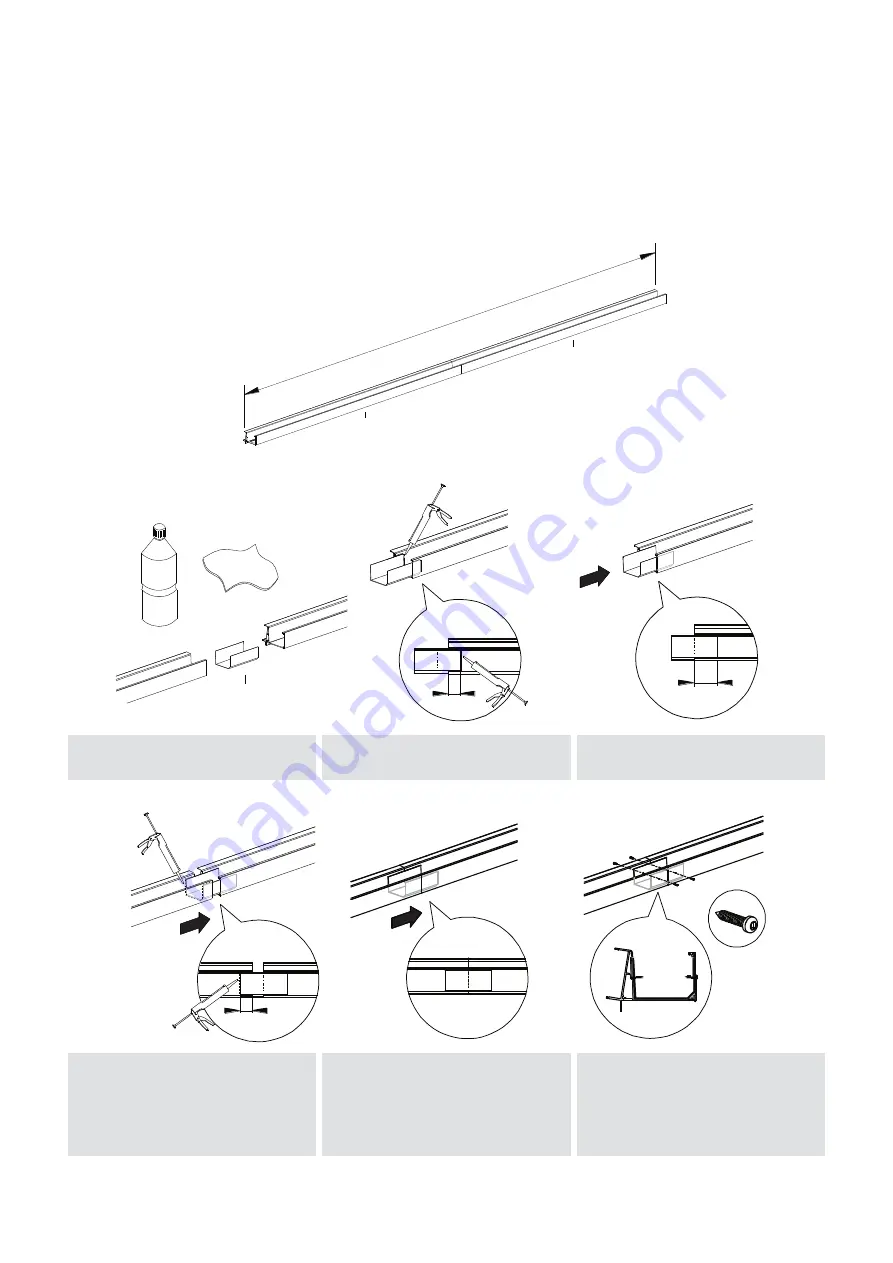
1. Clean and degrease the gutter
and the gutter connector.
2. Insert the gutter connector ¼ of
the way into the gutter and caulk
the inside edge.
3. Now press the gutter connector
further
until it is half way into the gutter.
4. Insert the second gutter ¼ of the
way into the other side of the
connector and caulk the edge.
5. Now press the second gutter
completely over the gutter
connector to form a seamless joint
between the gutters.
6. The gutter connector can now be
secured with the short stainless
steel screws in the chamber of the
gutter and on the front side under
the decorative profile. Caulk the
assembly so it is smooth and
waterproof!
B
2
2
cleaner
3
1/4
1/2
1/4
5.4 Joining patio roofs (continued)
It is recommended that you join the gutter sections with the supplied gutter connector before
installation. The installation steps are shown below:
5.4 JOINING PATIO ROOFS (CONTINUED)
It is recommended that you join the gutter sections with the supplied gutter connector before installation.
The installation steps are shown below:
1. Clean and degrease the gutter and
gutter connector.
4. Insert the second gutter ¼ of the way
into the other side of the connector and
caulk the edge.
2. Insert the gutter connector ¼ of the way
into the gutter and silicone the inside edge.
5. Now press the second gutter
completely over the gutter connector to
form a seamless joint.
3. Now press the gutter connector
further until it is half way into the gutter.
6. The gutter connector can now be
secured with the short stainless steel
screws in the chamber of the gutter and
on the front side under the decorative
profile. Caulk the assembly so it is
smooth and waterproof!


