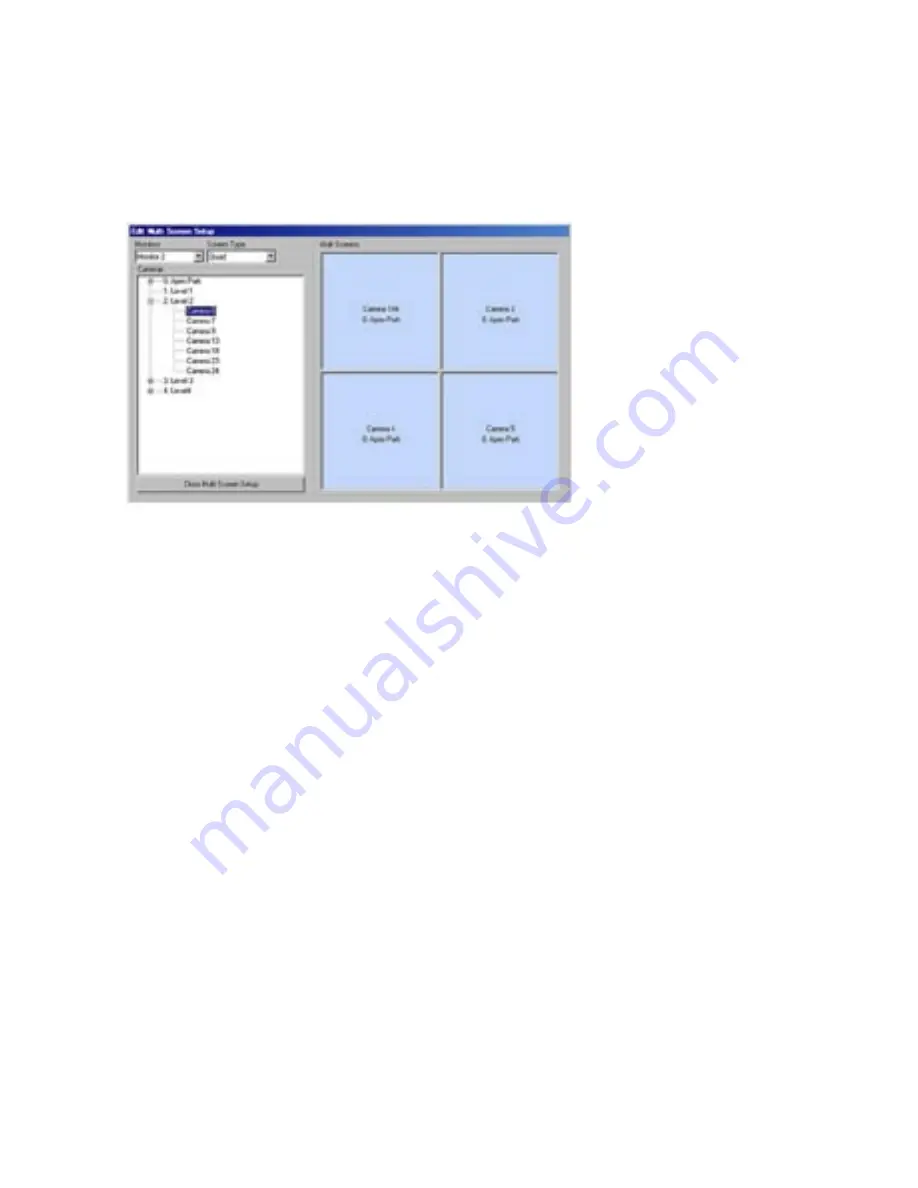
Dedicated Micros PICKAPOINT Скачать руководство пользователя страница 7

7

Multi-Screens

The 

‘Multi Screens’

 button allows the currently selected monitor to placed into a quad. This enables 4  images 

to be displayed on a single monitor.


1) 

Use the 

‘Monitors’

 drop down menu to select which monitor will show the multi screen display.

2) 

Use the drop down menu under 

‘Screen Type’ 

to select the display as quad (4 way) screen.

3) 

Cameras can now be dragged from the camera list into the viewing frames. Select a camera from the list 

in the left window and ‘drag and drop’ into the appropriate frame.

This menu can also be used to assign a camera to a monitor in full screen mode. 
1) 

Use the 

‘Monitors’

 drop down menu to select which monitor will show the full screen display.

2) 

Use the drop down menu under 

‘Screen Type’ 

to select the display as Full Screen.

3) 

Cameras can now be dragged from the camera list into the viewing frame.

Содержание PICKAPOINT

Страница 1: ...1 Pick a Point User Guide...

Страница 2: ...tart Stop Sequence 8 Set Time Date 8 DVR Search and Playback 9 Download Copy Video 10 Event List 12 Observed Events 13 Logging an event 13 Replaying an event 13 Site List 14 Description 14 Manager Men...

Страница 3: ...designed as a turnkey solution to meet the exact operational requirements The system is con gured and commissioned on site by a Dedicated Micros technician or appointed individual Custom maps are add...

Страница 4: ...the top of the screen with the map window below Menu Bar The menu bar at the top of the screen allows access to the available menus These will change according to the log in used The menu bar shown be...

Страница 5: ...o dynamically switch the view between JPEG and MPEG modes The button will display the alternative option The current feed will be shown on the monitor 11 Displays a list of sites map levels see Site l...

Страница 6: ...e established The on screen keyboard offers telemetry control via the joystick on the right and the ability to control zoom iris and focus Logging On and Off To log off 1 Touch or click on the Log Off...

Страница 7: ...y as quad 4 way screen 3 Cameras can now be dragged from the camera list into the viewing frames Select a camera from the list in the left window and drag and drop into the appropriate frame This menu...

Страница 8: ...t Time Date To adjust the workstation time and date click or touch the Set Time Date button on the menu bar The window shown below will be displayed 1 Click on or touch the plus and minus symbols next...

Страница 9: ...recorded images from the selected camera based upon the time of recording These can be fast forwarded and fast rewound on screen for easy access Use the Time and Date buttons in the right hand window...

Страница 10: ...VD after successfully downloading an incident and writing it to a DVD 9 Closes the DVR Control window 10 Event List button opens the list of Events recorded by the DVR See Event List below 11 Fast for...

Страница 11: ...the incident event to be downloaded 4 This should always be set to 0 during GMT and always be set to 1 during BST otherwise the downloaded footage will be wrong by 1 hour during British summer time 5...

Страница 12: ...PAR downloads are used when either the user only requires a short amount of footage with no audio from a speci c number of cameras or the network bandwidth on the system is limited e g 512Kbps ADSL Fi...

Страница 13: ...orkstation To playback recorded images from the Event 1 Select the Server 2 Select the start time and date A list of Events will be displayed on the right hand side of the panel Events logged include...

Страница 14: ...is tripped the alarm icon will turn red and the nominated User will receive a noti cation When the icon is clicked a dialog box will appear giving the alarm details Highlight the entry in the alarm bo...

Страница 15: ...option Select a suitable classi cation for the event Note The user de ned option can be entered by using the qwerty keyboard if available or by using the onscreen keyboard that appears when the user d...

Страница 16: ...display it Note The cameras on the remote sites cannot be selected from the touch screen keyboard Also there are no hotspots on the remote sites as they have no connection to each other or to the loca...

Страница 17: ...up to 2 DVIP servers for concierge door entry conversation recording The IP addresses of the audio recording DVIPs are entered into these boxes The update button updates the IP addresses into the dat...

Страница 18: ...allow access to new users and set authorisation levels The following screen will be displayed Assign a user name and a four digit pass code for the user Use the drop down menu to select a level of ac...

Страница 19: ...n will be displayed Select the Monitor will Display the sequence from the drop down menu at the top left of the page Select the dwell time the length of time each image will stay on screen using the d...

Страница 20: ...Network and Communications NET 10 100 10BASE T 100BASE TX 1000BASE TX Network Port USB 4 x USB 2 0 Ports Mic 3 5mm jack socket for Microphone Line In 3 5mm jack socket for Line In Line Out 3 5mm jack...

Страница 21: ...a Point Keyboard DVR Network switch Monitor Wall Pick a Point 1 2 3 4 5 6 7 8 9 10 11 12 13 14 15 16 1 2 3 4 5 6 7 8 9 10 11 12 13 14 15 16 EVENT GOTO COPY MODE MENU LIVE PLAY SPOT RECORD Logging on...

Страница 22: ...22...

Страница 23: ...23...

Страница 24: ...7743 Dedicated Micros USA 23456 Hawthorne Blvd Suite 100 Torrance CA 90505 USA Tel 1 310 791 8666 Fax 1 310 791 9877 Dedicated Micros Australia PTY 5 3 Packard Avenue Castle Hill NSW 2154 Australia T...

Отзывы: