background image

Large 
Gladetino

Mounting Options

Deco Lighting practices a program of continuous product improvement, and as a result product specifications change frequently. We reserve the right to change 
product specifications without notice. Contact Deco for the latest product information. 

     2917 Vail Ave., Commerce, CA 90040 • (800)613-DECO (3326) • [email protected] www.getdeco.com

2

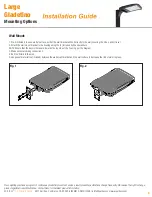
Fig. 4

Fig. 5

Slipfitter:

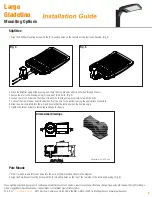
1. Align the Slipfitter mounting holes with the (2) mounting holes on the rear side of the luminaire housing. (Fig. 4)

Pole Mount:

1. Drill (1) wire hole and (2) mount holes into the pole, at the dimensions shown in the diagram.
2. Align the Pole-Mount mounting holes with the (2) mounting holes on the top of the rear side of the luminaire housing. (Fig. 6)

2. Place the Slipfitter against the housing, and route the Line, Neutral, and Ground wires through the arm.
3. Fasten the arm to the housing using (2) included 1/4-20 bolts. (Fig. 5)
4. Loosen the (4) set screws on the sides of the arm so that the pole will not interfere with the bolts.
5. Connect the Line, Neutral, and Ground wires from the pole to the luminaire using the appropriate connectors.
6. Slide the pole completely into the arm and ensure that the luminaire is at the desired angle.
7. Tighten the (4) set screws to fasten the luminaire to the pole.

Dimensional Drawings

Designed for 2-3/8” OD Pole

Содержание Large Gladetino

Страница 1: ...by a person familiar with the construction and operation of the product and the hazards involved Pole Mount Arm Mast Arm 1 Align the Pole Mount Arm mounting holes with the 4 mounting holes on the rear side of the luminaire housing Fig 1 2 Place the Pole Mount Arm against the housing and route the Line Neutral and Ground wires through the small hole in the arm 3 Fasten the arm to the housing using ...

Страница 2: ... pole at the dimensions shown in the diagram 2 Align the Pole Mount mounting holes with the 2 mounting holes on the top of the rear side of the luminaire housing Fig 6 2 Place the Slipfitter against the housing and route the Line Neutral and Ground wires through the arm 3 Fasten the arm to the housing using 2 included 1 4 20 bolts Fig 5 4 Loosen the 4 set screws on the sides of the arm so that the...

Страница 3: ...do not discard the 2 8 32 screws on the underside of the arm and open the access door 6 Place the luminaire and Pole Mount on the pole and bolt the pole mount to the pole using 2 3 8 16 Bolts along with the appropriate washers lock washers and nuts 7 Connect the Line Neutral and Ground wires from the pole to the luminaire using the appropriate connectors 8 Close the access door and secure the door...

Страница 4: ...www getdeco com 4 Wall Mount 1 Pre drill holes into a secure flat surface so that the wall bracket will bolt directly to the wall covering the J Box and sit level 2 Attach the wall mount bracket to the housing using the 2 included bolts and washers NOTE Ensure that the key slot holes are towards the top side of the housing per the diagram 3 Make necessary wiring connections 4 Bolt the fixture to t...

Отзывы: