background image

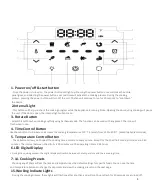
1.


Power


on/off


&

 s

tart


button

-


Once


the


power


is


turned


on,


the


power


button


will


light


up.


Pressing


the


power


button


once


will


make


the


entire

panel


glow,


and


selecting


the


power


button


a


second


time


will


activate


the


cooking


process.


During


the


cooking

process,


pressing


the


power


button


will


turn


off


the


unit.


The


fan


will


continue


to


run


for


20


seconds


to


"cool


down"

the


device.

2.Internal


Light

-


This


button


will


help


you


check


the


cooking


progress


while


the


appliance


is


running.


Note:


Opening


the


door


during


cooking


will


pause


the


unit.


If


the


door


is


open,


the


internal


light


will


come


on.

3.


Rotate


Button

- Select this button when cooking anything using barbecue mode. The function can be used with any preset. The icon will

flash when in use.

4. Time Control Button

- Use these buttons to increase or decrease the cooking temperature at 10

intervals from 150 to 400

. (Except dehydrator mode)

5. Temperature Control Button

- These buttons allow you to select the cooking time accurate to every minute. Except for the dried fruit mode, all modes are 1-60

minutes. The interval between dried fruits is 30 minutes and the operating time is 2-24 hours.

6.LED Digital Display

-

During the cooking process, the digital display will switch between the temperature and the remaining time.

7-14. Cooking Presets

- Choosing any of them will set the time and temperature as the default settings for specific foods. You can use the time

and temperature buttons to change these presets and view the cooking presets on the next page.

15.Working Indicate Lights

- During the cooking process, these lights will flash one after another, and will continue to flash for 20 seconds once turned off.

9

Содержание DCAIRD12BLK

Страница 1: ...MODEL DCAIRD12BLK DCAIRD12RED DCAIRD12STS DCAIRD12BLU When using electrical appliances basic safety precautions should Always be followed Do not use the air fryer until you have read this manual thoroughly 12 QT Digital Air Fryer View this product on decogear com ...

Страница 2: ...edge of table or counter or touch hot surfaces 10 Do not place on or near a hot gas or electric burner or in a heated oven 11 Extreme caution must be used when moving an appliance containing hot oil or other hot liquids 12 Always attach plug to appliance first then plug cord into the wall outlet To disconnect turn any control to off then remove plug from wall outlet 13 Do not use appliance for oth...

Страница 3: ...AFEGUARDS 5 Parts Accessories 7 Using the Digital Control Panel 9 Cooking Presets 10 General Operating Instructions 11 Using the Accessories 13 Cooking Chart 15 Cleaning Storage 16 Troubleshooting 16 Frquently Asked Questions 17 4 ...

Страница 4: ...r have been given proper instruction in using the appliance This appliance is NOT INTENDED FOR USE by children When cooking DO NOT PLACE the appliance against A wall or against other appliances Leave at least 5 free space on the back and sides and above the appliance Do Not place anything on top of the appliance DO NOT USE this Unit if the plug the power cord or the appliance itself is damaged in ...

Страница 5: ...a golden yellow color rather than dark or brown Remove burnt remnants Overheating Protection Should the inner temperature control system fail the overheating protection system will be activated and the Unit will not function Should this happen unplug the power cord Allow time for the UNIT to cool completely before restarting or storing Automatic Shut off The appliance has a built in shut off devic...

Страница 6: ...Rotisserie Air Fryer Parts Accessories 1 Main Unit 2 Rotating basket 3 chicken fork 4 Rotisserie Shaft 5 Fetch rack 6 Skewers 10 7 Adjustable Skewers Racks 2 8 Oil tray 9 Dehydrating rack 7 ...

Страница 7: ...cks Can be used not only for dehydration but also to cook Crispy snacks or reheat items like pizza Important Please make sure that you rotisserie air fryer has been shipped with the components that you ordered as some accessories may be sold separately Check everything carefully before use If any part is missing or damaged do not sure this product Contact shipper using the customer service number ...

Страница 8: ... when in use 4 Time Control Button Use these buttons to increase or decrease the cooking temperature at 10 intervals from 150 to 400 Except dehydrator mode 5 Temperature Control Button These buttons allow you to select the cooking time accurate to every minute Except for the dried fruit mode all modes are 1 60 minutes The interval between dried fruits is 30 minutes and the operating time is 2 24 h...

Страница 9: ...et Button Cooking Chart Cooking time for while roasted chicken will vary with weight Use meat thermometer to check internal temperature as per chart below Using the Rotisserie Air Fryer Without Presets Once you are familiar with the Rotisserie air fryer you may want to experiment with your own Warning Never use a cooking vessel filled with cooking oil or any other liquid with this unit Fire hazard...

Страница 10: ...esistant surface 2 Select the cooking accessory for your recipe A Versatile Appliance The Rotisserie Air Fryer is designed to cook a wide variety of your favorite foods The charts and tables provided within this manual and the Recipe Guide will help you get great results Please refer to this information for proper time temperature settings and proper food quantities Warning NEVER put anything on t...

Страница 11: ... halfway through the cooking process assures that all the pieces are evenly fired Misting a bit of vegetable oil to fresh potatoes is suggested for a crispier result When adding a little oil do so just before cooking Snacks normally cooked in air fryer can also be cooked in the Rotisserie air fryer Use pre made dough to prepare filled snacks quickly and easily Pre make dough also requires a shorte...

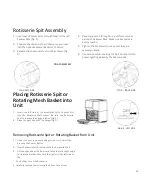
Страница 12: ...ABB B Components SKEWER RACK x2 FRONTAL VIEW ROTISSERIE SHAFT LEFT SIDE RIGHT SIDE SKEWERS x10 SET SCREWS x2 Rotisserie Shaft Skewers Racks 1 Place the two Skewer Racks at each end of the Rotisserie Shaft Make sure the Set Screws are on the outer side of the Rotisserie Shaft 2 Slightly tighten Set Screws Do not over tighten as you may need to adjust the tightness after you insert the Skewers 3 Car...

Страница 13: ... LEFT SIDE FIG D RIGHT SIDE Placing Rotisserie Spit or Rotating Mesh Basket into Unit 1 Insert the left side of the assembled Spit or Basket first into the Rotisserie Shaft socket Be sure the Rotisserie Shaft is in place to engage rotation fig E 2 Place the right side onto the hanger fig F ABB E LEFT SIDE Removing Rotisserie Spit or Rotating Basket from Unit 1 Open Unit door to pause cooking cycle...

Страница 14: ... in the clean dry place Troubleshooting Problem Possible Cause Lösung The Rotisserie air fryer does not work The appliance is not plugged in You have not turned the Unit on by setting the preparation time temperature Plug power cord into wall socket With basket in place set the Temperature and Time Check that door is closed Food not cooked The Rotating Mesh Basket is over loaded The temperature is...

Страница 15: ...cook time to compensate 3 Is it possible to shut off the Unit at any time Press the Power Button once or open the door 6 Can I check the food during the cooking process YoucanremovetheRotatingMeshBasketatanytimewhile cookingisinprogress Duringthistime youcan flip the contentsontheAirFlowRacksif neededtoensureeven cooking Timeandtemperaturewillresumewhereyouleft off 7 Is the Rotisserie air fryer di...

Страница 16: ......

Отзывы: