background image

GB

12

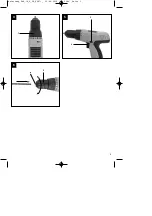
6.2 Torque setting (Fig. 4 / Item 1)

The cordless screwdriver is fitted with a mechanical
torque selector.

The torque for a specific size of screw is selected
with the set-collar (1). The correct torque depends on
several factors:

on the type and hardness of material in question

on the type and length screws used

on the requirements needing to be met by the 
screwed joint.

The clutch disengages with a grating sound to
indicate when the set torque is reached.

Important! The tool must be at a standstill when
you set the torque with the setting ring.

6.3 Drilling (Fig. 4 / Item 1)

For drilling purposes, move the set-collar to the last
step „Drill“. In this setting the slip clutch is inactive.
The maximum torque is available in drilling mode.

6.4 Forward/Reverse switch (Fig. 5 / Item 3)

With the slide switch above the On/Off switch you
can select the direction of rotation of the battery-
powered drill/screwdriver and secure it against being
switched on accidentally. You can choose between
clockwise and anticlockwise rotation. To avoid
causing damage to the gearing it is advisable to
change the direction of rotation only when the tool is
at a standstill. The On/Off switch is blocked when the
slide switch is in centre position.

6.5 On/Off switch (Fig. 5 / Item 4)

Infinitely variable speed control is possible with the
On/Off switch. The further you press the switch, the
higher the speed of the battery-powered
drill/screwdriver. 

6.6 Changing the tool (Fig. 6)
Important. 

Set the changeover switch (3) to its

centre position whenever you carry out any work (for
example changing the tool, maintenance work, etc.)
on the cordless screwdriver.

Open the chuck (2). The chuck opening (a) must
be large enough to hold the tool (drill bit or
screwdriver bit).

Select the suitable tool. Push the tool as far as
possible into the chuck opening (a).

Tighten the chuck (2) and then check that the
tool is secure.

6.7 Screwdriving

We recommend using self-centering screws (e.g.
Torx screws, recessed head screws) designed for
reliable working. Be sure to use a bit that matches
the screw in shape and size. Set the torque, as
described elsewhere in these operating instructions,
to suit the size of screw.

7.  Cleaning, maintenance and ordering

of spare parts

Always pull out the mains power plug before starting
any cleaning work.

7.1 Cleaning

Keep all safety devices, air vents and the motor 
housing free of dirt and dust as far as possible. 
Wipe the equipment with a clean cloth or blow it 
with compressed air at low pressure.

We recommend that you clean the device 
immediately each time you have finished using it.

Clean the equipment regularly with a moist cloth 
and some soft soap. Do not use cleaning agents 
or solvents; these could attack the plastic parts
of the equipment. Ensure that no water can seep
into the device.

7.2 Maintenance

There are no parts inside the equipment which 
require additional maintenance.

7.3 Ordering replacement parts

Please quote the following data when ordering
replacement parts:

Type of machine

Article number of the machine

Identification number of the machine

Replacement part number of the part required

8. Disposal and recycling

The unit is supplied in packaging to prevent its being
damaged in transit. This packaging is raw material
and can therefore be reused or can be returned to
the raw material system.
The unit and its accessories are made of various
types of material, such as metal and plastic.
Defective components must be disposed of as
special waste. Ask your dealer or your local council.

Anleitung_EAS_14_4_2B_SPK7:_  01.06.2010  8:49 Uhr  Seite 12

Содержание 45.131.57

Страница 1: ...I Nr 11010 EAS 14 4 2B k Originalbetriebsanleitung Akku Bohrschrauber t Original operating instructions Cordless Drill Z Orijinal Kullanma Talimatı Akülü Vidalama Anleitung_EAS_14_4_2B_SPK7 _ 01 06 2010 8 49 Uhr Seite 1 ...

Страница 2: ...2 1 2 1 3 8 2 3 5 4 1 2 5 6 8 1 7 5 a 1 2 7 6 Anleitung_EAS_14_4_2B_SPK7 _ 01 06 2010 8 49 Uhr Seite 2 ...

Страница 3: ...3 4 1 5 4 6 a 3 2 Anleitung_EAS_14_4_2B_SPK7 _ 01 06 2010 8 49 Uhr Seite 3 ...

Страница 4: ...Staubschutzmaske Beim Bearbeiten von Holz und anderer Materialien kann gesundheitsschädlicher Staub entstehen Asbesthaltiges Material darf nicht bearbeitet werden Tragen Sie eine Schutzbrille Während der Arbeit entstehende Funken oder aus dem Gerät heraustretende Splitter Späne und Stäube können Sichtverlust bewirken Anleitung_EAS_14_4_2B_SPK7 _ 01 06 2010 8 49 Uhr Seite 4 ...

Страница 5: ...n falls vorhanden Überprüfen Sie ob der Lieferumfang vollständig ist Kontrollieren Sie das Gerät und die Zubehörteile auf Transportschäden Bewahren Sie die Verpackung nach Möglichkeit bis zum Ablauf der Garantiezeit auf ACHTUNG Gerät und Verpackungsmaterial sind kein Kinderspielzeug Kinder dürfen nicht mit Kunststoffbeuteln Folien und Kleinteilen spielen Es besteht Verschluckungs und Erstickungsge...

Страница 6: ...Sie dieses Elektrowerkzeug vorschriftsmäßig bedienen bleiben immer Restrisiken bestehen Folgende Gefahren können im Zusammenhang mit der Bauweise und Ausführung dieses Elektrowerkzeuges auftreten 1 Lungenschäden falls keine geeignete Staubschutzmaske getragen wird 2 Gehörschäden falls kein geeigneter Gehörschutz getragen wird 3 Gesundheitsschäden die aus Hand Arm Schwingungen resultieren falls das...

Страница 7: ...erden Befindet sich der Schiebeschalter in der Mittelstellung ist der Ein Aus Schalter blockiert 6 5 Ein Aus Schalter Abb 5 Pos 4 Mit dem Ein Aus Schalter können Sie die Drehzahl stufenlos steuern Je weiter Sie den Schalter drücken desto höher ist die Drehzahl des Akkuschraubers 6 6 Werkzeugwechsel Bild 6 Achtung Stellen Sie bei allen Arbeiten z B Werkzeugwechsel Wartung usw am Akkuschrauber den D...

Страница 8: ...Rohstoff und ist somit wieder verwendbar oder kann dem Rohstoffkreislauf zurückgeführt werden Das Gerät und dessen Zubehör bestehen aus verschiedenen Materialien wie z B Metall und Kunststoffe Führen Sie defekte Bauteile der Sondermüllentsorgung zu Fragen Sie im Fachgeschäft oder in der Gemeindeverwaltung nach 9 Lagerung Lagern Sie das Gerät und dessen Zubehör an einem dunklen trockenen und frostf...

Страница 9: ...thing mask Dust which is injurious to health can be generated when working on wood and other materials Never use the device to work on any materials containing asbestos Wear safety goggles Sparks generated during working or splinters chips and dust emitted by the device can cause loss of sight Anleitung_EAS_14_4_2B_SPK7 _ 01 06 2010 8 49 Uhr Seite 9 ...

Страница 10: ...the packaging until the end of the guarantee period IMPORTANT The equipment and packaging material are not toys Do not let children play with plastic bags foils or small parts There is a danger of swallowing or suffocating Cordless Drill 2x Battery pack Battery charger Charging adapter Original operating instructions Safety instructions 3 Proper use The cordless drill screwdriver is designed for t...

Страница 11: ...is used over a prolonged period or is not properly guided and maintained 5 Before starting the equipment Be sure to read the following information before you use your cordless screwdriver for the first time 1 Charge the battery pack only with the charger supplied 2 Only ever use sharp drill bits and screwdriver bits which are suitable for the purpose and in faultless condition 3 Always check for c...

Страница 12: ...e enough to hold the tool drill bit or screwdriver bit Select the suitable tool Push the tool as far as possible into the chuck opening a Tighten the chuck 2 and then check that the tool is secure 6 7 Screwdriving We recommend using self centering screws e g Torx screws recessed head screws designed for reliable working Be sure to use a bit that matches the screw in shape and size Set the torque a...

Страница 13: ...ssories out of children s reach in a dark and dry place at above freezing temperature The ideal storage temperature is between 5 and 30 C Store the electric tool in its original packaging Anleitung_EAS_14_4_2B_SPK7 _ 01 06 2010 8 49 Uhr Seite 13 ...

Страница 14: ...çabilir Toz maskesi tak n Ahμap ve di er malzemeler üzerinde çal μ ld nda sa l a zarar veren tozlar oluμabilir Asbest içeren malzemelerin iμlenmesi yasakt r μ gözlü ü kullan n Çal μma esnas nda oluμan k v lc m veya aletten d μar f rlayan k ym k talaμ ve tozlar gözlere zarar verebilir Anleitung_EAS_14_4_2B_SPK7 _ 01 06 2010 8 49 Uhr Seite 14 ...

Страница 15: ... edin Alet ve aksesuar parçalarının transport esnasında hasar görüp görmediğini kontrol edin Garanti süresi doluncaya kadar mümkün olduğunda ambalaj malzemelerini saklayın DİKKAT Alet ve ambalaj malzemeleri oyuncak değildir Çocukların plastik poşet folyo ve küçük parçalar ile oynaması yasaktır Çocukların küçük parçaları yutma ve poşetler nedeniyle boğulma tehlikesi vardır Akülü Vidalama Akü Şarj c...

Страница 16: ...limatına uygun şekilde kullansanız dahi yine de bazı riskler mevcut kalır Bu elektrikli aletin yapı türü ve modeli itibari ile aşağıda açıklanan tehlikeler meydana gelebilir 1 Uygun bir toz maskesi takılmadığında akciğer hasarlarının oluşması 2 Uygun bir kulaklık takılmadığında işitme hasarlarının oluşması 3 Elektrikli alet uzun süre kullanıldığında veya talimatlara göre kullanılmadığında veya bak...

Страница 17: ...i ile devir deπerini kademesizce ayarlayabilirsiniz Ωalteri ne kadar ileri bast r rsan z devir deπeri o kadar yükselir 6 6 Takım değiştirme Şekil 6 Dikkat Akülü vidalama makinesi üzerinde yapacağınız tüm çalışmalarda örneğin takım değiştirme Bakım vs dönme yönü şalterini 3 orta pozisyona ayarlayınız Mandreni 2 döndürerek açın Mandren ağzı açıklığı a takımı matkap ucu ve veya vidalama ucu takmak iç...

Страница 18: ...verin Bu sistemin nerede oldu unu bayinizden veya yerel yönetimlerden ö renebilirsiniz 9 Depolama Alet ve aksesuar parçalarını karanlık kuru ve dona karşı korunmuş ve çocukların erişemeyeceği bir yerde saklayın Optimal depolama sıcaklığı 5 ve 30 C arasındadır Elektrikli aleti orijinal ambalajı içinde saklayın KULLANIM ÖMRÜ 10 YIL İthalatçı firma EINHELL İNTRATEK MÜHENDİSLİK VE DIŞ TİCARET A Ş Atat...

Страница 19: ...19 Anleitung_EAS_14_4_2B_SPK7 _ 01 06 2010 8 49 Uhr Seite 19 ...

Страница 20: ...20 Anleitung_EAS_14_4_2B_SPK7 _ 01 06 2010 8 50 Uhr Seite 20 ...

Страница 21: ...21 Anleitung_EAS_14_4_2B_SPK7 _ 01 06 2010 8 50 Uhr Seite 21 ...

Страница 22: ...toarea conformitate conform directivei UE şi normelor pentru articolul z δηλώνει την ακόλουθη συμμόρφωση σύμφωνα με την Οδηγία ΕΚ και τα πρότυπα για το προϊόν B potvrđuje sljedeću usklađenost prema smjernicama EU i normama za artikl f potvrđuje sljedeću usklađenost prema smjernicama EU i normama za artikl 4 potvrđuje sledeću usklađenost prema smernicama EZ i normama za artikal T следующим удостове...

Страница 23: ...to returning the electrical device the owner is obliged to cooperate in ensuring that the device is properly recycled if ownership is relinquished This can also be done by handing over the used device to a returns center which will dispose of it in accordance with national commercial and industrial waste management legislation This does not apply to the accessories and auxiliary equipment without ...

Страница 24: ...24 Technische Änderungen vorbehalten Technical changes subject to change Teknik de iμiklikler olabilir Anleitung_EAS_14_4_2B_SPK7 _ 01 06 2010 8 50 Uhr Seite 24 ...

Страница 25: ...ing or reproduction by any other means in whole or in part of documentation and papers accompanying products is permitted only with the express consent of ISC GmbH Ürünlerinin dokümantasyonu ve evraklar n n k smen olsa dahi kopyalanmas veya baμka μekilde ço alt lmas yaln zca ISC GmbH firmas n n özel onay al nmak μart yla serbesttir Anleitung_EAS_14_4_2B_SPK7 _ 01 06 2010 8 50 Uhr Seite 25 ...

Страница 26: ...26 Anleitung_EAS_14_4_2B_SPK7 _ 01 06 2010 8 50 Uhr Seite 26 ...

Страница 27: ...27 Anleitung_EAS_14_4_2B_SPK7 _ 01 06 2010 8 50 Uhr Seite 27 ...

Страница 28: ...EH 05 2010 01 Anleitung_EAS_14_4_2B_SPK7 _ 01 06 2010 8 50 Uhr Seite 28 ...

Отзывы: