DBI SALA Exofit Скачать руководство пользователя страница 18

18

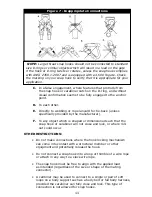
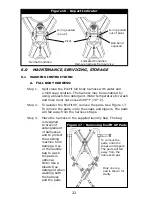
Figure 14 - ExoFit Quick Connect Buckle Connections

Hip Strap:

 Attach chest strap 

by inserting the tab of the 

buckle into the receptor of the 

quick connect buckle until a 

click is heard

Leg Straps: 

Attach leg strap by 

inserting the tab of the buckle 

into the receptor of the quick 

connect buckle until a click is 

heard

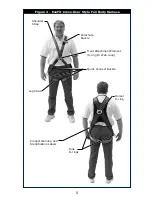
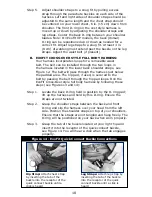
Step 5.  Adjust shoulder straps to a snug fit by pulling excess 

strap through the parachute buckles on each side of the 

harness. Left and right sides of shoulder straps should be 

adjusted to the same length and the chest strap should 

be centered on your lower chest, 6 in. (15 cm) down from 

shoulder. The front D-ring on the vest style harness is 

moved up or down by adjusting the shoulder straps and 

leg straps. Center the back D-ring between your shoulder 

blades. Note: On ExoFit XP models, the back (dorsal) 

D-ring can be repositioned up or down as needed for a 

correct fit. Adjust leg straps to a snug fit. At least 3 in. 

(8 cm) of webbing must extend past the buckle on the leg 

straps. Adjust the waist belt (if present).

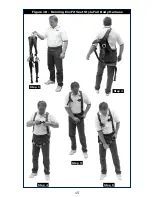
B.  EXOFIT CROSS-OVER STYLE FULL BODY HARNESS: 

Your harness incorporates loops for a removable waist 

belt. The belt can be installed through the two loops in 

the harness located in the lower back shoulder straps, see 

Figure 12. The belt will pass through the harness just below 

the padded area. The hip pad, if used, is secured to the 

belt by passing the belt through the hip pad loops. Don the 

ExoFit Cross-Over style full body harness by following these 

steps (see Figures 13 and 14):

Step 1.  Locate the back D-ring held in position by the D-ring pad; 

lift up the harness and hold by this D-ring. Ensure the 

straps are not twisted.

Step 2. 

Grasp the shoulder straps between the back and front 

D-ring and slip the harness over your head from the left 

side. Position the shoulder straps on top of your shoulders. 

Ensure that the straps are not tangled and hang freely. The 

D-ring will be positioned on your back when worn properly.

Step 3.  Grasp the tab of the buckle located at your right hip and 

insert it into the receptor of the quick connect buckle, 

see Figure 13. You will hear a click when the tab engages 

properly.

Содержание Exofit

Страница 1: ...tions as required by ANSI Z359 and should be used as part of an employee training program as required by OSHA Copyright 2008 DB Industries Inc Instructions for the following series products ExoFit Ful...

Страница 2: ......

Страница 3: ...serious injury or death IMPORTANT If you have questions on the use care or suitability of this equipment for your application contact DBI SALA IMPORTANT Before using this equipment record the product...

Страница 4: ...4 Figure 1 ExoFit Vest Style Full Body Harness Chest Strap Shoulder Strap Parachute Buckle Quick Connect Buckle Leg Strap Quick Connect Buckle Product Warning and Identification Labels Dorsal D ring...

Страница 5: ...Fit Cross Over Style Full Body Harness Leg Strap Quick Connect Buckle Parachute Buckle Shoulder Strap Front Attachment Element D ring Or Web Loop Side D rings Dorsal D ring Product Warning and Identif...

Страница 6: ...emergency use of this equipment A PERSONAL FALL ARREST The full body harness is used as a component of a personal fall arrest system Personal fall arrest systems typically include a full body harness...

Страница 7: ...or two frontal mounted D rings or a pair of connectors originating below the waist such as a seat sling may be used for connection to a descender or evacuation system E RESTRAINT The full body harnes...

Страница 8: ...must be rigged so that free fall is limited to 18 inches 5 m or less Rescue systems must be rigged so that no vertical free fall is possible See subsystem manufacturer s instructions for more informat...

Страница 9: ...tions to prevent injury to the user or damage to the equipment Hazards may include but are not limited to heat chemicals corrosive environments high voltage power lines gases moving machinery and shar...

Страница 10: ...DBI SALA connectors snap hooks and carabiners are designed to be used only as specified in each product s user instructions See Figure 3 for inappropriate connections DBI SALA snap hooks and carabine...

Страница 11: ...ded by the manufacturer F To any object which is shaped or dimensioned such that the snap hook or carabiner will not close and lock or where roll out could occur Other Restrictions Do not make connect...

Страница 12: ...NSI 359 1 for these application types A Fall Arrest Anchorages selected for fall arrest systems shall have a strength capable of sustaining static loads applied in the directions permitted by the syst...

Страница 13: ...ive times the foreseeable force for certified anchorages When more than one rescue system is attached to an anchorage the strengths set forth in 1 and 2 above shall be multiplied by the number of syst...

Страница 14: ...arness See Figure 9 for front and back views of the ExoFit Vest style full body harness Your harness incorporates loops for a removable waist belt The belt can be installed through the two loops in th...

Страница 15: ...15 Figure 10 Donning ExoFit Vest Style Full Body Harness Step 3 Step 1 Step 2 Step 3 Step 4 Step 5...

Страница 16: ...the tab engages properly The chest strap should be 6 in 15 cm down from the top of your shoulders Pass excess strap through the loop keepers The strap may be tightened to a snug fit by pulling the fre...

Страница 17: ...17 Figure 13 Donning ExoFit Cross Over Style Full Body Harness Step 1 Step 2 Step 4 Step 3 Step 5...

Страница 18: ...the buckle on the leg straps Adjust the waist belt if present B ExoFit Cross Over Style Full Body Harness Your harness incorporates loops for a removable waist belt The belt can be installed through...

Страница 19: ...straps to a snug fit At least 3 in 8 cm of webbing must extend past the buckle on the leg straps Adjust the waist belt if present 3 4 USE OF FALL ARREST D RING OR ATTACHMENT ELEMENT For fall protecti...

Страница 20: ...handheld reading device and the web based portal to simplify inspection and inventory control and provide records for your fall protection equipment See Figure 15 5 2 FREQUENCY Before each use inspec...

Страница 21: ...discoloration Inspect stitching check for pulled or cut stitches Broken stitches may be an indication that the harness has been impact loaded and must be removed from service When performing the annua...

Страница 22: ...harness straps Step 3 Place the harness in the supplied laundry bag The bag is designed to prevent entanglement of harnesses and to protect the washing machine from damage Use of the laundry bag to w...

Страница 23: ...and clean each side using a mild bleach free detergent with a sponge or light brush so as not to damage or bulk up the filaments Rinse throroughly Important ASTM F887 2004 rated harnesses should use a...

Страница 24: ...rization must be in writing Do not attempt to disassemble the unit 6 3 Store the full body harnesses in a cool dry clean environment out of direct sunlight Avoid areas where chemical vapors may exist...

Страница 25: ...rd otherwise referred to as user for the purpose of these instructions Rescuer Person or persons other than the rescue subject acting to perform an assisted rescue by operation of a rescue system Cert...

Страница 26: ...1 Labels are enclosed in an attached fabric wrap located on the back right shoulder strap as the harness is being worn If a waist belt is to be worn with the harness be careful not to enclose the belt...

Страница 27: ...27 Cover Instruction Label Vest Style Cover Instruction Label Cross Over Style Inspection Label Web Loop Harness Label 9 1 Labeling continued...

Страница 28: ...R DATE PURCHASED INSPECTION DATE INSPECTION ITEMS NOTED CORRECTIVE ACTION MAINTENANCE PERFORMED Approved By Approved By Approved By Approved By Approved By Approved By Approved By Approved By Approved...

Страница 29: ...08513 1108514 1108515 1108516 1108517 1108518 1108519 1108521 1108522 1108523 1108524 1108525 1108526 1108527 1108531 1108532 1101493 1101560 1101561 1101562 1101563 1101564 1101590 1101591 1101592 11...

Страница 30: ...873 1110880 1110881 1110882 1110883 1110884 1110885 1110886 1110887 1110888 1110889 1110890 1110891 1110892 1110893 1110894 1110900 1110901 1110902 1110903 1110904 1110910 1110911 1110912 1110913 1110...

Страница 31: ......

Страница 32: ...fective items DBI SALA reserves the right to elect to have any defective item returned to its plant for inspection before making a repair or replacement This warranty does not cover equipment damages...

Отзывы: