background image

Troubleshooting, Repair, & Warranty

Page 50

Vantage Pro Manual

R

ADIO

 T

RANSMISSION

 D

IAGNOSTIC

 S

CREEN

As part of Davis’ emphasis on customer service, we include here some infor-
mation on Vantage Pro’s diagnostic screen. The information can help you diag-
nose problems; however, it’s probably best used in conjunction with a call to 
Davis Technical Support.

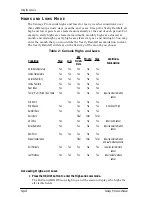
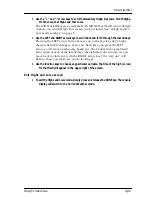
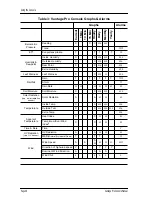
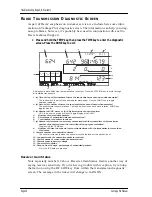
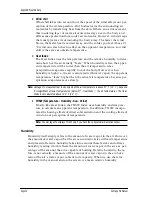
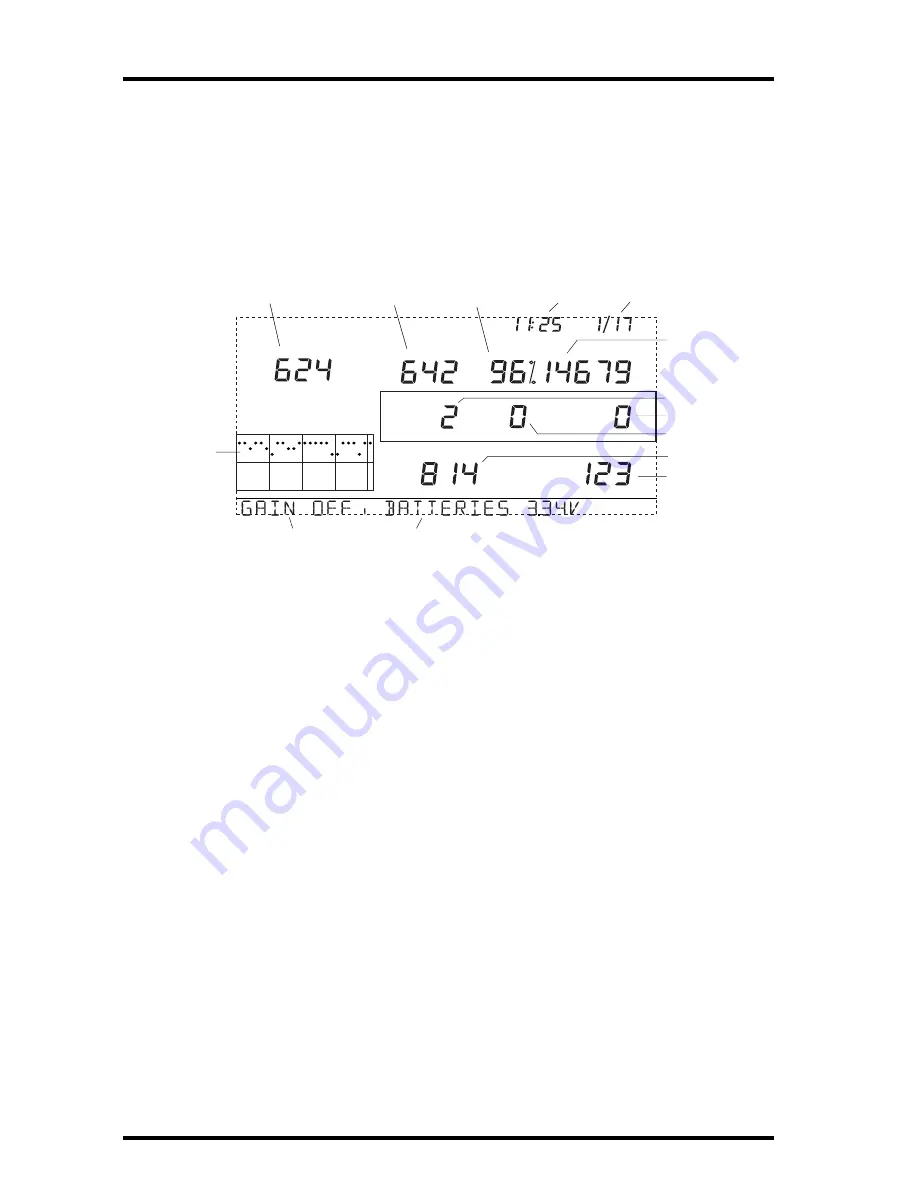
• Press and hold the TEMP key, then press the TIME key to enter the diagnostic 

screen. Press the DONE key to exit.

Receiver Gain Status

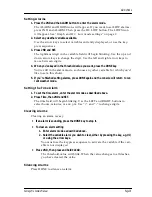
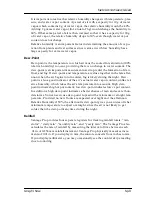
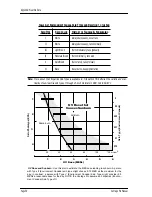
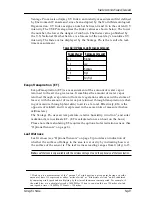
Note especially number 12 above, Receiver Gain Status. Gain is another way of 
saying receiver sensitivity. If you’re having trouble with reception, try turning 
the Gain on using the HI/LOW key from within the transmission diagnostic 
screen. The message in the ticker will change to GAIN ON.

Vertical Scale:           1 0

STATION NO.       5

am

Last  24      days

  day

Every 1 

1

2

3

4

5

6

7

8

9

10

11

12

13

14

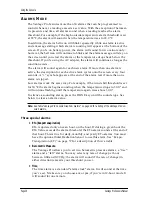
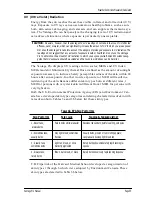
All diagnostic data fields clear automatically at midnight. Press the STATION key to cycle through 
all installed transmitters.

1. (a) Time of day or (b) number of times the reed switch was seen open when sampled.

The reed switch is part of the anemometer mechanism. Use the WIND key to toggle 
between readings.

2. (a) Date or (b) number of times the reed switch was seen closed when sampled.

The anemometer counts rotations. The reed switch closes once each rotation. WIND key 
toggles display.

3. (a) Number of CRC errors or (b) 8 bit timer value of next reception.

CRC is an error checking protocol. Toggle display with CHILL.

4.      Number of missed data packets.
5.      Percentage of scheduled data packets received.
6.      Total number of packets received.
7. (a) Number of times the console resynchronized with the transmitter or (b) maximum

number of packets missed in a row without losing synchronization.

Toggle using the TEMP key.

8.      Number of times the console lost communications with the transmitter for more than

10 minutes.

9. Current number of consecutive misses.

The counter increments when the console is synchronized but the packet is not.

10. Longest streak of consecutive packets received.
11. Current streak of consecutive packets received.
12. Current console battery voltage
13. Console Gain Status
14. Graph of last 24 days’ percentage of scheduled packets. 

Only the ISS data are graphed.

Содержание and Vantage Pro

Страница 1: ...Weather Station Product 6310 6310EU 6310UK 6310C 6310CEU 6310CUK N S W E NE SE NW SW CHILL WIND RAIN RATE in hr TEMP OUT HUM IN HUM OUT DAILY RAIN in TEMP IN inmb BAROMETER STATION NO 1 F F pm F MPH Last 24 hrs hr Every 1 N W S E N ...

Страница 2: ... IN hPa BAROMETER F F F 13 14 10 11 12 1 5 2 3 7 6 4 8 9 Display Features 1 Compass Rose 2 Graph and Hi Low mode settings 3 Forecast Icons 4 Moon Phase Indicator 5 Time Sunrise Time 6 Date Sunset Time 7 2nd button indicator 8 Barometric Trend Arrow 9 Graph Icon 10 Current Rain Icon 11 Station Number Indicator 12 Weather Ticker 13 Graph Field 14 Alarm icon ...

Страница 3: ... console and the Integrated Sensor Suite ISS 13 DISPLAYING THE CONSOLE 14 Table Shelf Display 14 Wall Display 15 USING THE CONSOLE 19 SETUP MODE 19 Entering Exiting Setup Mode 19 Setup Mode Screens 19 Screen 1 ActiveTransmitters 20 Screen 2 Selecting transmitters 20 Screen 3 Retransmit 22 Screen 4 Time Date 22 Screen 5 Latitude 23 Screen 6 Longitude 23 Screen 7 Time Zone 23 Screen 8 Daylight Savin...

Страница 4: ...e units for any variable 32 Calibrating Setting and Clearing Variables 33 Calibration 33 Setting Variables 34 Clearing variables 34 HIGHS AND LOWS MODE 36 Accessing Highs and Lows 36 Exit Highs and Lows screen 37 ALARMS MODE 38 Three special alarms 38 Setting Alarms 39 Setting the Time Alarm 39 Clearing Alarms 39 Silencing Alarms 39 GRAPH MODE 42 Entering and Exiting Graph Mode 42 Using and Unders...

Страница 5: ...Vantage Pro Manual Page 5 RADIO TRANSMISSION DIAGNOSTIC SCREEN 50 Receiver Gain Status 50 APPENDIX WEATHER DATA 51 SPECIFICATIONS 59 DEVICE 62 ...

Страница 6: ...Page 6 Vantage Pro Console Manual ...

Страница 7: ...ing histori cal weather data Station Versions The Vantage Pro System is available in two models Cabled and Wireless Cabled Vantage Pro System The Cabled Vantage Pro system links the Integrated Sensor Suite ISS to the console using standard four conductor cable Wireless Vantage Pro The wireless Vantage Pro console receives data transmitted by radio from the solar powered ISS Neither the ISS nor the...

Страница 8: ...r may be ordered directly from Davis Instru ments Please be aware that some options work with wireless units only Solar Radiation Sensor 6450 Measures solar radiation Also required for calculating evapotranspira tion see EvapoTranspiration ET on page 57 Available for cabled and wireless stations Requires Sensor Mounting Shelf 6672 See Optional Accessories on page 9 Ultraviolet UV Radiation Sensor ...

Страница 9: ... Software 6510C Logs data gathered by the Vantage Pro downloads it to your PC and generates reports and graphical displays Storage interval 1 5 10 15 30 60 or 120 minutes is set by the user The data logger will store approximately 2 9 18 27 53 107 or 213 days worth of data depending on the selected storage interval Windows compatible software lets you analyze plot print sort and summarize the data...

Страница 10: ...Welcome to Vantage Pro Page 10 Vantage Pro Console Manual ...

Страница 11: ...ay older Davis stations did Use only a Davis Vantage Pro AC power adapter Using an older Davis adapter will damage your Vantage Pro Powering your Vantage Pro Cabled Console Because the cabled Vantage Pro console supplies power to the ISS through the connecting cable you must use the AC power adapter or the optional Car Boat RV Lighter Cord to supply primary power The three C cell batteries provide...

Страница 12: ...wn on a flat firm surface Insert a finger tip between the two exposed batteries Press the middle battery down toward the notch toward the hidden battery This will relieve the tension on the first battery and allow you to withdraw it 3 Replace the battery cover After power up the Vantage Pro will automatically enter Setup mode Setup mode will lead you through setting up and calibrating your station...

Страница 13: ... the rain bucket back and forth You should see rain registering Check the other fields to ensure you re receiving from them too Establishing reception between the Wireless Vantage Pro console and the Integrated Sensor Suite ISS As you position your console be aware of possible interference from cordless phones and other items To prevent interference maintain a distance of 10 feet between the Vanta...

Страница 14: ... console on a wall choose an inner or interior wall Avoid walls that heat up or cool down depending on the weather Table Shelf Display The kickstand may be set at five different angles appropriate for different dis play angles 1 Lean the kickstand out by pulling on its top edge You ll see the indentation for your finger at the top edge of the console 2 Slide the catch to arrest the kickstand in th...

Страница 15: ...e wall attach the console over an empty switch box 2 Use an electric drill with a 3 32 or 7 64 drill bit to make pilot holes in these locations 3 Using a screwdriver drive the two 6 x 1 pan head self threading screws into the wall Leave at least 1 8 between the wall the the heads of the screws 4 Retract the kickstand into its upright and locked position 5 Slide the keyholes on the back of the cons...

Страница 16: ...Console Installation Page 16 Vantage Pro Manual ...

Страница 17: ...Displaying the Console Vantage Pro Manual Page 17 Use this template to hang the console on a wall ...

Страница 18: ...Console Installation Page 18 Vantage Pro Manual ...

Страница 19: ...s enter calibration numbers set up and view graphs select sensors read the forecast and so on The console operates in five different modes Setup Current Weather Highs and Lows Alarm and Graph SETUP MODE Setup Mode lets you choose settings that determine how your Vantage Pro sta tion operates Entering Exiting Setup Mode The console will automatically enter Setup Mode when you first power up Later i...

Страница 20: ...e can receive Press and release the DONE key to move to screen 2 Each wireless console receiver may receive signals from up to eight different transmitters however only certain combinations of transmitters are possible Table 1 below lists the maximum numbers of transmitter types each console receiver can handle Screen 2 Selecting transmitters Use setup screen 2 to tell the console receiver which t...

Страница 21: ...cti vate reception of that ID code As each different ID lights on the screen the ticker will display the word ON or OFF ON means the console receiver will listen to that transmitter s signal OFF means the console receiver will ignore signals from that transmitter Now press the GRAPH key to change the type of station assigned to each transmitter number When a station is listed as ON one of the poss...

Страница 22: ...NE key to move to screen 4 Screen 4 Time Date On first power up the time and date are set to the factory default January 1 2000 12 00 midnight Enter Time Press and release 2ND then UNITS if you wish to change from the 12 to the 24 hour clock then use the or key to change the hour Press the RIGHT arrow key to move to the minutes field then use or key to change the minutes Enter Date Press and relea...

Страница 23: ...de lines You can also talk to the reference department of your local library or try calling your local airport The more accurate you are the better however a reasonable estimate will work too Use the LEFT and RIGHT arrow keys to move between fields Use the and arrow keys to change digits Press 2ND then UNITS to specify North or South of the equator Press and release the DONE key to move to screen ...

Страница 24: ...e Auto or Manual Most users in North Amer ica including Mexico excepting Saskatchewan Indiana Arizona and Hawaii as well as users in Australia and Europe may choose the AUTO set ting The console is pre programmed with appropriate starting and stopping dates for Daylight Savings Time for the regions listed above as long as you have entered your correct time zone in screen 7 Users not living in the ...

Страница 25: ...elect digits Use the UNITS key to select feet or meters Press and release the DONE key to move to Setup screen 11 The more accurate you are the better however a reasonable estimate will work too Screen 11 Wind Cup Size All Vantage Pro Stations come with large wind cups Switch this setting to small only if you have separately purchased and installed small wind cups Use the and arrow keys to switch ...

Страница 26: ...ld you must specify the month you wish your yearly rain data to begin January is the default Use the and arrows to select the appropriate month Exiting Setup Mode Press and hold down the DONE key to exit setup mode The screen will return to the current conditions screen Re enter setup mode at any time by pressing and holding the DONE key then pressing the key ...

Страница 27: ...detailed descriptions of weather variables and their mea surements in Appendix Weather Data starting on page 51 Wind Speed and Direction Wind Speed Press the WIND key to select the wind speed field Wind speed may be displayed in miles per hour mph kilometers per hour kph meters per second m s and knots knots Press 2ND and UNITS to change the units Wind Direction The solid arrow within the compass ...

Страница 28: ...idity Wind Chill Current Wind Chill Press and release the 2ND key then press the CHILL key to select the Wind Chill field Note that the console calculates wind chill based on the ten minute average wind speed Wind Chill is displayed in either degrees Fahrenheit ºF or Centigrade ºC Dew Point Current Dew Point Press and release the 2ND key then press the DEW PT key to select the Dew Point field Dew ...

Страница 29: ...ee hours of pressure data is available whether the barometric pressure is selected or not UV Ultraviolet Radiation Current UV Press the UV key to display the current UV Index Press again to see MEDS See UV Ultra Violet Radiation on page 55 Heat Indices Heat Index Press and release the 2ND key then press the HEAT key to display the Heat Index See Apparent Temperature Measures on page 51 ET BAR N W ...

Страница 30: ...splays the precipitation accumulated since the calendar month began Month to date precipitation is displayed in inches in or millimeters mm Year to date precipitation Press the RAINYR key a third time to display the year to date precipitation record Yearly rain displays the precipitation accumulated since the 1st of the month you ve chosen in Setup Mode See Screen 13 Rain Season on page 26 Year to...

Страница 31: ... as either millimeters mm or inches in Solar Radiation Current Solar Radiation Press and release the 2ND key then press the SUN key to display the current solar radiation reading Solar radiation is displayed as Watts per square meter W m2 Note To display solar radiation readings you must have installed the optional Solar Radiation sensor See Optional Sensors on page 8 ET Evapotranspiration Current...

Страница 32: ...ote that you can set each variable s units indepen dently some to US some to Metric as you like You may change the units display at any time To change the units for any variable 1 Activate the variable using the keypress sequences described above 2 Press and release the 2ND key 3 Press the UNITS key The selected variable s units will change Repeat steps 2 and 3 until the desired units appear For e...

Страница 33: ... 12 7 F or C and a minimum off set of 12 8 F or C The variable will change value and the ticker will show the offset you ve entered 4 Press DONE to exit calibration Calibrating wind direction 1 Press WIND twice so that the wind direction is displayed 2 Press and hold the SET key The wind direction will begin to blink Continue holding until Cal 0 appears in the ticker 3 Use the and keys to add or s...

Страница 34: ...ly one digit is blinking 3 Use the and keys to add or subtract from each digit s value Use the LEFT and RIGHT arrow keys to move between the digits in the variable 4 Press DONE to exit Clearing variables To clear any of the following variables 1 Select the variable you d like to clear 2 Press and hold the CLEAR key The variable you ve chosen will blink Keep holding the key until the value changes ...

Страница 35: ...Does not affect yearly rain total Yearly rain Clears the yearly rain total Daily ET Clears daily ET and subtracts the old daily ET total from the monthly and yearly ET totals Monthly ET Clears the current monthly ET total Does not affect he yearly ET total Yearly ET Clears the current yearly ET total ...

Страница 36: ... Lows mode The DAY and HIGHS icons light up and the station displays the highs for all visible fields CONDITION HIGH LOW DAY TIME DATE MONTH YEAR ADDITIONAL INFORMATION Outside Temperature Yes Yes Yes Yes Yes Inside Temperature Yes Yes Yes Yes Yes Outside Humidity Yes Yes Yes Yes Yes Inside Humidity Yes Yes Yes Yes Yes Heat Index Yes Yes Yes Yes Temp Hum Wind Sun Index Yes Yes Yes Yes requires sol...

Страница 37: ...u to the previous day s highs the date field will change to show you Each time you press the LEFT arrow you ll move another day backward The 24 dots in the graph field also represent each of the last 24 days the rightmost dot is today As you move back or forward with the RIGHT arrow key the day dot will flash to show you what day you re looking at Use the function keys to choose any particular var...

Страница 38: ...ext if more than one alarm is tripped Low alarms work the same way For example if the wind chill threshold is set for 30 ºF the alarm begins sounding when the temperature drops to 30 0 º and will continue flashing until the temperature again rises above 30 0º To silence a sounding alarm press the DONE key until the sound stops See below to clear an alarm value Note See Table Vantage Pro Console Gr...

Страница 39: ... any other variable for which you d like to set a threshold 5 If you re finished setting alarms press DONE again and the console will return to cur rent weather mode Setting the Time Alarm 1 To set the time alarm enter the alarm mode as described above 2 Press Time then 2ND and SET The time field will begin blinking Use the LEFT and RIGHT buttons to select hours minutes or am pm Use and to change ...

Страница 40: ...ess Leaf Wetness C C H L H H L Rainfall Rain T T T T T T Storm Rain Rate H H H H H H H Soil Moisture Soil Moisture C C H L H L H L Solar Radiation req solar radiation sensor Solar Radiation A A H H H Temperature Inside Temp C C H L H L H L Outside Tem C C H L H L H L H L Extra Temp H L Apparent Temperature Heat Index C C H H H Temp Hum Sun Wind Index C C H H H Time Date Time Y UV Radiation req UV ...

Страница 41: ...for the day Flash Flood Alarm Specify total amount of rainfall for current 15 minutes 24 Hour Rain Alarm Specify total amount of rainfall for the current 24 hours Storm Alarm Specify totatl amount of rainfall for current storm MED Alarm Specify daily dose 10 Minute Average Wind Speed Alarm Specify speed Current values are shown in the right most column of graph and are the most recent records All ...

Страница 42: ...g the Graph Mode s Features Although the available graphs vary depending on what weather variable you re plotting you view each graph the same way Enter graph mode by pressing the GRAPH key Select a variable For example press the TEMP key Temperature readings from the last 24 hours will be displayed in the graph box Understand the graph Temperature readings from the last 24 hours will be displayed...

Страница 43: ...rs Use the HI LOW key to shift between highs and lows The console will beep when you ve reached the last of the possible time ranges for any variable Note You won t have any data in the graphs the first time you start your console The station can only display data it s recorded and it won t have recorded any when you get it Be patient and you ll have a lot of weather data right at your fingertips ...

Страница 44: ...Using the Console Page 44 Vantage Pro Console Manual ...

Страница 45: ...r checking this guide you are unable to solve the problem please call the factory at 1 510 732 7814 for further instructions Please do not return your unit for repair without prior authorization ONE YEAR LIMITED WARRANTY For details on Davis warranty policy please refer to the Maintenance Service and Repair Information brochure included with your station QUESTIONS CONTACT THE DAVIS SERVICE CENTER ...

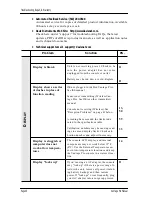
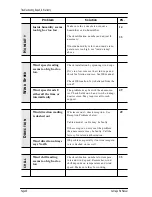
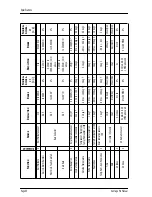
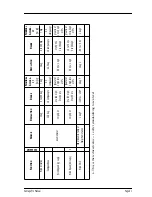
Страница 46: ...lugged in Cabled Vantage Pro See ISS manual Sensors not transmitting Wireless Van tage Pro See ISS or other transmitter manual Console not receiving Wireless See Reception Problems on page 49 below A reading has exceeded the limits indi cated in the specifications table Calibration numbers may be causing read ings to exceed display limits Check cali bration number and adjust if necessary 13 50 59 ...

Страница 47: ... outside tempera ture rises Make sure the console or sensor is not near a heater or other internal heat source lamps appliances etc Check calibration number and adjust if necessary 14 14 14 Outside temperature seems too low Check calibration number and adjust if necessary Sprinklers may be hitting the ISS radiaion shield Relocate See ISS manual 33 Inside temperature sensor reading seems too low Ma...

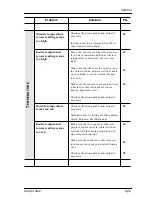
Страница 48: ...speed reads 0 either all the time or intermittently The problem may be with the anemome ter Check fields one b and two b on diag nostic screen May require call to tech support 49 D IRECTION Wind direction reading is dashed out Wireless model check reception See Reception Problems below Cabled model cable may be faulty If these steps do not reveal the problem the anemometer may be faulty Call the f...

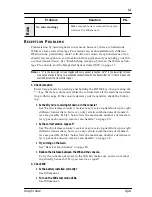
Страница 49: ...e console detects your transmitter check the follow ing Is the ID you re receiving turned on in the console See Each wireless console receiver may receive signals from up to eight different transmitters however only certain combinations of transmit ters are possible Table 1 below lists the maximum numbers of transmit ter types each console receiver can handle on page 20 Is the correct station type...

Страница 50: ... number of times the reed switch was seen open when sampled The reed switch is part of the anemometer mechanism Use the WIND key to toggle between readings 2 a Date or b number of times the reed switch was seen closed when sampled The anemometer counts rotations The reed switch closes once each rotation WIND key toggles display 3 a Number of CRC errors or b 8 bit timer value of next reception CRC ...

Страница 51: ...ue Wind The Vantage Pro measures wind speed andthe direction from which it s blow ing The ten minute average wind speed is displayed in the weather ticker when wind you press the WIND key Temperature Vantage Pro uses the ISS s temperature sensor to measure the outside air tem perature A second temperature sensor in the console measures the inside air temperature Additional temperature sensors avai...

Страница 52: ...because per spiration evaporates more slowly Note Vantage Pro measures Heat Index only when the air temperature is above 57 F 14 C because it s insignificant at lower temperatures Below 57 Heat Index the air temperature The Heat Index is not calculated above 135 F 52 C THSW Temperature Humidity Sun Wind Finally like Heat Index the THSW Index uses humidity and tempera ture to calculate an apparent ...

Страница 53: ...gether in the late after noon when the air begins to turn colder fog is likely during the night Dew point is also a good indicator of the air s actual water vapor content unlike rel ative humidity which takes the air s temperature into account High dew point indicates high vapor content low dew point indicates low vapor content In addition a high dew point indicates a better chance of rain and sev...

Страница 54: ...weather conditions making baro metric pressure an extremely important and useful weather forecasting tool High pressure zones are generally associated with fair weather while low pres sure zones are generally associated with poor weather For forecasting pur poses however the absolute barometric pressure value is generally less important than the change in barometric pressure In general rising pres...

Страница 55: ...al Dose defined as the amount of sunlight exposure necessary to induce a barely perceptible redness of the skin within 24 hours after sun exposure In other words exposure to 1 MED will result in a reddening of the skin Because different skin types burn at different rates 1 MED for persons with very dark skin is different from 1 MED for persons with very light skin Both the U S Environmental Protec...

Страница 56: ...ually IV Moderate Brown Burns minimally tans well V Dark Brown Burns rarely tans profusely VI Black Never burns deep pigmentation UV Dose that Causes Sunburn All Burn Some burn I II III IV V VI 1 2 3 4 Skin Type Environment Canada Skin Phototype EPA UV Dose MEDs 1 2 3 4 5 6 20 40 60 80 100 120 mJ cm 2 UV Dose and Sunburn Use this plot to estimate the MED dose leading to sunburn A person with Type ...

Страница 57: ...f rainfall and it is expressed in the same units of measure Inches millimeters The Vantage Pro uses air temperature relative humidity wind run1 and solar radiation data to estimate ET ET is calculated once an hour on the hour Please note that calculating ET requires the optional solar radiation sensor See Optional Sensors on page 8 Leaf Wetness Leaf wetness see Optional Sensors on page 8 provides ...

Страница 58: ...sensor measures the vacuum created in the soil by the lack of moisture A high soil moisture reading indi cates dryer soil a lower soil moisture reading means wetter soil Note Soil Moisture is only available with the wireless Vantage Pro with the optional Soil Moisture station Time The Vantage Pro has a clock and a calendar for tracking time and date The cal endar automatically adjusts during leap ...

Страница 59: ...arrow rising rapidly slowly Falling rapidly slowly Evapotranspiration X Solar radiation Temperature Humidity Anemometer 0 01 Daily to 99 99 Monthly Yearly to 199 99 5 0 25 mm Daily to 999 9mm Monthly Yearly to 1999 9mm 5 Inside Humidity Included in Console 1 10 to 90 5 RH 1 10 to 90 5 RH Outside Humidity Temp Hum station or ISS 1 0 to 100 3 RH 1 0 to 100 3 RH Dew Point overall Temp Hum station or ...

Страница 60: ...r ISS 0 1 deg F 40 to 140 deg F 1 deg F 0 1 deg C 40 to 60 deg C 0 5 deg C Extra Temperature X Temperature station 1 deg F 40 to 140 deg F 1 deg F 1 deg C 40 to 60 deg C 0 5 deg C Heat Index Temp Hum station or ISS 1 deg F 40 to 135 deg F 3 deg F 1 deg C 40 to 57 deg C 1 5 deg C Temp Hum Sun Wind index X Solar radiation sensor ISS 1 deg F 90 to 148 deg F 4 deg F 1 deg C 68 to 64 C 2 deg C Time Inc...

Страница 61: ...1 kph 1 to 54 m s 3 to 193 kph greater of 1 m s 3 kph or 5 Wind Speed Sm cups X 1 mph 1 kt 3 to 175 mph 3 to 150 kts greater of 3 mph kts or 5 0 5 m s 1 kph 1 5 to 79 m s 5 to 282 kph greater of 1 m s 5kph or 5 Wind Chill ISS or Anem Temp or Temp Hum station 1 deg F 120 to 130 F 4 deg F 1 deg C 84 to 54 C 2 deg C a This is the reduced value i e after standardizing to sea level F UNCTION A CCESSORY...

Страница 62: ...transmit frequency 916 5 MHz Models 6310 EU 6310 UK transmit frequency 868 35 MHz ID codes 8 user selectable License Low Power 916 5 MHz 1 mW no license required 868 35 MHz 15 mW no license required Temperature range 40 to 140 F 40 to 60 C Power Input 4 to 12 VDC output 1 5 mA ...

Страница 63: ...Vantage Pro Manual Page 63 ...

Страница 64: ...to radio or tele vision reception which can be determined by turning the equipment on and off the user is encouraged to try to correct the interference by one or more of the following measures Reorient or relocate the receiving antenna Increase the separation between the equipment and receiver Connect the equipment into an outlet on a circuit different from that to which the receiver is connected ...

Отзывы: