


31
Finish the Installation
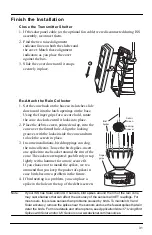
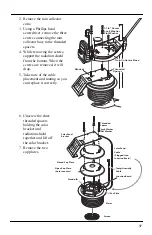
Close the Transmitter Shelter
1. If the solar panel cable (or the optional fan cable) were disconnected during ISS
assembly, reconnect them.
2. Find the two raised alignment
indicator lines on both the shelter and
the cover. Match these alignment
indicators as you place the cover
against the box.
3. Slide the cover down until it snaps
securely in place.
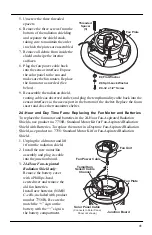
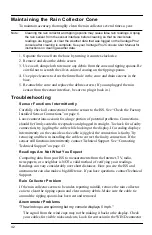
Re-Attach the Rain Collector
1. Set the cone back on the base so its latches slide
downward into the latch openings on the base.
Using the finger grips for a secure hold, rotate
the cone clockwise until it locks into place.
2. Place the debris screen, pointed end up, into the
cone over the funnel hole. Align the locking
grooves with the locks inside the cone and turn
to lock the screen in place.
3. In some installations, bird droppings can clog
the rain collector. To use the bird spikes, insert
one spike into each socket around the rim of the
cone. The sockets are tapered: push firmly or tap
lightly with a hammer for a more secure fit.
If you choose not to install the spikes, we rec-
ommend that you keep the packet of spikes in
case birds become a problem in the future.
4. If bird nesting is a problem, you can place a
spike in the hole on the top of the debris screen.
Note:
If your ISS has Solar and/or UV sensors, bird spikes around the rim of the rain cone
may cast shadows that can affect the accuracy of the sensors and ET readings. For
most users, this is less serious than problems caused by birds. To maintain UV and
Solar accuracy, remove the spikes near the sensors and use the fewest spikes that will
deter the birds. For more details and other options, see
Application Note 37: Using Bird
Spikes with Solar and/or UV Sensors
on www.davisnet.com/resources.
1
2
Finger
grips
Debris
Screen
Locking
Grooves
Bird
Spikes
Содержание 6322C
Страница 47: ......