6
PRESSURE SWITCH
Your Davey RVM pump set should have the correct pressure switch setting for zero
suction lift. If your pump is installed on a suction lift you may need to adjust the
pressure setting to suit.
Any adjustment of the pressure switch settings should be made according to the pump
curve*. The cut-out pressure should never be higher than 90% of the maximum pump
shut head pressure OR higher than the maximum operating pressure for the pressure
tank and the cut-in pressure should be set within the pump curve*.
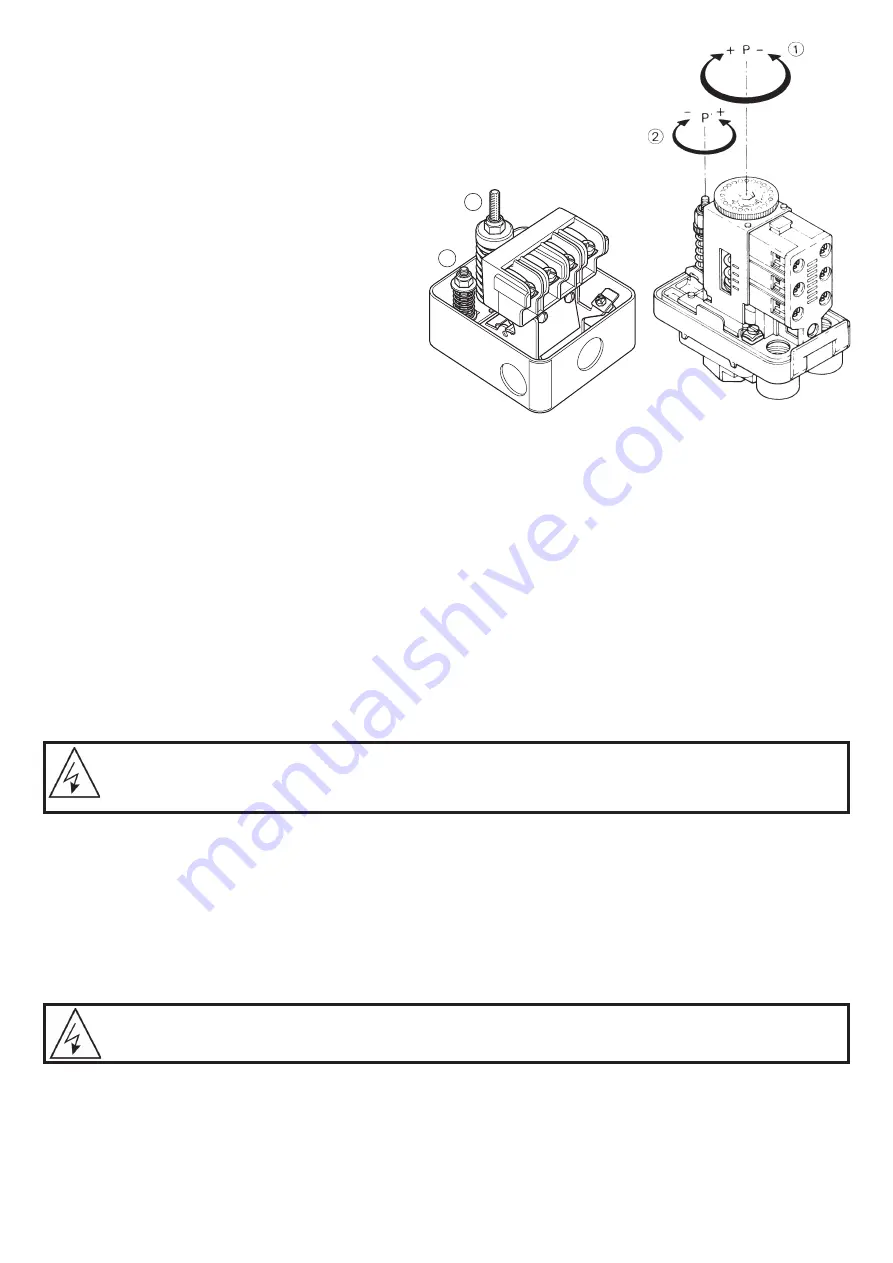
XMP12 Adjustments
To adjust the
cut-out (high) pressure
of the system,
turn the large dial (1) to the desired direction: + (CW)
for higher pressure, – (ACW) for lower pressure.
To adjust the
cut-in (low) pressure
of the system, turn
the smaller screw (2) to the desired direction: + (ACW)
for higher pressure, – (CW) for lower pressure.
9013GHG2 Adjustments
Cut-in Adjustment (range):
Always adjust the cut-in
spring nut (A) first, setting it to the desired operating
point. Keep in mind that adjustment changes both the
high and low operating points, but it should always be adjusted for the cut-in (low) operating point. Turning the nut (A)
clockwise increases the setting.
Cut-out Adjustment (differential):
to set the cut-out operating point, adjust the differential spring nut (B). Turning the nut
(B) clockwise increases the cut-out (high) operating point, which effectively increases the pressure difference between the
high and low operating points.
TANK PRECHARGE
The pressure tank fitted to your Davey pump set should be pre-charged with air to a value of 15kPa below the cut in
pressure. Refer to the table in the maintenance section of these instructions.
CHOOSING A SITE
Choose a site with a firm base and as close to the water source as possible with correct power supply. Make sure your
pressure pump is always connected to an adequate, reliable source of clean water.
Housing your Davey Pump:
To protect your pump from the weather, make sure the housing is both water proof, frost
free and has adequate ventilation.
The pump set should be mounted on its base in a firm dry area allowing for drainage, to avoid damage due to flooding
etc., that over time may occur from leaking pipe joints or pump seals.
POWER CONNECTION
Only connect the pump set to the power supply designated on the pump and motor label.
Single-phase pumps up to 1.5kW have a built in thermal overloads and have been provided with a 10 amp cable and plug
for connection to a standard power outlet.
Single-phase 2.2kW pumps have a built in thermal overload and have been provided with a 15 amp cable and plug for
connection to a standard 15 amp power outlet.
Do not use long extension leads as they cause substantial voltage drop, poor pump performance and may cause motor
overload.
Larger single phase and three phase pump sets should be wired to an approved overload by a licensed and qualified
electrician.
ELECTRICAL POWER SURGE PROTECTION
An electrical power surge or spike can travel along the supply lines and cause serious damage to your electrical
equipment. The RVM controller fitted to this system has a metal oxide varistor (MOV) fitted to help protect its circuit.
This MOV is a “sacrificial” device, meaning that it is gradually damaged every time it takes a surge. The MOV is not a
lightning arrestor and may not protect the control unit if lightning or a very powerful surge hits the pump unit.
B
A
WARNING: Some insects, such as small ants, find electrical devices attractive for various reasons.
If your pump enclosure is susceptible to insect infestation you should implement a suitable pest
control plan.
The electrical connections and checks must be made by a qualified electrician and comply with
applicable local standards.
* Adjusted for site conditions, i.e. suction life or positive suction pressure
Содержание RVM Series
Страница 19: ...NOTES...


