background image

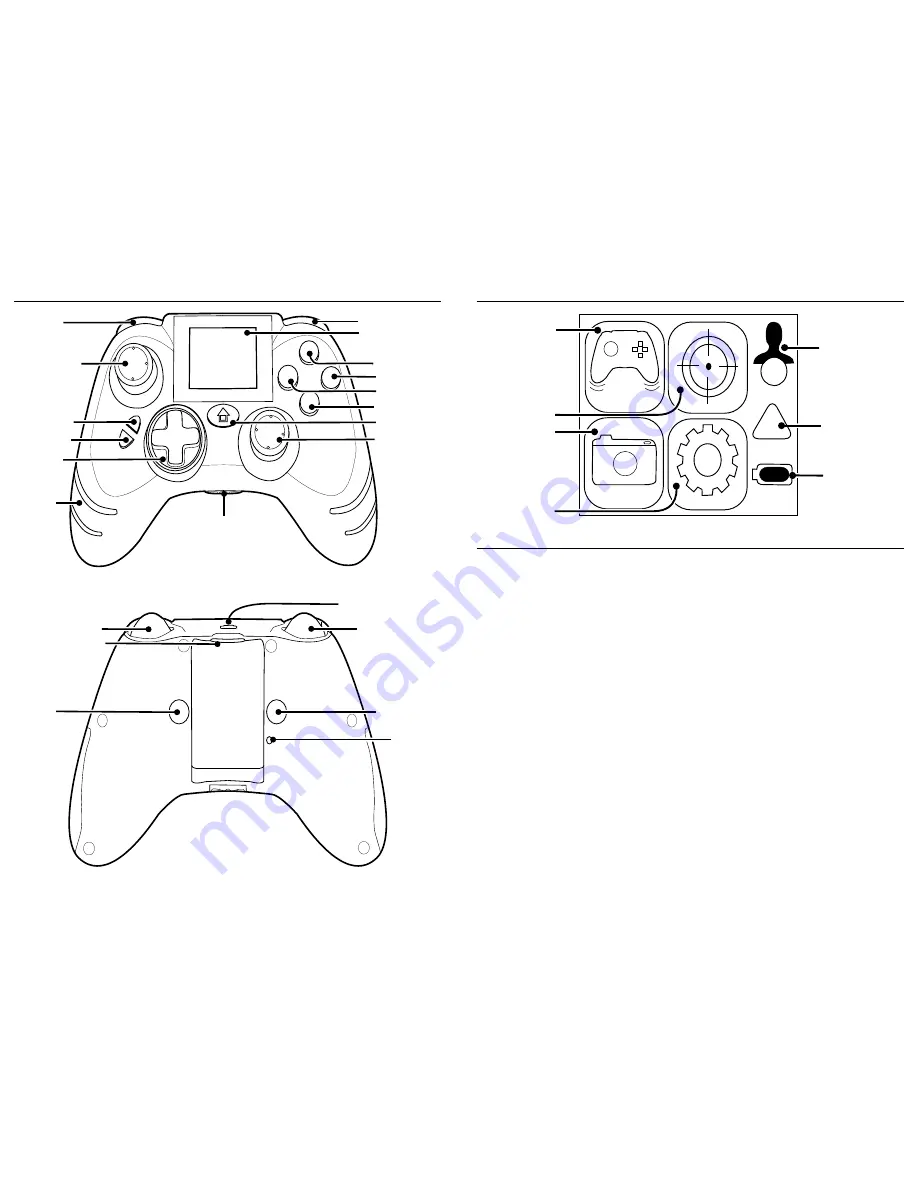
4. Controller Overview 


5. Combat Command LCD Display Overview 


6. Inserting Batteries 


Before inserting batteries, please refer to the ‘Important Battery Precautions’ information 
beneath section ‘3’.The WildFire EVO can be powered using regular cell AA batteries or using a 
rechargeable battery pack as described in the next section. In order to insert regular cell AA 
batteries in to the battery compartment, please follow these steps: 
 

Step 1: 

Whilst pressing and holding the Battery Compartment Button remove the battery 
compartment from the rear of the controller. 
 

Step 2: 

Insert 2 x regular cell AA batteries, ensuring that you orientate them as shown on the inside of 
battery moulding. 
 

Step 3: 

Re-attach the battery compartment to the controller ensuring that it latches correctly. 

 
Important Information 

The WildFire EVO does not support the usage of rechargeable AA batteries. For advice on the 
usage of a rechargeable battery pack, please refer to the next section. 


RT Button

LT Button

F2 Button

Sync
Button

Battery Compartment
Button

RB Button

Combat Command
LCD Display

Y Button

B Button

 X Button

 A Button

Home Button

Right Analogue
Stick

LB Button

Left Analogue
Stick

Start Button

Back Button

Direction
Buttons

Feature
Indicator
Lights

Headset Connection

F1 Button

USB Connection

1

Player Number
Indicator

Feature Slot 2

Feature Slot 3

Feature Slot 1

Feature Slot 4

Battery Status
Indicator

!

Notification
Indicator

Содержание WildFire EVO

Страница 1: ...ry Pack 8 Syncing the Controller 9 Adjusting the Level of Brightness 10 Entering and Exiting the WildFire EVO Menu 11 Activating Features 12 Pre installed Features 12 1 Sniper 12 1 1 Configuring Snipe...

Страница 2: ...Information Please ensure that you carefully read the following important information before continuing Important Battery Precautions Please ensure that you follow these recommendations to avoid caus...

Страница 3: ...ring that you orientate them as shown on the inside of battery moulding Step 3 Re attach the battery compartment to the controller ensuring that it latches correctly Important Information The WildFire...

Страница 4: ...Step 2 Connect the mini USB end of the USB Cable to the USB Connection located on the top of the WildFire EVO Other Charging Information The WildFire EVO does not support the usage or charging of rec...

Страница 5: ...t each of the features to activate in one of five ways You can choose to activate and deactivate a feature by pressing the F1 or F2 button You can choose to activate a feature when you are pressing an...

Страница 6: ...o adjust each of the slider bars you need to scroll up or down to highlight the slider bar which you would like to adjust Whilst highlighting the chosen slider bar move each of the sliders left or rig...

Страница 7: ...o wide range of buttons After entering the WildFire EVO Menu as detailed under section 10 using the A button select the Rapid Fire image to enter the Rapid Fire configuration screen If you would to re...

Страница 8: ...decrease or to the right to increase You can use any of the buttons shown in the following illustration Once you are happy with the configuration save the configuration by pressing the Start button As...

Страница 9: ...ler has a unique online software update feature Datel warrants that this controller will always be compatible with your Xbox 360 console and any Dashboard updates In the unlikely case that a future so...

Отзывы: