background image


37 


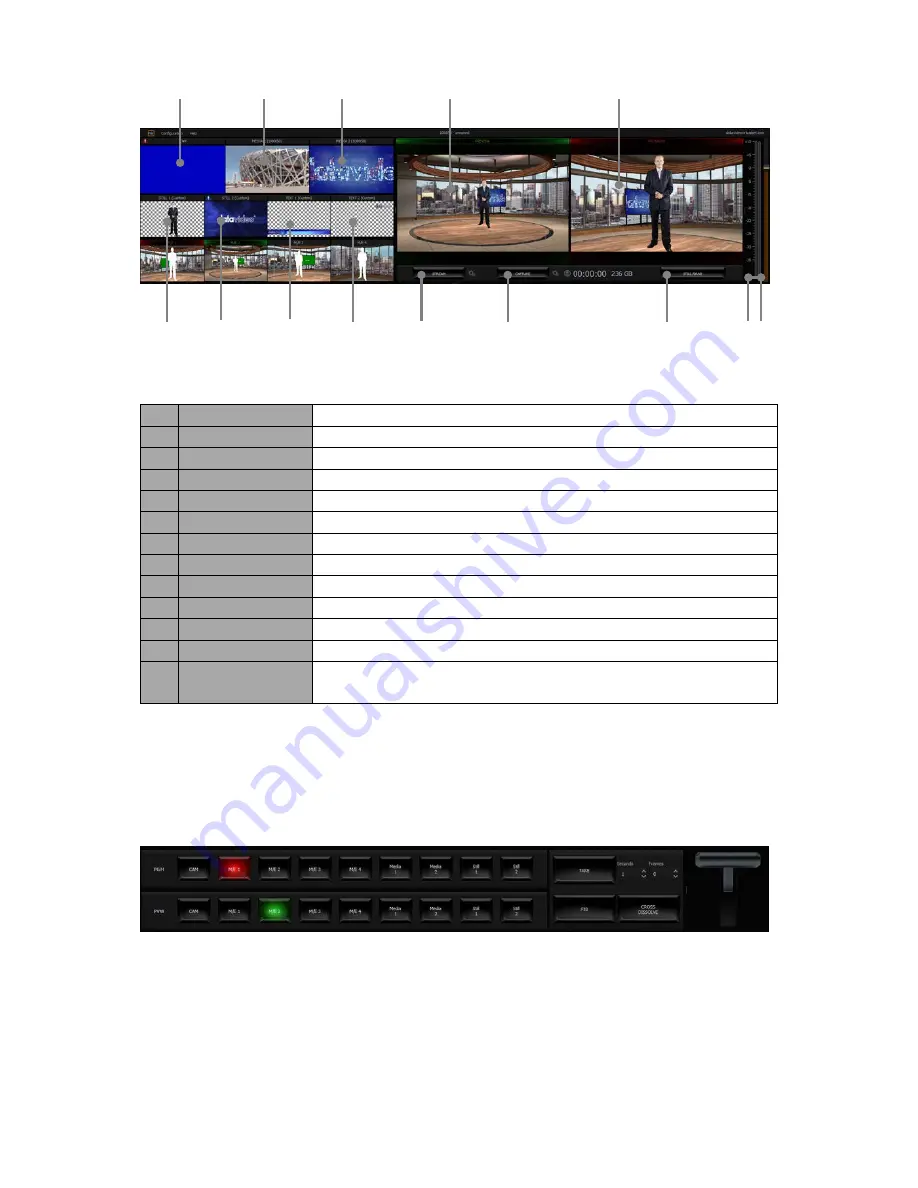
Details of each individual element are described in the table below. 


1  Cam


HDMI Camera preview window 

2  Media 1


Video clip 1 from hard disk drive 

3  Media 2


Video clip 2 from hard disk drive 

4  Still 1


Preview window for picture 1 

5  Still 2


Preview window for picture 2 

6  Text 1


Preview window for the still text source 1 

7  Text 2


Preview window for the still text source 2 

8  Preview


Preview source window 

9  Program


Program source window 

10  Stream


Stream the program video to the Internet 

11  Capture


Record the program video to PC’s hard disk 

12  Still / Grab


Capture still picture on the program screen 

13  Audio Meters / 

Volume Control


Audio meters display the output audio signal strength & volume 

control adjusts the output audio signal strength 


5.3    Program and Preview Rows & Function Settings 

The central part of the screen of 

Production Live

 is occupied by the Production Switcher. The 

Production Switcher panel consists of two rows of buttons and a block of executive buttons. It is 

used to send selected content on air and prepare the next material for broadcasting.   


Program and Preview Rows are production  switcher  style  buttons. The user is able to switch 

between different sources displayed on the Preview and Program screens by clicking on the 

corresponding buttons.   


12 

10 

11 

13 

Содержание TVS-1000

Страница 1: ......

Страница 2: ...and Preset rows 14 2 6 4 Preview and Program Switching 14 2 6 5 Downstream Keyers 15 2 6 6 Function Keys 15 2 6 7 Keyboard Backlight 16 CHAPTER 3 STARTING TVS 1000 SOFTWARE 18 3 1 PRODUCTION LIVE 19 3 2 STILL TEXT EDIT 19 3 3 VIRTUALSET MAKER 20 3 4 RICH SITE SUMMARY RSS 20 3 5 VIRTUALSET SHOP 21 3 6 CONFIGURATION 21 3 7 SHUTDOWN 23 CHAPTER 4 VIRTUALSET MAKER 24 4 1 FEATURES 24 4 2 GETTING STARTED...

Страница 3: ...APTER 14 SPECIFICATIONS 74 SERVICE SUPPORT 75 Disclaimer of Product and Services The information offered in this instruction manual is intended as a guide only At all times Datavideo Technologies will try to give correct complete and suitable information However Datavideo Technologies cannot exclude that some information in this manual from time to time may not be correct or may be incomplete This...

Страница 4: ...r a free one year extension to the standard Warranty providing the product is registered with Datavideo within 30 days of purchase For information on how to register please visit www datavideo tek com or contact your local Datavideo office or authorized Distributors Certain parts with limited lifetime expectancy such as LCD Panels DVD Drives Hard Drives are only covered for the first 10 000 hours ...

Страница 5: ...from the bin to virtual players used on air or as a source in virtual studios The system has six bin tabs for four kinds of media videos still images and text Logo insertion on virtual scene Virtual Background Features Load up to four virtual studio views simultaneously Define movements of a virtual camera in different phases within every studio Configurable Pan Tilt Zoom Multi Point Zoom Virtual ...

Страница 6: ... image resolution 1920 x 1080 Format 1080p29 97 image resolution 1920 x 1080 Video Processing Formats Video processing 4 4 4 16 bit floating point internal processing Inputs and outputs YUV 4 2 2 Capture in output format 4 2 0 Streaming 4 2 2 Other Miscellaneous Features A Five in One System Virtual Studio Switcher Character Generator Recorder and Web Streaming Multi Language Support RMC 220 Remot...

Страница 7: ...should be positioned so as to ensure air flows reaching the front and the back panels Fans providing appropriate system cooling are located behind the panels The workstation case is designed to be mounted on a server rack and occupies a 4U space 2 2 2 Back Panel Power Supply Socket Depending on the shipment destination and the user location a power supply cord with a suitable plug will be supplied...

Страница 8: ...nect production window Monitor 1 to HDMI port Display card allows connection of one DVI I ports one HDMI output port or three DisplayPorts Virtu Card Virtu card allows connection of a single HDMI input output pair and a mini phone jack for audio input With both display and virtu SDI cards installed it is thus possible to achieve different combinations of views on the monitors For more information ...

Страница 9: ...isk because it may cause damage to the system and files 1 Remove the two screws on the rear cover of the removable 2 5 HDD enclosure and manually pull out the PCB 2 Tighten four screws to fasten 2 5 HDD on the PCB as shown in the diagram below 3 Push the PCB with 2 5 HDD into the HDD enclosure 4 Tighten the two screws of the rear cover of the removable 2 5 HDD enclosure 5 Push the removable 2 5 HD...

Страница 10: ...10 2 4 System Diagram ...

Страница 11: ...tion There are two models of motherboard used for TVS 1000 PC System ASUS H87 PRO white PCIe slot and ASUS H97 PRO black PCIe slot ASUS H87 PRO Motherboard 1 Remove Wi Fi card 2 Insert AUX card in the Wi Fi card slot 3 For TVS VIRTU HDMI Card Version 1 4 use the cable shown to the right to connect between TVS Virtu AUX card and TVS Virtu HDMI card ASUS H97 PRO Motherboard 1 Remove Wi Fi card and i...

Страница 12: ...er functions and output effects to the 10 keys The features are summarized as follows A switcher style keyboard for direct TVS 1000 operation Clear key definitions Ten user defined function keys F1 to F10 and each of these function keys can be Audio DSK General Mix Effect Media Output Capture Mute Capture Volume Input Mute Input Solo Input Volume Output Mute Output Volume Streaming Mute Streaming ...

Страница 13: ...w selection Auto Play Auto Play function CAM 2 Camera 2 view selection Take Switch between PVW and PGM M E 1 M E 1 view selection FTB Fade PGM to Black M E 2 M E 2 view selection Cross Dissolve Cross dissolve transition effect M E 3 M E 3 view selection T Bar Manual Transition M E 4 M E 4 view selection STM Program Streaming Media 1 Media 1 Video selection CAP Video Recording Media 2 Media 2 Video...

Страница 14: ... buttons The Preset row of buttons is for control of the Preview window The Preset row sets the next transitioned program by pressing the corresponding key to select the source 2 6 4 Preview and Program Switching TAKE This performs switching from the current program source to the selected preset source Cross Dissolve This performs a cross dissolve switch from the current program source to the sele...

Страница 15: ...ce to DSK 1 2 from a selection of camera mix effects video files and pictures Cut This cuts from the current key source to the selected key source Transition effect is not used Fade This performs a fade transition switch from the current key source to the selected key source 2 6 6 Function Keys F1 F10 Ten user defined function keys please refer to the RMC 220 Function Keys section for more details...

Страница 16: ...Press the knob located below DSK1 key once and the DSK1 key will flash green 2 Rotate the knob right to enhance and left to dim 3 Press the knob again to turn off this feature 2 6 8 Dimensions All measurements in millimetres mm 2 6 9 Specifications Communication Interface RS 232 Baud Rate 38400 ODD Power DC12V 25 Power Consumption 5W ...

Страница 17: ...7 Working Temperature 0 C 40 C Storage Temperature 20 C 60 C Relative Humidity 90 non condensation Dimensions Refer to Page 10 Net Weight 1 28Kg Accessories RS 232 Transmission Cable DC In Power Adaptor ...

Страница 18: ... the appearance of the power button 4 Important Please ignore everything during the system boot up process which can take up to approximately one minute and you will be automatically directed to the TVS 1000 start up page For more information please refer to the System Recovery section 5 On the start up page seven options are available for the user to choose a Production live b STILL TEXT edit c V...

Страница 19: ...own below and click on the Load Session button to load previously saved production You can also browse the hard drive to load the previously saved session by clicking on the button 3 2 Still Text Edit The user can also open still text editior from start up screen Select a proper resolution first from the pull down menu and click on the Start Editor button to open the still text editor The Start ed...

Страница 20: ...n on the PC and may be downloaded from http www datavideo com TVS Virtualsetmaker The PC needs to meet the minimum system requirements as described below CPU i3 Processor or faster Memory 4GB RAM Graphic Card GPU with DirectX 11 Operating System Windows 7 64 bits or above Monitor resolution of 1680 x 1050 or higher 3 4 Rich Site Summary RSS The RSS feature allows Datavideo to publish updated infor...

Страница 21: ... clicking on the Open Web Browser button 3 6 Configuration Configuration offers the user four basic functions language selection firmware update free virtualset download and system summary Language A pull down menu allowing the user to choose a desired language from English Simplified Chinese and Traditional Chinese Update When clicked the following window appears while the system searches for fir...

Страница 22: ... DO NOT have an account on http www datavideovirtualset com On the TVS 1000 main screen select configuration then click the Free Sets Enter your registration info then click Register Please be patient while downloading After free sets are downloaded successfully click OK to go back to main screen Or you can also scan the QR Code on the right to open a video tutorial showing you how you can downloa...

Страница 23: ...artup panel the user can simply click on the Close application button or the Shutdown system button to shut down the system Note A popup warning dialogue box will appear as shown below after you click on the Close application button ...

Страница 24: ...ter Memory 4GB RAM Graphic Card GPU with DirectX 11 Operating System Windows 7 64 bits or above Monitor resolution of 1680 x 1050 or higher After Virtualset Maker is installed on your PC simply click on the VIRTUALSET maker desktop icon to open the VIRTUALSET maker Before you start the software please make sure your monitor resolution is set to 1920x1080p 4 1 Features Customized design of virtual ...

Страница 25: ... page as shown below Start up Screen Locate VIRTUALSET maker and click on to open the VIRTUALSET maker window However before you start select a proper resolution first from the pull down menu on the left of the Start Maker button first You can also select and load existing virtual set file from the hard disk The VIRTUALSET maker window should open as shown below ...

Страница 26: ...ns File New Opens a new file Load Loads an existing file Save Saves the current design Save as Save the design in a different name Overwrite protection function is available Exit Exits the Virtualset Maker Edit Undo Erases the last change done to the virtualset Redo Reverses the undo command Configuration Language English Simplified Chinese Traditional Chinese Japanese Talent Type Full Full body s...

Страница 27: ...embedded in virtual set Static Logo Logo layer adjustable images Studio Layer Graphic layers image will be stretched to the current display resolution Please note that the suggested resolution of the studio layer is 2880 x 1620 16 9 This is the standard virtualset resolution in TVS 1000 You can of course use other resolutions but you will need to fine tune your image later Select Studio Layer to b...

Страница 28: ...ane pane 2 beside the image thumbnail Their functions are described below Eyes Click to make a particular layer visible in the editor Solo Click this button to hide all other layers except the current layer object Next import a logo static layer from the disk and place it above the studio layer ...

Страница 29: ...ontrollers in pane 3 are enabled The example below illustrates how you can zoom rotate and position a datavideo logo using the five controllers outlined as follows The goal is to pave the ground with datavideo logo Position Knob Zoom Slide Bar X Knob Y Knob Z Knob The logo can be flipped along the x axis Knob for rotation along x axis ...

Страница 30: ...ly use the position knob to move the datavideo logo to the desired position and the zoom slide bar to fine tune the logo to an appropriate size The diagram below shows you the final work with the floor covered with datavideo logo Knob for rotation along y axis Knob for rotation along z axis ...

Страница 31: ...ayer Source B which will be shown in VIRTURALSET maker as a green rectangular box Screen is where the video or picture are placed after program starts Adjust and move the green rectangular screen to the respective desired size and position using the controllers in pane 3 ...

Страница 32: ...o an one time selection option However you are allowed to create unlimited number of static logos and studio layers Please note TVS 1000 supports only one talent layer Source A so even if your virtualset is designed for the two talent scenario Source A and Source C only one talent will appear on the TVS 1000 system After importing the talent layer the user will find that there is a white frame enc...

Страница 33: ...n fine tune your talent layer size and move the talent layer to the desired position Finally save your virtualset on the disk close VIRTUALSET maker and import the virtualset to the Production Live Module to start your virtual studio tour ...

Страница 34: ...tween phases by clicking on phase windows which is similar to the cut transition effect on a switcher The virtual studio configuration panel is located at the bottom left hand corner of the screen Two rows of buttons located below the three phase windows serve the purpose of allowing the user to select talent material source and green screen material source As depicted in the diagram above row A i...

Страница 35: ...areas 1 Tool Bar 2 Multi View Screens 3 Switcher like Buttons 4 Virtual Background Editing 5 File Management 5 1 Tool Bar There are three options on the tool bar File Configuration and Help File Load Session Opens previously saved production Save Session Saves the current production Save Session As Saves the current production with a different name Go to Startup Takes the user to startup screen 5 ...

Страница 36: ...About displays information such as EULA Version number and Serial Number QR Code Scan the QR code to download the TVS 1000 User Manual 5 2 Multi View Area In the multi view area the user is able to view the camera source and other multiple multimedia file sources on the left hand side of the area There are two screens on the right hand side PREVIEW and PROGRAM PREVIEW presentation of the next elem...

Страница 37: ...Still Grab Capture still picture on the program screen 13 Audio Meters Volume Control Audio meters display the output audio signal strength volume control adjusts the output audio signal strength 5 3 Program and Preview Rows Function Settings The central part of the screen of Production Live is occupied by the Production Switcher The Production Switcher panel consists of two rows of buttons and a ...

Страница 38: ... are outlined below 5 3 2 Switching between Preview and Program Views TAKE Click to switch between Program and Preview with a transition effect FTB A Fade to Black is the effect which fades the Program view gradually to black or when a picture gradually appears on screen click on the button to apply the FTB effect to Program output Cross Dissolve A dissolve is a gradual transition from one image t...

Страница 39: ...ependent of the Production Switcher TAKE button If the text is on air the colour of the DSK button changes to red To remove the text from the air click on the Fade or Cut button once again When the text is taken off air the DSK button colour returns to green and the text will now appear in PREVIEW screen again Text 1 Text 2 Media 1 Media 2 Still 1 Still 2 Camera To configure position and size of t...

Страница 40: ...he user to select talent material source and plasma TV material source As depicted in the diagram above row A is for talent material source selection and row B is for plasma TV material source selection The sources can be live show from HDMI Camera AUX Card Output Media 1 or 2 Still 1 or 2 or even Black if necessary The selected source button is illuminated in amber Usually Row A is the talent ima...

Страница 41: ... 4 2 Placement Phase is defined as the virtual camera position in a virtual studio Each virtual scene M E1 M E4 can be assigned three phases phase 1 3 Click on any of the three phase windows to configure the image phase settings The current phase is highlighted with an orange bar above the preview window as shown in the diagram below Placement function allows the user to customize the phases i e c...

Страница 42: ...after you have configured the desired placement settings 5 4 3 Auto Play Auto Play generates the animated PTZ transition effect If the AutoPlay function is switched on the camera movement is smooth animated The transition time is adjusted by controls located on the right of the phase previews Time Frame If the AutoPlay button is turned off the camera position is switched sharply cut effect without...

Страница 43: ...d they can be saved in the session file The configuration window is shown below Joystick Talent positioning Center Roller Talent scaling Adjustment Knob Talent rotation Please note that movement of the talent is limited within the white rectangular box as depicted in the diagram below All settings of a studio selected sources source positions camera phases can be stored for later use by saving the...

Страница 44: ... Within a given tab icons can be sorted using drag and drop For files with the alpha channel with transparency a preview is displayed showing transparency against a background of a gray and white grid To add a file to the bin a tab or a subtab within a tab has to be selected After that either click on the add file button or double click on an empty space within the selected tab of the bin and a ty...

Страница 45: ...ply move the cursor on the playback progress bar and fine tune the cursor position frame by frame by clicking the forward and reverse buttons In addition by checking the PlayAll option and enabling the loop feature the user is allowing loop playback of the whole media folder AutoPlay allows the virtual player to play the video clip upon entering the media folder NOTE It is recommended that files s...

Страница 46: ...bitmap files for media added to the STILL1 and STILL2 tabs JPG PNG with transparency BMP To perform slideshow of still pictures enable the PlayAll function and then click on the Play button Text 1 2 As depicted in the diagram below this is where the still text files can be displayed Click on to browse the local hard disk for still text files Again the user can classify the selected still text file...

Страница 47: ...oaded into memory Preview of all media loaded into virtual players Camera preview one or two depending on system configuration A third monitor may with suitable configuration show a full screen PREVIEW or PROGRAM view The third monitor can also be used for the mirror output of the talent Hence in order to allow the user to manage multiple monitors a Monitor Configuration Interface as shown in the ...

Страница 48: ...layback time sec and Mirror on PGM Monitor as shown in the diagram below By checking the option Image default playback time sec the user will then be allowed to set the playback time for slide show of still images Mirror on PGM Monitor after enabled will display a mirrored image of the Program View i e the Program view image is flipped along the y axis ...

Страница 49: ...despill and garbage mask Luma Key Mode This function enables TVS 1000 to be used for luminance based keying Camera input is fed with object on a black or white backdrop Background is generated by PC or any other media sources To ensure the best quality the keying function has a number of parameters available for the user to set the optimal keying The subsections below outline the entire configurat...

Страница 50: ... notified about it via a message window after which the colour will be reset to default The Default Color button is used to select the default colour 6 3 Matte Control Click on the Matte Control button to enter the preliminary keying setting page This is done with the Show Alpha Matte function which after a checkbox is checked will show a matte view for which colours closer to white are non transp...

Страница 51: ...nsparent this is why the function should be applied sparingly so that small differences are still discernible in the distribution of the black background The next step is to obtain a uniform distribution of white on objects which will remain fully non transparent This uneven distribution may arise from the fact that the colours of the object may have colour components close to the keying colour In...

Страница 52: ...the view after a White Level adjustment an extension of the range by means of the White Level function usually results in the restoration of a uniformly black surface to slight grays In this case in order to adjust the grayness two further functions from the Tolerance correction section are needed Click on the tolerance correction button to enter the Tolerance Correction configuration screen The f...

Страница 53: ...come more distinct A view before and after an adjustment is presented in the two pictures below A view before and after A view before a Luminance adjustment A view after a Luminance adjustment The Color function is also used to bring about another effect Once the option Show alpha matte is switched off and the real picture is restored it is possible to eliminate unnatural outlines This can be done...

Страница 54: ...object a view before a Despill correction Click on the Spill Correction button to enter the setting page Despill color and Despill coarse belong to the functions for the preliminary elimination of unwanted colours and are based on the RGB space The Despill color Despill coarse slider section Once the Despill color slider is moved to position 0 the left hand side the algorithm will automatically re...

Страница 55: ... eliminated from the object in the RGB red green blue space which results in the transition of colours into the purple magenta area A view after the green component has been eliminated Another function enables a more accurate adjustment of the above problem The use of the Despill fine function eliminates the keyed background colour from the object but this time on the basis of the chrominance comp...

Страница 56: ...to enter the setting screen The Edge Correction function is used to correct semi transparent areas e g hair ends that need to be darkened or brightened in order to make an object look natural The Edge brightness slider 6 7 Garbage Mask Garbage mask is used to reduce the mask size by cutting it in all of the possible directions left right up down Click on to configure the garbage mask ...

Страница 57: ...w of the keyed background is not large enough to fill in the entire object shot A view from the camera area By cutting the remaining elements by means of the sliders Left Right Top Bottom it is possible to place the object within the area of the keyed background ...

Страница 58: ...pt in mind that in this case the object may only move within the area of the cut off mask otherwise the object will disappear Furthermore if the Garbage mask sliders are used it is possible to check whether the previous settings were correct and whether they had any influence on the final look of the virtual background By moving for instance the Left slider within its full range no noise colour sh...

Страница 59: ...he contrast between colours to be increased Saturation this enables colour saturation to be boosted Intensity this enables the ambient colour intensity to be set Chapter 7 Fast Chromakeying The TVS 1000 comes with two special features that allow the user to perform fast chromakeying The two special features are Simple Chroma Key and the Wizard 7 1 Simple Chroma Key Simple Chroma Key mode gives the...

Страница 60: ... The Chroma Key Wizard is designed to guide the user to perform chromakeying step by step Click on the Wizard button enclosed in the red rectangular box as shown in the diagram below to start the chromakeying wizard ...

Страница 61: ...the signal level bar Additionally a separate Master Out slider can be used to set the output signal level The Master Out slider is also displayed next to the Program window Sound can be adjusted from 42 dB to 10 dB The 0 level corresponds to 10 dBV 7 8 dBu or 0 316 V RMS Also the following functions can be turned on for each input channel Follow This function mutes the sound of the selected channe...

Страница 62: ...59 94 50 1080p60 59 94 50 30 29 97 25 720p60 59 94 50 The user can perform simple manual settings such as selection of low medium high and customized quality All other parameters such as profiles bitrate and etc are configured internally Selection of custom bitrate allows the user to customize the recording bitrate In addition the user is also allowed to define the default captured video file savi...

Страница 63: ...er can also grab instantaneous images on the Program view by clicking on the STILL GRAB button The grabbed images are saved in PGN format The grabbed images will be added to section 5 of both Still tabs of the Media Bin Still 1 or Still 2 shown below ...

Страница 64: ...available by Live Production Convert the signal to a format supported by Internet connection Trigger online broadcast by clicking on the STREAM button shown below To configure the streaming setting click on located on the right of the stream button to open the configuration window as illustrated below Define your streaming service and configure video and audio settings accordingly The available st...

Страница 65: ...mport Studio Set AutoPlay Set Bus A Source Set Bus B Source Set Phase Set Speed Auto Play Loop Play Pause Play Select Stop Select Preview Select Program Transition Cross Dissolve Transition Fade to Black The user just needs to press the RMC 220 function key button once to execute the selected functions according to the sequence in which the functions are selected To assign specific multiple functi...

Страница 66: ...nctions are selected After all the desired functions are selected click on the next key tab and repeat the above until all keys are assigned the functions that you desire 11 1 2 Simple If the user s selection is Simple Mode a user interface will appear as shown in the diagram below On the interface the user is only given the Graphics Overlay function Media Stream to perform simple customization of...

Страница 67: ... Keys PGM Bus on the main switcher Q W E R T Y U I and O PRV Bus on the main switcher A S D F G H J K and L Switching between M E F1 F2 F3 and F4 Switching between phases of active M E 1 2 and 3 DSK1 Insert DSK2 Home Source for DSK1 Delete Source for DSK2 End Display on PGM screen with Cut Page Up Display on PGM screen with Fade Page Down TAKE Enter num lock key pads ...

Страница 68: ...Reboot TVS 1000 and during the system boot up process select the DriveClone System Recovery option to enter the recovery process when the screen below appears This recovery process resets C drive to factory default but keeps the data on D drive Click on the Next button on the introduction page of the recovery process ...

Страница 69: ...69 Select the appropriate recovery option and click on the Start button Wait till the progress bar shows 100 completion ...

Страница 70: ...70 Once the recovery process is finished click on OK button to trigger system reboot ...

Страница 71: ... So if rename on Hard Disk is required it must be done as a new feature 4 The aspect ratio of some PNG files is incorrect after loaded in VIRTUALSET maker Please load the picture as the logo layer to solve this issue 5 HDMI output of the AUX card green card has no audio output AUX card HDMI output does not support audio out This AUX card is for Preview Out and not Program Out so there is no audio ...

Страница 72: ...ion and does not rename the actual file name on the PC system This is because a single file can be referenced by many other projects or sessions so if the actual file name on the PC system is renamed the reference to other projects sessions will be lost 15 After Follow is enabled for Line IN on the TVS audio mixer the Line IN audio is found to output with CAM1 or Cam2 The Line in will follow Cam1 ...

Страница 73: ...lect RGBA format which includes Alpha Channel 24 It is difficult to make flexible adjustment to the screen in Virtualset maker The Virtualset maker now offers the point mode option in which the user is allowed to reshape the screen by dragging the four corners and move the screen with a few mouse clicks 25 Why is there no sound from Aux card Green card HDMI output Aux Card for PVW output does not ...

Страница 74: ... 720p60 59 94 50 Audio Input Mini Phone Jack HDMI Audio embedded 2 CH Downstream Key 2 Media 2 DDR Still Picture 2 Still Text 2 Still Text Editor included Keyer Chroma Key Luminance Key Recording H 264 MPEG 2 Live Streaming TS HTTP TS RTP TS UDP TS RTSP FLV HTTP FLV RTMP Hard Disk 2 5 inch removable hard drive ...

Страница 75: ...75 Service Support ...

Отзывы: