Datavideo PTC-305 Скачать руководство пользователя страница 120

120 


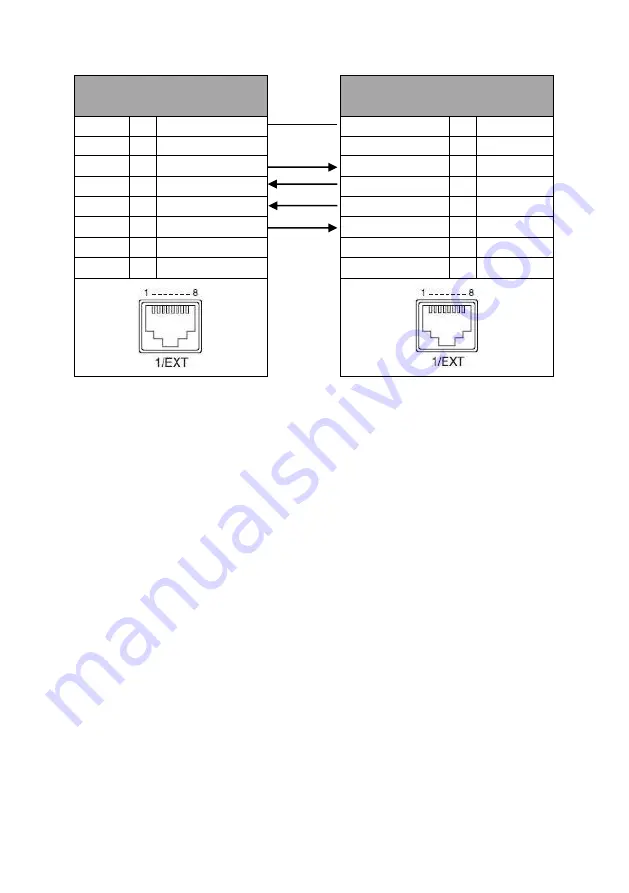
The RS-422 pinouts are described below. 

RMC-180 Controller 

(RJ-45 Port) 


PTC-305Camera 

(RS-422 Port)


GND 

White/Orange 


White/Orange 

GND 

NC 

Orange 


Orange 

NC 

TX- 

White/Green 


White/Green 

RX- 

RX- 

Blue 


Blue 

TX- 

RX+ 

White/Blue 


White/Blue 

TX+ 

TX+ 

Green 


Green 

RX+ 

NC 

White/Brown 


White/Brown 

NC 

NC 

Brown 


Brown 

NC 


GND 

Содержание PTC-305

Страница 1: ...1 4K TRACKING PTZ CAMERA PTC 305...

Страница 2: ...14 HDMI Video OUT 16 3G SDI Video Output 16 4 REMOTE CONTROL AND ON SCREEN MENU 17 4 1 REMOTE CONTROL FUNCTIONS 17 4 2 OSD MENU 21 4 3 PROFESSIONAL JARGON EXPLANATIONS OF THE OSD MENU 32 5 INSTRUCTIO...

Страница 3: ...AREA OF THE WEB UI 80 9 HOW TO USE THE WEB UI TO SET AND CALL PRESETS 83 10 QUICK SETTING AREA FOR THE AUTO TRACKING 84 11 CONTROL THE CAMERA BY THE PTZ VIEW ASSIST APP 85 12 DIP SWITCH SETTINGS 86 1...

Страница 4: ...e correct or may be incomplete This manual may contain typing errors omissions or incorrect information Datavideo Technologies always recommend that you double check the information in this document f...

Страница 5: ...ous damage 6 Slots and openings on the cabinet top back and bottom are provided for ventilation To ensure safe and reliable operation of this unit and to protect it from overheating do not block or co...

Страница 6: ...rked Do Not Remove may expose you to dangerous voltage points or other risks and will void your warranty Refer all service issues to qualified service personnel 13 Unplug this product from the wall ou...

Страница 7: ...sand grit or water is not covered under warranty Viruses and malware infections on the computer systems are not covered under warranty Any errors that are caused by unauthorized third party software...

Страница 8: ...is product must not be disposed of with your other household waste Instead it is your responsibility to dispose of your waste equipment by handing it over to a designated collection point for the recy...

Страница 9: ...stream and NDI The PTC 305 series will be the ideal choice for taking your remote camera production to the next level Features 2160p50 59 94 60 PTZ camera 20x Optical Zoom 16x Digital Zoom 4K Video in...

Страница 10: ...1 Lens Built in 1 1 8 8 51M Pixel CMOS 4K color camera with white balance control backlight compensation automatic gain and etc 2 Tally LED Tally lamp will be turned ON upon receiving the ON signal 3...

Страница 11: ...updating Note After inserting the USB flash drive please remember to turn ON the SETUP USB UPGRADE from the OSD menu of the PTC 305 camera 2 Power Input DC in socket connects the supplied 12V PSU The...

Страница 12: ...g the cable for the RS 422 interface 7 IRID Interface This interface allows users to use the DVIP Switch to control the numbering of the camera on the remote controller Users can use this interface to...

Страница 13: ...n the tripod 2 Screw Hole Screw holes for ceiling bracket mounting 3 For Safety Rope Ties safety rope for fixing the camera to the ceiling 4 DIP Switch This DIP Switch allows users to adjust needed pa...

Страница 14: ...at the HOME position with the lens facing front If the power is inserted the camera lens will go back to the position where the camera power is off last time Note After powering on you need to wait f...

Страница 15: ...a router 1 Please set the Ethernet IP address of your PC or laptop as 192 168 100 x x means 0 255 and it will be at the same local area network as the PTC 305 2 Please use an RJ 45 Ethernet cable to...

Страница 16: ...16 HDMI Video OUT Connect the 4K HDMI OUT to an external connected monitor using an HDMI cable 3G SDI Video Output Connect the SDI OUT to an external connected monitor using an SDI cable...

Страница 17: ...17 4 Remote Control and On Screen Menu The chapter 4 provides an overview of remote control functions and OSD menu 4 1 Remote Control Functions...

Страница 18: ...as 1 0 the camera IRID number will be 2 If the DIP Switch 1 2 are set as 0 1 the camera IRID number will be 3 If the DIP Switch 1 2 are set as 1 1 the camera IRID number will be 4 Note In normal situa...

Страница 19: ...to zoom out the subject 6 Micro Joystick Micro Joystick Up Down Left Right Confirm Please move the Micro Joystick to the up down left and right sides to move the camera lens to the up down left and r...

Страница 20: ...ck Button Back Button Please press the Back button to turn the camera head back to the Home position When the OSD menu is opened you can go back to the previous layer of the OSD menu by pressing the B...

Страница 21: ...peedByZoom Tracking Language Protocol ExpComp Mode RG Tuning Contrast AF Zone Tracking Area HDMI RGB Mode V_Address Backlight BG Tuning Sharpness AF Sense Figure Size Video Format V_AddrFix Gain Limit...

Страница 22: ...22 Information Restore Default Sub Options ARM Restore Yes No SOC Date AF Format Model IP GateWay NetMask...

Страница 23: ...enu are listed in the table below Main Menu Sub Menu Options Options Exposure Mode Auto Manual SAE AAE Bright ExpCompMode Off On ExpComp 7 7 Backlight Off On Gain Limit 0 1 2 3 4 5 6 7 8 9 10 11 12 13...

Страница 24: ...1 2 3 4 5 6 7 8 Iris F1 8 F2 0 F2 4 F2 8 F3 4 F4 0 F4 8 F5 6 F6 8 F8 0 F9 6 F11 0 Close NTSC Shutter PAL Shutter Shutter 1 30 1 25 1 60 1 50 1 90 1 75 1 100 1 100 1 125 1 120 1 180 1 150 1 250 1 250...

Страница 25: ...25 1 1500 1 1500 1 2000 1 2000 1 3000 1 3000 1 4000 1 4000 1 6000 1 6000 1 10000 1 10000 Gain 0 1 2 3 4 5 6 7 8 9 10 11 12 13 14 15 16 17 18 19 20 21 22 Bright 0 1 2 3 4 5 6 7 8 9 10 11 12 13 14 15...

Страница 26: ...26 16 17 Color WB Mode Auto Indoor Outdoor OnePush Manual VAR RG Tuning 0 1 2 3 4 5 6 7 8 9 10 10 9 8 7 6 5 4 3 2 1 BG Tuning 0 1 2 3 4 5 6 7 8 9 10 10 9 8 7 6 5 4 3 2 1 Saturation 60...

Страница 27: ...0 90 100 110 120 130 140 150 160 170 180 190 200 Hue 0 1 2 3 4 5 6 7 8 9 10 11 12 13 14 RG 0 255 BG 0 255 Color Temp 2500K 2600K 2700K 2800K 2900K 3000K 3100K 3200K 3300K 3400K 3500K 3600K 3700K 3800K...

Страница 28: ...0K 4700K 4800K 4900K 5000K 5100K 5200K 5300K 5400K 5500K 5600K 5700K 5800K 5900K 6000K 6100K 6200K 6300K 6400K 6500K 6600K 6700K 6800K 6900K 7000K 7100K 7200K 7300K 7400K 7500K 7600K 7700K 7800K 7900K...

Страница 29: ...29 10 11 12 13 14 Contrast 0 1 2 3 4 5 6 7 8 9 10 11 12 13 14 Sharpness Auto 0 1 2 3 4 5 6 7 8 9 10 11 12 13 14 15 Flip H Off On Flip V Off On B W Mode Off On NR3D Level Auto Off 1 2 3 4...

Страница 30: ...P T Z SpeedByZoom Off On AF Zone Front Top Center Bottom AF Sense High Low Normal L R Set STD REV Display Info Off On Image Freeze On Off Digital Zoom Off 2x 4x 8x 16x Pre Speed 1 2 3 4 5 6 7 8 9 10...

Страница 31: ...EN HDMI RGB Mode HDMI Note There is NO DVI Mode for 4K50 59 60 DVI Video Format 1080P25 720P50 1080P60 1080P50 1080I60 1080I50 1080P30 720P60 1080P29 97 1080I59 94 1080P59 94 720P59 94 4KP29 97 4KP59...

Страница 32: ...nnel will output the audio 4 3 Professional Jargon Explanations of the OSD Menu There are some professional jargons or nouns which are shown in the OSD menu of the PTC 305 camera please refer to this...

Страница 33: ...creen which is shot by the camera will flip vertically If OFF is selected the screen will be shown in normal direction L R Set If the REV is selected for this option the panning direction of the PTC 3...

Страница 34: ...et on plasterboard Step 1 DIP Switch Setting Set the Mirror option to H V mode Step 2 One End of Retaining Wire Attach the retaining wire to the junction box mounted on the ceiling by screwing one end...

Страница 35: ...racket B Again as illustrated in the diagram below screw a ceiling bracket B into the junction box mounted on the ceiling Make sure the screw holes of the ceiling bracket B are aligned with the holes...

Страница 36: ...Position the screws as shown in the diagram below Align the screw holes on the bottom of the camera with those in the ceiling bracket Insert the screws into the corresponding screw holes in the number...

Страница 37: ...37...

Страница 38: ...38 Step 5 Mount Camera to Ceiling...

Страница 39: ...to Fix Camera Fix the camera by screwing three screws into the corresponding screw holes as shown in the diagram below Step 7 Cable Connection Connect the cables to the connectors located on the rear...

Страница 40: ...the device please note that the camera s default IP address is 192 168 100 100 Set up direct connection between the camera and your PC laptop as depicted in the diagram below remember to manually assi...

Страница 41: ...t in fixed IP mode If the Dynamic IP Address is selected it will be set in DHCP mode After the setting is finished please click the Apply button for completing the setting In following two chapters we...

Страница 42: ...mera please select Dynamic IP Address from the IP Configuration Type drop down menu for assigning a dynamic IP address to PTC 305 by the router After that please click the Apply button to save the new...

Страница 43: ...ess for the camera the subnet mask and the gateway IP Note Never assign an address that ends in 0 or 255 as these addresses are typically reserved for network protocols An address to the very start of...

Страница 44: ...soft com en us p dvip network config 9p6gtz839k6s activetab pivot 3Aoverviewtab Android https play google com store apps details id com datavideo dvipnetconfig hl en_US iOS https itunes apple com tw a...

Страница 45: ...2 After the Network interface is selected the DVIP Network Configuration Tool interface will be shown as following diagram Step 3 Please press PTC 305 and then the network settings pop up window will...

Страница 46: ...for changing the device name Users can also click each setting column for changing value if it is needed After that please press Save for saving those settings Users can also press Default for resumi...

Страница 47: ...AI Auto Tracking function Please press the AT button of the remote controller 2 At this time PTC 305 s AI Auto Tracking function will be turned on There is a reminder Start Tracking that will be shown...

Страница 48: ...dy and Close Up 7 4 How to set the AI Auto Tracking Presenter Mode by the Web UI You can also use the PTC 305 Web UI to set the AI Auto Tracking function Please follow the steps below to set the Auto...

Страница 49: ...to 4 tracking areas Zone A Zone B Zone C Zone D You have to set at least 2 tracking zones and the maximum is up to 4 tracking zones Please pay attention that for setting the tracking zone in Zone Mode...

Страница 50: ...refer to the steps below to set the related settings of the Zone Tracking Mode 1 At first please click AT Zone to enter the Zone interface 2 Please set your desired camera settings and camera lens ang...

Страница 51: ...g start area from the Tracking Start Area drop down menu s Zone A Zone B Zone C and Zone D After that please select Zone 2 Zone 3 or Zone 4 from Zone option For example if the Zone 2 is set the zone t...

Страница 52: ...set and control your PTC 305 devices 8 1 Live Live option allows users to preview the image which is shot by the PTC 305 in a real time basis Please click the Live option and then users can preview th...

Страница 53: ...Video Format and Encode Level Moreover it also allows users to set the Encode Protocol Resolution Bit Rate Frame Rate I Key Frame Interval and Bit Rate Control for the First stream and Second stream...

Страница 54: ...including the video format and frame rate will be affected by the camera OSD menu settings Note 1 If you want to use the PTC 305camera to connect to some Datavideo switchers which support the interlac...

Страница 55: ...ver it will occupy more network bandwidth Resolution for the second stream Bit Rate First Stream Second Stream It allows users to determine the Bit Rate range by themselves The range for the Bit Rate...

Страница 56: ...terval between two I frames When the interval is larger the response speed from the viewing window will be lower Bit Rate Control First Stream Second Stream There are two ways for Bit Rate Control inc...

Страница 57: ...er to make sure that the video formats for the PTC 305 and the HS 1300 are consistent Moreover it can assure that the input screen that is received by the HS 1300 can be displayed correctly Please fol...

Страница 58: ...e and then press the ENTER button again to confirm your selection Step 9 Please press the right arrow button again to select the Save Setup option Step 10 Please use the left arrow button and the righ...

Страница 59: ...DI The SDI IN 1 to SDI IN 4 interfaces which are located on the rear panel of the HS 1300 represent the MULTIVIEW window s Input 1 to Input 4 For HDMI The HDMI IN 1 to HDMI IN 2 interfaces which are l...

Страница 60: ...Start Position drop down menu allows you to set the start position of the auto tracking The Figure Size option allows you to select Full Half Body or Close Up For the Zone mode the Zone Setting allow...

Страница 61: ...61...

Страница 62: ...Brightness This option allows users to adjust the Brightness Please use the slider for adjusting the Brightness Saturation This option allows users to adjust the Saturation Please use the slider for a...

Страница 63: ...ully Flip Please check the checkbox of the Flip On option and then please click the Apply button for flipping the image that is shot by the camera Mirror Please check the checkbox of the Mirror On opt...

Страница 64: ...lt audio type is the AAC format Sample Rate This drop down menu allows users to select desired sample rate for the input audio source There are two sample rate including 44 1K and 48K for users to sel...

Страница 65: ...ressed all of the changes will not take effect 8 6 System This System option allows users to select functions including Reboot Factory default User Guest Name and Password The main interface of the Sy...

Страница 66: ...r please press the OK button for resuming PTC 305 s OSD menu to its factory default value User There are several items including Username Password Guest and Password for users to set the username and...

Страница 67: ...Key If the Cancel key is pressed all of the changes will not take effect 8 7 Network The Network option allows users to set many network related functions The main interface of the Network option is s...

Страница 68: ...68...

Страница 69: ...cted it will operate in DHCP mode IP Address Subnet Mask Gateway DNS Address If the fixed IP address is selected users can set related parameters manually After the settings are finished please click...

Страница 70: ...llback Subnet Mask This is the backup Subnet Mask 255 255 255 0 When the DHCP mode can not be detected within default seconds it will change to this Subnet Mask automatically HTTP Port This is the HTT...

Страница 71: ...ming key from the streaming platform and then paste them into this MRL column After that please press the Apply button for starting the streaming successfully Second Stream This option allows users to...

Страница 72: ...ect Caller or Listener mode from this drop down menu SRT Server This SRT server provides an IP address for you to enter into your SRT streaming software when you are using the SRT streaming function a...

Страница 73: ...ad is a percentage which is set according to the network link You can multiply this percentage value by the encoder encoded video and audio total bitrates to get the maximum overhead which is allowed...

Страница 74: ...0 to 8000 SRT Stream ID This option allows you to turn on or turn off the SRT Stream ID The Stream ID is an information which can be exchanged between the SRT Caller and the SRT Listener when the SRT...

Страница 75: ...to turn on or turn off the Multicast function Address This option is the address of Multicast The default value is 224 1 2 3 Port This is the Port No of the Multicast The default No is 6688 NTP Time...

Страница 76: ...sers can enter different X coordinate and Y coordinate positions to determine the position for showing the time on the screen The allowable setting range is from 0 to 100 Sub Time Show Position This o...

Страница 77: ...77 Items Descriptions Cancel Key If the Cancel key is pressed all of the changes will not take effect...

Страница 78: ...ealizing the descriptions for each item for the information option Items Descriptions Device ID This column allows users to determine the device ID by themselves What they have to do is to enter their...

Страница 79: ...79 Items Descriptions Cancel Key If the Cancel key is pressed all of the changes will not take effect...

Страница 80: ...the Web UI allows users to control the directions Zoom In Zoom Out Focus Near and Focus Far parameters for the PTZ camera lens Moreover users can also adjust the panning tilting speed preset setting a...

Страница 81: ...ocus In Focus Out Click Zoom In or Zoom Out for zooming in or zooming out the camera lens Click the Focus In or Focus Out for Focusing Near or Focusing Far the camera lens Pan Speed The Pan Speed allo...

Страница 82: ...for users to set Users can use Set button to set the preset position and users can use the Call button to recall the pre saved presets OSD PTZ Drop Down Menu Press the OSD option from the web UI allow...

Страница 83: ...camera parameters and camera lens positions in advance 2 Please enter your desired preset number in the Preset column 3 Please click the Set button and then the preset is set successfully How to Reca...

Страница 84: ...eover it also allows you to select the Presenter or Zone tracking mode from the drop down menu You can also turn on or turn off the reminder If the reminder is turned on there is a green frame that wi...

Страница 85: ...oid or iOS platform by using the following addresses Note The Datavideo PTZ View Assist App can be operated only in DVIP mode So please remember to adjust the PTC 305 camera to the DVIP mode before us...

Страница 86: ...2 3 ON OFF ON VISCA ID 5 1 2 3 OFF ON ON VISCA ID 6 1 2 3 ON ON ON VISCA ID 7 DIP SW 4 Remote Control Protocol 4 ON or OFF System will detect automatically DIP SW 5 6 7 Resolution 5 6 7 OFF OFF OFF 00...

Страница 87: ...tch allows the user to assign an ID number to the camera so that the user can navigate between the cameras by pressing the CAMERA SELECT buttons DIP SW 1 2 Camera Select Function IR Remote Control Cam...

Страница 88: ...follow following steps for playing the RTSP streaming by using the VLC Player 1 Please open the VLC Player 2 Please click Media Open Network Stream 3 Please enter the RTSP address rtsp ip address port...

Страница 89: ...89 4 Please click Play button Note The default port No of the RTSP is 554 if the default http port of the camera is 80 it is no need for users to enter the port No...

Страница 90: ...player such as the VLC Player Please follow following steps for playing the RTP Multicast in the VLC Player 1 Download VLC media player from the link https www videolan org 2 Open VLC click Media Ope...

Страница 91: ...for Streaming 1 Please go to Facebook Live website https www facebook com formedia solutions facebook live and then please click Go Live Now button which is shown in the following diagram Note Faceboo...

Страница 92: ...eo in the Title and Description columns Moreover you can determine whether you want to share your live streaming video to your Facebook Story 4 Please select Advanced Settings and then you can see the...

Страница 93: ...ase click the Copy buttons which are located next to the Server URL and Stream Key columns respectively After that please paste them to the First Stream MRL column in the Network option of the PTC 305...

Страница 94: ...at the Video and Audio checkboxes are checked 6 Please click the Apply button 7 Please click the Reboot button in the System option to reboot the PTC 305 8 After the PTC 305is rebooted you can see the...

Страница 95: ...9 Please set related settings including Choose where to post and Select audience After that please press the Go Live button for live streaming the real time image which is shot by the PTC 305 immediat...

Страница 96: ...If you want to stop the live streaming please click the End Live Video button for stopping the live streaming immediately Use the Personal Facebook Page or the Facebook Fan Page for Streaming 1 Please...

Страница 97: ...following diagram 3 Please select the Streaming Software option and then please enter the title and description of your live streaming video in the Title and Description columns Moreover you can dete...

Страница 98: ...nd the Stream Key which are on the page for live streaming videos on the Facebook page 5 Please click the Copy buttons which are located next to the Server URL and Stream Key columns respectively Afte...

Страница 99: ...99 Note Please make sure that the ON is selected for the First Stream MRL Moreover please make sure that the Video and Audio checkboxes are checked 6 Please click the Apply button...

Страница 100: ...ick the Reboot button in the System option to reboot the PTC 305 8 After the PTC 305 is rebooted you can see the real time preview which is shot by the PTC 305 camera from the Video option of the Face...

Страница 101: ...ase press the Go Live button for live streaming the real time image which is shot by the PTC 305 immediately 10 And then you can see that the live streaming is done successfully If you want to stop th...

Страница 102: ...ng steps for realizing how to stream to Youtube streaming platform 1 Please go to Youtube website www youtube com and then click Create Go Live 2 Users will enter Youtube Live Control Room page please...

Страница 103: ...reaming Software option 4 Users will see the main page of the Youtube Studio Please click the EDIT button for setting detail information of your streaming activity After you finish filling out those i...

Страница 104: ...at are provided by the Youtube streaming platform Please copy the stream key and stream URL and then paste them into the First Stream MRL within the Network option of the PTC 305 Web UI Please click O...

Страница 105: ...ply button 7 Please reboot the PTC 305 camera and then users can see the streaming is started on the Youtube Live page If you want to stop the live streaming please click the END STREAM button for sto...

Страница 106: ...ing to following steps 1 At first please go to vMix official website and then download the vMix 60 day free trial This section will use vMix free trial as an example to demonstrate the operation steps...

Страница 107: ...107 4 Please click I accept the agreement and then click the Next button 5 Please click the Next button...

Страница 108: ...108 6 Please click the Next button 7 Please click the Next button...

Страница 109: ...109 8 Please click the Install button 9 The installation will be started...

Страница 110: ...se click the Finish button to finish the installation 11 Please select Register for a fully functional 60 Day Trial to fill out your Email Address After that please click the OK button to open the vMi...

Страница 111: ...111 12 Please select the initial resolution and frame rate that you want to use and then please click the OK button 13 After opening vMix the software interface is shown as following diagram...

Страница 112: ...ing the Caller Mode and the Listener Mode Please see following steps for realizing operation steps for the vMix If the PTC 305 is set in Listener Mode 1 At first please click the Vmix x64 from the Sta...

Страница 113: ...8 AES 192 and AES 256 The default value of the SRT Encryption option is Off In this section we will take AES 256 as an example If you need to set an SRT password please enter your desired SRT password...

Страница 114: ...SRT interface which is shown in the following diagram 6 Please select the SRT Caller option from the Stream Type drop down menu After that please enter the default static IP address 192 168 100 100 o...

Страница 115: ...Length please select 32 from the drop down menu After all of the values are entered please press the OK button 7 After that you can see that the image which is shot by the PTC 305 is streamed to the v...

Страница 116: ...llowing diagram 3 At first please go back to the PTC 305 web UI and then please click ON from the SRT option 4 Please select Caller from the SRT Mode drop down menu 5 Please enter the static IP addres...

Страница 117: ...s the Apply button 10 Please press the Reboot button from System Reboot from the PTC 305web UI 11 Please go back to the Vmix interface press the More option by pressing the Add Input option After that...

Страница 118: ...118 in the Stream ID column After all of them are entered please press the OK button 12 You can see that the image which is shot by the PTC 305 is shown in the Vmix software by Caller Mode...

Страница 119: ...ontrol you can also connect your PC or any keyboard controllers to the RS 422 remote port to control PTC 305 Use an Ethernet cable to connect the external RS 422 controller to PTC 305 You can make you...

Страница 120: ...45 Port PTC 305Camera RS 422 Port GND 1 White Orange White Orange 1 GND NC 2 Orange Orange 2 NC TX 3 White Green White Green 3 RX RX 4 Blue Blue 4 TX RX 5 White Blue White Blue 5 TX TX 6 Green Green...

Страница 121: ...pdate by the PTC 305 Firmware Update Tool Requirements PTC 305 Unit PC Laptop Latest Firmware Download from https www datavideo com product PTC 305 Ethernet Cable Procedure 1 At first please confirm t...

Страница 122: ...ss which is set by your laptop from the Interface drop down menu After that please press the Search button 6 Users can see that the interface of the firmware update tool is shown as following diagram...

Страница 123: ...123 7 Please select the Upgrade option and then users can see the interface which is shown as following diagram 8 Please click the Open button and select the downloaded latest firmware...

Страница 124: ...pgrading At this time the external connected monitor will show the wording Upgrading Please Wait 10 After the firmware upgrading is finished the PTC 305 camera will reboot automatically please click t...

Страница 125: ...w datavideo com product PTC 305 and then save it to the hard disk of your laptop 3 Please unzip the downloaded firmware file and then save the latest firmware file VXXXDA_Axx D_Vx x xx_xxM_yyyymmdd im...

Страница 126: ...option is selected please press the Microjoystick from the PTC 305remote controller to enter the Setup page 8 Please move down the Microjoystick of the PTC 305 remote controller to the USB Upgrade opt...

Страница 127: ...ocedure the reminder Updating Please Wait will be shown on the screen When the firmware update procedure is done the PTC 305 will reboot automatically and the firmware update is done successfully Note...

Страница 128: ...se a neutral detergent rather than acidic or corrosive detergents to clean the lens 2 There is no output video 1 Check that your power is properly connected This is indicated by the power LED 2 After...

Страница 129: ...is not working 1 Try setting the camera to CAM1 and try again 2 Make sure the remote control s battery is fully charged 3 Check your device working mode 4 Make sure the OSD menu is closed The remote c...

Страница 130: ...130 21 Dimensions Unit mm...

Страница 131: ...lectronic Shutter 1 30s 1 10000s Zoom Ratio 20x Optical Zoom 16x Digital Zoom Iris Control Auto Manual Digital Noise Reductions 3D On Screen Display OSD English Simplified Chinese Traditional Chinese...

Страница 132: ...co P VISCA VISCA over IP DVIP Remote Control Interface IR Web GUI RS 422 DVIP Video Compression Format H 264 H 265 MJPEG Audio Compression Format AAC Audio Bitrate 96Kbps 128Kbps Streaming Protocols R...

Страница 133: ...UI or USB 2 0 IR Control Yes Camera Control Unit RMC 180 series RMC 300 series PTZ View Assist APP Tripod Mount 1 4 20 UNC Optional Accessories WM 1 WM 10 WM 11 Color Dark Blue White Dimension LxWxH...

Страница 134: ...134 Note...

Страница 135: ...135 Note...

Страница 136: ...136 Service and Support www datavideo com product PTC 305 Sept 04 2023 Ver E3...

Отзывы: