DI–1000TC User Manual
Getting Started
9
2.
Insert the
WinDaq Resource CD
in your drive. The installation software should start automatically within 20 sec-
onds. If it does not start it manually by double-clicking the Setup application (setup.exe)located on the root of the
WinDaq Resource CD.
3.
In the “What do you want to do?” dialog box, select the radio button “Install Software” and click OK.
4.
In the “Installing Software” dialog box, select the radio button “Install Software for all other products” and click
OK.
5.
In the “Specify the product” dialog box, select “WINDAQ/Lite, WWB, and Software Development Kit” and
click OK.
6.
In the “Specify the Instrument” dialog box, select “DI-1000 Series” and click OK.
7.
The Welcome! dialog box allows the user to cancel the installation. Click OK to continue installation or Cancel
to abort.
8.
Read the License Agreement. If you accept the terms, click Accept and Continue. If you choose not to accept,
click on the Do not accept and stop button to end the installation.
9.
When prompted, specify the directory where you want to install your WinDaq software. It is recommended that
you accept the default. If you have already successfully installed a DI-1000 instrument be sure to install to the
same folder.
10. In the “Interface” dialog box click on the USB button.
11. Make sure all DATAQ Instruments USB devices are disconnected. Click OK to continue.
12. Connect the DI-1000-USB adapter to your computer’s USB Port using the supplied cable.
13. Connect the DI-1000TC to the DI-1000-USB adapter using a patch cable.
14. Connect and apply power to the DI-1000TC. Wait for Windows to complete driver installation.
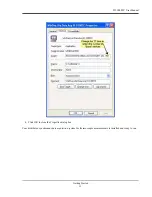
15. Access the Windows Device Manager and locate the Ports (COM & LPT) icon and click the small “+” sign to
expand the menu and see all the devices installed.
16. Note the COM number that has been assigned to your device and close the Device Manager.
17. Specify the COM port number your instrument is connected to (steps 15 and 16 above) and click OK. If you do
not enter this correctly, you may run WinDaq Lite Data Acq Setup from your WinDaq Program Group to change
it.
18. When prompted to Select a Program Manager Group specify a destination (or group window) in the Start Menu
for WinDaq software icons. It is recommended that you accept the default.
19. In the “Installation Option” dialog box specify whether you want all users to have access to WinDaq software or
just the current User. Click Yes to allow all users to have access, click No to allow just the current user to have
access.
20. Select the Baud Rate. You should not need to change the Baud Rate - all DI-1000TC modules come pre-config-
ured from the factory. If you do not enter this correctly, you may run WinDaq Lite Data Acq Setup from your
WinDaq Program Group to change it.
21. You should now see the Done! dialog box. Installation is complete. To exit the installation program click OK.


