22 18/10/2010
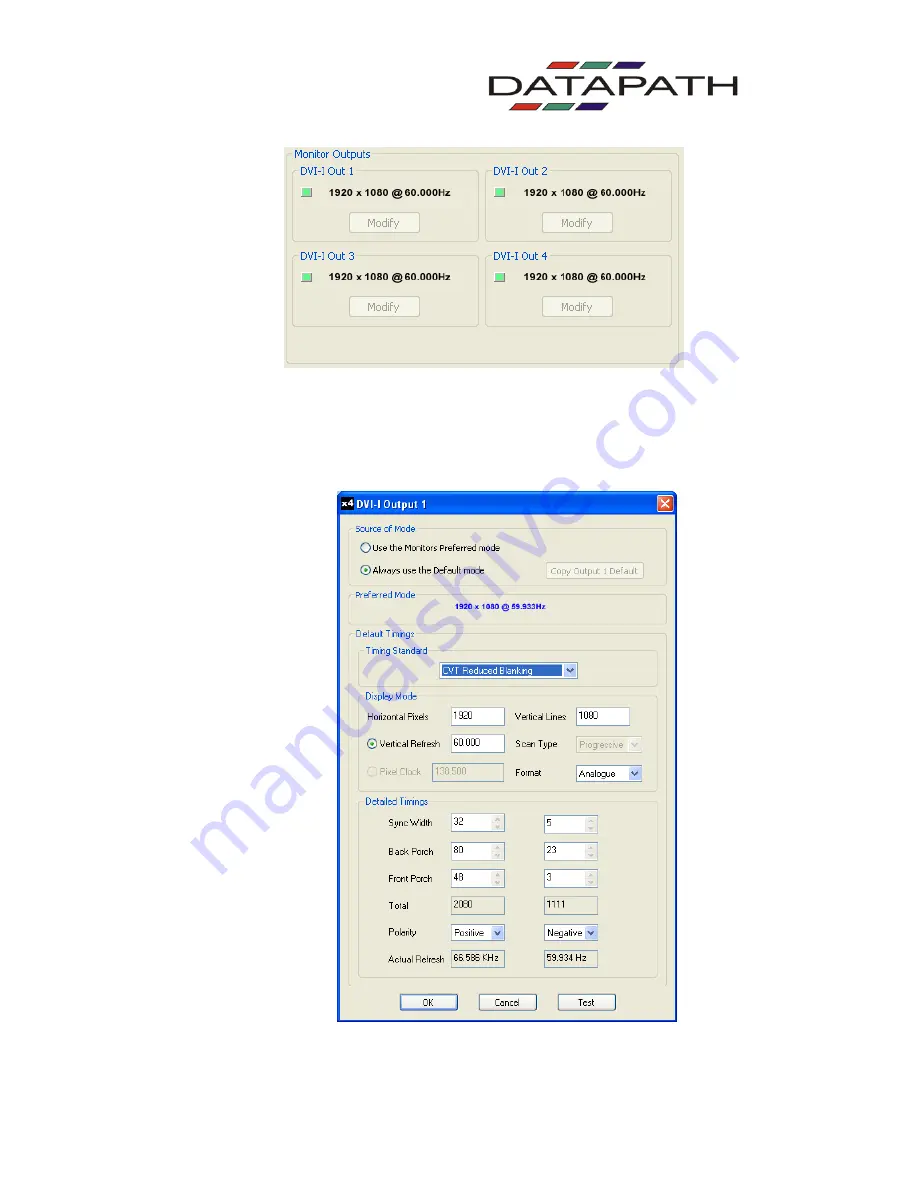
Fig.11
Individual monitor outputs can be configured by clicking on the corresponding
Modify
button.
This will bring up a timing dialog similar to that of the input timings. This dialog is shown in
Fig.12.
Fig.12
Страница 1: ...1 18 10 2010 User Manual Datapath Limited Alfreton Road Derby DE21 4AD England Tel 44 0 1332 294441 Fax 44 0 1332 290667 Email sales datapath co uk Web http www datapath co uk...
Страница 2: ...ty Instructions 3 Introduction 4 Configuration Examples 5 Unpacking 9 Description 10 Setting up the x4 12 Configuring the x4 13 Operating Instructions 15 X4 Control Application 16 Specification 24 Dat...
Страница 3: ...The equipment should be located in an environment free from dust moisture and extreme changes in temperature and should be placed on a stable and solid work surface Liquids hot cold drinks etc should...
Страница 4: ...rop region of the original input image The output resolution and frame rate does not need to be related to that of the input as the Datapath x4 will optionally upscale and frame rate convert each crop...
Страница 5: ...s are just a few examples of what can be achieved with the Datapath x4 The list of examples is not definative and users are encouraged to experiment with different display orientations Duplicate the i...
Страница 6: ...Divide the input signal into quadrants and display each quarter on separate displays with optional frame rate conversion in this case 30Hz to 60Hz Crop regions can be adjusted to provide monitor bezel...
Страница 7: ...he input signal x2 and display 1 on a single landscape display and divide the 2nd into thirds rotate to portrait upscale and split between 3 displays Crop input signal upscale specific areas and displ...
Страница 8: ...splay x2 quarters landscape and x2 quarters portrait Crop the input signal x4 rotate through 90 180 or 270 display in landscape and portrait Arbitrary crop regions can allow the monitors to be artisti...
Страница 9: ...also recommend that you make note of the serial number of the controller in a prominent place before you connect it to the computer This should hasten any query should you need to contact our Technic...
Страница 10: ...operating over the normal operating temperature Ensure the input fan vent is not blocked If the Status LED goes off and remains off this indicates that the settings configured in the x4 application n...
Страница 11: ...tion and gaps DVI D Input Socket The DVI D Input socket is used to connect the DVI input source to the x4 The x4 supports Dual Link DVI Single Link DVI and also HDMI not HDCP compliant by using the op...
Страница 12: ...page 9 Power up the DVI source The Power LED located on the front panel will illuminate to indicate that power has successfully been applied to the unit The x4 incorporates an internal processor that...
Страница 13: ...Preferred Mode resolution and timings presented by the x4 EDID but they may need to be forced to re detect if the EDID contents are changed by the x4 application This would typically be via a hot plu...
Страница 14: ...tor the x4 would upscale from an 800x600 region and would reprogram its scale factors to 2 4 horizontally and 1 8 vertically to support the same 1080p monitor The cropping regions can be assigned arib...
Страница 15: ...DVI I VGA cables are required To connect to a DVI output a DVI D cable is required Configuring the x4 The x4 has a USB port to allow a host PC to connect to the x4 box and for the user to program its...
Страница 16: ...upplied At this point the hardware will be detected by Windows as an x4 splitter and a New Hardware wizard is displayed Allow the wizard to search and click on the recommended option to to enable the...
Страница 17: ...ice The unique USB device name that is connected is displayed in the Device group It is possible to associate a more user friendly name such as First Four Outputs The friendly name is stored in non vo...
Страница 18: ...Modify button to update the EDID The small square to the left of the current input resolution indicates whether the x4 has genlocked to the input source Green The outputs are genlocked to the input do...
Страница 19: ...eters to be edited It should be noted that you will need to select between definition of Pixel Clock or Vertical Refresh since these are mutually excusive parameters Once edited clicking OK writes the...
Страница 20: ...The numbers denote the top left width and height coordinates of the region that is to be displayed Note these are described in terms of the current active input resolution If the input resolution chan...
Страница 21: ...ses In this case the firmware will adjust the scaling factors to give a 1 1 crop of the input centred on the original region In order to signal that at least one output is no longer exactly honouring...
Страница 22: ...10 Fig 11 Individual monitor outputs can be configured by clicking on the corresponding Modify button This will bring up a timing dialog similar to that of the input timings This dialog is shown in Fi...
Страница 23: ...he dialog is identical to that for setting the Input timings with the exception that for the output monitors it is possible to select Analog RGB VGA output as well as DVI All modifications to the Outp...
Страница 24: ...contains a cooling fan The input and output vents should not be restricted USB 2 0 Full speed 12Mbits s operation supported 1 x Dual link DVI capture To 330 Mpixels s Input Surface 4k x 4k maximum 4...
Страница 25: ...usually with a response within 24 hours excluding weekends www datapath co uk suppnew asp Via Email Send an email to support datapath co uk with as much information about your system as possible To en...
Страница 26: ...26 18 10 2010 UK Headquarters and Main Sales Office Datapath Limited Alfreton Road Derby DE21 4AD Tel 44 0 1332 294441 Fax 44 0 1332 290667 Email sales datapath co uk Web www datapath co uk...
Страница 27: ...mware Support 23 front panel 10 Input Capture Regions 20 Input Sockets 11 Input Surface 23 Monitor Outputs 13 21 Operating Temperature 23 Output 15 output sockets 12 packing box 9 Physical Dimensions...
Страница 28: ...28 18 10 2010...