background image

C-BOX 150 


2.6 TYPICAL 

LAYOUTS 


2.6.1 

1000, 2000A/N, 4000 Family Scanners 

 
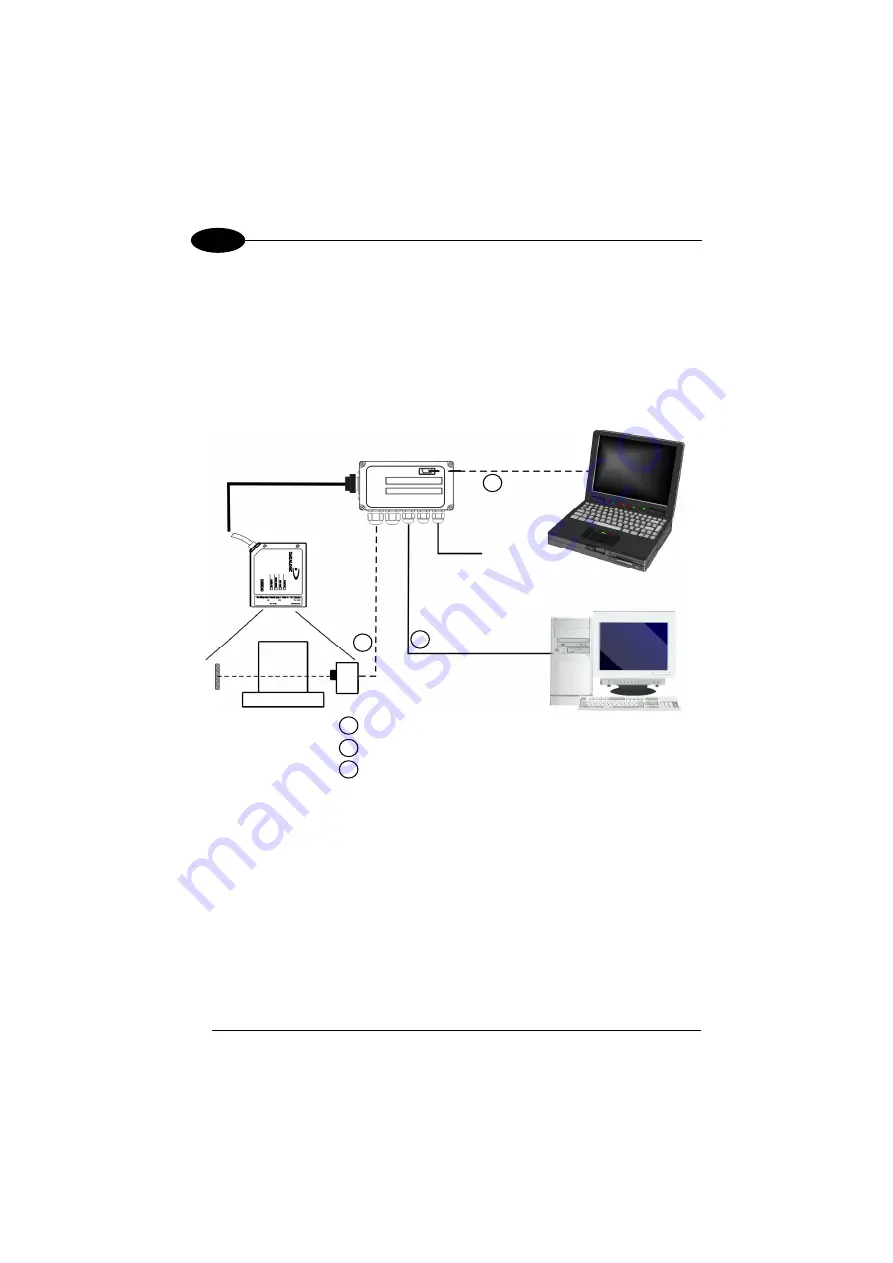
For 1000, 2000A/N and 4000 scanner families which operate in a point-to-point 
single scanner configuration, a typical layout is shown below and the C-BOX 150 is 
connected as follows. 


Laptop 

Host 

Scanner 

1

2

Main serial interface

Auxiliary serial interface (Local Echo)

External Trigger (for On-Line mode)

PWR supply

C-BOX 150


Figure 17 – Typical point-to-point scanner Layout 


20


Содержание Connection Box C-BOX 150

Страница 1: ...www automation datalogic com C BOX 150 Installation Manual...

Страница 2: ...hout prior notification Datalogic shall not be liable for technical or editorial errors or omissions contained herein nor for incidental or consequential damages resulting from the use of this materia...

Страница 3: ...sis Grounding Jumper Settings 12 2 4 4 Scanner Selection 12 2 4 5 RS485 Bus Termination 13 2 4 6 Powering C BOX 150 From A Scanner 13 2 4 7 OM4000 Jumper Settings 14 2 4 8 Configuration Switch And 9 P...

Страница 4: ...s is a Class A product In a domestic environment this product may cause radio interference in which case the user may be required to take adequate measures WEEE COMPLIANCE ENGLISH Information for the...

Страница 5: ...er den sie das Produkt erworben haben oder besuchen sie unsere Hompage unter www automation datalogic com FRAN AIS Information aux utilisateurs concernant la Directive Europ enne 2002 96 EC Au terme d...

Страница 6: ...GENERAL VIEW C BOX 150 2 3 1 Figure A 25 pin scanner connector Cover screws 4 Compression connectors 1 2 3 vi...

Страница 7: ...larity error LED red 5 4 RS485 Bus termin switch Scanner selection switch 10 INT 30 power connector 11 12 Auxiliary port connector OM4000 jumpers 13 Warning LED red 14 Status LED 6 Power on LED green...

Страница 8: ...4 Set all the proper configuration jumpers and switches according to your application See all sub paragraphs under 2 4 5 Connect the scanner to the C BOX 150 6 Switch on the system 7 Wait until the W...

Страница 9: ...scanner Therefore the substituted scanner will be correctly configured The C BOX 150 allows you to perform the following functions Facilitate the connection of the scanner signals using a spring clamp...

Страница 10: ...ing scanners through the 25 pin connector illustrated in Figure A Scanner Configuration Tool DS1100 WinHost DS2100A WinHost DS2100N Genius DS2200 WinHost DS2400A WinHost DS2400N Genius DS4600A WinHost...

Страница 11: ...and all the parts supplied with the equipment are present and intact when opening the packaging the list of parts includes 1 C BOX 150 2 Installation manual 3 C BOX 150 configuration CD ROM 4 2 mount...

Страница 12: ...open it by unscrewing the four cover screws CAUTION The C BOX 150 must be disconnected from the power supply during this operation Figure 2 Opening the C BOX 150 It is possible to perform the followin...

Страница 13: ...The diagram below gives the overall dimensions of the C BOX 150 and may be used for its installation mm inch 3 5 0 14 12 0 47 66 2 60 12 0 47 5 0 20 150 5 91 5 0 20 40 1 57 161 6 34 90 3 54 89 8 3 54...

Страница 14: ...4 To mount the C BOX 150 1 Open the C BOX 150 by unscrewing the 4 cover screws If necessary using the two mounting holes inside the device as a pattern mark the panel with an appropriate object and t...

Страница 15: ...nal spring clamp connectors The scanner configuration and data monitoring are possible once the warning LED is turned OFF The internal 9 pin connector can also be used to configure the C BOX 150 with...

Страница 16: ...n the package to improve the C BOX 150 noise immunity Simply connect its open end to the scanner cable s fixing screw and the other end to the ground as shown in the figure below 2 4 1 Power Supply Po...

Страница 17: ...larity reversal A dedicated red LED signals this condition until correct polarity is restored 2 4 2 System Wiring The connection and wiring procedure for C BOX 150 is described as follows 1 Open the C...

Страница 18: ...xt to the clamp see Figure 8 Insert the wire into the clamp and release the lever The wire will now be held in the spring clamp Figure 8 System Cable Connections The wiring used can be solid or strand...

Страница 19: ...IN1 IN 2 ENC B 31 NC NC NC IN2 IN 3A 32 NC NC NC IN2 IN 4A 33 RESERVED RESERVED RESERVED RESERVED IN 3A 34 RESERVED RESERVED RESERVED RESERVED IN 4A 36 NC RTSA ID NET GND IN 3B IN 4B 38 NC CTSA ID NE...

Страница 20: ...od earth ground or to the power supply ground signal The scanner chassis can also be left floating but in this case the jumper must be removed Figure 9 Chassis Grounding 2 4 4 Scanner Selection DS1100...

Страница 21: ...is resistor MUST NOT be enabled OFF position 2 4 6 Powering C BOX 150 From A Scanner In order for C BOX 150 to accept power from the scanner through the 25 pin connector instead of the external power...

Страница 22: ...pin 20 to pin 28 EXT TRIG If the jumpers are removed pin 20 and pin 40 are disconnected 2 4 8 Configuration Switch And 9 Pin Internal Connector The 9 pin internal connector may have two different fun...

Страница 23: ...the C BOX 150 configuration see table below The C BOX 150 enters configuration mode and waits to be configured through WinHost see WinHost Help On Line Once the C BOX 150 configuration is completed it...

Страница 24: ...ng mode the scanner reads barcodes and communicates with the host Also in this mode through the C BOX 150 internal buttons it is possible to communicate with the scanner to perform one of the three GE...

Страница 25: ...150 preserves this configuration also when switched off The GET option can be disabled through WinHost TEST center button The C BOX 150 forces the WinHost compatible scanners only to run the Test Ope...

Страница 26: ...OWER POLARITY ERROR red indicates a wrong polarity While activated all other LEDs will be off until the power feed is connected with correct polarity WARNING WL red indicates a warning or error condit...

Страница 27: ...y is empty no configuration on board 1 blinking sec the memory is not empty a Get scanner configuration service has been executed 2 blinking sec the memory is not empty a Get Scanner Configuration ser...

Страница 28: ...ate in a point to point single scanner configuration a typical layout is shown below and the C BOX 150 is connected as follows Laptop Host Scanner 1 2 3 1 2 3 Main serial interface Auxiliary serial in...

Страница 29: ...cal ID NET scanner Layout C BOX 150 can perform Backup Restore of a whole cluster under the following conditions the Master Slave network is composed of one master and up to 9 Slaves maximum the Maste...

Страница 30: ...4 Slave 3 PWR 240 CAB 63XX Figure 19 Typical Lonworks scanner Layout NOTE In a Master Slave layout with a great number of Slaves a Power Supply Unit can be connected to the scanners and the C BOX 150...

Страница 31: ...ter only see the WinHost Help On Line 2 7 SCANNER REPLACEMENT If you have to replace the scanner with another one 1 Switch off the system 2 Connect the new scanner 3 Switch on the system 4 Wait until...

Страница 32: ...Parameter storage Non volatile internal memory ENVIRONMENTAL FEATURES Operating temperature 10 to 50 C 14 to 122 F Storage temperature 20 to 70 C 4 to 158 F Humidity max 90 non condensing Vibration r...

Страница 33: ...s relating to electromagnetic compatibility and product safety Bas e sur la l gislation des Etats membres relative la compatibilit lectromagn tique et la s curit des produits ber die Ann herung der Ge...

Страница 34: ...www automation datalogic com C BOX 150 Installation Manual...

Отзывы: