background image


A-12

SD460 Laminating System

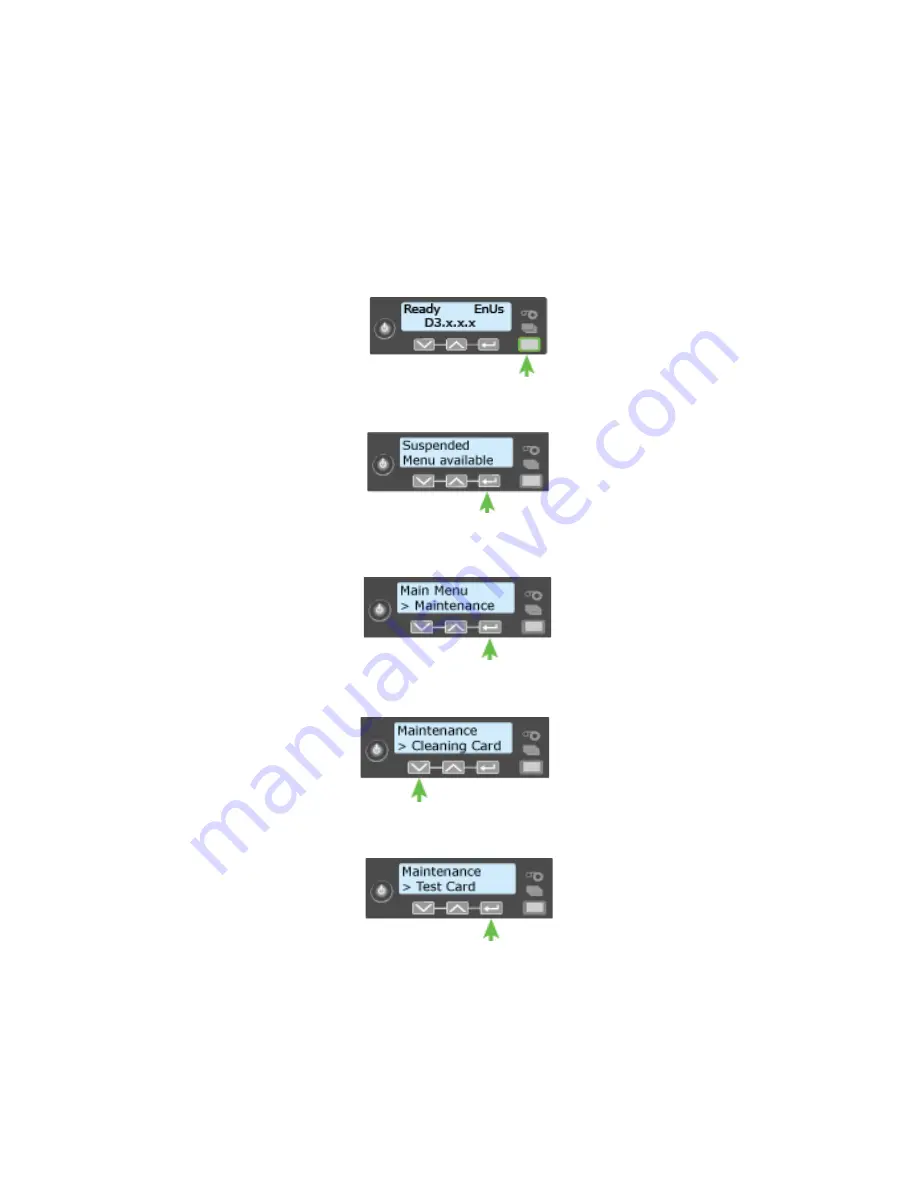
Use the Printer LCD Panel

Use


the


printer


LCD


panel


to


run


a


card


that


tests


the


L1


and


L2


laminators


(if


L2


is


installed),


debows


the


card,


and


impresses


the


card


if


an


impresser


is


installed.


Do


the


following:

1. 

Press


the


U

SER


button


to


enter


the


menu


system.


2. 

Suspended 

displays


on


line


1


of


the


LCD


panel.


Press


the


E

NTER


key.


3. 

Maintenance


displays


on


line


2.


Press


the


Enter


key.


4. 

Cleaning


Card


displays


on


line


2.


Press


the


down


arrow


key.


5. 

Test Card


displays


on


line


2.


Press


the


E

NTER


key.


Содержание SD260

Страница 1: ...Datacard SD Series Card Printers Installation and Administrator s Guide March 2014 Part No 527445 001 Rev A...

Страница 2: ...use and reproduction is prohibited Trademark Acknowledgments Datacard is a registered trademark and service mark of DataCard Corporation in the United States and other countries SD is a trademark of D...

Страница 3: ...ard Printers Installation and Administrator s Guide Revision Date Description of Changes A March 2014 First release of this document formerly Part No 527249 001 Updated for SD460 laminating system and...

Страница 4: ...iv...

Страница 5: ...r _____________________________________________________ 12 Use OpenCard Data Format ___________________________________________________ 12 Chapter 2 Elements of Card Design ___________________________...

Страница 6: ...________ 32 WebUser ______________________________________________________________ 32 WebAdmin ____________________________________________________________ 32 WebService ______________________________...

Страница 7: ...____ 79 Monochrome Print Ribbon Kits __________________________________________ 79 Ribbon Saver __________________________________________________________ 80 Print Ribbon Storage Guidelines __________...

Страница 8: ..._ A 1 SD460 Site Requirements _____________________________________________________ A 2 SD460 Electrical Requirements ________________________________________________ A 2 Unpack the System ___________...

Страница 9: ...rocessor running at 2GHz or faster 2GB or more memory RAM and at least 1GB free space on the hard drive One of the following supported operating systems Windows 8 1 Windows 8 32 or 64 bit Windows 7 32...

Страница 10: ...d communicating with the network USB Requirements You can connect up to eight card printers to a PC using USB cables To install a printer using a USB connection the following components are required A...

Страница 11: ...t keeping paper and foreign materials off of the equipment Place the printer on a sturdy level surface Place the printer away from direct sunlight Do not place the printer near heating ducts fans or o...

Страница 12: ...s disabled DPCL must remain enabled for the Card Printer Driver to function For more information refer to your card printer s Driver Guide If your card production site requires secure printing use the...

Страница 13: ...ards load blank card stock into the input hopper and load print ribbon and a cleaning sleeve onto the print cartridge Load Cards If you are using a manual feed printer skip this step and keep a supply...

Страница 14: ...p spool counterclockwise one full turn Load the Cleaning Sleeve Load a new cleaning sleeve with each new roll of print ribbon if you notice debris on the printed cards or if the cleaning sleeve is no...

Страница 15: ...the printer cover 2 Hold the print ribbon cartridge by the handle and lower it into the printer with the handle toward the front of the printer 3 Make sure that the ribbon cartridge is correctly posit...

Страница 16: ...cards The large output hopper kit includes two base sections and the large output hopper The two base sections are identical with hooks marked by green circles that attach to the bottom of the printe...

Страница 17: ...and then push the base back to lock it to the printer 7 Remove the 25 card output hopper from the printer Slide it out similar to a drawer 8 Slide the 100 card output hopper into the assembled base a...

Страница 18: ...opper can be installed without using tools You also can refer to the instructions shipped with the 200 card input hopper kit 1 Open the input hopper 2 Press the release tab located on the back wall of...

Страница 19: ...T bar of the Kensington lock 1 Prepare the printer by installing the metal security plate A Tip the printer on its right side B Locate the security plate receptacle on the underside of the printer to...

Страница 20: ...ware with the printer s IP address Refer to your printer s Driver Guide for complete information about installing and setting up the Card Printer Driver Use OpenCard Data Format The OpenCard Data Form...

Страница 21: ...tic Stripe Design on page 25 Smart Card Design on page 28 Settings for Card Design in Printer Manager on page 29 Basic Card Design Card design includes Color and monochrome printing The various types...

Страница 22: ...overlay materials However DuraShield overlay materials require that the ribbon topcoat be applied first Laminating printers also support full color print ribbon with a front side ultraviolet UV fluore...

Страница 23: ...information Print Text in Color The printer can print text in any color Small characters are likely to be more readable if they are a sans serif font formatted as black and printed with the black K p...

Страница 24: ...at can help improve the printed color of text B Use an image editing application to adjust the color of a logo file for optimal printing Monochrome Printing Monochrome printing prints cards using a si...

Страница 25: ...nter leaves a small margin between each card to avoid image overlap Print Text in Monochrome Printing text using a K panel can make text look crisp because it uses only one panel for printing Fine tex...

Страница 26: ...ftware processes it using the K panel of the print ribbon If the data contains a pixel of color other than pure black or pure white such as the various colors in a JPEG image it processes the image us...

Страница 27: ...readability Choose a K power value and bar code size to produce the grade your system requires Refer to Printer Setting Menu on page 37 for information about setting the K power value Test Bar Codes...

Страница 28: ...y can affect images supplies or printer operation If you change the design of your cards or if you start producing an additional card design review setup tasks to make sure that each design prints as...

Страница 29: ...urability and security Refer to Laminator Supplies on page 81 for information about the types of overlays available Non Printing Areas The card design can have areas where printing is not allowed Such...

Страница 30: ...ws the direction the card travels through the printer Use the following dimensions to prevent printing in the smart card area Custom Non Printing Areas Use ID software a custom application or escape c...

Страница 31: ...of a Card The card printers can print edge to edge which is the same as a margin of zero 0 or no margin The card on the left shows a margin of white space at the outer edge of the card The card on th...

Страница 32: ...a smart card chip Image Placement Use the following suggestions to help you locate important images such as a photo logo or bar code When placing images avoid uneven areas and areas of high wear which...

Страница 33: ...many characters can be encoded on each track and which characters can be encoded Your cards can use the default format for each track or can use a different combination of tracks and data formats Thre...

Страница 34: ...ustrial Standard Type II format The maximum number of characters for the JIS format is 69 characters These characters can include spaces numeric characters uppercase alphabetic characters lowercase al...

Страница 35: ...values are set they remain the same for all cards processed using the same design The defaults are set to standard ISO format and high coercivity Refer to MagStripeGeneral on page 52 for information a...

Страница 36: ...mart card reader in the printer A cable for the smart card port used this cable is not needed for single wire processing A card production application that is designed to work with the printer and the...

Страница 37: ...r other smart card systems except as noted Settings for Card Design in Printer Manager Printer Manager contains card design settings that managers and service providers can use to set up card producti...

Страница 38: ...30 Elements of Card Design...

Страница 39: ...ut the printer System administrators and service providers can use Printer Manager to fine tune card appearance set advanced options and troubleshoot printing problems You can access Printer Manager u...

Страница 40: ...e WebAdmin user also can specify a password using the Printer Settings Update Password option for WebUser access level users In a card production environment the WebAdmin access level user typically s...

Страница 41: ...In screen displays 2 Select the language in which to display the Printer Manager session from the Select Language column Because you are using a secure protocol https the browser may display a warning...

Страница 42: ...e cursor hovers over the setting in the description column Printer Manager Settings The printer is shipped with recommended settings in Printer Manager You may need to change these settings to customi...

Страница 43: ...iew in your Internet browser to scale the image to fit the paper Use Printer Manager The following sections describe how to use the options on the Printer Manager menus that are available to WebUser a...

Страница 44: ...t this page for reference if you need to contact your service provider View View Printer Status Display printer status information including the printer mode the printer state how long the printer has...

Страница 45: ...ettable shown with an r as the first letter of the name and non resettable counts and error reporting collected by the printer This page acts as a general overview for all the counters and can be usef...

Страница 46: ...Available to WebService access level users only No No FrontPanel Set front panel values for the printer Change Backlight Brightness KeySenseLevel and SpeakerEnabled values Change all Current Values Pr...

Страница 47: ...Current Values Laminator Specify laminator settings Change all Current Values Change all Current Values LaminateType Specify overlay settings Change all Current Values Change all Current Values Update...

Страница 48: ...ide DNS server information When the value is STATIC the EthGatewayAddress EthIPAddress and EthSubnetMask values must be set manually EthGatewayAddress Enter the gateway address for the Ethernet networ...

Страница 49: ...you are writing to an external log ExternalLog is set to Enabled FilterCardActions Write the start and completion of a card action with the specified severity and higher to the activity log FilterCon...

Страница 50: ...Example Change the FilterJobStates status recorded in the activity log to help isolate a card production problem 1 Select Printer Setting Activity Log 2 Set FilterJobStates to Error from the drop down...

Страница 51: ...l Enabled Enabled 3 CPX Enabled Enabled 4 DPCL Enabled Enabled 5 DPCL2 Enabled Enabled 6 DPCL2Secure Enabled Enabled 7 DPCLSecure Enabled Enabled 8 NetworkAccessControl Disabled Disabled 9 Plugin Enab...

Страница 52: ...twork access control Plugin Enable or disable the plugin feature for the printer to access an installed plug in This setting is used for OpenCard enabled printers RejectHopper Enable or disable use of...

Страница 53: ...light brightness at the desired level from 1 percent dim to 100 percent bright KeySenseLevel Set the front panel key sensitivity to a comfortable level Select from 0 low sensitivity almost a press to...

Страница 54: ...Low Set the percentage of ribbon remaining before being notified that the ribbon is low and should be changed The ribbon light blinks amber when the ribbon reaches this value SpeakerEnabled Enable or...

Страница 55: ...color management in the printer None disables color management in the printer and allows color management to be handled by the application sRGBColorSpace uses the standard Red Green and Blue color spa...

Страница 56: ...bbon breaks when printing with the M panel KCustom1Power1200DPI Modify the print intensity at 1200 dpi for the non black monochrome panel of MT KT ST KT or GT KT ribbon Increase the value to make sing...

Страница 57: ...to make single color printing thicker and more defined on the card Decrease the value for crisp bar codes or to prevent frequent ribbon breaks when printing with the K panel KWhiteShade Modify the am...

Страница 58: ...C color ribbon panels Increase the value to make the color printing more intense Decrease the value to reduce the color intensity or to prevent frequent ribbon breaks when printing colors YMCPower600...

Страница 59: ...e Select ehs_Standard if the printer has a standard output hopper Select ehs_Extended if the printer has an extended 100 card output hopper TransMedSpeed Set the speed at which to run the transport mo...

Страница 60: ...e 1 Attempts 3 3 1 5 2 Coercivity HICO HICO 3 DataFormat1 IATA IATA 4 DataFormat2 ABA ABA 5 DataFormat3 TTS TTS 6 NoDataDisableTrack Disabled Disabled 7 ReadTrack1 Enabled Enabled 8 ReadTrack2 Enabled...

Страница 61: ...ce The choices are HICO LOCO NTT1 NTT2 NTT3 DataFormat 1 2 3 Specify the names of the data formats used for tracks 1 2 and 3 For single track magnetic stripe encoding set DataFormat1 to JIS and DataFo...

Страница 62: ...CustomCharLength Track 1 6 Tracks 2 3 4 6 4 1 8 3 CustomCharLow Track 1 32 Tracks 2 3 48 32 48 1 255 4 CustomCharMask Track 1 32 Track 2 48 32 48 1 255 5 CustomCharMax Track 1 76 Track 2 37 Track 3 10...

Страница 63: ...ecify the number of data bits per inch of magnetic stripe media for the track also called bits per inch or bpi Allowed values are 75 bpi or 210 bpi CustomEndSentinel Specify the last character encoded...

Страница 64: ...DataFormat1 MagStripeCustomTrack2 corresponds to DataFormat2 MagStripeCustomTrack3 corresponds to DataFormat3 2 Click Set Current to apply the changes Laminator The Laminator settings let you specify...

Страница 65: ...Debow DistanceDown 15 15 0 150 16 Hopper1CardDebow DistanceUp 105 105 0 150 17 Hopper1CardDebow DwellMs 1000 1000 0 5000 18 Hopper1CardImpress Depth 0 0 200 200 19 Hopper1CardImpress DwellTime 2000 20...

Страница 66: ...tings to use in your environment Exception Card Debow Settings ExceptionCardDebowDirection Set the direction of the debow action in the laminator to return the card to its proper shape after an overla...

Страница 67: ...ession on a card The value is in steps of the impresser punch Increase the value to deepen the impression Decrease the value to lessen the impression ExceptionCardImpressDwellTime Set the time in mill...

Страница 68: ...on from the back edge of the card ExceptionCardImpressTemperature Set the temperature of the impresser punch in degrees Celsius Increase the value to increase the temperature of the impresser punch De...

Страница 69: ...is set to Down Increase the value to bend the card down more Decrease the value to bend the card down less Hopper1DebowDistanceUp Set the amount distance to move the debow arms up The value is in incr...

Страница 70: ...e offset value to decrease the distance of the impression from the back edge of the card Hopper1ImpressPositionOffset3 Set the distance from the back edge of the card to the center of the third impres...

Страница 71: ...t to read a bar code on a serialized overlay If the read fails the next read attempt advances the overlay to the next usable bar code on the overlay This applies only to laminators that have the optio...

Страница 72: ...rtridge or the job will be canceled and a supply error issued OverlayDisplayedName Select the name of the overlay whose settings you want to change Click Set Current to apply the overlay selection You...

Страница 73: ...Name when it is loaded in the specified cartridge The speed adjustment is measured in steps per second of the motor that moves the card Set the speed as the difference between the default speed value...

Страница 74: ...nter Manager If no password is assigned a password is not needed to log on to Printer Manager 1 Select the access level for which you want to assign a password The WebAdmin access level can update the...

Страница 75: ...Deactivates the printer but allows for some exception jobs Offline Deactivates the printer for transportation This setting is used primarily for financial printers Contact your service provider for mo...

Страница 76: ...t the printer To re enable an Offline printer and set it back to Online you must enter the same password that was used to set it to Offline TroubleShooting Menu Option Function WebUser WebAdmin Test C...

Страница 77: ...ut Hopper Number Select the input hopper from which the test card should be picked Magnetic Stripe Print the test card with encoded magnetic stripe data Description Card Front page 1 Card Back page 2...

Страница 78: ...n3 Use this test to identify print intensity issues that can appear as wrinkles on the printed card The option prints a dense blue color card to test the density of the printed card TestPattern4 Use t...

Страница 79: ...ront Applies overlay from the L2 laminator to the back of the card and overlay from the L1 laminator to the front of the card L2 Front L1 Back Applies overlay from the L2 laminator to the front of the...

Страница 80: ...4 0d 00h 00m 25 196s SYSTEM__WARNING Improper shutdown detected 14 0d 01h 10m 14 135s JOB_____NOTICE Resolved condition 1 JobFailed Notice 637 638 hostname 770962 0 0 Reset Log The Reset Log option al...

Страница 81: ...mation Managed Items Select Card Format Images Card Stock Fonts or Font Families and click List Items to display the current list of loaded files for the selected group To add an item to a selected gr...

Страница 82: ...er Manager Additionally the Maintenance menu provides the WebAdmin level with the rights to upload updates to the printer Cleaning Cleans the printer using a cleaning card If the printer has a laminat...

Страница 83: ...er or reject card tray 7 Remove the used cleaning card Wait a few minutes for the rollers to dry 8 Replace the supplies A Place the cards in the input hopper B Replace the cleaning sleeve with a new s...

Страница 84: ...gs file 1 Click Browse and select the file to upload 2 Click Upload File Log Out Menu Use the Log Out option to end the current Printer Manager session and return to the Printer Manager Log In page Fo...

Страница 85: ...Parts This section describes the supplies and parts for the printer It includes Print Ribbon on page 78 Laminator Supplies on page 81 Cards on page 84 Cleaning Supplies on page 87 Replacement Parts on...

Страница 86: ...s for color printing on the entire card Short Panel Color Print Ribbon Use short panel print ribbon when only a portion of the card design calls for color For example a card design may have a color ph...

Страница 87: ...ble Alternating black and topcoat panels KT ribbon 1000 images per roll Black with two topcoat panels KTT ribbon 750 images per roll The printer applies black and two topcoat panels on the same side o...

Страница 88: ...quality for about one year For optimum card quality purchase and store quantities of print ribbon that can be used within one year The print ribbon and card stock might require secure storage and tra...

Страница 89: ...d chip or can cover the card under the magnetic stripe Both topcoat and patch overlays can be clear or can have a transparent holographic image on them The holographic materials are called holographic...

Страница 90: ...1 0 mil up to 300 images roll Topcoat Clear number of images depends on lamination settings Holographic Random number of images depends on lamination settings Registered Holographic up to 600 images r...

Страница 91: ...rial might require secure storage and tracking Follow your organization s policy for storing and tracking the supplies used to make cards Store the overlay in a location away from direct sunlight with...

Страница 92: ...ng x 53 98 mm wide 0 010 to 0 030 inches thick 0 508 mm to 0 762 mm thick Actual card thickness can vary by up to ten percent from the sizes listed Typically card bow must be less than the thickness o...

Страница 93: ...rd adhesive backed cards with the printer The printing surface white side of an adhesive backed card meets the material requirements for use in the printer Use the following guidelines Store cards in...

Страница 94: ...printed cards Cards must be stacked so that they do not shift and rub against each other When you store cards make sure that no two cards contain images or blocks of color that come in contact with ea...

Страница 95: ...cleaning supplies on hand The following additional cleaning supplies are available Package of 5 Replaceable Cleaning Sleeves Package of 10 Printer Cleaning Cards Package of 5 Cleaning Swabs use a cle...

Страница 96: ...head following the steps in your printer s User s Guide Print Ribbon Cartridge The ribbon cartridge holds the print ribbon and the replaceable cleaning sleeve in the printer Cleaning Roller Spindle Th...

Страница 97: ...eplace the small standard hopper with the large hopper without using tools 200 Card Input Hopper The 200 card input hopper kit includes the larger hopper with an attached cover The standard hopper is...

Страница 98: ...connect the printer to the PC Be sure to use a cable rated for USB 2 0 data transmission Network Cable Use a standard Ethernet network cable also called a Category 5 or Cat 5 cable to connect the prin...

Страница 99: ...the printer power supply to the facility power Be sure to use a cord that grounds to the facility power source Laminator The laminator power cord connects the laminator power supply to the facility p...

Страница 100: ...92 Supplies and Parts...

Страница 101: ...tem consists of a card printer and laminator The SD460 system can print cards and apply an overlay material on the front and back of the card for increased durability and security Using an overlay mat...

Страница 102: ...rical Requirements The power supply is rated as follows Dimensions inches mm SD460 A B C D E F G X Y Without impresser 20 2 513 4 102 10 6 270 6 153 4 102 23 2 589 4 102 20 6 524 31 2 793 With impress...

Страница 103: ...accessories boxes 3 Lift the laminator from the carton and remove the foam end caps 4 Place the laminator on a surface that meets the requirements specified in SD460 Site Requirements on page A 2 5 Se...

Страница 104: ...001 contains two M6 well nuts Two M6 6 mm screws purchased separately The length of the screws you need depends on the thickness of the mounting surface The screw length is the surface thickness 0 75...

Страница 105: ...bottom of the laminator 4 Return the laminator to its upright position and position it over the holes that are drilled in the mounting surface 5 Secure the laminator to the mounting surface A Place a...

Страница 106: ...t to position the mounting lock in the unlocked state 4 Lift the printer over the laminator and align the pins on the laminator with the holes on the underside of the printer 5 Press down on the print...

Страница 107: ...minator to the bottom data port on the printer Connect the Power Cords 1 Connect the printer power cord to the printer 2 Plug the power supply cord into the power outlet 3 Connect the laminator power...

Страница 108: ...printer s Driver Guide to set up the Card Printer Driver to work with the system Connect the Network Cable You can connect the system to a Windows based PC on a network using an Ethernet cable the ca...

Страница 109: ...2 Remove the L1 green laminator cartridge from the laminator Place the cartridge on a smooth level surface for loading 3 Push the release latch a and open the gate on the laminator cartridge b 4 Remov...

Страница 110: ...slack from the material e The overlay material loads in an S shape Make sure that the overlay material is between the guides on both the take up and supply sides of the cartridge 6 Close the laminator...

Страница 111: ...e of cards Use the Card Printer Driver Refer to the printer s Driver Guide for information about how to set up lamination preferences and print a driver test card The laminator has a power save featur...

Страница 112: ...he card and impresses the card if an impresser is installed Do the following 1 Press the USER button to enter the menu system 2 Suspended displays on line 1 of the LCD panel Press the ENTER key 3 Main...

Страница 113: ...ng to print a test card from Printer Manager 1 Log on to Printer Manager A Do one of the following Open an Internet browser and enter the printer IP address from the front panel of the printer as foll...

Страница 114: ...A 14 SD460 Laminating System B Select WebAdmin from the drop down menu and then click Log In 2 Run a test card A Select TroubleShooting Test Card...

Страница 115: ...the test cards to verify the following The overlays are being applied properly Each overlay is applied completely to the card The material adheres well to the edges of the card The overlay does not co...

Страница 116: ...A 16 SD460 Laminating System...

Отзывы: