Temperature Sensor
3
Status Light
Indicates
No light
Sensor is Off. Short press the On/Off switch
Blue flashing
Sensor On and Bluetooth advertising
White flashing
Charging via USB mains charger or USB port
Green flashing
Communication with the EasySense2 software (via USB or Bluetooth)
has been established
Orange/green flashing
Recording data
To switch the Temperature sensor off: Press and hold down the On/Off switch for about 2 seconds
until the white light is lit solidly then release.
If not communicating with the EasySense2 software the sensor will puts itself to sleep after a period of about
one hour of inactivity (blue LED flashing).
Connecting the Smart Wireless Temperature sensor to a computer
Bluetooth users: Do
NOT pair devices
(if paired the sensor will not be available to the EasySense2 software). Computers
or devices will need to support Bluetooth Low Energy (BLE), for further information refer to the instructions provided for
the EasySense2 software.
Install the EasySense2 software, if it is not already on your computer. For details of how to install and
operate this app, please refer to the instructions provided for the EasySense2 software.
On the computer acting as the Controller (interface connected to the computer).
If connecting via USB:
Step 1: Connect the Temperature sensor to the computer’s USB port using the USB cable supplied. The
computer will automatically detect a new device and install the drivers. The status light on the
Temperature sensor will flash white to show its charging.
Step 2: Open the EasySense2 app.
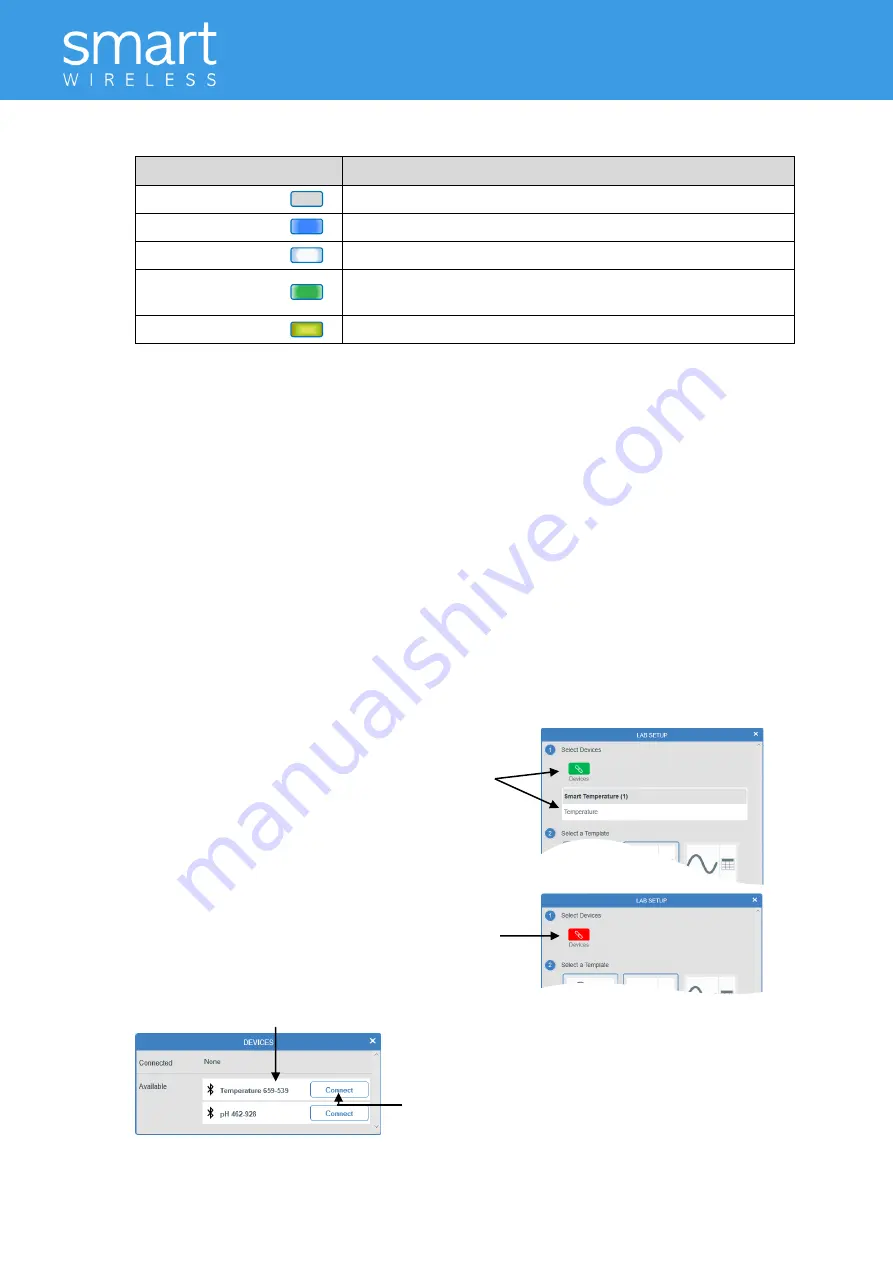
Lab Setup will open showing the Smart Temperature
sensor as connected (Devices icon green). The status
light on the Temperature sensor will flash green to
indicate a connection is established.
If connecting via Bluetooth:
Step 1: Switch the Temperature sensor On.
Step 2: Open the EasySense2 app.
Step 3: Lab Setup will open, select the red Devices
icon.
Step 4: Select to connect to the Temperature sensor (the
list will show the ID number printed on the sensor).
ID number
Connect


