background image

Display User Manual 


DDJ07310001 

1-Oct-03


Page 8


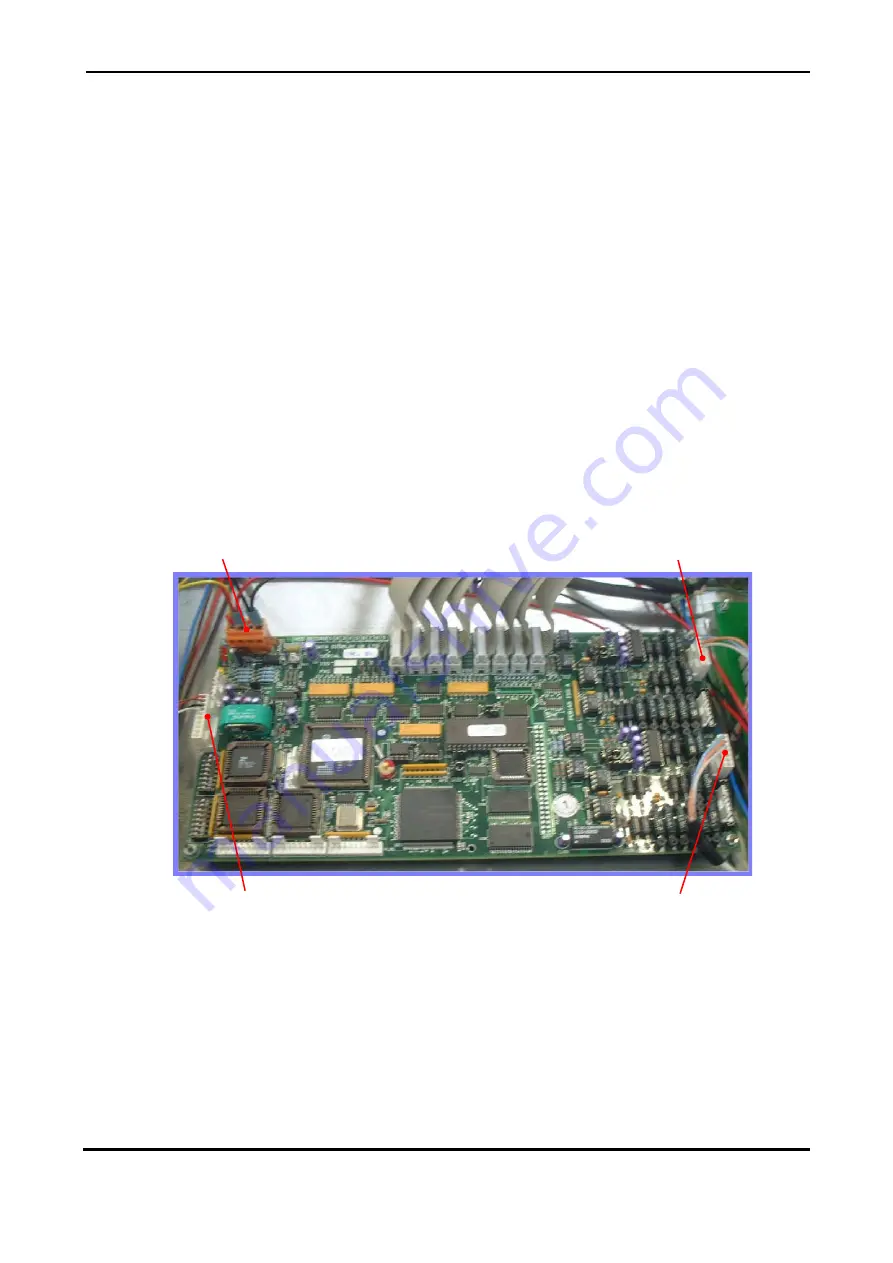
2.6  Logic Board, PAS145 


The PAS145 Board consists of a V53 Micro Processor running at 29 MHz. (bus speed 14.5 MHz.) 
and associated peripheral devices together with the following features necessary to control and 
monitor the Display System as a whole: 

- Real Time Clock if required. 
- RS485 optically isolated 4 wire communications interface for communication with the rest 
of the Passenger Information Display System. 
- Program memory to store the application code which the Logic Board executes in order to 
allow the Display to operate. 
- SRAM (896 Kbytes) memory to store various program variables and show data. 
- 2 display/control interfaces to facilitate connection with the Display Boards, one for each 
side of a double-sided Display (largest Display requirement). 
- Serial EEPROM (4 Kbytes) for reset determination purposes and in-house usage where 
required. 
- Flash memory 

This device provides for 512KB of non-volatile memory but has the facility to be erased and 
reprogrammed on-board. 


Figure 2.6 – Logic Board.


Incoming RS232 signal wires from the Wireless Modem are terminated at PL18, while the Temp 
Probe Signal terminates at PL21.  The display data and control signals connect to the Interface 
Board using a 14-way horizontal ribbon cable.  
5 Volt DC Logic power is connected at the screw terminal block at J1. 

Temp Probe Signal Input 

Light Sensor Signal Input 

DC Power 

Red = 5V DC 

Yellow = 15V DC 

Black = GND 

Display Cables to 

Interface Board 

RS232 Signal on PL18 of V53 

Logic Board                                

Pin 1 = GND (Blue/White)      Pin 
2 = Rx (Orange/White)           Pin 

3 = Tx (White/Orange) 

Содержание Great Hills

Страница 1: ...of the application or use of the information or products described herein Moreover Data Display Ltd reserves the right to alter specifications or procedures without notice This document may contain or...

Страница 2: ...out and Symbols 12 3 7 1 The Caption Bar 12 3 7 2 The Speed Bar 13 3 7 3 The Menu Bar 13 3 7 4 The Canvas 13 3 7 5 The Status Line 13 3 8 The Menu Bar 14 4 Examples 35 4 1 How to Setup a Graphics Fram...

Страница 3: ...t of the Display Each Display has four cable entries two Mains 120V AC power cables an RS232 serial data cable and a Temperature Probe serial cable The two Mains power cables provide power for the top...

Страница 4: ...Figure 2 1 System Configuration Wireless Modem TX TX Control Box Graphic Board Display 64 x 120 Pixels RX Control Box Warning Do NOT power up the Display Board until all cabling is connected Power Co...

Страница 5: ...of the Boxes are cable glands through which the incoming 120V AC power and Serial Cables for the Modems are routed The two Temp Signal cables and two RS232 Serial Cables to the each Displays Logic Boa...

Страница 6: ...oard The Interface Board PAS186 provides buffering of the LED Display multiplexing signals which form part of the Display interface The source of these interfaces is the PAS145 V53 Logic Board via 14...

Страница 7: ...the display driver circuitry which generates the multiplexing signals for illuminating the LEDs Data enters the Board via the Buffer Board PAS186 on a 14 way screened Horizontal ribbon cable via an I...

Страница 8: ...tate connection with the Display Boards one for each side of a double sided Display largest Display requirement Serial EEPROM 4 Kbytes for reset determination purposes and in house usage where require...

Страница 9: ...ic frames for the display The minimum hardware and software requirements to run the GRAFIT software are as follows Processor Pentium 1 or higher Memory 16MB Display VGA 15 inch or larger recommended 2...

Страница 10: ...CD ROM Installation 3 Click on the Next button to begin the installation and follow the on screen instructions 4 When the process is complete all files are stored in the C GRAFIT folder unless the des...

Страница 11: ...e 1 Use the normal menu command Click on Frame Exit and click on the Yes button of the dialog box 2 Click on the Close button in the top right hand corner of the screen and click on the Yes button of...

Страница 12: ...main area of the window and the Status Line at the bottom of the screen When selected many of the main menu items open Dialog Boxes Note For single color Displays red is used as the default color Fig...

Страница 13: ...is followed by an ellipsis choosing the command opens a dialog box If the command is followed by an arrowhead the command leads to another menu selection If the command has neither an ellipsis nor an...

Страница 14: ...e into a sequence Load Selecting Load under the Frame menu produces a dialog box from which the user may select any of the file types listed For example bmp gif pcx tga or tif FIELDS File Name To sele...

Страница 15: ...provides the facility to save any changes to the bitmap or system e g pause rate of this application as a BMP file A BMP file is a single bitmap Send Send the current frame to the Display hardware as...

Страница 16: ...ich the user can select an effect for the bitmap frame being worked on The ON effect is how the frame is drawn onto the Display page and the OFF effect is how the frame is drawn off the Display page P...

Страница 17: ...s options for dealing with animations or sequences of frames All working frames are effected using options in this menu An Animation is a group of saved frames frm Clear Blanks clears the all frames L...

Страница 18: ...their drives by clicking with the left mouse button on the required drive BUTTONS OK Accept configuration as entered and load file CANCEL Exit dialog without loading file Join This option works like...

Страница 19: ...define a pause click the left mouse button in the space to the right of Pause and type in your required value BUTTONS OK Accept configuration as entered CANCEL Exit dialog without altering bitmap eff...

Страница 20: ...speed bar Stop Clicking with the left mouse button on Stop will stop the animation This option is also available as the eight button on the speed bar Schedule This menu provides options for dealing w...

Страница 21: ...arch for and select the file BUTTONS SETTINGS This button pops up the Animation Settings dialog for the selected file in the list You select a file in the Animation list by left clicking on it This di...

Страница 22: ...ensions are of the form W x H x C where W LED columns H LED rows C colors including LED off Update Test mode This is a drop down list of the modes available on the chosen type of Display The modes ava...

Страница 23: ...en you must also choose the Options Display COMs button and set its address To switch to select a Panel select the Options Display List menu option and click on the Panel in question Set Time Date Set...

Страница 24: ...ttings etc Ports This dialog provides facilities for setting up testing and monitoring the system communications ports BUTTONS EXIT Exit this dialog SETTINGS This button pops up a port settings dialog...

Страница 25: ...the length of time the software will wait for device responses after polling sending on this port If this value is greater than 2000ms for the GRAFIT application then the software will popup an infor...

Страница 26: ...ait states The number of wait states between each consecutive poll during a poll loop ICONS Each of the icons represents a COMn port To select a port you just click on its icon A port is selected if i...

Страница 27: ...ndows modem settings and the Attention String Protocol AT This option provides the facility to save any changes to the configuration or system of this application This option provides a dialog box to...

Страница 28: ...em Edit This menu provides the option for altering complete bitmaps or sections of bitmaps selected with the grab tool Undo This option allows the user erase his last action on the bitmap If Undo is c...

Страница 29: ...he text if the character does not appear where you want it to then delete it with the backspace key and reposition the cursor By referring to the Co ordinates box you will soon be able to position the...

Страница 30: ...conduction with the Palette With this tool chosen you can fill a bounded area on the frame with the chosen color in the palette simply by clicking within the area on the frame RECTANGLE This square t...

Страница 31: ...ark a rectangle on the frame as if you were drawing a rectangle with the left mouse button Then drag this rectangle over the area to which you wish to copy it by clicking on the rectangle with the lef...

Страница 32: ...or left mouse button color Clicking on a color within the color box with the left mouse button will have the effect of changing the foreground color and clicking on a color with the right mouse butto...

Страница 33: ...mple of the font will appear in the bottom right hand corner of the options box The scroll up keys adjacent to the font choice will give more font options for selection Font Style To change the font s...

Страница 34: ...to leave a mark in it An example of how the text will appear in the sample box To undo the effect click on the box again to clear the mark which selected it Colors The color option for text is not av...

Страница 35: ...f 10 3 Now you can create the frames by hand using the Tools and the Palette or load each one from an existing frame file BMP GIF etc are supported choose the Frame Load menu option 4 For starters jus...

Страница 36: ...the software so make sure that the time and date on the PC is correct To show the current time enter the following syntax or combination of h hour M minutes S seconds a am pm Note To show the proper...

Страница 37: ...s MS Paintbrush which is installed in most PCs is also an ideal graphics editor for GRAFIT When creating logos that have a specific type of font it is most likely easier to import that proper font fil...

Страница 38: ...in DOS since it is not multi tasking iv If a serial mouse has ever been used on the computer or the computer is a lap top with a tracker ball then there is a possibility that there are software driver...

Страница 39: ...me onto the Display in the direction relating to the WIPE effect selected i e Left or Down Use On and Off Command Close This command is the opposite to OPEN in that is closes the frame onto the Displa...

Страница 40: ...intenance 7 1 Maintenance Instructions 7 1 1 Cleaning the Display Routine cleaning of the Display Board is at the discretion of the operator and subject to local conditions Use damp non abrasive mater...

Страница 41: ...l 4 Pixel Pitch 35mm LED Diameter 5mm LED Color Ultra Bright Red Communication EPROM GB64X120 Protocol MATIF Baud Rate 19200 Addressing Dip Switch default 21h Data Format 8 bit 1 stop bit no parity Ch...

Страница 42: ...DR Board Cable Entries Logic Board Light Sensor Replaceable Parts for Graphics Display Viewed from Front with Display Panels removed Filter for second Mains Supply T 40C PSU Interface Filter Fans 5V 1...

Страница 43: ...ottom right hand Display Board via the Interface Board 3 Data is transmitted via 14 way Horizontal ribbon cables 4 When the Data reaches the last Header on the top Display Board it is routed back down...

Отзывы: