background image

∙ 4 ∙

• 

Please read and save this 

instruction manual.

• 

When using electrical appliances, 

basic safety precautions should be 

followed including:

• 

Read all instructions.

• 

Remove all bags and packaging 

from appliance before use. 

• 

Do not use appliance outdoors or 

for commercial purposes.

• 

Never leave appliance unattended 

when in use. 

• 

Only use the appliance on a stable, 

dry surface.

• 

Make sure the appliance is cleaned 

thoroughly before using.

• 

Do not use appliance for other than 

its intended use. For household use 

only. Do not use outdoors.

• 

Close supervision is necessary 

when any appliance is used by or 

near children. Children should be 

supervised to ensure that they do 

not play with the appliance.

• 

Do not operate this appliance with 

a damaged cord, damaged plug, 

after the appliance malfunctions, is 

dropped, or damaged in  

any manner. Return appliance to 

the nearest authorized service 

facility for examination, repair, or 

adjustment. 

• 

For maintenance other than 

cleaning, please contact 

StoreBound directly at 1-800-898-

6970 from 7AM-7PM PT Monday-

Friday or by email at support@

storebound.com. 

• 

Do not place appliance on or near a 

hot gas burner, hot electric burner, 

or in a heated oven. Extreme 

caution must be used when 

moving an appliance containing 

hot oil or other hot liquids. Always 

attach plug to appliance first, then 

IMPORTANT SAFEGUARDS

IMPORTANT SAFEGUARDS:


PLEASE 

READ AND SAVE THIS INSTRUCTION 

AND CARE MANUAL.

When using electrical appliances, basic safety precautions should be followed, including:

Содержание DBCM100GBAQ04

Страница 1: ...Mini Bundt MAKER recipes inside DBCM100 Instruction Manual Recipe Guide...

Страница 2: ......

Страница 3: ...uards 4 9 Parts Features 10 Before Using Your Mini Bundt Maker 11 Using Your Mini Bundt Maker 12 17 Cleaning Maintenance 18 Tips Tricks 19 Recipes 20 41 Customer Support 42 Warranty 43 Mini Bundt make...

Страница 4: ...hat they do not play with the appliance Do not operate this appliance with a damaged cord damaged plug after the appliance malfunctions is dropped or damaged in any manner Return appliance to the near...

Страница 5: ...damages caused by improper use of the appliance Improper use of the appliance can result in property damage or even in personal injury This appliance has a polarized plug one blade is wider than the...

Страница 6: ...Cover so that your arm is over the Cooking Surface as it is hot and may cause injury Lift from the side To prevent the risk of fire electric shock or personal injury do not put cord plug or appliance...

Страница 7: ...Pour usage domestique seulement Ne pas utiliser l ext rieur Une surveillance troite est n cessaire lorsqu un appareil est utilis par ou proximit d enfants Les enfants doivent tre surveill s pour s as...

Страница 8: ...nts ayant des capacit s physiques sensorielles ou mentales r duites ou manquant d exp rience et de connaissances moins qu une personne responsable de leur s curit ne les supervise et ne les instruise...

Страница 9: ...fils AVERTISSEMENT Surfaces chaudes Ne touchez jamais la surface de cuisson ou le couvercle pendant l utilisation de l appareil Soulevez et baissez toujours le couvercle l aide de sa poign e NE soule...

Страница 10: ...Indicator Light Blue Cover Non slip Feet Cover Handle Lifter Cooking Surfaces Main Body 10 parts Features parts Features...

Страница 11: ...urfaces of the Mini Bundt Maker with a damp cloth or sponge Wipe dry with a soft cloth NEVER IMMERSE THE Mini Bundt MAKER OR CORD IN WATER OR ANY OTHER LIQUID Position the Mini Bundt Maker on a dry le...

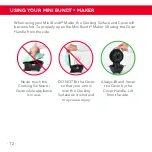
Страница 12: ...injury Always lift and lower the Cover by the Cover Handle Lift from the side Never touch the Cooking Surface or Cover while appliance is in use When using your Mini Bundt Maker the Cooking Surface an...

Страница 13: ...using your Mini Bundt maker 13 using your Mini Bundt maker using your Mini Bundt maker 13 using your Mini Bundt maker...

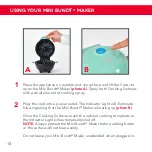
Страница 14: ...ower outlet The Indicator Light will illuminate blue signaling that the Mini Bundt Maker is heating up photo B Once the Cooking Surfaces reach the optimal cooking temperature the Indicator Light will...

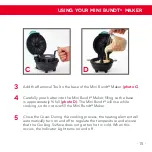
Страница 15: ...lling so the base is approximately full photo D The Mini Bundt will rise while cooking so do not overfill the Mini Bundt Maker Close the Cover During the cooking process the heating element will autom...

Страница 16: ...ine most recipes require on average 9 11 minutes of cooking time It is okay to open the Cover to check for doneness photo E Always lift using the Cover Handle You can use a toothpick to check the cake...

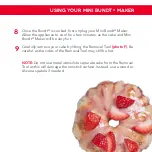
Страница 17: ...tes as the cake and Mini Bundt Maker will be very hot Carefully remove your cake by lifting the Removal Tool photo F Be careful as the sides of the Removal Tool may still be hot NOTE Do not use metal...

Страница 18: ...oking Surfaces pour a small amount of cooking oil onto the hardened food After 5 minutes wipe with a paper towel or dry cloth A clean kitchen brush or even a toothbrush works well to remove stubborn f...

Страница 19: ...when you take them out of the Mini Bundt Maker Use caution and allow to cool before serving or enjoying them Always fill the Mini Bundt Maker full to ensure the best shape In a pinch pre made cake mix...

Страница 20: ......

Страница 21: ...RECIPE GUIDE Mini Bundt maker Follow us unprocessyourfood for recipes videos daily inspiration...

Страница 22: ...owl beat butter and sugar with handheld mixer on medium until they are fluffy and light Add egg milk vanilla and blend until mixed Using slow speed mix dry ingredients into the wet until just combined...

Страница 23: ...23...

Страница 24: ...d whisk to combine Change to a spatula and fold in olive oil in about 6 additions mixing very well after each addition 4 Coat Mini Bundt Maker and Removal Tool lightly with baking spray Fill the Mini...

Страница 25: ...the Mini Bundt Maker 3 4 full 1 3 cup batter If using sprinkle 1 tbsp walnuts over top of batter Bake for 12 to 13 minutes until a toothpick comes out clean when inserted into the cake 5 Lift out cak...

Страница 26: ...l whisk together egg sour cream milk and vanilla 4 In larger bowl beat butter and sugar with a handheld mixer on medium until they are fluffy and light Add wet ingredients blending until mixed Using s...

Страница 27: ...27...

Страница 28: ...der baking powder baking soda and salt 3 In a measuring cup whisk buttermilk egg vinegar vanilla and red food color together 4 In a medium mixing bowl beat butter and sugar with handheld mixer on medi...

Страница 29: ...lightly with butter or baking spray Lower the top Fill the Mini Bundt Maker 3 4 full 1 3 cup batter Bake for 10 to12 minutes until a toothpick comes out clean when inserted into the cake 5 Lift out th...

Страница 30: ...juice in a blender until smooth 3 In medium bowl combine flour baking powder baking soda and salt 4 In larger bowl beat butter and sugar with handheld mixer on medium until they are fluffy and light A...

Страница 31: ...31...

Страница 32: ...utes until a toothpick comes out clean when inserted into the cake 4 Lift out cake using the Removal Tool and transfer the cake to wire rack If using Jalape o Syrup soak cake while warm If using Jalap...

Страница 33: ...econds With slotted pancake turner transfer cake to wire rack and cool completely Repeat with remaining cakes 7 For Jalape o Glaze in small bowl whisk confectioners sugar with 2 tablespoons of Jalape...

Страница 34: ...s cream cheese coconut flour erythritol baking powder lemon zest vanilla and lemon extracts Whirl to combine well Let batter sit for 15 minutes to thicken Pour batter into measuring cup 3 Brush Mini B...

Страница 35: ......

Страница 36: ...combined 4 Brush Mini Bundt Maker lightly with butter or baking spray Fill Mini Bundt Maker 3 4 full 1 3 cup batter Bake for 12 minutes until a toothpick comes out clean when inserted into the cake 5...

Страница 37: ...baking spray Fill the Mini Bundt Maker 3 4 full 1 3 cup batter 5 Bake for 12 minutes until a toothpick comes out clean when inserted into the cake 6 Lift out cake using the removal tool and transfer c...

Страница 38: ...l bowl mix all ingredients together until well combined Cream Cheese Glaze cup cream cheese room temperature 1cup confectioners sugar 3 tbsp whole milk room temperature Place cream cheese in mixing bo...

Страница 39: ...r 2 tbsp peanut powder 4 tsp whole milk In a mixing bowl combine the sugar peanut powder and milk stirring vigorously until the glaze is smooth and creamy Chocolate Glaze cup confectioners sugar 3 tbs...

Страница 40: ......

Страница 41: ...Peanut Butter Sprinkles Shredded Coconut Fresh Berries Chopped Peanuts Red Velvet Cream Cheese Vanilla Sprinkles Mini Chocolate Chips Confectioner s Sugar Banana Bread Peanut Butter Vanilla Mini Choco...

Страница 42: ...upport bydash com Dash values quality and workmanship and stands behind this product with our Feel Good Guarantee To learn more about our commitment to quality visit bydash com feelgood 8am 8pm 9am 9p...

Страница 43: ...es to support storebound com There are no express warranties except as listed above REPAIR OR REPLACEMENT AS PROVIDED UNDER THIS WARRANTY IS THE EXCLUSIVE REMEDY OF THE CUSTOMER STOREBOUND SHALL NOT B...

Страница 44: ...1 800 898 6970 unprocessyourfood bydash com...

Отзывы: