background image


17 


MP-220BT 

Product code: D1245 


Adjusting Bass/Treble/Volume 

Turn the master volume control (23) to the left/right to decrease/increase the master volume. 
The adjustment range is from –∞ to +10 dB. 

Turn the treble level control (24) to the left/right to decrease/increase the treble level. The adjustment 
range is from –∞ to +10 dB. 

Turn the bass level control (25) to the left/right to decrease/increase the bass level. The adjustment range 
is from –∞ to +10 dB. 


Setting Device Volume 

It is possible to set the volume of the device in all 3 functions. 

Press and hold down the /FORWARD button (C) or the VOLUME –/BACKWARD button (E) to 
increase/decrease the volume. The display shows: 


The adjustment range is 0–30, from low to high volume. 


Remote Control 

The device can be controlled with an IR remote control. The remote control is included in the delivery. 

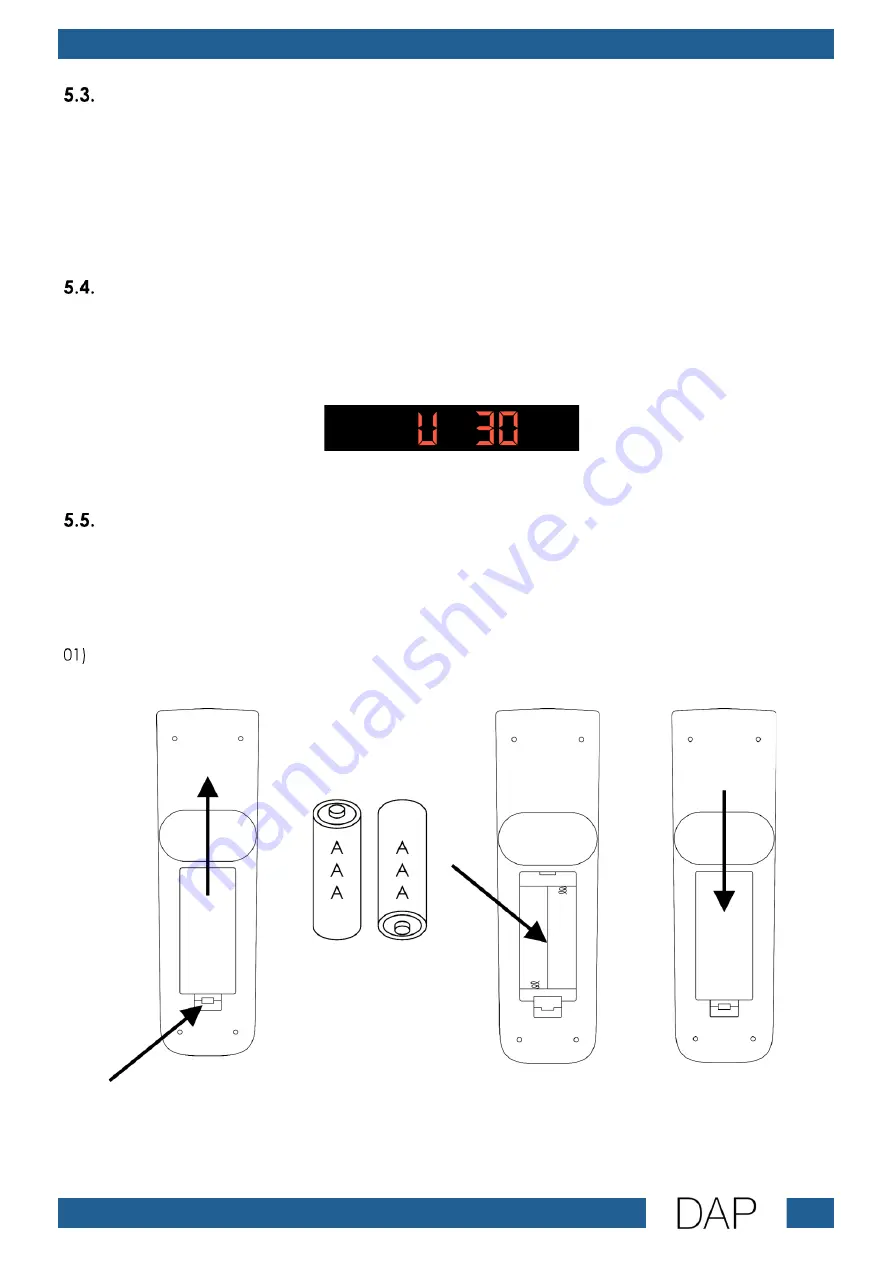
The supplied remote control is delivered without batteries. It accepts 2 x AAA 1,5 V (alkaline) batteries. 

To install the batteries: 


Press on the battery compartment cover and move it up to open (Fig. 08). 

02)


Insert 2 x AAA 1,5 V batteries into the battery housing (Fig. 09). 

03)


Close the battery compartment cover (Fig. 10). 


Fig. 08 

Fig. 09 

Fig. 10 

Note: 

Make sure that you install the batteries with correct polarity orientation. 


Содержание MP-220BT

Страница 1: ...MP 220BT Highlite International B V Vestastraat 2 6468 EX Kerkrade the Netherlands Product code D1245 USER MANUAL ENGLISH V1 ...

Страница 2: ...ce Non observance of the instructions in this user manual may result in serious injuries and damage of property 2022 DAP All rights reserved No part of this document may be copied published or otherwise reproduced without the prior written consent of Highlite International Design and product specifications are subject to change without prior notice For the latest version of this document or other ...

Страница 3: ...Site Requirements 11 Rack Mounting 11 Connecting to Power Supply 12 Start up 12 Setup Example 13 Switching On Off 13 5 Operation 14 Safety Instructions for Operation 14 Functions 14 FM Radio Mode 15 Auto Scan 15 Saving Presets 15 Selecting Presets 15 Bluetooth Mode 15 USB SD Mode 16 Playback 16 Select Previous Next File 16 Adjusting Bass Treble Volume 17 Setting Device Volume 17 Remote Control 17 ...

Страница 4: ...22 Adjusting Settings 22 6 Troubleshooting 23 7 Maintenance 23 Safety Instructions for Maintenance 23 Preventive Maintenance 23 Basic Cleaning Instructions 24 Corrective Maintenance 24 8 Deinstallation Transportation and Storage 24 9 Disposal 24 10 Approval 24 ...

Страница 5: ...ng microphone holder Remote control User manual Fig 01 Intended Use This device is intended for professional use as a dual media player It is suitable only for indoor installation It is not suitable for households Any other use not mentioned under intended use is regarded as non intended and incorrect use Text Conventions Throughout the user manual the following text conventions are used Buttons A...

Страница 6: ...oided may result in minor or moderate injury Attention Indicates important information for the correct operation and use of the product Important Read and observe the instructions in this document Electrical hazard Provides important information about the disposal of this product Symbols on the Information Label This product is provided with an information label The information label is located on...

Страница 7: ...tlet with ground earth connection Do not cover the ground earth connection Do not let the power cable come into contact with other cables Handle the power cable and all connections with the mains with caution Do not modify bend mechanically strain put pressure on pull or heat up the power cable Make sure that the power cable is not crimped or damaged Examine the power cable periodically for any de...

Страница 8: ...tain user serviceable parts Unauthorized modifications to the device will render the warranty void Such modifications may result in injuries and material damage Attention Do not expose the device to conditions that exceed the rated IP class conditions This device is IP20 rated IP Ingress Protection 20 class provides protection against solid objects greater than 12 mm such as fingers and no protect...

Страница 9: ...ia player 2 see 3 3 Media Player on page 9 06 Media player 1 see 3 3 Media Player on page 9 Back View Fig 03 07 5 pin XLR paging microphone connector IN 08 DIP switches 09 Microphone bass level control 10 Microphone treble level control 11 Microphone gain level control 12 RCA analog line level connectors OUT Left Right output 2 13 3 pin Phoenix terminal line level connectors OUT Left Right output ...

Страница 10: ...l Input voltage 220 240 V AC 50 Hz Power consumption 96 W Playback Supported audio files WAV FLAC MP3 USB flash drive USB A 32 GB FAT32 formatted SD 32 GB FAT32 formatted Outputs Main outputs 2 Inputs Stereo inputs 2 Auxiliary inputs 1 Paging microphone inputs 1 Audio Specifications Frequency response 20 20000 Hz FM frequency 87 5 108 MHz FM antenna impedance 75 Ω Bluetooth 4 2 Bluetooth range 20 ...

Страница 11: ...d 3 5 mm TRS jack Main output connections RCA Phoenix terminal connectors Paging microphone input connections 5 pin XLR Construction Housing Aluminum metal Color Black IP rating IP20 Thermal Minimum ambient temperature ta 0 C Maximum ambient temperature ta 40 C Optional Accessories You can additionally purchase the following accessories Product code D1385 GCM 10 Gooseneck Condenser Mic Dimensions ...

Страница 12: ...perature ta 40 C must never be exceeded The relative humidity must not exceed 50 with an ambient temperature of 40 C Rack Mounting The device can be mounted in a standard 19 inch rack The device requires 1 rack unit U of space which is 44 5 mm high Make sure that the rack is sufficiently secured to prevent it from becoming unstable or falling over To mount the device in a two post rack follow the ...

Страница 13: ...ophone on page 21 for more information Note When using a paging microphone activate phantom power and set signal priority See 5 6 2 DIP Switches on page 22 for more information 04 Connect an amplifier and other devices See 4 6 1 Setup Example on page 13 To connect an amplifier use the RCA analog line level connectors OUT 12 15 or the 3 pin Phoenix terminal line level connectors OUT 13 16 To connec...

Страница 14: ...Setup Example Fig 06 Switching On Off The device has a power button Press the power button 03 to switch on the device If the power LED indicator Blue 02 is on the device is powered Release the power button 03 to switch off the device ...

Страница 15: ...lowing functions FM See 5 2 1 FM Radio Mode Bluetooth See 5 2 2 Bluetooth Mode USB See 5 2 3 USB SD Mode Paging microphone The device can be operated with the control panel or with an infrared IR remote control see 5 5 Remote Control on page 17 There are 2 separate control panels for media player 1 and media player 2 Both control panels have the same layout and functions A LED display B MODE butto...

Страница 16: ...t 01 Press and hold down for 3 seconds the MODE button B and VOLUME FORWARD button C or the VOLUME BACKWARD button E until the display shows P 02 Press the VOLUME FORWARD button C and the VOLUME BACKWARD button E to select one of the 32 preset slots 03 Press and hold down for 3 seconds the MODE button B and VOLUME FORWARD button C or the VOLUME BACKWARD button E The display will stop blinking Sele...

Страница 17: ...media player from your mobile device The display will start blinking again Note When your mobile device receives an incoming call playback will stop automatically When the conversation is finished you need to resume playback manually USB SD Mode In this menu you can play music files from a USB flash drive or an SD card Insert an SD card into the SD card connector IN 20 or a USB flash drive into th...

Страница 18: ...functions Press and hold down the VOLUME FORWARD button C or the VOLUME BACKWARD button E to increase decrease the volume The display shows The adjustment range is 0 30 from low to high volume Remote Control The device can be controlled with an IR remote control The remote control is included in the delivery The supplied remote control is delivered without batteries It accepts 2 x AAA 1 5 V alkali...

Страница 19: ...ect music files USB SD Preset file Press to select media player 1 or media player 2 before adjusting settings Note To prevent unintentional adjustment of settings of the incorrect media player press the button of the correct media player before pressing the remaining buttons Volume Decrease increase the volume all functions Volume FM Radio Mode In this menu you can search for FM radio stations sel...

Страница 20: ...sets You can do it in one of the 2 ways Press the 0 9 buttons Example To select preset 18 insert 18 Press the PRESET FILE button and the PRESET FILE button to manually select a preset The device will activate the selected FM preset Bluetooth Mode In this menu you can stream Bluetooth signals from your mobile devices smartphones tablets notebooks etc The display shows The display will be blinking c...

Страница 21: ... music file The display shows Playback Use the PLAY PAUSE button to start or pause playback Press the PLAY PAUSE button to play the currently selected file Press the PLAY PAUSE button again to pause playback Select Previous Next File Use the PRESET FILE button and the PRESET FILE button to select files backward forward Playback Modes You can decide how music files will be played Repeatedly press t...

Страница 22: ...d and shall be purchased separately See 3 5 Optional Accessories on page 10 Fig 12 27 3 pin XLR paging microphone connector IN 28 ALL ZONES button 29 ZONE 2 button 30 ZONE 1 button 31 5 pin XLR connector OUT Installation of the Paging Microphone To install a paging microphone follow the steps below Connect the paging microphone to the 3 pin XLR paging microphone connector IN 27 Fig 13 Fig 13 Conne...

Страница 23: ...ll be muted when you speak into the paging microphone When the DIP switch is set to OFF position the input device will not be muted Operation The paging microphone holder has 3 buttons ZONE 1 Signal from the paging microphone will be sent to zone 1 ZONE 2 Signal from the paging microphone will be sent to zone 2 ALL ZONES Signal from the paging microphone will be sent to all zones Press and hold do...

Страница 24: ...oes not work The signal is weak Extend the antenna Check if there are electrical devices that cause interference Playback stutters buffering Bandwidth is too low or busy Test reception with another station The device does not respond to the remote control The remote control is outside the range of the sensor of the infrared port Walk closer to the device or change the angle at which you point the ...

Страница 25: ...nstructions in chapter 7 2 1 Basic Cleaning Instructions on page 24 Store the device in the original packaging if possible 9 Disposal Correct disposal of this product Waste Electrical and Electronic Equipment This symbol on the product its packaging or documents indicates that the product shall not be treated as household waste Dispose of this product by handing it to the respective collection poi...

Страница 26: ...25 MP 220BT Product code D1245 ...

Страница 27: ...26 MP 220BT Product code D1245 ...

Страница 28: ... 2022 DAP ...

Отзывы: