background image


Phase switch (16) 

This switch allows you to reverse the phase of the subwoofer if necessary. 


IEC power inlet and fuse (17) 

This connector is meant for the connection of the supplied main cord. Connect one end of the power 
cord to the connector, the other end to the mains, and then turn on the power switch (52) to operate 
the unit.  

Note: 

Please make sure that the supply voltage matches the operation voltage before connecting    

the unit to mains.


Replace the fuse only with a fuse of same specification (T8A). 

 
Mains Switch (18) 

Do not supply power before the whole system is set up and connected properly. 


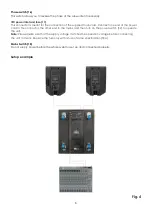
Setup example 


           Fig. 4 

Содержание K-18BA

Страница 1: ...K 18BA ORDERCODE D3375...

Страница 2: ...Audio for more excellent audio products We design and manufacture professional audio equipment for the entertainment industry New products are being launched regularly We work hard to keep you our cu...

Страница 3: ...10 11 DAP Audio DAP Audio K 18BA Product Guide Warning Safety instructions Operating Determinations Description Features Overview Set Up and Operation Connection Cables Maintenance Troubleshooting Pro...

Страница 4: ...eplace product s As a suggestion proper UPS packing or double boxing is always a safe method to use Note If you are given an RMA number please include the following information on a piece of paper ins...

Страница 5: ...rticular caution Never remove warning or informative labels from the unit Never use anything to cover the ground contact Do not insert objects into air vents Do not connect this system to a dimmerpack...

Страница 6: ...ation do not switch it on immediately The arising condensation water might damage your system Leave the system switched off until it has reached room temperature Repairs servicing and electric connect...

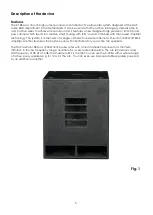
Страница 7: ...amplifier technology The system is composed of a single compact subwoofer cabinet with built in 1000 Watt RMS amplifier Another feature is the built in x over with clip limiters for your active top s...

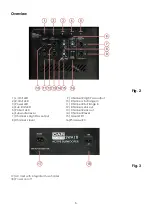
Страница 8: ...ge in 3 Power LED 11 Channel R Full range in 4 Sub limit LED 12 Channel L Link out 5 Protect LED 13 Channel R Link out 6 Subwoofer level 14 Channel R level 7 Channel L High Pass output 15 Ground lift...

Страница 9: ...put level with the L R level controls in such way that the LED blinks yellow occasionally If the LED light up red continuously we strongly suggest you to lower the L R Level controls Power LED 3 Indic...

Страница 10: ...of the power cord to the connector the other end to the mains and then turn on the power switch 52 to operate the unit Note Please make sure that the supply voltage matches the operation voltage befo...

Страница 11: ...and twists when coiling them This gives the advantage of increasing their life and reliability Periodically check your cables A great number of problems faulty contacts ground hum discharges etc are...

Страница 12: ...t from electric power source 2 Insert a flat head screwdriver into a slot in the fuse cover Gently pry up the fuse cover The fuse will come out 3 Remove the broken fuse If brown or unclear it is burne...

Страница 13: ...1000 Watt RMS Crossover Frequency 125 Hz 24 dB Oct Freq Response 3 dB 6 dB 38 125 Hz Freq Range 10 dB 32 160 Hz Sensitivity Half Space 104 dB W m Max SPL at 1 m Theoretical 134 dB X over Frequency 12...

Страница 14: ...2009 DapAudio...
Отзывы: