


11
Operations
1. Preparation
• When you want to watch a DVD film, switch the TV-set on and select the video input connected to
the DVD player.
• If you want to listen to audio via your audio installation, switch the audiosystem on and select the
DVD player input.
2. Normal Playback
1. Press standby at the front panel to switch the DVD player on. The start logo appears on the TV
screen. If the disc drive already contains a disc, the playback will start as soon as the DVD player is
switched on.
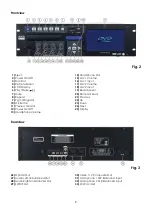
2. Press the
Eject (1)
or the
Open/Close (54)
button to open the disc drive and insert a disc.
3. Press the
Eject (1)
or the
Open/Close (54)
button to close tye disc drive. Playback will start.
4. Press the
Play/Pause (6, 68)
button if the playback does not start automatically.
5. Some discs will start by presenting a menu. Use the
Cursor
(21, 22, 23, 24/ 45, 46, 66, 67)
buttons to
choose between the different options, then press the
OK (10)
or
Enter (47)
button. Alternativly, you
can enter the number of the function in question using the
0-9
buttons
(39)
.
3. Pause
1. Press
Play/Pause (68)
on the remote control or
Play/Pause (6)
on the frontpanel to stop playback
(still picture). The sound will be deactivated in still mode.
2. Press
Play/Pause (68)
on the remote control or
Play/Pause (6)
on the frontpanel to resume
playback.
4. Stop
1. Press the
Stop (44)
button on the remote control to stop playback. The start logo will appear on the
TV screen. Some discs offer the possibility of resuming from the same spot, e.g. DVD’s and music
CD’s.
2. Press
Play/Pause (68)
on the remote control or
Play/Pause (6)
on the frontpanel to resume playback
from where the playback was stopped or from the beginning depending on the DVD.
3. Press the
Stop (44)
button twice to stop the playback completely.
5. Previous and next
During playback, press
Previous (21, 49)
to return to the start of the track. Press
Previous
(21/49)
again to go back to the previous.
Each time you press the
Next (24, 69)
button you will skip to the next track.
6. Fast Forward/ reverse
1. Press
Fast Forward (52)
to go fast forward on the disc. The speed changes every time
Fast
Forward
(52)
is pressed.
2. Press
Play/Pause (6, 68)
to return to normal playback.
3. Press
Fast Reverse (51)
to go fast forward on the disc. The speed changes every time
Fast
Reverse (51)
is pressed.
4. Press
Play/Pause (6/ 68)
to return to normal playback.
7. TFT-mode
Use the
TFT On/Off (71)
button to swich the TFT mode On or Off.
8. OSD (On Screen Display)
Press
Display (36)
to switch between TITLE PLAYE, TITLE LEFT, CHAPTER PLAYED, CHAPTER LEFT and
DISPLAY OFF.
9. Subtitle
When
Title (55)
is pressed, the display shows SUBTITLE 01/XX XXXXX. Where 01 is language number
one. XX is the total number of languages available on the disc. XXXXX is the language. (eg. Dutch,
German etc.) Use the
Scroll (21, 22, 23, 24/ 45, 46, 66, 67)
and
Enter (47)
or
OK (10)
buttons to select the
desired language.
Содержание DS-220K
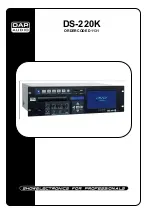
Страница 1: ...DS 220K ORDERCODE D1131...
Страница 23: ...2010 Dap Audio...