background image


10 

Installation 

Remove all packing materials from the device. Check that all foam and plastic padding is removed.. 
Connect all cables. 

Always disconnect from electric mains power supply before cleaning or servicing. 
Damages caused by non-observance are not subject to warranty.


Set Up and Operation


Before plugging the unit in, always make sure that the power supply matches the product specification 
voltage. The power supply is printed on the back of the device. 
Do not attempt to operate a 120V specification product on 230V power, or vice versa.
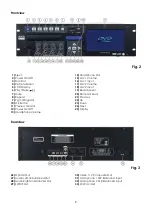


Connections 

1.

 Turn off the 

Power

 switch.  

2.

 Connect the DS-220K to your amplifier using the proper cables.  

 
CAUTION: Be sure that the power is off, when connecting the cables. 


Installing batteries 


1.

 Remove the cover.  


2.

 Insert batteries. Make sure that the terminals correspond to the symbols shown in the drawing below. 


3. 

Replace the cover. 


Note:  


The batteries must be placed correctly. 


Do not recharge, heat, open or short circuit the batteries. Do not throw the batteries into open 
fire. 


Do not mix different types or old and new batteries. 


If the remote control does not work properly, or if the range is reduced, all batteries should be 
replaced. 


Содержание DS-220K

Страница 1: ...DS 220K ORDERCODE D1131...

Страница 2: ...Audio for more excellent audio products We design and manufacture professional audio equipment for the entertainment industry New products are being launched regularly We work hard to keep you our cu...

Страница 3: ...ons Description Overview Frontview Rearview Remote Control Installation Set Up and Operation Installing batteries Operations Preparation Normal Playback Pause Stop Previous and Next Fast Forward Rever...

Страница 4: ...2 19 19 19 20 20 20 Dap Audio Dap Audio DS 220K Product Guide Connections Connecting a television set Connecting a television set using an A V cable Maintenance Troubleshooting Product Specifications...

Страница 5: ...involved with the installation operation and maintenance of this system has to be qualified follow the instructions of this manual Before you initial start up please make sure that there is no damage...

Страница 6: ...o balance unbalanced signals All incoming signals should be clear Make sure that the available voltage is not higher than stated on the rear panel Make sure that the power cord is never crimped or dam...

Страница 7: ...description of the symptoms Claims The client has the obligation to check the delivered goods immediately upon delivery for any short comings and or visible defects or perform this check after our ann...

Страница 8: ...ead to dangers like short circuit burns electric shock etc You endanger your own safety and the safety of others Improper installation can cause serious damage to people and property Connection with t...

Страница 9: ...n of the device Features The DAP audio DS 220K is a 1U Karaoke DVD player LCD display with blue backlight Preview monitor Full control remote control unit Reverb effect unit 2 Adjustable mic inputs Ov...

Страница 10: ...b Level 7 Mute 20 Remote Sensor 8 Repeat 21 Previous 9 Pgm Program 22 Up 10 OK Button 23 Down 11 Preview Monitor 24 Next 12 Power On Off 25 Display 13 Headphone Volume Rearview Fig 3 26 Optical Out 30...

Страница 11: ...p 39 0 9 Keys 58 L R 40 Audio 59 10 41 Angle 60 Time 42 Slow 61 Zoom 43 Step 62 Subtitle 44 Stop 63 Vol 45 Scroll up 64 Vol 46 Scroll left 65 Mute 47 Enter 66 Scroll Right 48 Down Pitch 67 Scroll Down...

Страница 12: ...120V specification product on 230V power or vice versa Connections 1 Turn off the Power switch 2 Connect the DS 220K to your amplifier using the proper cables CAUTION Be sure that the power is off whe...

Страница 13: ...tton on the remote control to stop playback The start logo will appear on the TV screen Some discs offer the possibility of resuming from the same spot e g DVD s and music CD s 2 Press Play Pause 68 o...

Страница 14: ...rn to normal playback 15 Program Press Prog 35 to enter program mode Enter the desired number at the desired program on track or title and chapter Move the cursor to START to start the program If you...

Страница 15: ...clean discs Always handle discs carefully to prevent damaging the surface in particular when removing a disc from its case or returning it Do not bend the disc Do not put the DVD near heating sources...

Страница 16: ...2 Angle Mark 3 OSD Language 4 Captions 5 Screensaver 6 HDCD 7 Last Memory 1 TV Display In this submenu you can select the format of the TV to which the DVD is connected you can choose between Normal...

Страница 17: ...select a language for the setup menu and for the screen display 4 Captions Closed Captions CC is a standardized method used to code text into a NTSC TV signal A DVD may include Closed Captions If a D...

Страница 18: ...ssing 1 SPDIF Setup In the SPDIF Setup menu you can set up the digital sound format that comes from the coaxial or optical output on the rear panel This signal is used when the unit is connected to a...

Страница 19: ...sic Soft or off 3 3d Processing The 3d Processing submenu allows you to select a Reverb effect You can choose between 5 reverb modes or switch the reverb function off C Video Setup Includes 1 Quality...

Страница 20: ...Quality Allows you to adjust the sharpness brightness contrast and hue of the built in preview monitor D Password Setup Allows you to protect your system with a password E Exit Allows you to exit the...

Страница 21: ...19 Connections Connecting a television set Television Karaoke player Connecting a television set using an A V cable Television Karaoke player...

Страница 22: ...lve simple problems If a problem occurs carry out the steps below in sequence until a solution is found Once the unit operates properly do not carry out following steps 1 If the device does not operat...

Страница 23: ...2010 Dap Audio...

Отзывы: