background image


14 

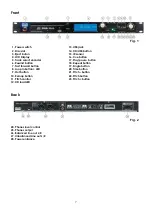
Loop play 

1.

  Push the 

loop in (8/53)

 button to set the loop start point, the LED beneath the 

loop in (8/53)

 button will 

light up, indicating that the start point is memorized. 

2.

  Push the 

loop out (9/54)

 button to set the loop end point. The LED beneath the button will light up also. 

As soon as the end point is set, the playback will start loop play from start point to end point 
repeatedly. Both the LEDs beneath 

loop in (8/53)

 and 

loop out (9/54)

 buttons will light and 

LOOP

 will 

appear in the LCD display. 

3.

  Pushing the 

loop out (9/54)

 button will cancel the loop play function, the 

LOOP

 indication in the 

LCD 

display (13)

 will disappear and the LED beneat the 

loop out (9/54)

 button will dim. 

4.

  The only way to erase a loop is to record a new loop.  


Reloop 

1.

  If you press the 

reloop (10/50)

 button, the disc will return to loop playback. 

2.

  Push the 

loop in (8/53)

 button over and over rapidly to start the loop again and again. 

3.

  Push the 

loop out (9/54)

 button, the loop play function is canceled, the 

LOOP

 indication in the 

LCD 

display (13) 

will disappear. 


Program play  

1.

  Push the 

play/pause (17/37)

 button to enter pause mode. 

2.

  Push the 

pgm (43)

 button, the player will enter program mode, indicated by 

PROGRAM

 blinking in the 

LCD (13) 

display.


3.

  Only in MP-3 mode: Select a folder by pushing the 

folder (46)

 button. 

4.

  Select a track by either pushing the direct 

access (41)

 buttons or by dialing the 

track (5)

 encoder.


5.

  Push the 

pgm (43)

 button to store the selected track in the program sequence. 

6.

  Repeat step 3 to 5. A maximum of 99 tracks can be programmed. 

7.

  Use the 

play/pause (17/37)

 button to start or pause program play. 

8.

  To exit program play, enter pause mode by pushing the 

play/pause (17/37)

 button and push the 

pgm 

(43)

 button.  

9.

  To erase a program, push and hold the 

pgm (43)

 button more than 3 seconds. The 

PROGRAM


indication in the display will disappear. 


Before switching off the power 


CAUTION: 

Do not force the disc in when the power is switched off. 

Do not switch off the power, when the disc is ejecting. 
Switch off the power after the disc has been ejected. 

 
CD’s 
1.  Precautions on handling compact discs 

•  Do not allow fingerprints, oil or dust to get on the surface of the disc. If the disc is dirty, wipe it off with a 

soft dry cloth. 

•  Do not use thinner, water, record spray, electrostatic-proof chemicals, or silicone-treated cloths to 

clean discs. 

•  Always handle discs carefully to prevent damaging the surface; in particular when removing a disc 

from its case or returning it. 

•  Do not bend the disc. 
•  Do not put the CD near heating sources. 
•  Do not enlarge the hole in the center of the disc. 
•  Do not write on the label (printed side) with a hard-tipped implement such as a pencil or ball point 

pen. 

•  Condensation will form if a disc is brought into a warm area from a colder one, such as outdoors in 

winter. Do not attempt to dry the disc with a hair dryer, etc. 


2. Precaution on storage 

•  After playing a disc, always unload it from the player. 
•  Always store the disc in the jewel case to protect from dirt or damage. 
•  Do not place discs in the following areas: 

1. Areas exposed to face sunlight for a considerable time. 
2. Areas subject to accumulation of dust or high humidity. 

Содержание CDMP-150

Страница 1: ...CDMP 150 ORDERCODE D1152 Highlite International B V Vestastraat 2 6468 EX Kerkrade The Netherlands...

Страница 2: ...AP Audio for more excellent audio products We design and manufacture professional audio equipment for the entertainment industry New products are being launched regularly We work hard to keep you our...

Страница 3: ...mes and functions 9 Operations 12 CD s MP3 discs USB sticks SD MMC cards 12 Starting playback 12 Stop playback 12 Selecting tracks 12 Selecting Folders 12 Pausing 12 Scanning Fast forward 13 Scanning...

Страница 4: ...dealer and do not use the system To maintain perfect condition and to ensure a safe operation it is absolutely necessary for the user to follow the safety instructions and warning notes written in thi...

Страница 5: ...densation water might damage your system Leave the device switched off until it has reached room temperature If your Dap Audio device fails to work properly discontinue use immediately Pack the unit s...

Страница 6: ...description of the symptoms Claims The client has the obligation to check the delivered goods immediately upon delivery for any short comings and or visible defects or perform this check after our an...

Страница 7: ...CDMP 150 is a professional 1U CD USB MP3 player from DAP Audio LCD display with blue backlight Pitch control 16 Electronic anti shock buffer 40 seconds Seamless loop function Cue function Program fun...

Страница 8: ...y pause button 6 Rewind button 18 Repeat button 7 Fast forward button 19 Single button 8 Loop in button LED 20 Time button 9 Out button 21 Pitch button 10 Reloop button 22 Pitch button 11 Pitch contro...

Страница 9: ...der button 33 Repeat button 47 Fast forward button 34 OK button 48 Skip button 35 Time button 49 Pitch bend button 36 Cue button 50 Reloop button 37 Play pause button 51 Source button 38 Rewind button...

Страница 10: ...ntly in the slot The disk will load automatically Stop playback and press the eject 3 44 button to eject the disk 3 42 Eject button Use this button to eject the disc The disc can t be ejected during P...

Страница 11: ...45 Single S C button Use this button to switch between the single play mode and continuous play mode The selected mode is indicated by Single or Cont in the LCD display 4 In single play mode the unit...

Страница 12: ...r right button Not functional in combination with the CDMP 150 32 Power button Not functional in combination with the CDMP 150 34 OK button Not functional in combination with the CDMP 150 39 Pitch but...

Страница 13: ...tically stored in the memory as the cue point The CD Player returns to the cue point when the cue 16 36 button is pressed Stop playback There are two ways to stop playback Push the play pause 17 37 bu...

Страница 14: ...start playback from the cue point Repeat mode Two different repeat modes are available REPEAT 1 and REPEAT ALL When you press repeat 18 33 during playback you can choose between the following play mod...

Страница 15: ...6 Repeat step 3 to 5 A maximum of 99 tracks can be programmed 7 Use the play pause 17 37 button to start or pause program play 8 To exit program play enter pause mode by pushing the play pause 17 37 b...

Страница 16: ...onnections are thoroughly dry before linking equipment or supplying electric power Troubleshooting DAP Audio CD Player CDMP 150 This troubleshooting guide is meant to help solve simple problems If a p...

Страница 17: ...SB files MP3 max 99 folder 999 files USB format FAT NTFS max 16Gb Anti shock buffer 40 Sec Remote batteries 2x AAA not included Power supply 100 240V 50 60Hz Power consumption 16W Dimensions 483 x 225...

Страница 18: ...2013 DapAudio...

Отзывы: