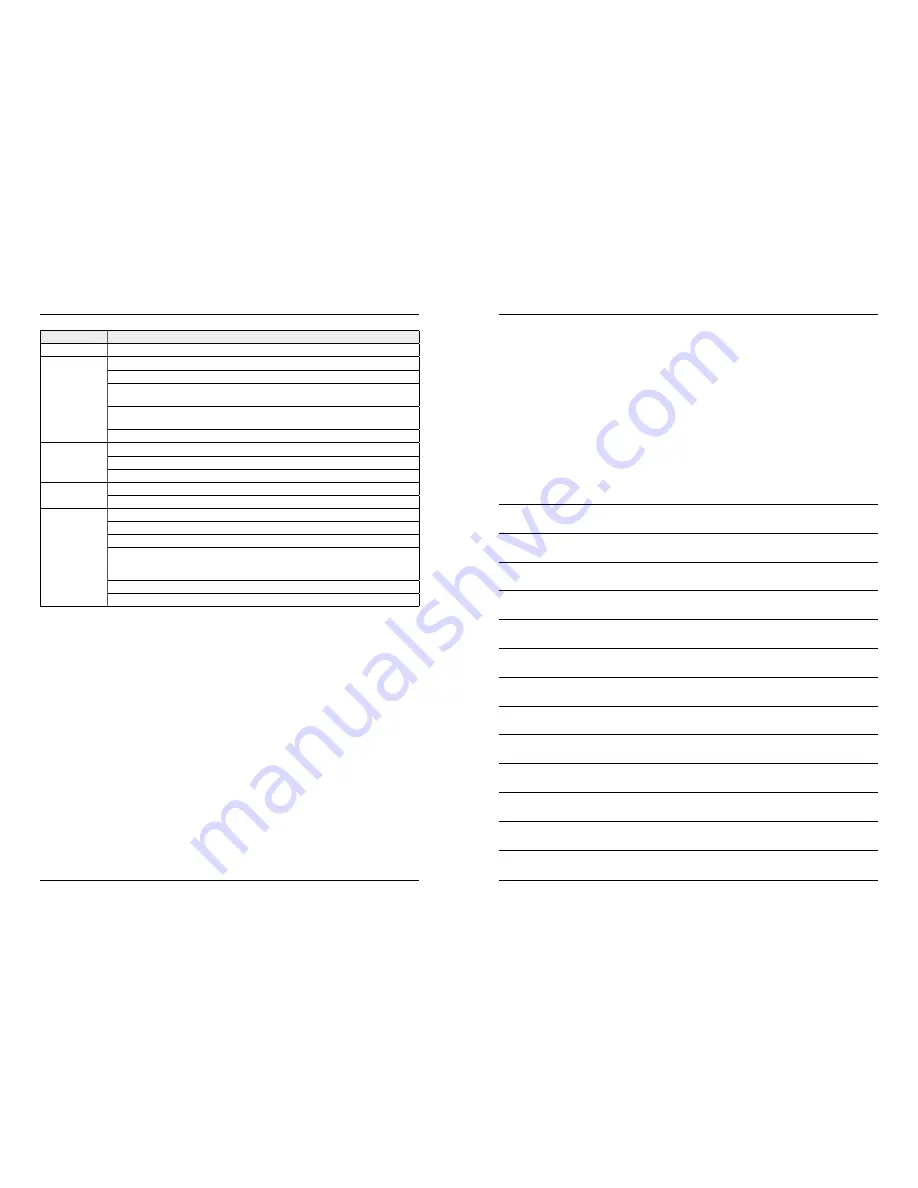
Danguard HS-200 Скачать руководство пользователя страница 16

Problems

Solutions

No display

Confirm the adapters of receiver and camera connect OK

Failed

Failure in USB connection. Confirm the USB plug connects OK
Failure in setting, see more details in the manual.
Failure in SD card connection. It is suggested to use SD card with brand like 
Kingston SanDisk Panasonic Kingmax or Transcend
Failure in Mobile Hard disk connection. It is suggested to use hard disk with 
brand like IBM, TOSHIBA or Seagate.
The format of mobile hard disk should be FAT32 instead of NTFS.

No alarm

interference in the surrounding environment, such as WIFI and other wireless devices.
The antennas of receiver and camera install unwell.
IR night version is on, which leads to the color cast.

Camera is off

Confirm the adapter and camera connect OK.
Confirm the setting of both Active and Display Items. See details in the manual.

No alarm

or alarm

failed

Failure in alarm PIP setting. See more details in the manual.
blocked by some moving objects or barrier.
interference from light,thunder,infrared or microwave etc.
The stored recording image keeps unchanged, because the angle of the 
pyroelectric sensor is wider than the camera angles, the sensor is triggered 
beyond the camera view angle.
Objects pass through the recording effective area too quickly in less than 2s.
Fresnel shell is dirty.

This attesting conformity with the following directives / standards:

Electromagnetic Compatibility Directive 2004/108 / EC

EN 55013: 2001 + A1: 2003 + A2: 2006

EN 55020: 2007

EN 61000-3-2:2006 + A1:2009 + A2:2009

EN 61000-3-3:2008

Low Voltage Directive 2006/95/EG

EN 60065: 2002 + A1: 2006 + A11: 2008

9. Troubleshooting

30

31

Declaration of Conformity

ENGLISH

ENGLISH

Notes:

FAQ

1.  Why the screen doesn’t display any monitoring picture after the camera is connected? 

Answer: 

1. Please check whether “Active” is set to “ON”. 


2. Please check whether pairing succeeds. 

2.  The recording time is set already or the motion detection recording is enabled, but the recei-

ver does not start recording when the time comes or a motion is detected. Why? 
Answer: 

1. Check whether the storage medium is inserted. 


2. Check whether the storage medium is full. 

3.  The system does not respond when the playback button is pressed. Why? 

Answer: 

Please check whether the current camera is in the recording status. If it is in 


the recording status, the system will not respond when this button is pressed. 

4.  Why cannot see human body in the picture area, when the alarm occurs? 

Answer: 

For the product, the angle of sensor is greater than that of lens. When human 


body moves beyond the angle of lens and within the angle of senor, an alarm 


can also occur on the device. However, the display device cannot display 


human body‘s move in the picture area.

Содержание HS-200

Страница 1: ...d 2 1 Januar 2015 Technische Änderungen Druckfehler und Irrtümer vorbehalten Megasat Werke GmbH Industriestraße 4a D 97618 Niederlauer www megasat tv info megasat tv User manual HS 200 HS 210 HS 400 HS 410 ...

Страница 2: ...en can display the monitoring images from the connected cameras In addition the cameras have an infrared detection of the human body with alarm function Optionally the video surveillance system over an IP feature that allows you to transfer the surveillance video to your smartphone or tablet Easy installation without cables Completely digital no interference 7 TFT LCD monitor with built in VCR Sup...

Страница 3: ... power switch on the remote control direct the remote control toward the receiver The power indicator is turned on and the power on picture appears 4 Pair the cameras and receiver respectively at most four cameras can be connected at the same time Pairing is completed by default before delivery If pairing is not completed complete pairing according to Pairing on page 18 2013 11 15 09 30 2013 11 15...

Страница 4: ...ed Mobile you will see the selected mobile devices If None is displayed on the screen no mobile devices are currently connected to the camera system Network Information Here all the network information will be displayed when a network connection is available This option is available only at the IP version Network Date Time The SYSTEM menu consists of several sub items which are explained in the fo...

Страница 5: ... Video playback Menu Record Stop Video Aufnahme Stop Video Delete file LCD TV switch Positioned on a level plane Installieren Sie die Kamera auf einer ebenen Fläche 2 Designations 04 05 3 Installation ENGLISH ENGLISH 1 Install the camera at the proper monitoring location and screw up the bracket 2 Install the receiver at a proper location 3 Insert the SD card or connect an external USB storage dev...

Страница 6: ... p or q button to select the menu item STORAGE FOR RECORDING Confirm with OK You can choose between two options SD Card Choose SD card to get the videos on an SD card USB device Choose USB device to get the videos on an USB device Press the p or q button to select the menu item DISPLAY ITEMS In this menu you can choose which icons should be shown on the display RSSI Signal intensity icon SD USB St...

Страница 7: ...ation by clicking OK or select Cancel to leave the menu Press the p or q button to select the menu item BRIGHTNESS In this menu you can adjust the brightness of the monitor Use the t or u keys to adjust brightness Confirm with OK to save and exit the menu Press the p or q button to select the menu item VOLUME In this menu you can adjust the volume of the monitor Use the t or u keys to adjust the v...

Страница 8: ... particularly sensitive when movement takes place When you have made your settings press the MENU button to save and exit the menu After you have made all the settings press the OK button to set the timer to save and again to check your settings in an overview To save the timer settings and exit the menu press the MENU button If you want to add another recor ding select New Schedule and confirm wi...

Страница 9: ...ill be saved automatically Accor dingly it is stored on the storage medium every 5 minutes a video Simultaneous recordings with multiple cameras max 4 cameras is possible The recorded videos of the respective cameras are placed independently of each other in a separate video folder PIR Recording Manual Recording Playback Delete Video output Hinweis Die Erkennung einer Wärmequelle reagiert nicht nu...

Страница 10: ... q button to select a camera and confirm again with OK Resolution Size Press the p or q button to select a video re solution You can choose between high and low Confirm your selection with OK Quality Press the p or q button so set the quality of the videos You can choose between Low Medium High or Top Confirm your selec tion with OK To exit the menu and save the settings press the MENU button Pres...

Страница 11: ...otion If you select Off this function is disabled Exit the menu by pressing the MENU button PIR Detection Press the p or q button to select the menu item PIR Detection If you confirm On by pressing the OK button the monitor will be playing an alarm sound when the camera detects heat source If you select Off this function is disabled Exit the menu by pressing the MENU button Note The network featur...

Страница 12: ...an normally connect to outer net You just need to input device ID to the client or scan the QR code to get the Device ID the password is set up in the receiver and then input to the mobile phone and saving scannen oder eingeben Passwort festlegen und eingeben 3 Click the play icon the image will display on the smart phone 4 Press and hold the device ID to enter the settings ...

Страница 13: ...g the Push Notification Note Only if the motion detection and or heat detection in the menu item Recording is enabled a push notice may be served 5003 Networ k ready Networ k Informatio n Golbal IP Loca l IP Port Device ID Insert the receiver in the pedestal and connect with the base power Then connect the outer net Turn on the receiver After successful connection go to the Main Menu Network Netwo...

Страница 14: ... client or scan the QR code to get the Device ID the password is set up in the receiver and then input to the mobile phone and saving Passwort festlegen und eingeben 3 To view the video image you need to choose the right title in the Device list then click the line to enter the monitoring mode 4 Click on the bottom play icon APP will try to connect the RX of the previous selected title if connecti...

Страница 15: ...perate with a different power source Imortant notes 7 Operating with iOS devices 28 29 8 Specifications ENGLISH ENGLISH Go to the Main Menu System Network Push notification in the menu item Enab le Disable you can set the push notification on or off By minimum time interval the time delay of a push notification can be set Click at the Android app to push notification settings to register an accoun...

Страница 16: ...ctive area too quickly in less than 2s Fresnel shell is dirty This attesting conformity with the following directives standards Electromagnetic Compatibility Directive 2004 108 EC EN 55013 2001 A1 2003 A2 2006 EN 55020 2007 EN 61000 3 2 2006 A1 2009 A2 2009 EN 61000 3 3 2008 Low Voltage Directive 2006 95 EG EN 60065 2002 A1 2006 A11 2008 9 Troubleshooting 30 31 Declaration of Conformity ENGLISH EN...

Страница 17: ...Status 2 1 January 2015 Technical changes misprint and errors reserved Megasat Werke GmbH Industriestraße 4a D 97618 Niederlauer www megasat tv info megasat tv ...

Отзывы: