Danfoss District Energy
MAKING MODERN LIVING POSSIBLE
Akva Lux II TDP-F
Instructions for installation and use
Страница 1: ...Danfoss District Energy MAKING MODERN LIVING POSSIBLE Akva Lux II TDP F Instructions for installation and use...
Страница 2: ...9 7 0 Installation instructions Getting started 10 8 0 Installation instructions general 11 9 0 Installation instructions recirculation connection 14 9 1 Installation instructions recirculation conne...
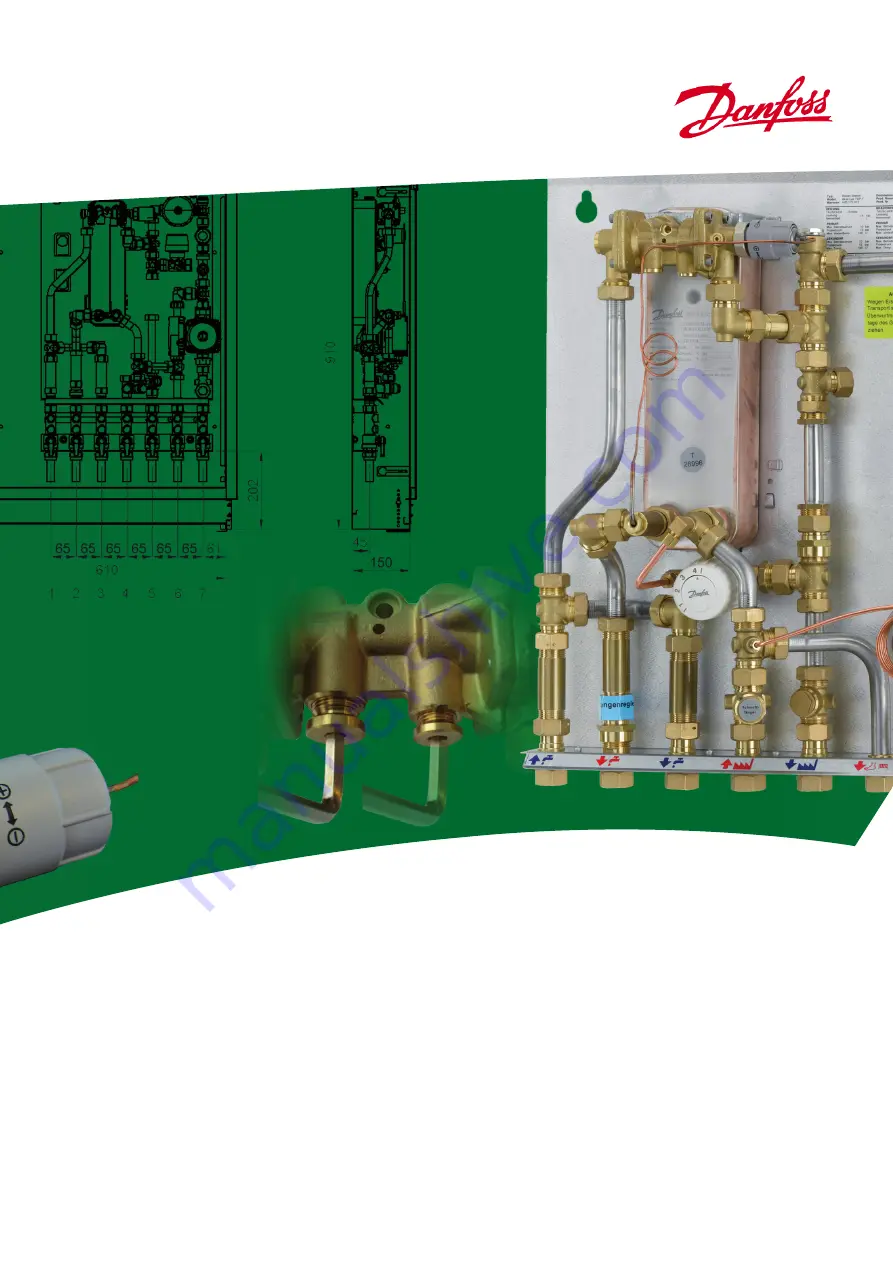
Страница 3: ...7 Air vent 23 Sensor pocket for heat meter 24 Fitting piece for heat meter 38 PTC2 P controller 40 Thermostat for bypass circulation 52 Zone valve 60 Fitting piece for DCW meter Please note that the b...
Страница 4: ...4 Differential pressure controller 5 Dirt strainer 6 Non return valve 17 Air vent 23 Sensor pocket for heat meter 24 Fitting piece for heat meter 38 PTC2 P controller 40 Thermostat for bypass circula...
Страница 5: ...ial pressure controller 5 Dirt strainer 5A Dirt strainer with plug 6 Non return valve 17 Air vent 23 Sensor pocket for heat meter 24 Fitting piece for heat meter 30 Return temperature limiter 38 PTC2...
Страница 6: ...kva Lux II TDP F with bypass thermostat mounted before heat meter Type 004U8044 Akva Lux II TDP F with bypass thermostat mounted after heat meter Connections 1 Domestic cold water DCW 2 Domestic hot w...
Страница 7: ...deally in con nection with readings of the district heating meter Pay special attention to any leaks and an excessively high return tem peratureinthedistrictheatingcircuit poorcoolingofthedistrictheat...
Страница 8: ...hermostat Thermostat Fig 2 that keeps the branch pipe warm in the summer or regulates the circulation temperature if domestic hot water recir culation has been established in the hot water system The...
Страница 9: ...s far as possible do not lift the substation by the pipes Lifting by the pipes may cause leaks REMEMBER to retighten Disposal Dispose of the packaging in accordance with the local regulations for disp...
Страница 10: ...sub station on a solid wall using two sturdy bolts screws expan sion bolts or similar 3 Mount ball valves not part of the delivery on the substation and make sure that they are closed when connnecting...
Страница 11: ...Please note that the connections features EPDM rubber gaskets Therefore it is important that you DO NOT OVERTIGHTEN the union nuts Over tightening may result in leaks Leaks caused by over tightening o...
Страница 12: ...ball valves on the domestic cold water and the do mestic hot water supply Loosen the union nuts at both ends of the fitting piece and remove it Fit the cold water meter remember to insert gaskets Afte...
Страница 13: ...room thermostat keeps the temperature at a constant level in the whole apartment according to the set room parameters Consult additional maintenance instructions for room thermostat for further infor...
Страница 14: ...ation the substation must be connected to the recirculation system The circulation set for recirculation connection is not standard equipment The set must be purchased as extra equipment We recommend...
Страница 15: ...controller Fig 4 Loosen union nuts and remove the existing capillary tube between the bypass thermostat and the T piece as shown in fig 4 Fig 5 Plug the hole with ball C and union nut D Fig 6 Fit new...
Страница 16: ...hten the union nut again Fig 12 Please note that the arrow on the back of the housing indicates the dirction of flow Please note the position of the arrow as shown in the photo to your right Fig 13 Fi...
Страница 17: ...nipple A in the DHW controller pack Fig 3 Fit pipe bushing B in the DHW controller Fig 4 Remove the existing capillary tube and union nut from bypass thermostat and angle piece do not re use Fig 5 Plu...
Страница 18: ...fasten by means of two screws I Fig 9 Mount non return valve J and hexagon nipple K in the pump as shown in the photo to your right Fig 10 Loosen union nut Fig 11 Turn pump motor head by 180 degrees T...
Страница 19: ...structions 1 Start by shutting off all connections to the substation 2 First follow the instructions for Fig 1 2 and 3 on page 16 3 Then demount 3 4 plug in T piece pos A as illustrated in fig 1 4 Rem...
Страница 20: ...non return valve to the recir culation pipe with flow direction towards the substation A safety valve must be mounted in the DCW inlet For recirculation connection please refer to installation instru...
Страница 21: ...Allen key Fig 2 Mount hexagon nipple A in the DHW controller pack and mount hexagon nipple C and union nut D in hexagon nipple A for fitting of recirculation pipe Fig 3 Fit pipe bushing B in the DHW...
Страница 22: ...mount hexagon nipple C and union nut D in hexagon nipple A for fitting of recirculation pipe Fig 3 Fit pipe bushing B in the DHW controller Fig 4 Remove the existing capillary tube and union nut from...
Страница 23: ...ust be mounted before the heat meter Please follow the below instructions 1 Start by shutting off all connections to the substation 2 First follow the instructions for Fig 1 2 and 3 on page 21 3 Then...
Страница 24: ...insulation Fig 1 Remove the nipples plugs from the domestic hot water controller use a 6 mm Allen key Fig 2 Mount hexagon nipple A in the DHW controller pack Fig 3 Mount circulation pipe C incl hexag...
Страница 25: ...before the substation is prepared for recirculation i e the by pass thermostat must be mounted before the heat meter Please follow the below instructions 1 Start by shutting off all connections to the...
Страница 26: ...ng controllerPM2 P Fig 1b RegulationofthehotwatertemperaturePTC2 P SettheDHWtemperaturebymovingtheadjusterlevertowards hotter or colder Startbyturningtheleverclockwise untilitstops untilyou cannot tur...
Страница 27: ...a differential pressure controller type TD200 is mount ed in Akva Lux II TDP F types 004U8089 and 004U8044 This type of differential pressure controller is preset from factory and should not be adjust...
Страница 28: ...eflowreg ulator automatically equalizes all changes in pressure within a large pressurerange normally1to10bar andtherebyensuresaconstant flow regardless of water supply pressure Even at low pressures...
Страница 29: ...Max 4 5Watt For more information about the pump please refer to enclosed instal lation and maintenance instructions WILO STAR Z NOVA Installation and operating instructions D Einbau und Betriebsanlei...
Страница 30: ...isusedonthesecondaryside Ifitbecomes necessarytocleantheexchangerwithacid thiscanbedoneasshown on the drawing to the right Brazed plate heat exchangers can withstand rinsing with a dilute acid sulutio...
Страница 31: ...e a year Check all connections for leaks If you identify a leak replace the gaskets and retighten the pipe connec tions Check that the safety valve on the cold water supply is functioning correctly Ch...
Страница 32: ...Clean dirt strainer Poor cooling Too small heating surface too small radiator in relation to the total heating requirement of the building Poor utilization of existing heating surface Increase total h...
Страница 33: ...tion pump out of operation not part of the dly Check whether the pump is running whether the pump is receiving power control that there is no air in the pump housing see pump manual No domestic hot wa...
Страница 34: ...used in accordance with our instructions EU Directives EMC Directive 2004 108 EEC EN 61000 6 1 2007 Electromagnetic compatibility Generic standard Immunity for residential commercial and light indust...
Страница 35: ...comply with all technical regulations and the applicable legislation in every respect Installation and commissioning must only be performed by trained authorised personnel The substation is checked in...
Страница 36: ...Produced by Danfoss Redan A S 09 2012 VI HE A1 02 Danfoss Redan A S District Energy Omega 7 S ften DK 8382 Hinnerup Tel 45 87 43 89 43 Fax 45 87 43 89 44 redan danfoss com www redan danfoss dk...