background image

Danelec Business System

Danelec Marine S-VDR/VDR USER GUIDE

 Confidential. Copyright Danelec Marine A/S

DBS11343-11

Page 31/44

9 Extracting data from a NAS disc

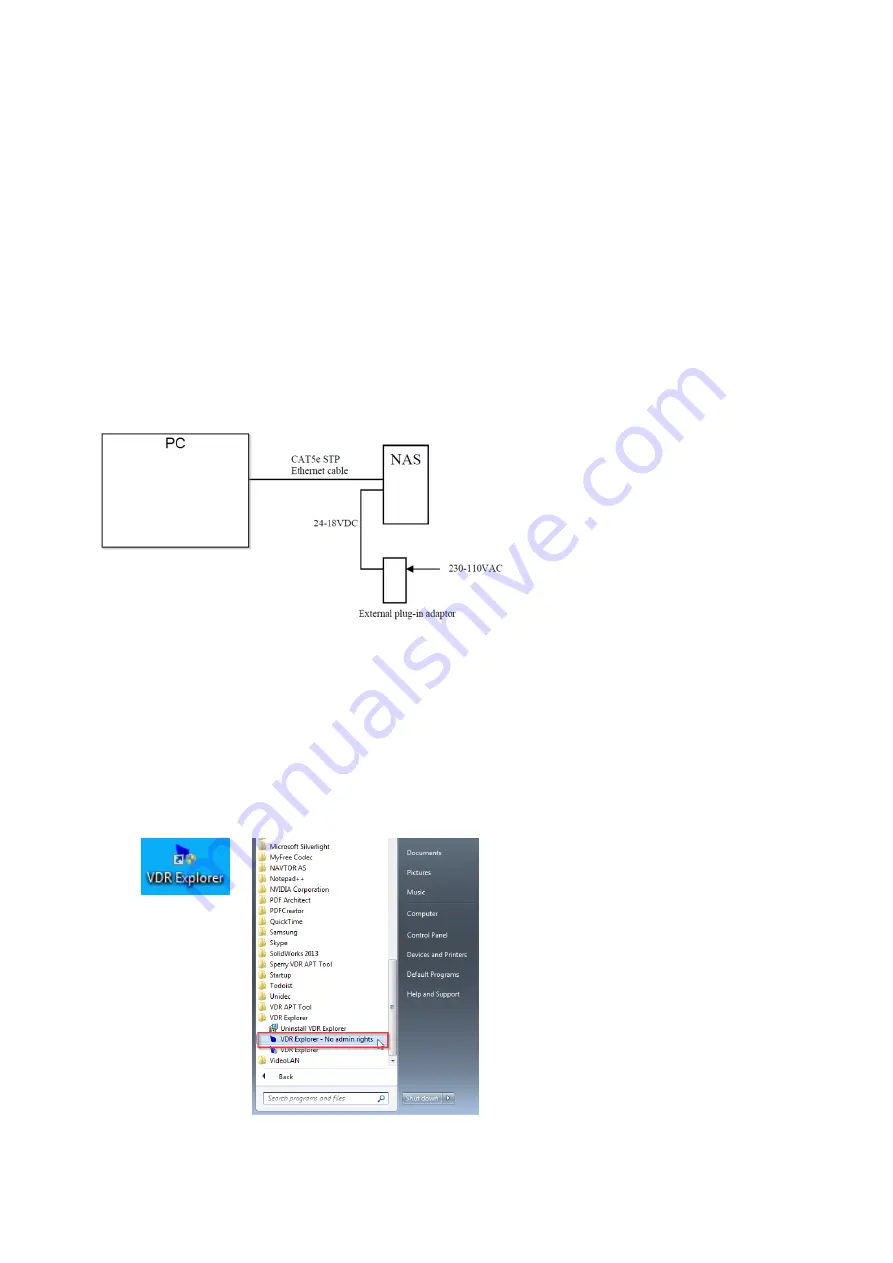
To extract data from a NAS disc, the NAS disc must be disconnected from the S-VDR/VDR.

The NAS Disc must be connected to a PC using a standard LAN cable, and the PC LAN port must 
be configured as described in chapter 6. 

The VDR Explorer software must be installed on the PC. 

The NAS disc must be powered using the standard NAS power supply.

9.1

NAS Setup

9.2

Connecting to the NAS

1. Open the VDR Explorer Software by clicking on the desktop Icon or selecting the program 

from the start menu. 

Note that if the user account on the PC running the VDR explorer does not have 
administrator rights, Windows may prevent the VDR Explorer from starting. In this case 
start the program from the start menu selecting the option VDR Explorer – No admin rights.


Содержание DM100 S-VDR G2

Страница 1: ...rine A S DBS11343 11 Page 1 44 Danelec Marine S VDR VDR USER GUIDE Document number and version DBS11343 11 Date 2018 11 12 Prepared by NAW Approved by Date CET Initials Name Justification 2018 11 13 12 58 31 NAW Nikolaj Weldingh Filename hs files General DBS DBS11343 DBS11343 11 DBS11343 11 doc ...

Страница 2: ... DBS11343 11 Page 2 44 Revision record Version Date Author Description 1 0 2015 04 20 NAW Original issue of document 1 1 2018 11 12 NAW Added description of DFS and extraction to USB for DM100 and rearranged chapters Document template DBS V1 0 2010 10 29 Last saved by Nikolaj Weldingh 2018 11 12 16 28 ...

Страница 3: ...9 3 7 How to save an incident 9 4 USER INTERFACE FOR DM100 VDR 11 4 1 Dimmer button 11 4 2 Alerts 11 4 3 Menu 12 4 3 1 Audio test 13 4 3 2 Communication audio test 13 4 3 3 Operational Performance Test 13 4 3 4 Performing an OPT 14 4 3 5 OPT report 15 4 3 6 Network Data 17 4 3 7 System Info 17 4 3 8 Analysis of recorded audio 17 4 3 9 Download data to USB disk 18 5 HANDLING UNRESOLVED ALARMS 19 6 ...

Страница 4: ...RACTING DATA TO AN USB DISK DM100 VDR 29 9 EXTRACTING DATA FROM A NAS DISC 31 9 1 NAS Setup 31 9 2 Connecting to the NAS 31 9 3 Exporting Data from NAS disc to file 34 10 MAKE A DUMP FOR SUPPORT USING A PC 36 11 MAKE A DUMP FOR SUPPORT TO USB DRIVE DM100 VDR 38 12 VDR EXPLORER 40 12 1 Starting VDR Explorer 40 12 2 Connecting to a data file 41 12 3 Play control 42 12 4 Playing the data 43 12 5 Acce...

Страница 5: ...l as the procedure to extract data from the S VDR VDR and how to replay the extracted data 1 1 References User Manual for VDR Explorer Document Number 9200294 Inspectors and Authorities Manual Document Number 9200343 Manual for Network Attached Storage NAS 01 001 Document number DBS10903 1 2 Terms and Abbreviations VDR Voyage Data Recorder S VDR Simplified Voyage Data Recorder BCP Bridge Control P...

Страница 6: ...However there are some differences It is therefore necessary to determine what type of S VDR VDR is installed The following are the current and previous Danelec Marine S VDR VDR Models S VDR DM100 S VDR DM200 S VDR DM300 S VDR VDR DM100 VDR DM400 VDR DM500 VDR 2 1 How to determine the S VDR VDR type To determine what type of S VDR VDR is installed open the S VDR VDR door and look for the Type Appr...

Страница 7: ...te how many incidents are available in the system If alarms exist in the system the display will indicate the alarm type 3 1 Dimmer button The Dimmer button can be used to adjust the backlight of the display and buttons Press the dimmer button multiple times to move between the different backlight levels 3 2 Alarms During normal operation the S VDR VDR should not have any alarms and no user operat...

Страница 8: ...an incident the crew of the vessel is required to save data onto the S VDR VDR backup disk drive for later analysis The Danelec S VDR VDR contains a backup disk drive with data capacity for 3 incidents When an incident is saved the S VDR VDR automatically stores the last 12 hours of recorded data on a protected area of the backup disk drive while continuing to record new data When 3 incidents have...

Страница 9: ... DM200 S VDR USB disk DM300 S VDR Hard disk cassette DM400 VDR USB disk DM500 VDR Hard disk cassette Note The USB disk is not standard formatted If connected to a computer the computer may ask to format it DO NOT FORMAT THE USB DISC all data will be lost and the S VDR VDR will not be able to record to it again In case of a formatted USB disc service is required 3 7 How to save an incident To save ...

Страница 10: ...ht Danelec Marine A S DBS11343 11 Page 10 44 After each saving operation the text in the display will change according to the table below Incident saved Display text SAVE LED Display 0 Incidents Left 3 Green 1 Incidents Left 2 Green 2 Incidents Left 1 Yellow 3 No Incidents Left Red ...

Страница 11: ...ystem information and network data status Two function buttons F1 and F2 and navigation buttons are used to navigate through the different menus 4 1 Dimmer button The DIM button can be used to adjust the brightness of the display and buttons Press the DIM button to enter the menu and use left and right navigation buttons to adjust the brightness Pressing the F2 button while in the brightness menu ...

Страница 12: ...tion When an alarm is no longer present in the VDR the alarm is removed from the Alert list on the alert screen 4 3 Menu Pressing F2 button Menu opens the menu page where different tests can be initiated or system information viewed The menu list contains Menu Description Audio test Starts a microphone test Communication audio test Starts a test of the VHF to VDR connection Operational performance...

Страница 13: ... FRM of the VDR An OPT should be conducted on a regularly scheduled basis to ensure that the VDR is working and recording correctly The OPT consist of the following test Test Description Final recording media Verifies that the recording media are working and have recorded continuously for the required period Audio test Verifies all configured Microphones Communication test Verifies main and second...

Страница 14: ... the communication Audio test The BCP will now prompt the activation of the communication audio channel within 60 seconds At this point activate the VHF When the system detects audio on the channel it will start to record 15 seconds of audio After recording 15 seconds of audio the system will analyse the audio and if audio is present pass the test Click OK to continue If the test has failed no aud...

Страница 15: ...nally the OPT report will automatically be displayed after an OPT has been performed An OPT report consist of 8 pages General information Display the vessel specific data including the expiry date of the VDR backup batteries FRM Information Display information about the final recording media FRM Green colour indicates that the media is working and has recorded for at least the period required by r...

Страница 16: ...The picture can be used to evaluate if there is excessive noise etc overlaying the audio Communication input Display the result of the serial data input analysis All serial data that are configured to be recorded will be displayed Green colour indicates that the channel has received the correct data Yellow colour indicates an error or that the data configured for this channel was not received e g ...

Страница 17: ...annel by selecting the image channel and press the OK button The picture can now be evaluated for quality Pay special attention to resolution issues picture looks stretched picture sharpness and whether the picture has captured the whole Radar ECDIS display 4 3 6 Network Data The network data menu provides information about network errors etc related to the VDR system It can be used to verify if a...

Страница 18: ...e A S DBS11343 11 Page 18 44 4 3 9 Download data to USB disk This page allows the user to download either a VDR data extraction or a Dump for Support file See chapter 8 for a guide on how to extract data to a USB disk and chapter 11 for a guide of how to make a dump for support file to a USB disk ...

Страница 19: ...ates a connection or hardware problem In this case service is required Some alarms may take a while to disappear from the system even though the condition that caused the alarm has been corrected On all systems with a BAU pressing the Purge List button will clear the alarms from the system immediately and the alarm will only reappear if the condition for the alarm still exists On systems with a BC...

Страница 20: ...rk adaptor must be set to an IP address in the same range The recommended IP address for the PC is IP address 10 0 0 10 Subnet mask 255 255 255 0 Note If the IP address of the VDR has been changed to another value than the default the PC network adaptor must be configured accordingly Note The IP address of the computer may not be the same as the IP address of the S VDR VDR Follow these steps to co...

Страница 21: ...DE Confidential Copyright Danelec Marine A S DBS11343 11 Page 21 44 4 Double click on the network adaptor controlling the LAN port used to connect to the S VDR VDR 5 Click on Properties 6 Highlight Internet Protocol Version 4 TCP IPv4 and click on Properties ...

Страница 22: ...pyright Danelec Marine A S DBS11343 11 Page 22 44 7 Set IP address and Subnet mask Select Use the following IP adress Type in IP address 10 0 0 1 Type in Subnet mask 255 0 0 0 8 Click OK and exit the control panel The PC LAN port is now setup to communicate with the S VDR VDR ...

Страница 23: ...orts are different on the Danelec DM200 500 range S VDR VDR and Danelec DM100 S VDR VDR 6 3 1 DM200 DM300 S VDR and DM400 DM500 VDR connection Connect a LAN cable to any of the 4 ETHERNET ports 6 3 2 DM100 S VDR and DM100 VDR connection Connect a LAN cable to LAN 1 port if unused If LAN 1 port is in use connect to one of the other LAN ports LAN 2 LAN 7 Note Do not connect the cable to the SIU port...

Страница 24: ...k cable between the PC and the S VDR VDR use a web browser Internet Explorer version 6 or higher is recommended to log in and extract data Open the Web browser and type in the IP address of the S VDR VDR 10 0 0 100 in the address field A new window opens Click on connect The VDR front page appears Click on login Enter user and password information User svdr Password password Click Submit to log in...

Страница 25: ...M300 S VDR and DM400 DM500 VDR In the WEB Extractor menu select which memory to extract data from Options are Capsule Incident backup disc On the capsule the last 12 hours of recording is available In Incident there are a total of 3 incidents available The latest 12 hours of recording is available in the incident indicated with a Recording since date If saved incidents exist they are labelled with...

Страница 26: ...psule the saved incident or the second incident currently recording 7 2 Data source DM100 VDR In the DM100 VDR there are 3 data sources available Final Recording Media FRM Fixed capsule Float free capsule Long term backup disc The fixed and float free capsules contain data from the last 48 Hours The long term backup disc contains data from the last 30 days Web Extractor menu of the DM100 VDR ...

Страница 27: ... 3 Extracting data 1 Select the medium to extract data from and click Select Capsule Incident or Select FRM DM100 VDR 2 A list of available tracks will now appear There may be several tracks A start and a end label indicates when each specific track was recorded 3 Select the track to extract data from and click on Select track ...

Страница 28: ...elected track If only a portion of the data is needed the start and end time can be adjusted Set Start time and End time and click on Extract 5 Data is now extracted and the browser will prompt to save the data The extracted data file is a VEE file type and the file name contains the IMO number of the vessel The VEE file can be opened using the VDR Explorer Replay Software The VDR Explorer softwar...

Страница 29: ...n USB connector and the Bridge Control Panel BCP Note that this feature is available from version 1 51 only To extract data to a USB disk follow these steps 1 Insert a normal windows formatted FAT32 USB disk into either of the two USB ports on the DM100 VDR DPU 2 On the Bridge control panel select Download data to USB disk and press OK 3 Select Download VDR data and press OK 4 Select the duration ...

Страница 30: ...ss F2 button on the BCP to continue 6 Data is donwloaded to the USB disk 7 The USB drive can now be inserted in a PC and data replayd using the VDR Explorer Note Extraction files names are set as IMO number Date Time vee Note The end time of data extracted directly to a USB disk will always be the same time as the data extraction was initiated If a specific start and end time is required extract t...

Страница 31: ...d as described in chapter 6 The VDR Explorer software must be installed on the PC The NAS disc must be powered using the standard NAS power supply 9 1 NAS Setup 9 2 Connecting to the NAS 1 Open the VDR Explorer Software by clicking on the desktop Icon or selecting the program from the start menu Note that if the user account on the PC running the VDR explorer does not have administrator rights Win...

Страница 32: ...ge 32 44 2 In the VDR Explorer start screen Connect dialog select the option VDR extraction and click on browse Type in the IP address of the NAS disc in the file name field 10 0 0 200 vdr data Click open The VDR Explorer will prompt for a username and a password Username vdrdata lowercase Password vdrdata lowercase ...

Страница 33: ...tion file has now been selected and the VDR Explorer can connect to the data in the file It is possible to do a track analysis of the extraction data before connecting to the data Click on Analyze This will produce a list of tracks available in this data extraction The list will appear in the Track Information window To connect to the data click on connect Now data can be played in the VDR Explore...

Страница 34: ...n the VDR explorer has been connected to a NAS disc data file it is possible to extract this data and export it into a separate file on a PC 1 Select menu Tools Extractor 2 In the extractor menu select Tracks to be included in the extraction Start and end time of the extraction 3 Click on browse to select a location for the file and give the file a name then click save ...

Страница 35: ...DR USER GUIDE Confidential Copyright Danelec Marine A S DBS11343 11 Page 35 44 4 Click on Extract Data is now saved as a VEE file in the specified folder and can be stored on any media and replayed on any PC with the VDR Explorer software installed ...

Страница 36: ...mpressed into a single file small enough to send as an attachment to an email To perform a Dump for Support a PC with the LAN port configured as described in 6 is needed Follow the below steps to perform the Dump for Support 1 Connect the PC to S VDR VDR as described in 6 2 2 Log in to the S VDR VDR as described in 6 4 3 In the main menu select the Tech Support sub menu 4 In the Tech Support subme...

Страница 37: ...is ready the browser will prompt to save the file Click on Save to save the file to the PC The Dump for support file is approximately 3 7 MB in size depending on the S VDR VDR model It is a compressed file in the TGZ format The Dump for Support file can easily be attached to an email and sent to Danelec Marine support for analysis support danelec marine com ...

Страница 38: ... the Bridge Control Panel Note that this feature became available from version 1 51 only To make Dump for Support file to a USB disk follow these steps 1 Insert a normal windows formatted FAT32 USB disk into either of the two USB ports on the DM100 VDR DPU 2 On the Bridge control panel select Download data to USB disk and press OK 3 Select Save Dump fo support and press OK 4 The system will now ch...

Страница 39: ...elec Marine S VDR VDR USER GUIDE Confidential Copyright Danelec Marine A S DBS11343 11 Page 39 44 5 The Dump for Support file will be downloaded to the USB disk Note Dump for support files names are set as dump4supp Date Time tgz ...

Страница 40: ... Danelec S VDR VDR data extraction file with the file format VEE VDR Explorer Extraction format A data extraction file can be extracted from the S VDR VDR or from a NAS disc Information on how to connect to the S VDR VDR and extract data can be found in the section Error Reference source not found 12 1 Starting VDR Explorer Open the VDR Explorer software by clicking on the desktop icon or selectin...

Страница 41: ...must connect to the file When the VDR Explorer has first started it will automatically display the Connect dialog Alternatively the Connect dialog can be found under Menu Tools Connect 2 In the Connect dialog select VDR extraction and click on Browse 3 Browse to the location of the data extraction file Highlight the desired file and click open The VDR explorer is now connected to the extraction fi...

Страница 42: ...controlled by the Play control tool bar Clicking on the small arrow in the bottom left corner of the play control tool bar shows a set of advanced play options Clicking the arrow again hides these features Please consult the User Manual for VDR Explorer Doc 9200294 for an in depth description of the play control features Recording date and time Stop Play Pause Selected track Track list Jump contro...

Страница 43: ...art playing the data Click on the play button again to pause Click on the stop button to stop data When the data is being played data can be observed in the different tab pages of the VDR Explorer configuration Layout of the VDR Explorer configuration will vary from each installation Clicking on the tabs at the top of the player configuration will change the tab page displayed ...

Страница 44: ... audio sources by clicking on the speaker symbols and turning up and down the overall volume on the volume slider 12 6 Vessel information When the VDR is connected to a VDR Explorer extraction it is possible to view the Vessel information that is configured in the S VDR VDR In the Item list select what information to display Available information Vessel name Authority approval Flag IMO number MMSI...

Отзывы: