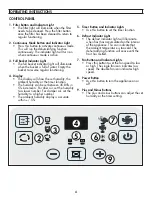
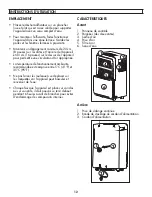
background image

CONTROL PANEL

1.  Filter Button and Indicator Light

• The 

fi lter light will illuminate when the fi lter 

needs to be cleaned. Press the fi lter button 

once the fi lter has been cleaned to return to 

regular functioning.

2.  Continuous Mode Button and Indicator Light

•  Press this button to activate continuous mode.  

This will run the dehumidifying function 

continuously. The indicator light will turn on 

when continuous mode is active.

3.  Full Bucket Indicator Light

•  The full bucket indicator light will illuminate 

when the bucket is full of water. Empty the 

bucket to resume regular functioning.

4. Display

•  The display will show the set humidity, the 

ambient humidity or the timer function.

•  The humidity can be set between 35-85% in 

5% increments. For drier air, set the humidity 

to a lower number. For damper air, set the 

humidity to a higher number.

•  The ambient humidity display is accurate 

/- 5%.

OPERATING INSTRUCTIONS

4

5.  Timer Button and Indicator Lights

•  Use this button to set the timer function.

6.  Defrost Indicator Light

•  The defrost indicator light will illuminate 

when frost has accumulated on the interior 

of the appliance. This can indicate that 

the ambient temperature is too cold. The 

dehumidifying function will cease until the 

frost has melted.

7.  Fan Button and Indicator Lights

•  Press this button to set the fan speed to low 

or high. The single fan icon indicates low 

speed. The double fan icon indicates high 

speed.

8. Power Button

•  Use this button to turn the appliance on or 

off.

9.  Plus and Minus Buttons

•  The plus and minus buttons can adjust the set 

humidity or the timer setting.

1

3

5

7

9

2

4

6

8

Содержание DDR030BECWDB

Страница 1: ...S INC FINDLAY OHIO USA 45840 OWNER S MANUAL MANUEL DU PROPRI TAIRE MANUAL DEL PROPIETARIO DEHUMIDIFIER Owner s Manual 1 9 D SHUMIDIFICATEUR Manuel du propri taire 10 18 DESHUMIDIFICADOR Manual del pro...

Страница 2: ...ide the original purchase receipt to validate your warranty and receive service Model Number _________________________________________________ Serial Number ___________________________________________...

Страница 3: ...use this dehumidi er for commercial or industrial applications GROUNDING INSTRUCTIONS This appliance must be grounded Grounding reduces the risk of electrical shock by providing an escape wire for th...

Страница 4: ...he appliance to allow for proper air circulation The recommended ambient operating temperature is between 5 C 41 F and 35 C 95 F Do not force rollers to move over carpeting as the appliance may tip ov...

Страница 5: ...tween 35 85 in 5 increments For drier air set the humidity to a lower number For damper air set the humidity to a higher number The ambient humidity display is accurate within 5 OPERATING INSTRUCTIONS...

Страница 6: ...rst setting one and then the other Both indicator lights will illuminate and the display will count down to the appliance either turning off or on whichever function was set rst Note The timer will no...

Страница 7: ...is removed 4 Attach the female threaded end of the garden hose to the adapter on the back of the appliance Direct the other end of the garden hose to a bucket or oor drain Ensure that the garden hose...

Страница 8: ...in If the error persists call for service AS Humidity sensor error ES Temperature sensor error P2 Full bucket or bucket not in the correct position EC Cooling system error or sensor error CLEANING To...

Страница 9: ...t humidity Bucket is full or is not in the proper position Insuf cient dehumidifying Air lter is dirty Blocked air ow Appliance size is too small for application Ambient humidity is lower than the set...

Страница 10: ...x 669 Findlay Ohio U S A 45840 Telephone 419 425 8627 FAX 419 425 8629 04 09 1 800 263 2629 Warranty Service In home Transportation charges to and from the service location are not protected by this w...

Страница 11: ...e re u d achat original pour valider votre garantie et recevoir le service Num ro de mod le _____________________________________________ Num ro de serie ______________________________________________...

Страница 12: ...pas ce d shumidi cateur pour des applications commerciales ou industrielles INSTRUCTIONS DE MISE LA TERRE Cet appareil doit tre mis la terre La mise la terre r duit le risque de choc lectrique en fou...

Страница 13: ...ctionner l appareil dans une zone ferm e Gardez les portes et les fen tres ferm es proximit Maintenir un d gagement minimum de 20 cm 8 pouces sur les c t s et l arri re de l appareil et 40 cm 16 pouce...

Страница 14: ...humidit un nombre inf rieur Pour l air amortisseur r gler l humidit un nombre plus lev L af chage de l humidit ambiante est pr cis entre 5 13 5 Bouton de minuterie et voyants lumineux Utilisez ce bout...

Страница 15: ...af chage et d butera jusqu ce que l appareil s allume Fonction de d sactivation automatique 1 Appuyez sur le bouton de la minuterie jusqu ce que le t moin de d sactivation automatique s allume 2 Util...

Страница 16: ...extr mit let e femelle du tuyau d arrosage l adaptateur l arri re de l appareil Dirigez l autre extr mit du tuyau d arrosage vers un seau ou un drain de plancher Assurez vous que le tuyau d arrosage...

Страница 17: ...elez pour le service AS Erreur du capteur d humidit ES Erreur du capteur de temp rature P2 Seau complet ou seau pas dans la position correcte EC Erreur du syst me de refroidissement ou erreur du capte...

Страница 18: ...bonne position La surface du plancher n est pas de niveau Odeurs Formation de moisissure sur des surfaces int rieures humides Placer un comprim d alga cide dans le seau eau L eau sur le sol Le raccord...

Страница 19: ...t pas couverts par la pr sente garantie et doivent tre acquitt s par l acheteur Pendant les premiers vingt quatre 24 mois toutes les pi ces fonctionnelles de ce produit qui s av rent d fectueuses sero...

Страница 20: ...ci n para obtener un servicio bajo garant a Debe proporcionar el recibo de compra original para validar su garant a y recibir servicio N mero de modelo _____________________________________________ N...

Страница 21: ...DE CONEXION A TIERRA Este aparato debe estar conectado a tierra La puesta a tierra reduce el riesgo de descarga el ctrica proporcionando un cable de escape para la corriente el ctrica Este aparato tie...

Страница 22: ...funcionar el aparato en un lugar cerrado Mantenga las puertas y ventanas cercanas cerradas Mantenga una distancia m nima de 20 cm 8 pulgadas en los laterales y la parte posterior del aparato y de 40 c...

Страница 23: ...humedad a un n mero m s bajo Para el aire del amortiguador ajuste la humedad a un n mero m s alto La visualizaci n de la humedad ambiental es precisa dentro de 5 22 5 Bot n del temporizador y luz ind...

Страница 24: ...La hora seleccionada aparecer en el panel de visualizaci n y contar hasta que el aparato se encienda Funci n de apagado autom tico 1 Presione el bot n del temporizador hasta que se ilumine el indicado...

Страница 25: ...oscado hembra de la manguera de jard n al adaptador en la parte posterior del aparato Dirija el otro extremo de la manguera de jard n a un cubo o desag e del piso Aseg rese de que la manguera de jard...

Страница 26: ...rlo Si el error persiste llame al servicio t cnico AS Error del sensor de humedad ES Error del sensor de temperatura P2 Cuchara llena o cubo no en la posici n correcta EC Error del sistema de refriger...

Страница 27: ...ire est sucio El cuchar n no est en la posici n adecuada Super cie del piso no nivelada Olores Formaci n de moho o moho en super cies mojadas internas Coloque una tableta algicida en el cubo de agua A...

Страница 28: ...resulte defectuosa incluyendo cualquier sistema sellado ser reparado o reemplazado a opci n del fabricante sin cargo para el comprador original P ngase en contacto con el distribuidor donde adquiri el...

Страница 29: ...___________________ __________________________________________________________________________________________ _________________________________________________________________________________________...

Страница 30: ...___________________ __________________________________________________________________________________________ _________________________________________________________________________________________...

Страница 31: ...___________________ __________________________________________________________________________________________ _________________________________________________________________________________________...

Страница 32: ...MODEL MOD LE MODELO Printed in China Imprim en Chine Impreso en China Danby Products Limited Guelph ON Canada N1H 6Z9 Danby Products Inc Findlay Ohio USA 45840 MODEL MOD LE MODELO DDR030BECWDB...

Отзывы: