background image

LOCATION

•  Two people should be used when moving the 

appliance.

•  Remove interior and exterior packaging prior to 

installation. Wipe the outside of the appliance 

with a soft, dry cloth and the inside with a 

lukewarm wet cloth.

•  Place the appliance on a fl oor that is strong 

enough to support it when it is fully loaded. 

•  Do not place the appliance in direct sunlight or 

near sources of heat, such as a stove or heater, 

as this can increase electrical consumption. 

Extreme cold ambient temperatures may also 

cause the appliance to perform improperly.

•  Do not use the appliance near water, for 

example in a wet basement or near a sink.

•  This appliance is intended for household use 

only. It is not designed for outside installation, 

including anywhere that is not temperature 

controlled (garages, porches, vehicles, etc.).

•  Before connecting the appliance to a power 

source, let it stand upright for approximately 

6 hours. This will reduce the possibility of a 

malfunction in the cooling system from handling 

during transportation.

•  This appliance is 47.4 cm (18.7 inches) wide 

by 63.6 cm (25.1 inches) high by 44.7 cm 

(17.6 inches) deep. Make sure that you leave 

the minimum amount of space between the 

appliance and all surrounding walls and vents.

•  Allow 12.7 cm (5 inches) of space between the 

back, sides and top of the appliance and all 

adjacent walls.

•  This appliance is intended for free-standing 

installation only and is not intended to be 

built into a cabinet or counter. Building in this 

appliance can cause it to malfunction.

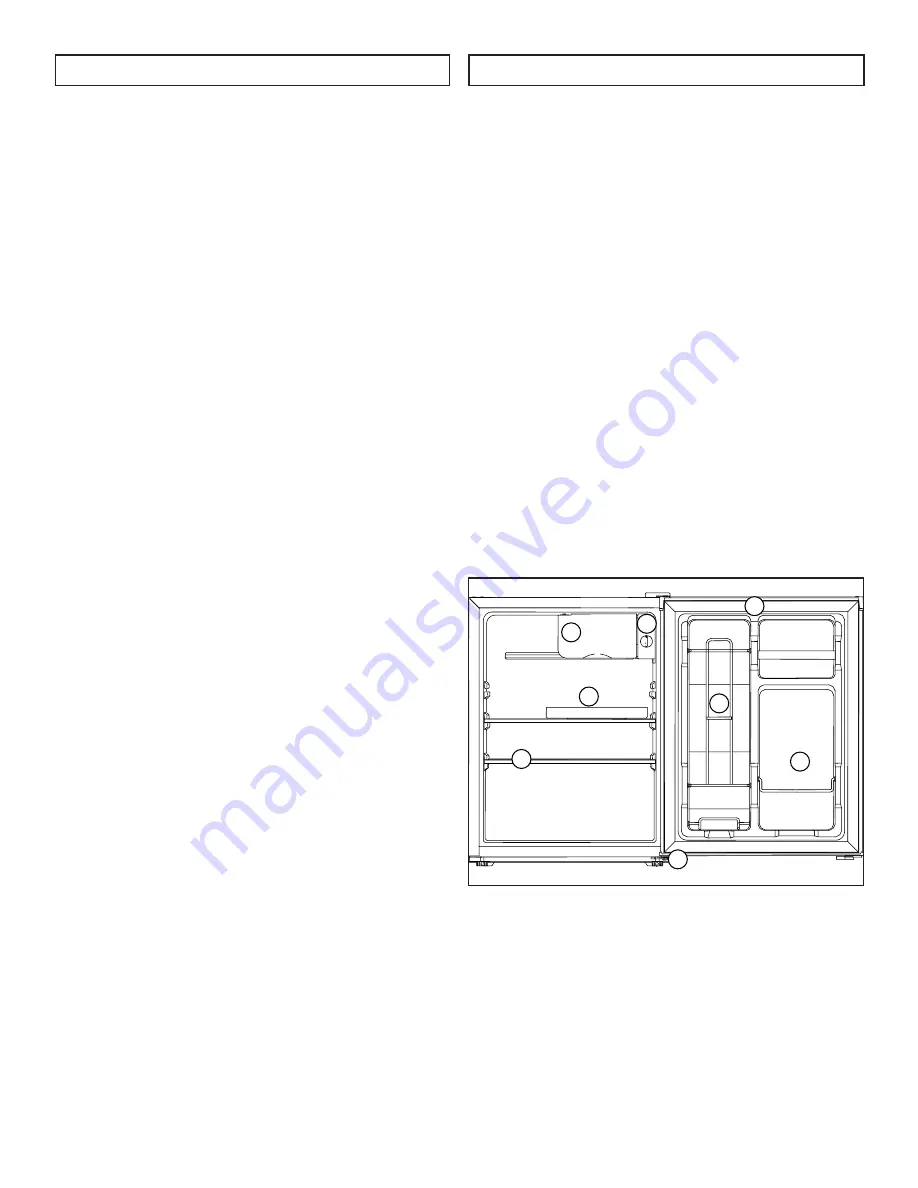
FEATURES

1.  Freezer Compartment with Freezer Door: 

Separate freezer section can hold small items.

2. Thermostat Dial: 

Controls the temperature inside 

the refrigerator.

3. Drip Tray: 

Catches the water that drips off the 

evaporator when defrosting.

4. Glass Shelves

5. CANSTOR

TM

 Door Liner:

 Holds 355 ml cans of 

pop, juice or beer.

6. Bottle Racks: 

For tall, small and medium cans or 

jars.

7. Magnetic Gasket: 

Tight fi tting door seal keeps 

all the cooling power locked inside. No hooks or 

latches.

8. Leveling Leg: 

Adjust so the unit is level.

3

LEVELING INSTRUCTIONS

There is an adjustable leg on the bottom of the 

appliance that can be turned up or down to ensure 

that the appliance is level.

1.  Turn the leveling leg counter-clockwise as far as 

it will go, until the top of the foot is touching the 

bottom of the cabinet.

2.  Slowly turn the leveling leg clockwise until the 

appliance is level.

INSTALLATION INSTRUCTIONS

OPERATING INSTRUCTIONS

1

2

3

4

5

6

7

8

Содержание DCR023C1WDB

Страница 1: ...INDLAY OHIO USA 45840 OWNER S MANUAL MANUEL DU PROPRI TAIRE MANUAL DEL PROPIETARIO MODEL MOD LE MODELO DCR023C1WDB 2017 11 28 COMPACT REFRIGERATOR Owner s Manual 1 8 R FRIG RATEUR COMPACT Manuel du pr...

Страница 2: ...ovide the original purchase receipt to validate your warranty and receive service Model Number _________________________________________________ Serial Number _________________________________________...

Страница 3: ...persons including children whose physical sensory or mental capabilities may be different or reduced or who lack experience or knowledge unless such persons receive supervision or training to operate...

Страница 4: ...hat you leave the minimum amount of space between the appliance and all surrounding walls and vents Allow 12 7 cm 5 inches of space between the back sides and top of the appliance and all adjacent wal...

Страница 5: ...in case of leaking Remove all food and set the thermostat to the OFF position Unplug the appliance and leave the door open Ensure that the drip tray is under the evaporator to collect melted water Af...

Страница 6: ...ide of the refrigerator Install the adjustable foot on the right side of the refrigerator as shown in Fig 4 5 Move the door bushing to the left and the plastic hole cover to the right as shown in Fig...

Страница 7: ...pted VACATION Short vacations Leave the appliance operating during vacations of less than three weeks Long vacations If the appliance will not be used for several months remove all items and turn off...

Страница 8: ...nlight Ambient temperature or humidity is very high Appliance runs continuously Temperature setting is too cold Door not shut properly or opened excessively Recently added a large quantity of warm foo...

Страница 9: ...Box 669 Findlay Ohio U S A 45840 Telephone 419 425 8627 FAX 419 425 8629 04 09 1 800 263 2629 Warranty Service In home Transportation charges to and from the service location are not protected by thi...

Страница 10: ...re u d achat original pour valider votre garantie et recevoir le service Num ro de mod le _____________________________________________ Num ro de serie _______________________________________________...

Страница 11: ...as destin tre utilis par des personnes y compris des enfants dont les capacit s physiques sensorielles ou mentales peuvent tre diff rentes ou r duites ou qui n ont pas d exp rience ou de connaissances...

Страница 12: ...aisser le d gagement minimum d entre l appareil et tous les murs environnants et les ouvertures Laisser 12 7 cm 5 pouces d espace entre le dos les c t s et le dessus de l appareil et les parois adjace...

Страница 13: ...tous les aliments et r glez le thermostat sur la position OFF ou 0 D branchez l appareil et laissez la porte ouverte Assurez vous que le bac d gouttage se trouve sous l vaporateur pour recueillir de...

Страница 14: ...r frig rateur comme indiqu sur la Figure 4 5 D placez le manchon m le femelle de la porte la gauche illustr la droite dans Figure 5 et d placez le couvercle en plastique du trou la droite illustr la...

Страница 15: ...aissez le unit fonctionner pendant les vacances durant moins de trois 3 semaines Longues vacances Si l unit ne doit pas tre utilis pendant plusieurs mois retirez tout ce qu il contient et mettez le ho...

Страница 16: ...lumi re directe du soleil La temp rature ambiante ou l humidit est tr s lev e L appareil fonctionne en continu Le r glage de la temp rature est trop froid Le porte n est pas ferm es correctement ou o...

Страница 17: ...sont pas couverts par la pr sente garantie et doivent tre acquitt s par l acheteur Pendant les premiers douze 12 mois toutes les pi ces fonctionnelles de ce produit qui s av rent d fectueuses seront r...

Страница 18: ...jo garant a Debe proporcionar el recibo de compra original para validar su garant a y recibir servicio N mero de modelo _____________________________________________ N mero de serie __________________...

Страница 19: ...capacidades f sicas sensoriales o mentales pueden ser diferentes o reducir o que carecen de experiencia o conocimiento a menos que dichas personas reciban supervisi n o entrenamiento para operar el ap...

Страница 20: ...nimo entre la unidad y todas las paredes circundantes y las aberturas de ventilaci n Espere 12 7 cm 5 pulgadas de espacio entre la parte posterior los lados y la parte superior del aparato y todas la...

Страница 21: ...parato en caso de fugas Retire todos los alimentos y ajuste el termostato en la posici n OFF o 0 Desconecte el aparato y deje la puerta abierta Aseg rese de que la bandeja de goteo est debajo del evap...

Страница 22: ...l pie ajustable en el lado derecho del refrigerador como se muestra en la Figura 4 5 Mueva el casquillo de la puerta mostrado a la derecha en la Figura 5 a la izquierda y la tapa del agujero de pl sti...

Страница 23: ...ortas Deje el aparato en funcionamiento durante las vacaciones de menos de tres semanas Largas vacaciones Si el aparato no se va a utilizar durante varios meses retire todos los art culos y apague el...

Страница 24: ...e la luz solar directa La temperatura ambiente o la humedad es muy alta El aparato funciona continuamente La temperatura est demasiado fr a La puerta no se cierra correctamente o se abre demasiado Rec...

Страница 25: ...lte defectuosa incluyendo cualquier sistema sellado ser reparado o reemplazado a opci n del fabricante sin cargo para el comprador original P ngase en contacto con el distribuidor donde adquiri el ele...

Страница 26: ...___________________ __________________________________________________________________________________________ _________________________________________________________________________________________...

Страница 27: ...___________________ __________________________________________________________________________________________ _________________________________________________________________________________________...

Страница 28: ...MODEL MOD LE MODELO Printed in China Imprim en Chine Impreso en China Danby Products Limited Guelph ON Canada N1H 6Z9 Danby Products Inc Findlay Ohio USA 45840 DCR023C1WDB...

Отзывы: