background image

Consignes de sécurité important

LISEZ TOUTE L'INFORMATION DE SÉCURITÉ AVANT UTILISATION

POUR VOTRE SÉCURITÉ: Lire attentivement ces instructions avant d'utiliser l'appareil.

SPECIFICATIONS
ELECTRIQUE

1)

Tous les câblages doivent être conformes aux codes électriques locaux

et nationaux et doivent être installés par un électricien qualifié. Si vous
avez la moindre question au suject des instructions ci-dessous,
contactez un électricien qualifié.

2)

Vérifiez la fourniture d’alimentation électrique disponsible et résolvez

tout problème de câblage AVANT d’installer et de faire fonctionner cet
appareil. 

3)

Ce climatiseur à 115V utilise 5.4 ampères ou moins de puissance

nominale et peut être utilisé dans toute prise de courant domestique de
but général adéquatement câblée. Voir le Tableau 1 pour les
spécifications pour circuit de dérivation individuel.

4)

Pour votre sécurité et votre protection, cet appareil est mis à la masse

par la fiche du cordon d’alimentation lorsqu’elle est branchée dans une
prise murale qui lui correspond. Si vous n’êtes pas certain que votre
prise de courant murale est mise à la masse adéquatement, veuillez
consulter un électricien qualifié.

5)

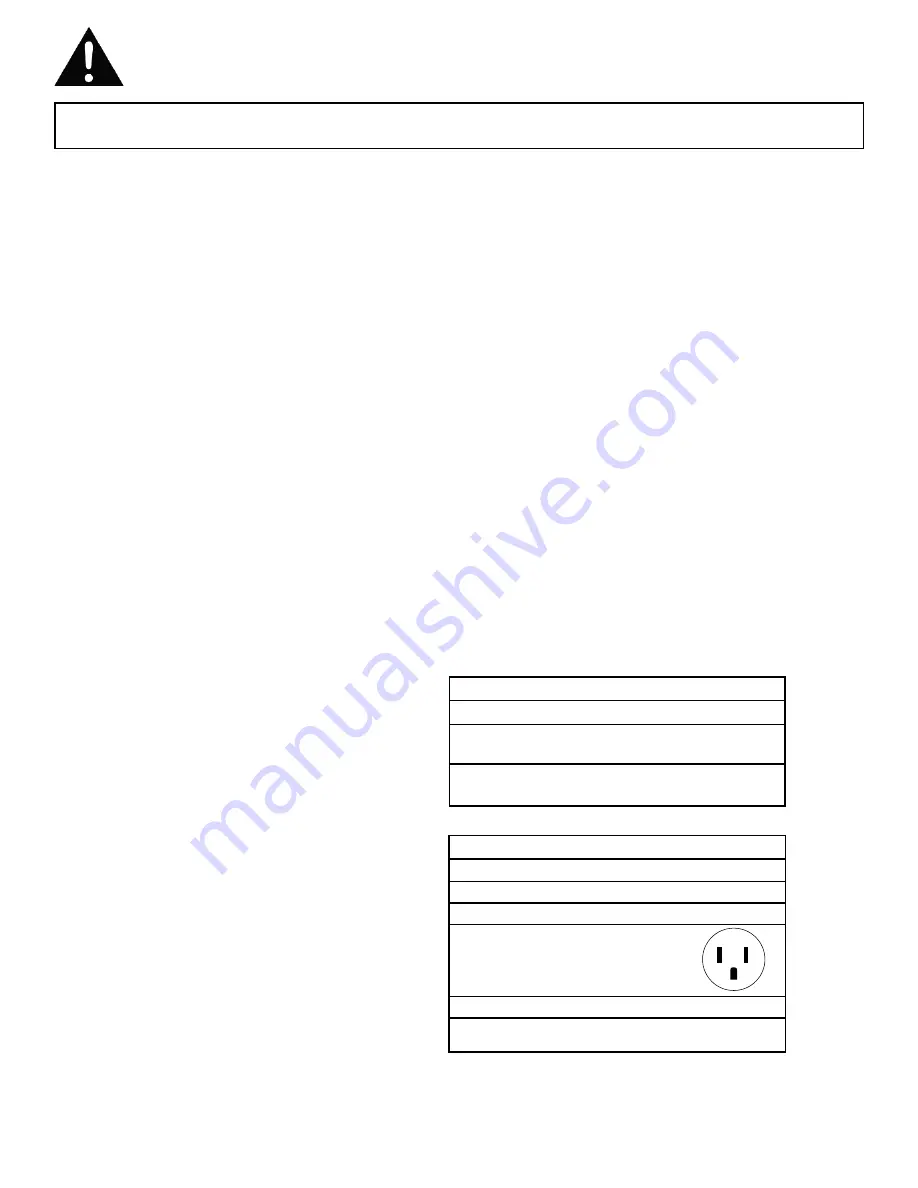
La prise murale doit correspondre à la fiche à 3 broches sur le cordon

de service fourni avec l’appareil. N’utilisez PAS de fiches d’adaptation.
Voir Tableau 2 pour les renseignements sur les prises de courant et les
fusibles. S’il est nécessaire d’utiliser une rallonge électrique pour
brancher votre climatiseur, utilisez une rallonge électrique approuvée
pour «climatiseur», exclusivement (disponsible dans la plupart des
magasins locaux de quincaillerie). 

6)

La plaque signalétique sur l’appareil contient des données électriques

et techniques; elle se trouve sur le côté droit de l’appareil, au-dessus du
cordon d’alimentation. 

TABLEAU 2

Types de fusibles et de réceptacles

Tension nominale

125

Ampères

15

Prise de courant

Intensité de fusible

15

Fusible temporisé

Type fiche

(ou disjoncteur de circuit)

TABLEAU 1

Circuit de distribution individuel suggéré

Ampères de plaque d’identification          Calibre de fil AWG*

5.4

18

AWG – American Wire Gauge (Calibre de fil américain)

*Basé sur le fil en cuivre à une température nominale de 60°C

19

Содержание DAC6011E

Страница 1: ...ted Ontario Canada N1H 6Z9 Danby Products Inc Findlay Ohio USA 45840 Model Mod le Modelo Owner s Use and Care Guide Guide d utilisation et soins de Propri taire AIR CONDITIONER CLIMATISEUR V1 11 10 DM...

Страница 2: ...ation initiale de ce produit CLIMATISEUR Guide d utilisation et d entretien Bienvenue Consignes de S curit Importantes Caract ristiques Installation Consignes d utilisation Soins et Entretien D pannag...

Страница 3: ...For easy reference may we suggest you attach a copy of your sales slip receipt to this page along with the following information located on the manufacturers nameplate on the rear panel of the unit N...

Страница 4: ...rough the power cord plug when plugged into a matching wall outlet If you are not sure whether your wall outlet is properly grounded please consult a qualified electrician 5 The wall outlet must match...

Страница 5: ...FIlter Exterior Air Inlet Cabinet Interior Air Inlet Control Panel Interior Air Outlet Installation Instructions CAUTION Because the compressor is located on the controls side of the unit left side t...

Страница 6: ...30 above the floor or ground Curtains and other objects within a room should be prevented from blocking the air flow E Be certain the proper electrical outlet is within reach of the installation Use...

Страница 7: ...Cabinet Extend the shutter from the shutter frame and slide it into the shutter tabs on the side channel of the air conditioner as shown in Fig 4 Slide the shutters into the top L Shaped and bottom U...

Страница 8: ...the frames to the window sash using one 3 4 screw on each side and one in the L shaped mounting bracket Fig 5 Secure the shutter clamp on each side of the lower shutter and secure to window sill using...

Страница 9: ...operation SLEEP MODE When activated the current set temperature is gradu ally increased over a one 1 hour period then maintained for seven 7 hours Once the program is complete the air conditioner will...

Страница 10: ...indoor unit Prevent any liquid from falling into the remote controller Do not expose the remote controller to direct sunlight or heat If the infrared signal receiver on the indoor unit is exposed to d...

Страница 11: ...tion is available on COOL HEAT or AUTO mode only and maintain the most comfortable temperature for you REMOTE CONTROLLER BUTTONS ON OFF MODE TEMP UP TEMP DOWN SWING TIMER SLEEP FAN ON OFF button TEMP...

Страница 12: ...FAN COOLING HEATING FAN OPERATION Ensure the unit is plugged in and power is available 1 Press the ON OFF button to start the air conditioner 2 Press the MODE button to cool heat cooling and heating...

Страница 13: ...fore it returns to the originally selected temperature This ends the Sleep mode and the unit will continue to operate as originally programmed The Sleep mode program can be cancelled at any time durin...

Страница 14: ...itioner This indicates the program is set NOTE To cancel the TIMER setting push the TIMER button until 0 hour is displayed on the LCD window of the air conditioner 1 ON OFF MODE TEMP UP TEMP DOWN ENER...

Страница 15: ...ed by a cover Remove the button cell according to the arrow marked at the back of the remote controller 1 Slightly press A position according to the number 1 arrow direction by your forefinger 2 Press...

Страница 16: ...y hand in warm water Dry thoroughly before re installing CLEANING AIR FILTER 1 Use a vacuum cleaner with soft brush attachment 2 Wash the filter in lukewarm water below 40 C 104 F To get best results...

Страница 17: ...utside Hot and humid weather Condensation run off is normal under these conditions 6 Water dripping inside Unit is not properly angled to allow water to drain outside Unit must be installed on an angl...

Страница 18: ...t Danby will be responsible or liable for any spoilage or damage to food or other contents of this appliance whether due to any defect of the appliance or its use whether proper or improper EXCLUSIONS...

Страница 19: ...la plaque signal tique du fabricant sur le c t droit de l appareil au dessus du cordon d alimentation Vous aurez besoin de ces renseignements si vous contactez un repr sentant du Service la client le...

Страница 20: ...e dans une prise murale qui lui correspond Si vous n tes pas certain que votre prise de courant murale est mise la masse ad quatement veuillez consulter un lectricien qualifi 5 La prise murale doit co...

Страница 21: ...xternes sont suffisamment froides placer le climatiseur hors de service et utiliser le MODE DE VENTILATEUR la position HAUTE MOYENNE ou BAS Ceci fait circuler l air l int rieur de la pi ce pour fourni...

Страница 22: ...auvent pour prot ger l unit D Laissez suffisamment d espace libre autour du caisson pour permettre une ample circulation d air travers l appareil Voir Fig 2 L arri re de l appareil doit donner sur l...

Страница 23: ...e de canaux sup rieur sur le caisson Pr install sur certain mod les Canal sup rieur en forme de L Installez le canal en forme de L au dessus du caisson tel que montr la Fig 3 un utilisant quatre 4 vis...

Страница 24: ...s volets compl tement de chaque c t et fixez le haut des structures au cadre de la fen tre en utilisant une vis de 3 4 po et une rondelle de s curit sur chaque c t Fig 5 Coupez la bande mousse adh sif...

Страница 25: ...ommeil Le mode de sommeil augmentera votre temp rature de cli matisation pr r gl e graduellement pendant une p riode de un 1 heures la nouvelle temp rature est maintenue pendant sept 7 heures Une fois...

Страница 26: ...e indoor unit Prevent any liquid from falling into the remote controller Do not expose the remote controller to direct sunlight or heat If the infrared signal receiver on the indoor unit is exposed to...

Страница 27: ...is available on COOL HEAT or AUTO mode only and maintain the most comfortable temperature for you REMOTE CONTROLLER BUTTONS ON OFF MODE TEMP UP TEMP DOWN SWING TIMER SLEEP FAN ON OFF button TEMP UP bu...

Страница 28: ...FAN COOLING HEATING FAN OPERATION Ensure the unit is plugged in and power is available 1 Press the ON OFF button to start the air conditioner 2 Press the MODE button to cool heat cooling and heating...

Страница 29: ...efore it returns to the originally selected temperature This ends the Sleep mode and the unit will continue to operate as originally programmed The Sleep mode program can be cancelled at any time duri...

Страница 30: ...itioner This indicates the program is set NOTE To cancel the TIMER setting push the TIMER button until 0 hour is displayed on the LCD window of the air conditioner 1 ON OFF MODE TEMP UP TEMP DOWN ENER...

Страница 31: ...ed by a cover Remove the button cell according to the arrow marked at the back of the remote controller 1 Slightly press A position according to the number 1 arrow direction by your forefinger 2 Press...

Страница 32: ...FILTRE AIR 1 Utilisez un aspirateur de poussi re muni d une brosse douce 2 Lavez le filtre dans de l eau ti de de moins de 40 C 104 F Pour obtenir de meilleurs r sultants lavez avec une eau savonneus...

Страница 33: ...nt de la condensation est normal quand le temps est chaud et humide Ajoutez un tube flexible pour r acheminer l coulement de l eau 6 De l eau s goutte l int rieur L appareil n est pas inclin ad quatem...

Страница 34: ...ondition ou repr sentation qu elle soit exprim e ou tacite de fa on manifeste ou intentionnelle par Danby ou ses distributeurs agr s De m me sont exclues toutes les autres garanties conditions ou repr...

Страница 35: ...call the TOLL FREE NUMBER When requesting service or ordering parts always provide the following information Product Type Model Number Part Number Part Description CLIMATISEUR Le num ro de mod le se...

Отзывы: