background image

4

Electric Shift System

General Information

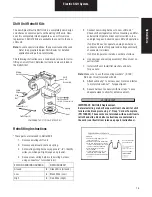
Slider Block Inspection Procedure

Bottom of 
Ba

s

e Ho

us

i

n

g

• Remove 

s

hift 

un

it f

r

om axle.

• Move 

s

lide

r

 block f

r

om 

s

ide to 

s

ide.

 Make 

sur

s

lide

r

 block move

s

 f

r

eely

  i

n

 ho

us

i

n

g.

Содержание Spicer Drive Axles

Страница 1: ...Service Manual AXSM0029 September 2007 Spicer Drive Axles...

Страница 2: ...commended for use and as such should not be considered as an endorsement Equivalents if available may be used This symbol is used throughout this publication to call your attention to areas in which c...

Страница 3: ...Cover Production units effective December 1989 17 Speedometer Adapter 18 Control Switch 18 Air Shift System Air Shift System Description 19 Operation 19 Air Shift Unit 20 Description and Operation Sh...

Страница 4: ...circuit to turn off power to motor Motor rotation is stopped quickly by means of dynamic braking through resistor If during rotation driver decides to switch back to low range motor continues to turn...

Страница 5: ...in appropriate direction for axle range change When opposite axle range is selected by driver the process is repeated by motor turning another 180 in same direction In this case though eccentric pin m...

Страница 6: ...tch Knob Motor Circuit Breaker Speedometer Adapter Wiring Harness Control Switch Ground Housing Cover Wiring Harness Connector Black Green Red Ground Circuit Board Resistor Ground Black Switches Low R...

Страница 7: ...tric Shift System General Information Slider Block Inspection Procedure Bottom of Base Housing Remove shift unit from axle Move slider block from side to side Make sure slider block moves freely in ho...

Страница 8: ...unit from axle and apply voltage Does unit shift properly Check the battery cab switch wire harness and connectors Repeat troubleshooting procedure No Yes Inspect slider block from bottom of shift uni...

Страница 9: ...REAR REAR AND SINGLE AXLES Shift Fork Fit up Card Shift Fork Fit up Card Part No 128039 Fit up Card must set flush on mounting surface of axle Shift fork must NOT touch Fit up Card at points A and B P...

Страница 10: ...ing cover does NOT require a gasket see page 17 211319 113745 113746 113759 113753 Circuit Board and Cover Kit Motor and Lube Kit Drive Gear and Cam Pin Kit Slider Block and Lube Kit Connector and Har...

Страница 11: ...t unit seal and spring assembly Remove Slider Block Note To remove slider block it is necessary to separate base housing from motor housing Gasket compound may cause these housings to stick together U...

Страница 12: ...re black Disconnect this wire then remove cir cuit board 4 Remove circuit board mounting washer 5 Remove cap screws fastening motor 6 Lift motor to separate it from the housing Note Gasket compound ma...

Страница 13: ...as been disassembled Instructions are contained in the shift unit assembly procedures in this manual Note Use only Rheolube 362 for shift lubrication Use of other lube types may cause shift unit opera...

Страница 14: ...ow temperature conditions 1 Lubricate pins Install pins in motor housing 2 Lubricate both sides of gear washer and gear face that contacts gear washer 3 Liberally apply lubricant on gear teeth Complet...

Страница 15: ...a light film of lubricant to the full length of the slider block shaft Fill entire slot area of slider block with lubricant the area which engages gear pin Also fill the cavity next to the gear with l...

Страница 16: ...Note There should be some slider block free play If block is rigid loosen cap screws reposition block and tighten cap screws finger tight Recheck slider block free play Install Motor 1 Apply a contin...

Страница 17: ...ot available 4 To continue assembly of the shift unit when reusing the original cover proceed as follows 5 Apply RTV Electrical Grade Gasket Compound in PN 113771 cover gasket groove Install gasket Ap...

Страница 18: ...ing control switch in cab or apply 12 volt power supply to low range and ground terminals in shift unit cover see wiring sche matic page 3 1 Lubricate shift fork in seal area Install seal and spring a...

Страница 19: ...ier studs 7 Install shift unit Install flat washers and nuts Torque nuts Note Make sure to use the mounting washers 0 100 2 54 mm thick furnished with kit 8 Attach cable clip to harness near motor and...

Страница 20: ...ition on the shift unit housing and draw a reference line on the motor base to show the width of the area to be modified 3 Using a file or small die grinder remove material from the motor base as show...

Страница 21: ...not over tighten Speedometer Adapter The speedometer adapter is lubricated and sealed for life of the unit No maintenance is required Replace a faulty unit Control Switch For inspection or replacemen...

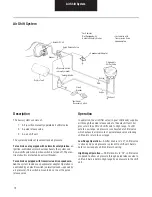
Страница 22: ...ies air through the quick release valve to the axle shift unit Air pressure in the shift unit shifts axle to High range To shift axle to Low range air pressure is exhausted at shifter valve which exha...

Страница 23: ...High range Exhaust of air pressure permits the heavy duty spring to return the axle gearing to Low range Note A harsh environment kit consisting of a vent filter and fittings is available for shift u...

Страница 24: ...able to operate the sys tem When ignition switch is OFF solenoid valve is de energized and exhausts the system which down shifts axle to low range Check wiring and circuit breaker for defects that wou...

Страница 25: ...uring the following procedure the piston will pop out of housing under spring pressure Exercise caution to prevent possible injury 3 Remove locknut flat washer and piston from push rod Remove 0 ring a...

Страница 26: ...y Reinstall cover Remove pipe plug in cover Fill through pipe plug opening until lube is level with bottom of filler hole Parts Inspection Shift Fork Seal Inspect shift fork seal for defects and tight...

Страница 27: ...in shift unit housing Place piston and push rod assembly in housing Position housing assembly in arbor press 4 Apply pressure to piston until actuating lever is in alignment with push rod end Install...

Страница 28: ...ce shift unit on mounting studs and make certain shift fork actuating lever engages slot in shift fork Install flat washers and stud nuts Torque nuts 3 When axle is installed in vehicle fill shift uni...

Страница 29: ...from cover then lift off cover and remove shifter knob knob spring shifter plate 0 ring guide and 0 ring from valve housing 2 If housing requires replacement disconnect air lines loosen jam nut then...

Страница 30: ...rts with barium base grease during assembly 2 Place shifter plate in mounting position on valve housing 3 Pre assemble guide and 0 ring then place this assembly in mounting position in shifter plate 4...

Страница 31: ...place a faulty unit Solenoid Valve Replace solenoid valve as an assembly The valve should not be serviced Quick Release Valve If quick release valve fails to operate properly it may be repaired as fol...

Страница 32: ...information on 2 Speed Axle shifting components may be found in the appropriate Axle Service Publications Parts Information Complete information for identifying replacement parts for 2 Speed Shift Sys...

Страница 33: ...ons and or design are subject to change without notice or obligation Printed in USA AXSM 0029 09 07 For spec ing or service assistance call 1 877 777 5360 or visit our website at www dana com Dana Com...

Отзывы: