background image

Electrical Installation

9

TX RX

Media Converter - FCC2

(A-2466)

Power IN - 

TBL2 & GND

Fiber Connection

(From Fiber Conversion Box

or Fiber Splice Box)

Front Isometric View

(with grille removed)

High-

Range

Speaker

Cabinet

Mid-Range

Speaker

Cabinet

Low-Range

Speaker

Cabinet

Power Supply - PWS2

(A-2238)

Line Filter

(Z-1007)

Transformer - TRX1

(T-1130)

Analog Backup Connection

(From Fiber Conversion Box)

Figure 10: 

Sound Cabinet & Control Enclosure Components (Covers Removed)

Power IN

The system requires three (3) 20 amp 208/230/240 circuits (50 

or 60Hz); 2W + GND. Power wiring must be run in conduit up 

into the bottom of the sound cabinet and terminated at TBL2. 

Refer to Detail “F” of 

DWG-984140

A voltage surge protector (part # A-1129) is provided for 

additional protection at the main breaker panel. Refer to 

Figure 11

 and Detail “G” of 

DWG-984140

Figure 11: 

Surge Protector

Содержание SPORTSOUND 2000HD

Страница 1: ...201 Daktronics Drive Brookings SD 57006 5128 www daktronics com support 800 325 8766 SPORTSOUND 2000HD AUDIO SYSTEM INSTALLATION MANUAL P1340 DD1798478 Rev 12 30 July 2021...

Страница 2: ...he limits for a Class A digital device pursuant to part 15 of the FCC Rules These limits are designed to provide reasonable protection against harmful interference when the equipment is operated in a...

Страница 3: ...nstallation 8 Power Signal Connections 8 Power IN 9 Signal IN 10 Grounding 10 Lightning Protection 10 Fiber Conversion Box Connections 10 5 Maintenance 12 Grille Maintenance and Cleaning 12 Grille Mes...

Страница 4: ...Checking for Output Signal 25 Replacement Parts 25 Sound Cabinet 25 Fiber Conversion Box 25 7 Daktronics Exchange and Repair Return Programs 26 Exchange Program 26 Repair Return Program 27 Daktronics...

Страница 5: ...ipment or allow it to get wet Always turn off and or unplug the control equipment when it is not in use This keeps equipment protected from power spikes and lightning Inspect equipment for shipping da...

Страница 6: ...ct a Daktronics sales coordinator or project manager Daktronics Nomenclature Most components have a white label that lists the part number Figure 2 Part numbers will also appear on certain drawings If...

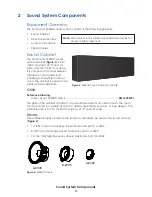
Страница 7: ...ng Mesh Layout 2000HD Gen II DWG 983337 The grille of the cabinet consists of a woven flame resistant acoustical mesh The mesh can be printed in a variety of colors to display advertising sponsors or...

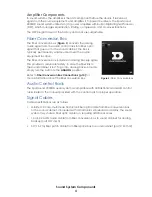
Страница 8: ...log backup signal This provides a redundant safety in case the fiber link to the sound cabinet is lost To go into analog backup mode simply turn the switch to the ANALOG position Refer to Fiber Conver...

Страница 9: ...ate from attachment details specified on shop drawings Daktronics also assumes no liability for system damage or injury resulting from incorrect setup or lifting methods performed by non Daktronics em...

Страница 10: ...han 45 Exceeding load angles or weight limits could cause the bolts in the cabinet to buckle resulting in serious damage to the equipment or injury to personnel Also loads should be applied directly i...

Страница 11: ...the cabinet has been mounted in place it may be necessary to adjust the direction of the speakers for the individual facility DWG 1023805 in Appendix A provides speaker aiming instructions as well as...

Страница 12: ...ignal Connections Reference Drawings System Riser 2000HD DWG 984140 System Riser Electrical Audio Notes DWG 985713 Schematic Control Enclosure Sound Cabinet 2000HD DWG 1082599 DWG 984140 details power...

Страница 13: ...RX1 T 1130 Analog Backup Connection From Fiber Conversion Box Figure 10 Sound Cabinet Control Enclosure Components Covers Removed Power IN The system requires three 3 20 amp 208 230 240 circuits 50 or...

Страница 14: ...cable local and national codes Inspect and verify all grounding methods meet the provisions of all applicable local and national codes Proper grounding is necessary for reliable equipment operation an...

Страница 15: ...From Source Figure 12 External Fiber Conversion Box Connections Analog Backup SWT2 To Control Enclosure Fiber Splice Point FPP1 To Fiber Splice Box Power Supply PWS1 A 2238 Media Converter FCC2 A 258...

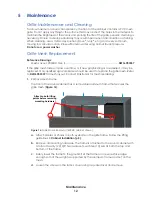
Страница 16: ...ogos are desired it may be replaced Only qualified sign companies should be used to replace the grille mesh Refer to DWG 983337 for mesh layout Contact Daktronics for mesh reordering 1 Remove Mesh Fra...

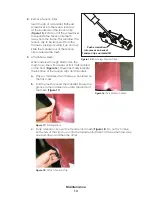
Страница 17: ...with a series of tick marks printed on the front Figure 16 These tick marks indicate the location of the tension clips and mandrels a Place a mandrel smooth side up centered on the tick mark b Fold th...

Страница 18: ...e or two clicks h Work around the frame tightening down all the tension clips until all the wrinkles are removed and the mesh is properly taut Do not over tension This may cause damage to mesh graphic...

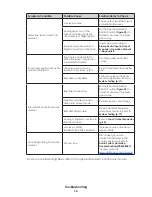
Страница 19: ...onversion box is unplugged from wall outlet or cable to audio control rack Plug in fiber conversion box power signal Analog signal out of the mixer is not being correctly converted to a digital signal...

Страница 20: ...ring source level down below clip Bad driver or amplifier Perform a system check via Monitor Application Refer to System Testing p 17 Intermittent audio from audio cabinet Bad fiber connection Set the...

Страница 21: ...st Tone button for AMP1 and compare the Impedance value in ohms to the reference ranges shown beneath the Channel 6 Repeat Step 5 for all remaining amplifiers If any impedance values are out of the re...

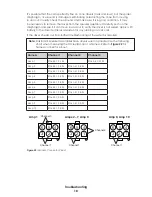
Страница 22: ...hecks out fine further troubleshooting of the system is required Note Daktronics speaker assemblies have drivers wired in parallel Use the following chart when measuring the DC resistance of a harness...

Страница 23: ...following Driver Troubleshooting p 17 4 Remove the bad driver s a Disconnect wires if not already done b Remove 4 threaded studs with the 10mm wrench c Pull off the bad driver Figure 23 5 Install rep...

Страница 24: ...oting p 17 4 Remove bad driver s a Disconnect wires if not already done taking note of positive and negative wire location b Remove 4 screws with 3 16 Allen wrench c Pull off bad driver Figure 24 5 In...

Страница 25: ...a Disconnect wires if not already done b Remove 8 screws with the 3 16 Allen wrench c Pull off the bad driver Figure 25 5 Install replacement driver a Align driver with screw holes b Fasten 8 screws...

Страница 26: ...0 LF 2 These amplifiers will be replaced by the corresponding new amplifier part number 4 Remove the defective amplifier a Use a 2 screwdriver to remove the machine screws securing the amplifier b Car...

Страница 27: ...has power Refer to Figure 28 1 If this LED does not light Verify proper connections to power supply Red to V1 Black to V1 Verify power supply is supplying 24 VDC Try connecting power to V2 inputs Red...

Страница 28: ...left corner of the Ethernet port for LED identification Figure 29 1 Consistent flashing about 6 times a second Device has a CobraNet connection to amplifiers This is proper working state Intermittent...

Страница 29: ...ange Driver A 2305 12 Woofer A 2306 Industrial Media Converter Ethernet Switch 16 Port A 2466 Power Amplifier SP2 1200 1200 A 3922601 Transformer Audio Input 1 Channel T 1130 RFI Line Filter 20 Amp Z...

Страница 30: ...er ID Number ______________________________________________________ To participate in the Exchange Program follow these steps 1 Call Daktronics Customer Service United States Canada 1 800 DAK TRON 325...

Страница 31: ...revent damage during shipment Electronic components such as printed circuit boards should be placed in an antistatic bag before boxing Daktronics does not recommend using packing peanuts when shipping...

Страница 32: ...This page intentionally left blank...

Страница 33: ...y SS1500HD SS2000HD DWG 374493 Harness MF Speaker Assy 1500HD 2000HD DWG 384426 Harness HF Speaker Assy SS2000HD DWG 384731 Shop Drawing Sound System 2000HD DWG 330901 Mesh Layout 2000HD Gen II DWG 98...

Страница 34: ...This page intentionally left blank...

Страница 35: ...ACED ALL AMPLIFIERS WITH A 2538 IN APRIL 2014 REV DATE BY 07 17 OCT 17 CJB ADDING AMPLIFIER LOCATION NOTES AMPLIFIER MOUNTS IN TOP CUTOUT A 2482 AMP 3 A 2499 AMP 7 AMP 9 AMPLIFIER MOUNTS IN BOTTOM CUT...

Страница 36: ...EV DATE BY 07 1 AUG 18 CJB 2CH AMP A 2538 TO A 3922601 SEE REV 06 FOR EARLIER REVISION HISTORY 6 5 2 1 4 REAR VIEW WIRE EXITS PIN 2 CH1 RED PIN 3 CH1 BLK PIN 1 CH2 BLK PIN 4 CH2 RED A 2483 A 2500 BOM...

Страница 37: ...PIN PLUG TO FIRST DRIVER CONNECTION BY CABINET MANUFACTURER PIN 2 CH1 RED PIN 3 CH1 BLACK 2 A 2501 BOM TABLE ITEM QTY UNITS DAK PART DESCRIPTION PREFERRED MFGR PART 1 1 EA A 3922601 2CH AMPLFIER SPEAK...

Страница 38: ...This page intentionally left blank...
Страница 39: ...CONCEALED FASTENER 0 063 ALUMINUM PANELS ATTACHED ON SIDES AND BACK 0 125 ALUMINUM PANELS ATTACHED TO TOP OF CABINET 22 0 6706mm OVERALL 0 1 3 8 35mm SIDE BORDER TYP 0 3 5 8 93mm TOP BORDER 10 5 3 8...

Страница 40: ...ONCEPTS EXPRESSED AND DETAILS SHOWN ON THIS DRAWING ARE CONFIDENTIAL AND PROPRIETARY DO NOT REPRODUCE BY ANY MEANS WITHOUT THE EXPRESSED WRITTEN CONSENT OF DAKTRONICS INC COPYRIGHT 2011 DAKTRONICS INC...

Страница 41: ...PER LINE SYSTEM VOLTAGE NUMBER OF POLES WIRES GND TOTAL POWER REQUIREMENTS CIRCUIT 2 208 230 240 2 2 3340W 16A MAXIMUM WATTS AMPERES PER LINE SYSTEM VOLTAGE NUMBER OF POLES WIRES GND TOTAL POWER REQUI...

Страница 42: ......

Страница 43: ......

Страница 44: ...NOT REPRODUCE BY ANY MEANS WITHOUT THE EXPRESS WRITTEN CONSENT OF DAKTRONICS INC OR ITS WHOLLY OWNED SUBSIDIARIES COPYRIGHT 2016 DAKTRONICS INC USA THIRD ANGLE PROJECTION BH REV TITLE PROJECT INCHES...

Страница 45: ...MPER WIRES L W 1054 22AWG BLACK JUMPER WIRES M N W 1615 22AWG AUDIO 1 PAIR W 1080 14AWG GREEN YELLOW W 1080 14AWG GREEN YELLOW DATE REV BY 02 24 JUN 13 CJB UPDATED WIRING WIRE C N INCLUDED IN 0A 1534...

Страница 46: ...This page intentionally left blank...
Страница 47: ...When viewing a digital copy of this manual from www daktronics com manuals click on the appropriate manufacturer link below to view a component s manual If the link is broken visit the manufacturer s...

Страница 48: ...This page intentionally left blank...
Страница 49: ...Daktronics Warranty Limitation of Liability 45 C Daktronics Warranty Limitation of Liability This section includes the Daktronics Warranty Limitation of Liability statement SL 02374...

Страница 50: ...This page intentionally left blank...

Страница 51: ...y per Incoterms 2020 otherwise End User shall pay transportation charges to return the Equipment back to the End User and such Equipment shall be shipped Ex Works Daktronics designated facility per In...

Страница 52: ...Daktronics or M paint or refinishing the Equipment or furnishing material for this purpose 3 Limitation of Liability A Daktronics shall be under no obligation to furnish continued service under this W...

Страница 53: ...ation of this warranty Alternatively an Extended Service Agreement may be purchased in conjunction with this Warranty for extended additional services For further information contact Daktronics Custom...

Страница 54: ...This page intentionally left blank...

Отзывы: