


125A7V1B
VRV IV System indoor unit
4P325971-1B – 2012.07
Installation and operation manual
17
8.
Commissioning
8.1.
Pre-operation checks
After the installation of the unit, check the following:
1
Field wiring
Make sure that the field wiring has been carried out according to
the instructions described in the chapter
"6.3. Preparing
electrical wiring" on page 11
, according to the wiring diagrams
and according to European and national regulations.
2
Fuses and protection devices
Check that the fuses and other locally installed protection
devices are of the size and type specified in the chapter
"Electrical specifications table" on page 43
. Make sure that
neither a fuse nor a protection device has been bypassed.
3
Earth wiring
Make sure that the earth wires have been connected properly
and that the earth terminals are tightened.
4
Internal wiring
Visually check the switch box and the inside of the unit on loose
connections or damaged electrical components.
5
Installation
Check that the unit is properly installed, to avoid abnormal
noises and vibrations when starting up the unit.
6
Damaged equipment
Check the inside of the unit on damaged components or
squeezed pipes.
7
Refrigerant leak
Check the inside of the unit on refrigerant leakage. If there is a
refrigerant leak try to repair the leak (recovery, repair, and
vacuuming needed). If it is impossible to repair by yourself, call
your local dealer.
Do not touch any refrigerant which has leaked out of refrigerant
piping connections.
This may result in frostbite.
8
Vacuuming/recovery and refrigerant charging
Refer to the outdoor unit manual for more details.
9
Water leak
Check the inside of the unit on water leakage. In case there is a
water leakage try to repair the leak. If it is impossible to repair by
yourself, close the water inlet and water outlet shut-off valves
and call your local dealer.
10
Power supply voltage
Check the power supply voltage on the local supply panel. The
voltage must correspond to the voltage on the identification label
of the unit.
11
Air purge valve
Make sure the air purge valve of the heat pump is open (at least
2 turns).
12
Shut-off valves
Make sure that the shut-off valves are correctly installed and
fully open.
Once all checks are fulfilled, the unit must be closed, only then can
the unit be powered on. When the power supply to the indoor unit is
turned on, "
88
" is displayed on the user interface during its
initialization, which might take up to 30 seconds. During this process
the user interface can not be operated.
8.2.
Final air purging
To get rid of all the air in the system, the pump should be operated.
Therefore, change the field setting [E-04] as explained in the chapter
"8.3. Field settings" on page 17
. More details about setting
"[E-04]
Pump only operation (air purge function)"
can be found on
page 21
.
8.3.
Field settings
The indoor unit should be configured by the installer to match the
installation environment (outdoor climate, installed options, etc.) and
user demand. Therefore, a number of so called field settings are
available. These field settings are accessible and programmable
through the user interface on the indoor unit.
Each field setting is assigned a 3-digit number or code, for example
[5-03], which is indicated on the user interface display. The first digit
[5] indicates the 'first code' or field setting group. The second and
third digit [03] together indicate the 'second code'.
A list of all field settings and default values is given in the
"8.4. Field
setting list for Installation Manual" on page 22
. In this list we provided
2 columns to register the date and value of altered field settings at
variance with the default value.
8.3.1.
Procedure
To change one or more field settings, proceed as follows.
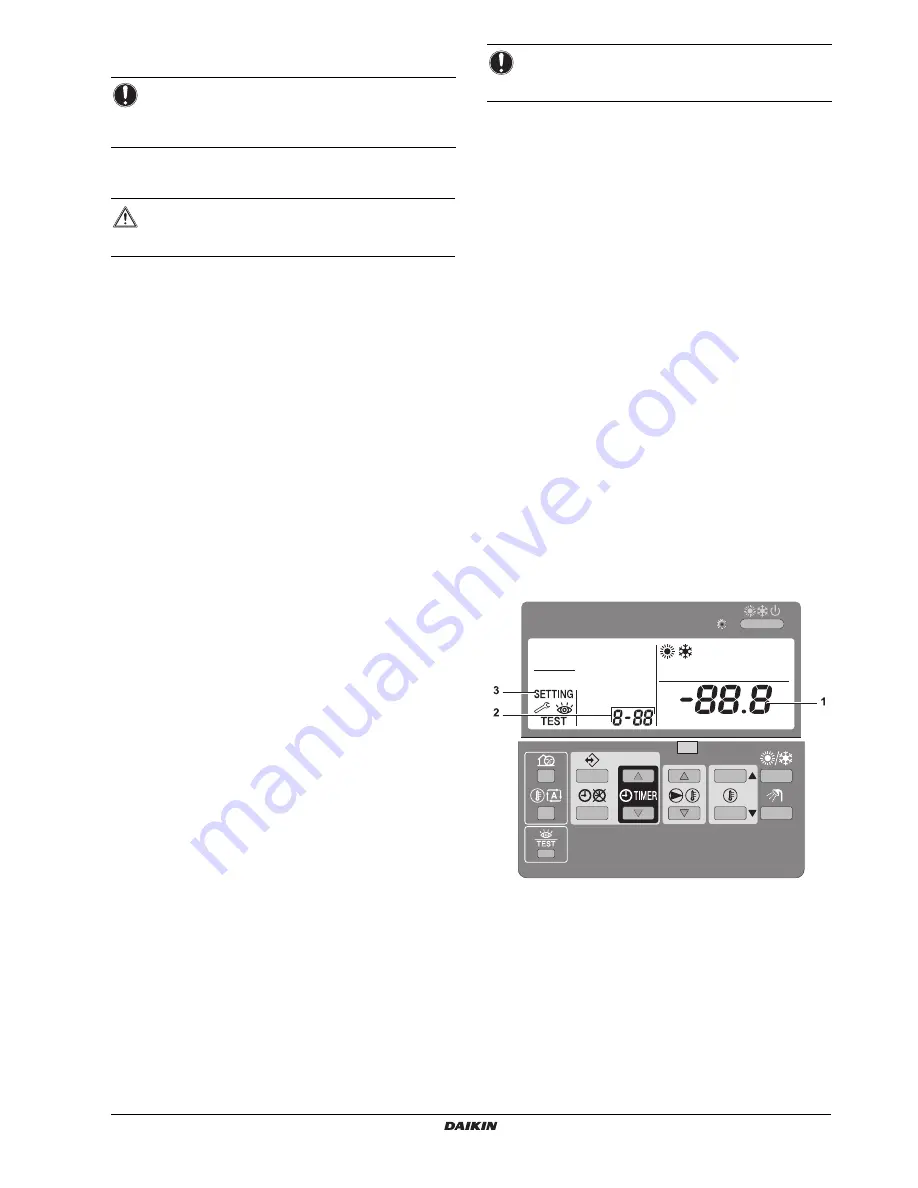
1
Press the
z
button for a minimum of 5 seconds to enter FIELD
SET MODE.
The
$
icon (3) will be displayed. The current selected
field setting code is indicated
;
(2), with the set value
displayed to the right
-
(1).
2
Press the
ébi
button to select the appropriate field setting
first code.
3
Press the
ébj
button to select the appropriate field setting
second code.
4
Press the
pfi
button and
pfj
button to change
the set value of the select field setting.
5
Save the new value by pressing the
pr
button.
NOTICE
It is important that all information in this chapter is read
sequentially by the installer and that the system is
configured as applicable.
WARNING
Switch off the power supply before making any
connections.
NOTICE
Operating the system with closed valves will damage the
pump!
Содержание HXY080A7V1B
Страница 46: ......
Страница 47: ......
Страница 48: ...4P325971 1B 2012 07 Copyright 2012 Daikin ...