background image

English

10

CAUTION

• Do not twist or bend the drain hose (1), so that exces-

sive force is not applied to it, as this could cause leaks.

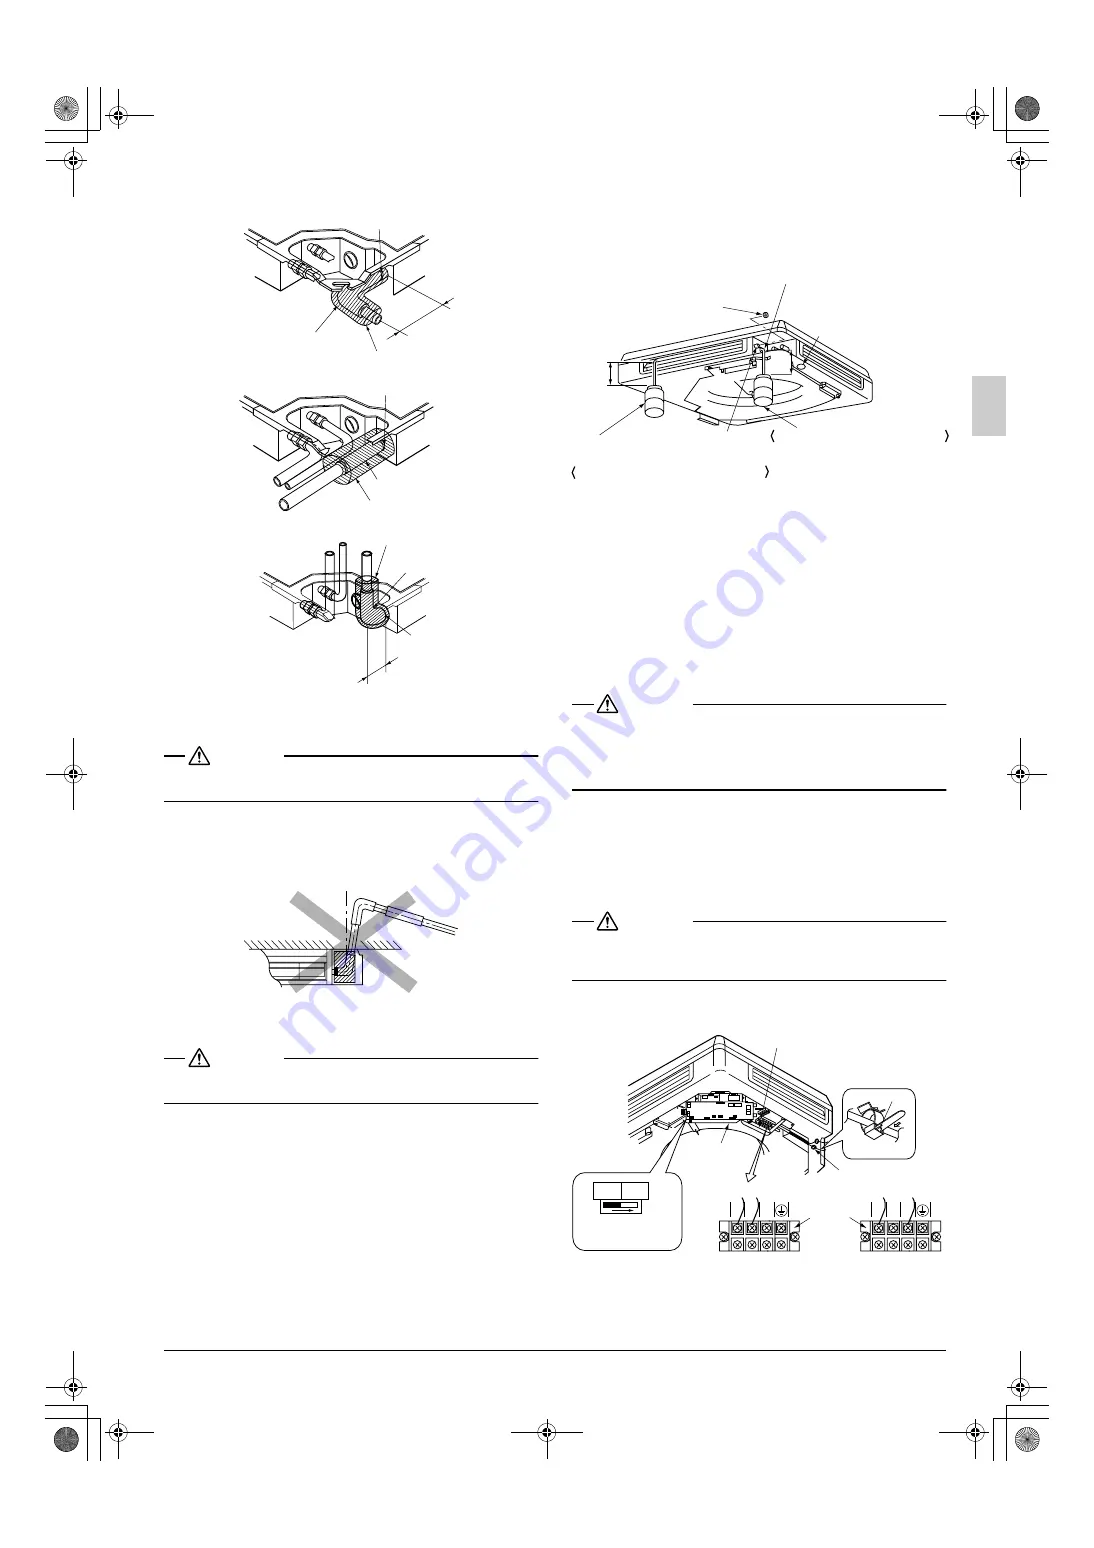
PRECAUTIONS FOR UPWARD DRAIN RAISING PIPING

• Install the drain raising pipes at a height of less than 

500mm.

• Install the drain raising pipes at a right angle to the 

indoor unit. 

(Refer to Fig. 29)

CAUTION

If the upward running drain hose leans at a slant, the float 
switch will malfunction and water will leak.

7-2 After piping work is finished, check if drainage 

flows smoothly.

• Open the water inlet lid, add approximately 1000cc of 

water slowly and check drainage flow. 

(Refer to Fig. 30)

[Caution]

Drain piping connections

• Do not connect the drain piping directly to sewage pipes that 

smell of ammonia. The ammonia in the sewage might enter 
the indoor unit through the drain pipes and corrode the heat 
exchanger.

WHEN ELECTRIC WIRING WORK IS FINISHED

• Check drainage flow during Cooling operation, explained 

under “TEST OPERATION”.

WHEN ELECTRIC WIRING WORK IS NOT FINISHED

CAUTION

• Electrical wiring work should be done by a certified electri-

cian.

• If someone who does not have the proper qualifications per-

forms the work, perform the following after the test run is 
complete.

• Remove the control box lid and change the emergency 

switch above the PC board assembly of the indoor unit from 
“NORM.” to “EMERG.”. Connect the single-phase power 
supply and earth wire to the power supply (50Hz 220-240V) 
terminal board and confirm drain operation.
Be sure to change the switch before turning on the power.  

(Refer to Fig. 31)

CAUTION

• Clamp solidly to clamp C to make sure no excess pressure 

is applied to the wiring connections.

• Be aware that the fan will turn during the operation.

• After confirming drainage, turn off the power and be sure to 

change the emergency switch back to “NORM.”.

Clamp (2)

Clamp (2)

Clamp (2)

Sealing pad (8)

Sealing pad (8)

Sealing pad (8)

Elbow (9)

Drain hose (1)

Short end

Upward
running
pipe

Elbow (9)

Fig. 28

Long
end

WRONG

Fig. 29

Service cover

100

100

Plastic watering can
(Tube should be about 100mm long.)

Inspection opening

Service drain outlet 
(with rubber plug).
(Use this outlet to drain water 
from the drain pan.)

Drain pipe

Method of adding water

Fig. 30

Adding water through air discharge outlet

Adding water from inspection opening

Power supply terminal board

Indoor PC

board

assembly

Single phase power supply

Fig. 31

Clamp C

Tab

1 2 3

Power

supply 

terminal 

board

1 2 3

(FUQ model)

(Other models)

NORM. EMERG.

Emergency switch
(Normal, Emergency)

Clamp C

01_EN_3P249378-5G.fm  Page 10  Friday, January 20, 2012  2:01 PM

Содержание FUQ100BUV1B x 2

Страница 1: ...RE ATTENTAMENTE QUESTE ISTRUZIONI TENERE QUESTO MANUALE A PORTATA DI MANO PER RIFERIMENTI FUTURI LEES DEZE INSTRUCTIES ZORGVULDIG DOOR VOOR INSTALLATIE BEWAAR DEZE HAN DLEINDING WAAR U HEM KUNT TERUGV...

Страница 2: ...eenkomstig de bepalingen van Richtlijnen zoals geamendeerd siguiendo las disposiciones de Directivas seg n lo enmendado secondo le prescrizioni per Direttive come da modifica de acordo com o previsto...

Страница 3: ...71BV1 FHYP100BV1 FHYP125BV1 FH35BZV1 FH45BZV1 FH60BZV1 III FHQ35BUV1B FHQ50BUV1B FHQ60BUV1B FHQ71BUV1B FHQ100BUV1B FHQ125BUV1B FHQ35BVV1B FHQ50BVV1B FHQ60BVV1B FHQ71BVV1B FHQ100BVV1B FHQ125BVV1B FUQ71...

Страница 4: ...t and never connect additional wiring to the existing circuit An insufficient power supply capacity or improper electrical work may lead to electric shocks or fire Be sure to earth the air conditioner...

Страница 5: ...here the air contains high levels of salt such as that near the ocean and where voltage fluctuates greatly such as that in factories Also in vehicles or vessels 2 2 ACCESSORIES Check the following acc...

Страница 6: ...rection therefore select flow direction from the below patterns Air flow patterns Refer to Fig 1 IIlustrations seen from ceiling A B C and D indicate drain pans Refrigerant pipe direction To the rear...

Страница 7: ...Fig 4 and 5 Slide the locking knobs 2 on the air intake grille inward direction of arrows and lift upwards Fig 4 Fig 5 Open the air intake grille to a 45 angle and detach from the unit Detach the corn...

Страница 8: ...hole in anchor for existing ceilings and a sunken insert sunken anchor or other field supplied parts for new ceilings to reinforce the ceiling to bear the weight of the unit Adjust clearance from the...

Страница 9: ...ged by sliding the shutter Refer to Fig 14 CAUTION Be careful not to touch the heat exchanger fins 2 way air discharge Refer to Fig 15 NOTE Illustrations seen from ceiling Fig 15 Retainers for blockin...

Страница 10: ...18 Lock the unit to the hangers on side A Hook the unit onto the other 2 hangers and lock with bottom washers and nuts 5 3 Check whether the unit is horizontally level from sides C and D both Refer t...

Страница 11: ...ly ester oil or ether oil to the inside of the flare section and spin 3 4 times before screwing in Refer to Fig 22 CAUTION Do not let oil get on the screw holders on the dressing board Oil can weaken...

Страница 12: ...a flared or a flanged connection Nitrogen should be set to 0 02MPa with a pressure reducing valve if brazing while inserting nitrogen into the piping Refer to Fig 25 Fig 25 7 DRAIN PIPING WORK 7 1 Ri...

Страница 13: ...ing after the test run is complete Remove the control box lid and change the emergency switch above the PC board assembly of the indoor unit from NORM to EMERG Connect the single phase power supply an...

Страница 14: ...wires After all the wiring connections are done fill in any gaps in the through holes with putty or insulation procured locally to prevent small animals and insects from entering the unit from outside...

Страница 15: ...g ceiling height Select the SECOND CODE NO that corresponds to the ceiling height Refer to Table 5 and 6 SECOND CODE NO is factory set to 01 for a ceiling height of less than 2 7m Table 5 Table 6 10 2...

Страница 16: ...the end of the setting procedure You do not need to rewire the remote controller from the master unit if the optional remote controller for slave unit is used However remove the wires attached to the...

Страница 17: ...rystal display In such a case diagnose the fault contents by referning to the table on the Error code list it case of group control the unit No is displayed so that the indoor unit no with the trouble...

Страница 18: ...4 Low pressure switch faulty outdoor unit H7 Outdoor fan motor position signal malfunction out door unit H9 Outdoor air thermistor faulty outdoor unit NOTE 1 J1 Pressure sensor system error batch outd...

Страница 19: ...elivering the product to the customer after the test run is completed check that the control box lid the air filter and the suction grille are mounted In addition explain to the customer regarding the...

Страница 20: ...NG CENTRAL REMOTE CONTROLLER CONNECT IT TO THE UNIT IN ACCORDANCE WITH THE ATTACHED INSTALLATION MANUAL 4 X24A IS CONNECTED WHEN THE WIRELESS REMOTE CONTROLLER KIT IS BEING USED 5 REMOTE CONTROLLER MO...

Страница 21: ...RMINAL CONNECTOR 2 FIELD WIRING 3 IN CASE USING CENTRAL REMOTE CONTROLLER CONNECT IT TO THE UNIT IN ACCORDANCE WITH THE ATTACHED INSTALLATION MANUAL 4 X24A IS CONNECTED WHEN THE WIRELESS REMOTE CONTRO...

Страница 22: ...TEM SEE THE INDOOR UNIT WIRING ONLY 4 FOR THE DETAIL SEE WIRING DIAGRAM ATTACHED TO OUTDOOR UNIT 5 IN CASE USING CENTRAL REMOTE CONTROLLER CONNECT IT TO THE UNIT IN ACCORDANCE WITH THE ATTACHED INSTAL...

Страница 23: ...1201 3P249378 5G EM11A075 HT 00_CV_3P249378 5G fm Page 2 Thursday December 8 2011 4 16 PM...

Отзывы: