EWLP012~065KBW1N
Condenserless water-cooled water chillers
4PW61665-1 – 07.2010
Installation manual
1
C
ONTENTS
Page
Operation range................................................................................. 2
Main components .............................................................................. 2
Selection of location .......................................................................... 2
Inspecting and handling the unit........................................................ 2
Unpacking and placing the unit ......................................................... 2
Important information regarding the refrigerant used ........................ 2
Selection of piping material ............................................................... 3
Connecting the refrigerant circuit....................................................... 3
Precautions when handling piping ............................................................. 3
Connecting the refrigerant circuit ............................................................... 3
Leak test and vacuum drying ..................................................................... 4
Open the discharge- and liquid stop valves. .............................................. 4
Charging the unit........................................................................................ 4
Checking the water circuit.................................................................. 5
Water quality specifications ............................................................... 5
Connecting the water circuit .............................................................. 5
Water charge, flow and quality .......................................................... 6
Water piping insulation ...................................................................... 6
Refrigerant piping insulation .............................................................. 6
Installation of the condenser inlet temperature sensor...................... 6
Connecting sensors and power supply ...................................................... 6
Parts table .................................................................................................. 6
Power circuit and cable requirements ........................................................ 6
Connection of the water-cooled water chiller power supply ....................... 6
Point for attention regarding quality of the public electric power supply..... 7
Interconnection cables ............................................................................... 7
How to continue ................................................................................. 7
Thank you for purchasing this Daikin air conditioner.
The English text is the original instruction. Other languages are
translations of the original instructions.
I
NTRODUCTION
The unit is supplied and shipped with a holding charge of 0.5 bar
nitrogen (N
2
). This unit has to be charged with R407C refrigrant.
Pay attention to the selection of your remote condenser. Make sure to
select a remote condenser developped for use with R407C.
The EWLP units can be combined with Daikin fan coil units or air
handling units for air conditioning purposes. They can also be used
for supplying chilled water for process cooling.
The present installation manual describes the procedures for
unpacking, installing and connecting the EWLP units.
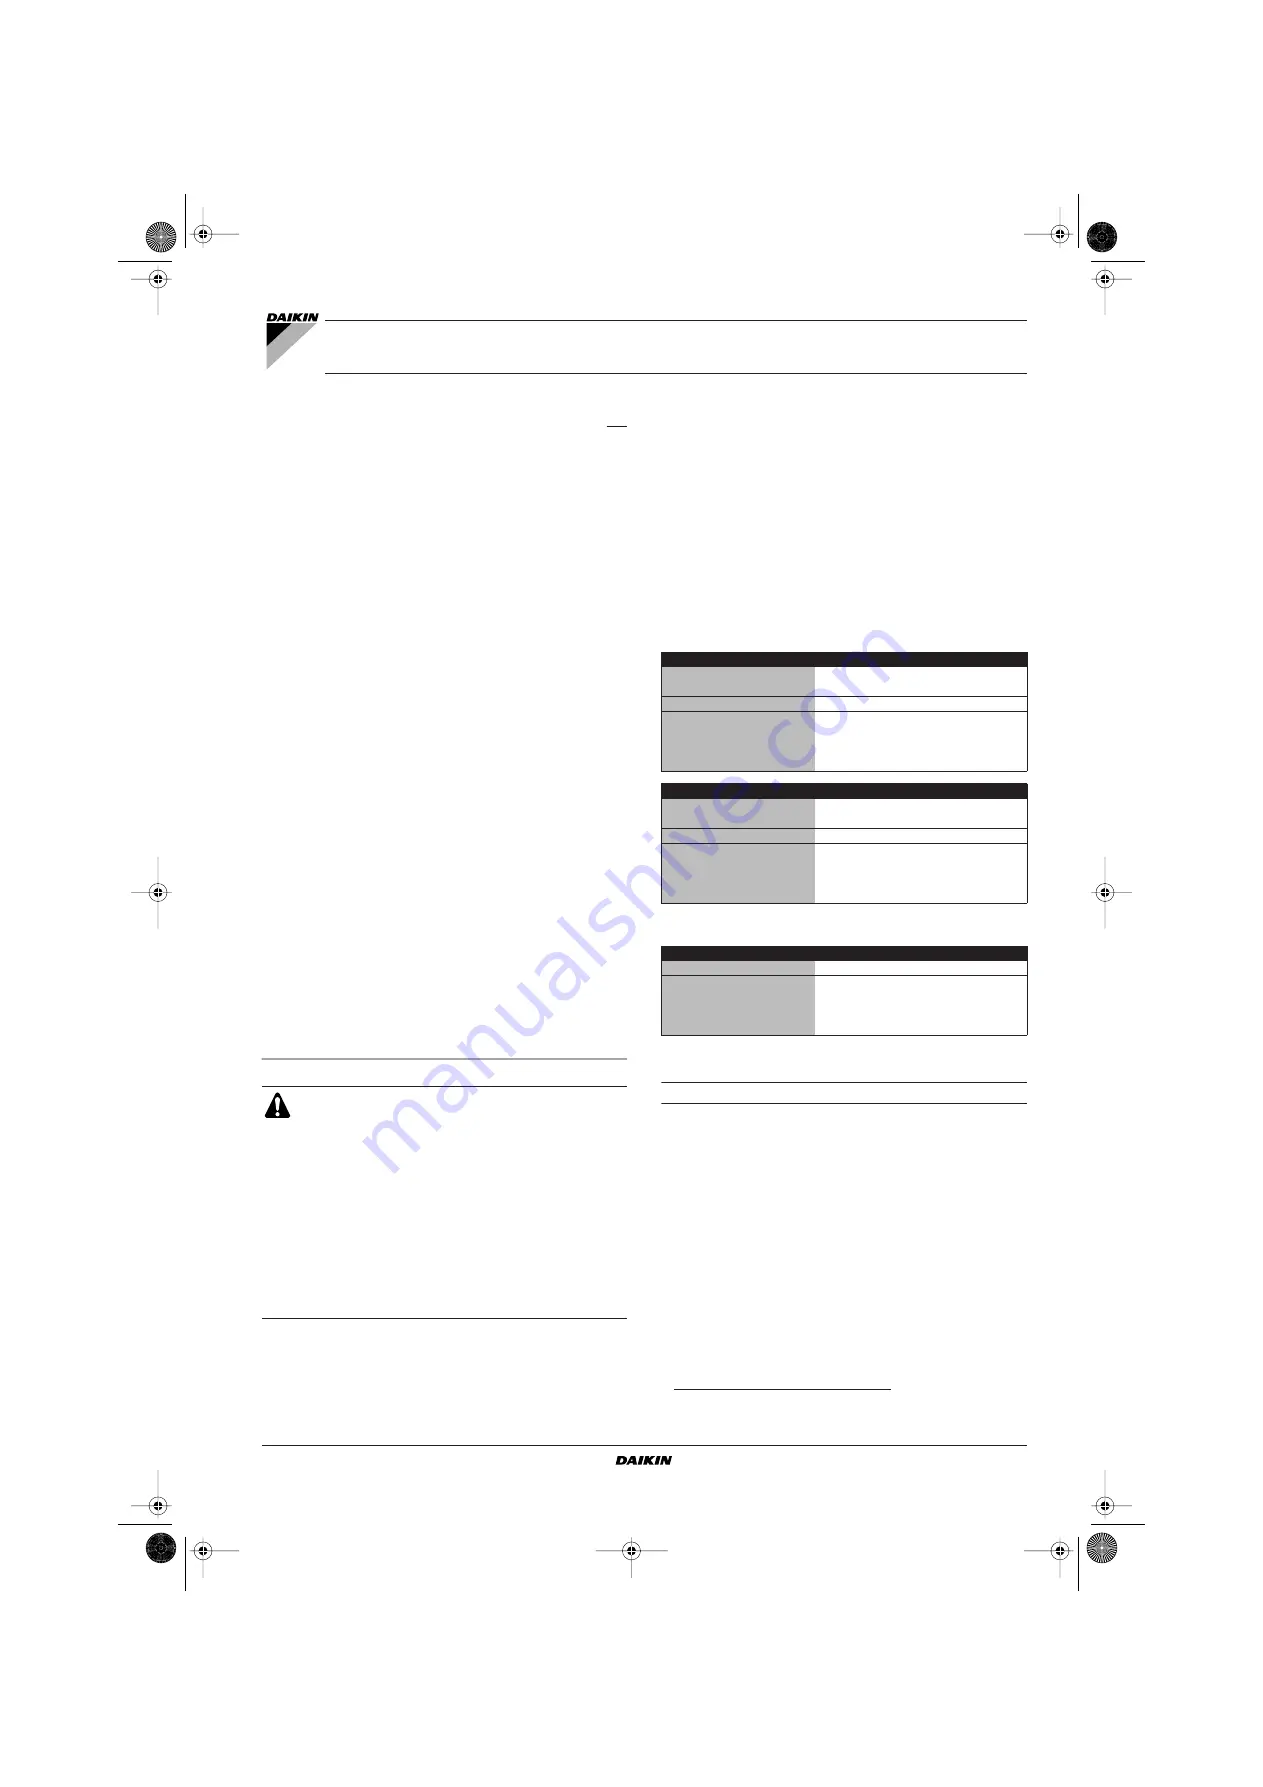
Technical specifications
(1)
Options and features
Options
■
Glycol application for chilled water temperature down to –10°C
or –5°C.
■
BMS-connection MODBUS (optional kit address card
EKAC10C)
(2)
■
Remote user interface (optional kit EKRUMCA). (Necessary to
additionally install kit address card EKAC10C.)
■
Low noise operation kit (field installation)
EWLP012KBW1N
EWLP040KBW1N
EWLP020KBW1N
EWLP055KBW1N
EWLP026KBW1N
EWLP065KBW1N
EWLP030KBW1N
Condenserless water-cooled water chillers
Installation manual
READ THIS MANUAL ATTENTIVELY BEFORE STARTING
UP THE UNIT. DO NOT THROW IT AWAY. KEEP IT IN
YOUR FILES FOR FUTURE REFERENCE.
IMPROPER INSTALLATION OR ATTACHMENT OF
EQUIPMENT OR ACCESSORIES COULD RESULT IN
ELECTRIC SHOCK, SHORT-CIRCUIT, LEAKS, FIRE OR
OTHER DAMAGE TO THE EQUIPMENT. BE SURE ONLY
TO USE ACCESSORIES MADE BY DAIKIN WHICH ARE
SPECIFICALLY DESIGNED FOR USE WITH THE
EQUIPMENT AND HAVE THEM INSTALLED BY A
PROFESSIONAL.
IF UNSURE OF INSTALLATION PROCEDURES OR USE,
ALWAYS CONTACT YOUR DAIKIN DEALER FOR
ADVICE AND INFORMATION.
(1) Refer to the operation manual or engineering data book for the complete
list of specifications, options and features.
Model EWLP
012
020
026
030
Dimensions HxWxD
(mm)
600x600x600
Machine weight
(kg)
104
138
144
149
Connections
• chilled water inlet and outlet
(mm)
FBSP 25
• condenser discharge
connection (copper)
(mm)
12.7 flare
19.1 flare
19.1 flare
19.1 flare
• condenser liquid
connection (copper)
(mm)
9.52 flare
12.7 flare
12.7 flare
12.7 flare
Model EWLP
040
055
065
Dimensions HxWxD
(mm)
600x600x1200
Machine weight
(kg)
252
265
274
Connections
• chilled water inlet and outlet
(mm)
FBSP 40
• condenser discharge
connection (copper)
(mm)
2x 19.1 flare
2x 19.1 flare
2x 19.1 flare
• condenser liquid
connection (copper)
(imm)
2x 12.7 flare
2x 12.7 flare
2x 12.7 flare
Model EWLP
012~065
Power circuit
• Phase
3N~
• Frequency
(Hz)
50
• Voltage
(V)
400
• Voltage tolerance
(%)
±10
(2) When EKAC10C is used in combination with remote user controller
EKRUMCA then it is not possible to use the BMS-connection MODBUS.
4PW61665-1_digital_EN.book Page 1 Friday, August 27, 2010 2:13 PM


