EKHBH/X016BB
Indoor unit for air to water heat pump system
4PW62572-1A – 01.2011
Installation manual
14
6.4.
Mounting the indoor unit
1
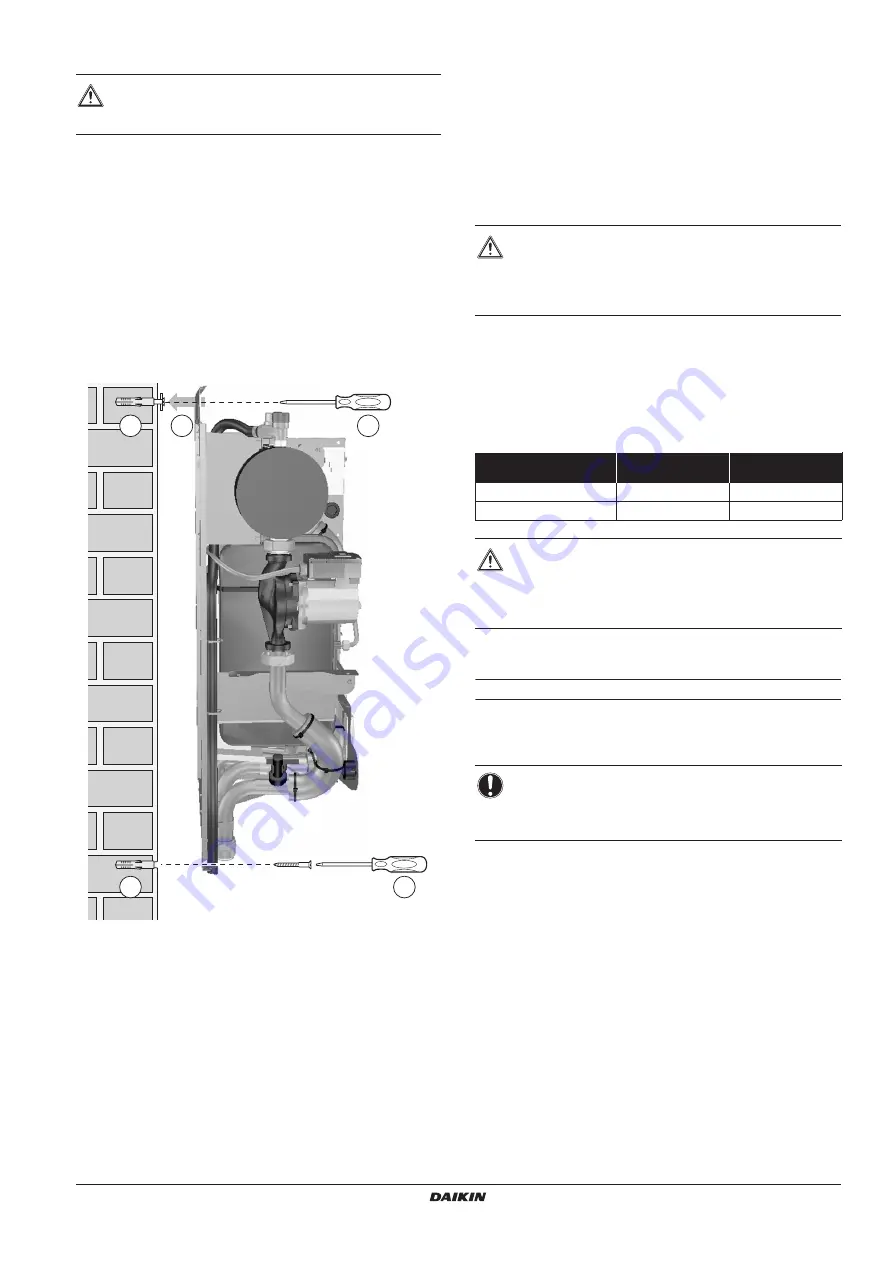
Put the installation pattern (see packing) on the wall and mark
the fixation positions (2 on top (
●
T) and 2 at the bottom (
●
B)).
Make sure that the marks (2 by 2) are completely level and the
dimensions of the marks are corresponding according to
.
When the unit is not installed level, air might get trapped in the
water circuit resulting in malfunctioning of the unit.
Pay special attention to this when installing an EKHBX model to
prevent overflow of the drain pan.
2
Drill 4 holes and install 4 plugs (suitable for M10).
3
Put the screws in top plugs and hang the indoor unit on the top
screws.
4
Put the screws in bottom plugs and fix the screws firmly.
6.5.
Installation of the EKHBDP drain pan kit (only for
EKHBX models)
For heating/cooling models, it is necessary to install the drain pan kit
(see
During cooling operation, water vapour (humidity) in the air might
condense to liquid and collect on the cold refrigerant and water pipes.
This water is collected in the drain pan, which must be connected to a
drain.
For installation instructions, refer to the instruction sheet delivered
with the drain pan kit.
6.6.
Refrigerant pipework
For all guidelines, instructions and specifications regarding
refrigerant pipework between the indoor unit and the outdoor unit,
please refer to the outdoor unit installation manual.
The location of the gas pipe and liquid pipe on the indoor unit is
shown under
"5.2. Main components" on page 10
6.7.
Water pipework
Checking the water circuit
The units are equipped with a water inlet and water outlet for
connection to a water circuit. This circuit must be provided by an
installer and must comply with the applicable legislation.
CAUTION
The weight of the indoor unit is approximately 48 kg. Two
persons are required to mount the unit.
4
2
1
3
1
CAUTION
Make sure to position the pressure relief valve hose end in
the drain pan. Failure to do so might lead to water coming
into contact with electrical parts, resulting in electrical
shocks or short-circuit of the electrical system.
Refrigerant piping
specifications
Indoor unit
Outdoor unit
Gas pipe connection
15.9 mm (5/8 inch)
15.9 mm (5/8 inch)
Liquid pipe connection
9.5 mm (3/8 inch)
9.5 mm (3/8 inch)
CAUTION
When connecting the refrigerant pipes, always use two
wrenches/spanners for tightening or loosening nuts!
Failure to do so can result in damaged piping connections
and leaks.
NOTICE
The unit is only to be used in a closed water system.
Application in an open water circuit can lead to excessive
corrosion of the water piping.
Содержание EKHBH016BB3V3
Страница 54: ......
Страница 55: ......
Страница 56: ...4PW62572 1A 01 2011 Copyright 2010 Daikin ...


